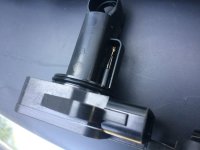
Cleaning the MAF

Re: 2000 Avalon. Check engine light came on, and dealer said the MAF sensor and O2 bank 2/sensor 1 needed replacement.

I cleaned the MAF sensor today with the CRC MAF sensor cleaner. It really didn't look all that dirty. Gave it a couple good shots several times and used about 1/4 of the can in total.

The reason I'm posting is that the solvent ruined the o-ring on the MAF sensor unit. It stretched it out. I literally watched it happen. You could see it getting looser and looser as I cleaned and time passed. I then couldn't get the sensor back into the opening because the o-ring kept getting pinched. Had to use a new o-ring. I am not an expert in these matters, but if I ever do this again, I will take the o-ring off first before cleaning to avoid possible damage.

In any event, the MAF sensor cleaning didn't solve my problem because the check engine light came back on after a little while. I think my problem is bad gas, dirty injector(s), and/or bad plug(s). I think I'll work down those paths before I buy a bunch of expensive sensors.
 
Last edited:
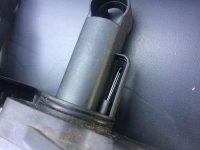
Make sure the wire in the smaller cylinder gets sprayed. The amber crystal is not the only part that needs sprayed, if at all.
 
This single post was really helpful.

http://www.toyota-4runner.org/2190487-post16.html

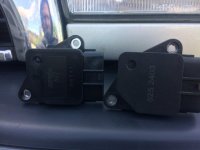
I've been getting an intermittent P0110 - Intake Air Temp. Circuit Malfunction error on my 2000 4runner. Cleaned my MAF a couple times but didn't seem to help. Gas mileage has gone down about 10-15%. Decided to buy a Denso part from Amazon and during the instal I snapped a couple photos of the (apparently) 3rd party sensor that was installed in my 4runner and compared it to the new Denso unit. The physical difference is obvious. Hopefully it fixes my error problems and mileage.

You can't see it well in the photo, but the Denso unit, in addition to the larger bulb (which I think is more similar to the OEM toyota Denso unit), has flat wires going to the sensor bulb. Couldn't be bothered to bust out a magnifying glass to check out the other wires in the tube.

Denso part number: 1976020 (197-6020)

*Note, my Echo and Yaris both have almost an identical MAF sensor unit. Part number is 6030 though and seems it might be wired differently. Wasn't brave enough to try to swap one into the 4runner.
 

Attachments

  • IMG_3529.JPG
    IMG_3529.JPG
    46.2 KB · Views: 904
  • IMG_3527.JPG
    IMG_3527.JPG
    51 KB · Views: 890
  • IMG_3528.JPG
    IMG_3528.JPG
    58.4 KB · Views: 923
Last edited:
The reason I'm posting is that the solvent ruined the o-ring on the MAF sensor unit. It stretched it out. I literally watched it happen. You could see it getting looser and looser as I cleaned and time passed. I then couldn't get the sensor back into the opening because the o-ring kept getting pinched. Had to use a new o-ring. I am not an expert in these matters, but if I ever do this again, I will take the o-ring off first before cleaning to avoid possible damage.

I just cleaned mine yesterday and had this same issue. Wish I had noticed your post. BTW, what size o-ring did you use as a replacement?

Here's to hoping the MAF cleaning will have solved my P0171 problems. I'm hopeful. My total fuel trim (short term + long term) was around 20-40% pre-cleaning. My total fuel trim numbers after cleaning are between 0-15%. (Monitoring with PID graphs with OBD Fusion & a Wi-Fi Scan Tool)

The resistance across the MAF sensor was 1.78 kilo-ohms before cleaning. After cleaning it was 2.77 kilo-ohms (right where FSM says it should be). There's some evidence that cleaning the MAF actually does something!
 
O-ring? I didn't install or remove any o-ring. I think the sensor unit had one pre-installed. I'm only half way thru my gas tank but it seems like my gas milleage has improved significantly. Hard to say before the end and I think it takes a couple tanks for the ECU to re-optimize?
 
Fixed my problem

Hi, just want to say thanks for this thread. I had the check engine light on and a System Lean Bank Code (P0171) and thanks to this thread I was able to just use MAF cleaner and it was fine. I drive a 99 4Runner woth about 170,000 miles. The light went off :) Now, if I could just figure out the roof leak....
Thanks, all!
 
This single post was really helpful.

http://www.toyota-4runner.org/2190487-post16.html

I've been getting an intermittent P0110 - Intake Air Temp. Circuit Malfunction error on my 2000 4runner. Cleaned my MAF a couple times but didn't seem to help. Gas mileage has gone down about 10-15%. Decided to buy a Denso part from Amazon and during the instal I snapped a couple photos of the (apparently) 3rd party sensor that was installed in my 4runner and compared it to the new Denso unit. The physical difference is obvious. Hopefully it fixes my error problems and mileage.

You can't see it well in the photo, but the Denso unit, in addition to the larger bulb (which I think is more similar to the OEM toyota Denso unit), has flat wires going to the sensor bulb. Couldn't be bothered to bust out a magnifying glass to check out the other wires in the tube.

Denso part number: 1976020 (197-6020)

*Note, my Echo and Yaris both have almost an identical MAF sensor unit. Part number is 6030 though and seems it might be wired differently. Wasn't brave enough to try to swap one into the 4runner.

Hey I just caught the mention of my thread. Glad it helped. That's what this site is all about!
 
Decided to clean mine today. On previous 4runners I’ve had it’s always looked perfect. But this one the PO was clearly an off roader, and sure enough, the MAF was dirty.

Easy to do guys!

LrqcGGj_d.jpg


hDjtiRO_d.jpg


Edit - wrong board, just did a search. This is a 4th gen
 
Last edited:
I'm at 232k and I'm doing this, the PCV replacement, and a cleaning of the throttle body this weekend.

No idea if the previous owner ever did this stuff, so wish me luck!


Thanks - T
 
Stripping the screws is very easy. I used a dremel to cut a groove and got them out. I then found the best replacement at Home Depot
Part number 30699-82558 4mmx10mm cap screw with socket head
I can now use a hex wrench and never strip them again.

I'm too new to reply on this thread without quoting someone, so I had to reply to this...

Just did the MAF cleaning on my new-to-me 1999 Limited. Learned something that nobody has mentioned here: For the love of God, dismount the air cleaner box before trying to take out the MAF. It's only three 12mm bolts, and a wiring connector that you're going to have to remove, anyway. Loosen up the clamp on the air duct to the throttle body, and away you go...

Once you have the entire assembly out, you can put a real screwdriver onto those two little screws on the MAF, apply pressure, and out they come, no stripping, no fuss. The reason you strip them is because you can't apply enough pressure from the side where the MAF is mounted, due to the other stuff mounted on the inner fender. Pull the entire airbox, then apply some real screwdriver pressure to prevent the Phillips heads from camming out, and there you go: No need to replace the screws, and no worries about stripping them out because they cammed while you were trying to turn them.
 
I'm too new to reply on this thread without quoting someone, so I had to reply to this...

Just did the MAF cleaning on my new-to-me 1999 Limited. Learned something that nobody has mentioned here: For the love of God, dismount the air cleaner box before trying to take out the MAF. It's only three 12mm bolts, and a wiring connector that you're going to have to remove, anyway. Loosen up the clamp on the air duct to the throttle body, and away you go...

Once you have the entire assembly out, you can put a real screwdriver onto those two little screws on the MAF, apply pressure, and out they come, no stripping, no fuss. The reason you strip them is because you can't apply enough pressure from the side where the MAF is mounted, due to the other stuff mounted on the inner fender. Pull the entire airbox, then apply some real screwdriver pressure to prevent the Phillips heads from camming out, and there you go: No need to replace the screws, and no worries about stripping them out because they cammed while you were trying to turn them.

You really need to use JIS drivers on those screws. The wrong "real" screwdriver will strip those JIS screws every time because the point bottoms out and the drive surfaces don't fully engage.

I recommend swapping in Allen-head screws and then you can use a ratchet on it and leave the airbox where it is.
 
Last edited:

Members online

Forum statistics

Threads
278,309
Messages
3,554,066
Members
248,016
Latest member
Advally Service

Trending content

Back
Top