
CV axle shaft removal/install questions

fourfive

Senior Member
CV axle shaft removal/install questions: Edit with pics

Looked up the various write ups for tackling this project & have a pretty good grasp on what all I need to do but have a few questions:

1. Is moly grease more commonly used for greasing the axle splines? (don't intend to start a grease debate since the general consensus when researching types of grease to use was "any grease is better then no grease")

2. When installing the axle shaft, can that be securely done by hand or is it best to use the pry bar/hammer method as mentioned in the 4x4wire write up?

3. Is it best/safer to remove the hub nut before it is lifted on a jack stand since it seems it would take a fair amount of force to remove it?

4. This one's kind of a weird question but is there a difference in quality regarding cotter pins from toyota vs an auto parts store?


Edit: Completed my CV axle shaft replacement for the driver & passenger side (also replaced both LBJ/OTR/ITR since I had to disconnect most of that stuff anyway). Everything was pretty straight forward. The couple hang ups I had were:

1. Getting the dust cap off...this caught me off guard (I did spray it down with penetrating oil about an hour before). I tried hammering a sharpened chisel & flat head screwdriver but the ends were still too thick to wedge into the dust cap. Ended up creating some space by hammering in a butter knife then used the chisel to finish prying the dust cap off.
2. The only other issue was trying to get the knew axle back into the diff. I was hung up for a couple hours on this part. I had the axle as straight & lined up as I could possibly get it but could not get it pushed all the way into the diff. Got it about 1 inch away from having it fully seated but couldn't get it in any further. Ended up using a 3lb plastic hammer and hammered it in the rest of the way (I used the hammer after multiple checks using a level to make sure I had the axle as straight as possible).

*Side note: The dust guard on one of the axles was damaged. I was too far into the project to take it back to toyota & even if I did it would have taken another few days before I got a replacement. So I used some pliers to straighten it the best I could. Moral of the story is to check the parts before installing.

Toyota axle shaft part number for my 02 4wd 4runner (Same number for both sides): 434303503084 (I was told it would come with cotter pins but it did not. Axle cotter pin part number: 9538104045)

A few pics of the process: My apologies for the couple sideways pics...

Used several zip ties as suggested to keep the axle lined up and the wheel hub out of the way...worked great by the way.
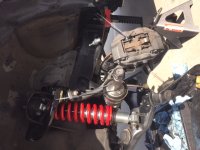
cv shaft support.JPG

Using the 3lb plastic hammer to get the axle in the rest of the way... not sure if this is a safe way to do it but I was by myself and out of options.
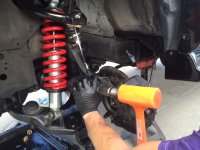
cv axle install.JPG

Was going to use gear oil that I already had for the splines but ended up getting this grease off amazon since it had pretty good reviews. Applied a little on both the inner & outer splines.
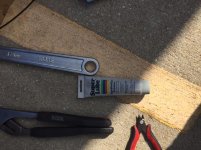
grease for splines.jpg

Purchased this ingersoll rand rechargeable impact wrench off amazon for this job since it also had pretty good reviews. Wasn't cheap but was worth the investment since I plan on doing most of my own work. Was strong enough to loosen all lug nuts and axle/hub nut without a problem. After completing this job, it was still 75% charged...ended up not even using the extra battery it came with.
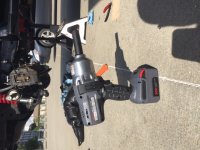
ingersoll rand impact.JPG
 

Attachments

  • cv shaft support.JPG
    cv shaft support.JPG
    112.9 KB · Views: 1,858
  • cv axle install.JPG
    cv axle install.JPG
    111 KB · Views: 2,534
  • grease for splines.jpg
    grease for splines.jpg
    53.1 KB · Views: 1,658
  • ingersoll rand impact.JPG
    ingersoll rand impact.JPG
    132.9 KB · Views: 1,602
Last edited:
Register to hide this ad
1. I have always used gear oil on the splines that are going into the axle and nothing for the ones that sit in the bearing in the knuckle. This has worked well for me for 15 years.

2. You may get lucky and just be able to push the new one in there. Otherwise a long pry bar (36") is a good friend. Try and get the new CV as in line with the front axle as possible, it makes it easier to install. When pulling the old one out and installing the new ones make sure the CV does not rest or drop on the outer seal.

3. You will probably have more leverage with the wheel on the ground, but I personally have never done it that way. If no impact than this is the way to go.

4. Usually OEM cotters don't rust as quickly as aftermarket (Dorman) ones though since this one sits behind a cover, it doesn't matter as much.
 
If you have a buddy once you get the truck lifted and tires off they can step on the brake so you can get the hub nut off/on.
 
1. I have always used gear oil on the splines that are going into the axle and nothing for the ones that sit in the bearing in the knuckle. This has worked well for me for 15 years.

2. You may get lucky and just be able to push the new one in there. Otherwise a long pry bar (36") is a good friend. Try and get the new CV as in line with the front axle as possible, it makes it easier to install. When pulling the old one out and installing the new ones make sure the CV does not rest or drop on the outer seal.

3. You will probably have more leverage with the wheel on the ground, but I personally have never done it that way. If no impact than this is the way to go.

4. Usually OEM cotters don't rust as quickly as aftermarket (Dorman) ones though since this one sits behind a cover, it doesn't matter as much.

^^^Agreed!!
 
1. I have always used gear oil on the splines that are going into the axle and nothing for the ones that sit in the bearing in the knuckle. This has worked well for me for 15 years.

2. You may get lucky and just be able to push the new one in there. Otherwise a long pry bar (36") is a good friend. Try and get the new CV as in line with the front axle as possible, it makes it easier to install. When pulling the old one out and installing the new ones make sure the CV does not rest or drop on the outer seal.

3. You will probably have more leverage with the wheel on the ground, but I personally have never done it that way. If no impact than this is the way to go.

4. Usually OEM cotters don't rust as quickly as aftermarket (Dorman) ones though since this one sits behind a cover, it doesn't matter as much.

Very helpful info, thanks man. & good to know I can just use gear oil on the splines since I already have that.

If you have a buddy once you get the truck lifted and tires off they can step on the brake so you can get the hub nut off/on.

Is having the brake depressed (either with someone stepping on it or having something wedged onto it) the only way I can remove the hub nut if the truck is lifted?...just trying to be as time efficient as possible. I am however biting the bullet and getting an Ingersoll rand high torque impact wrench to make things go faster. Been debating spending the money on a good cordless impact wrench but since I will be doing most of my own maintenance work, thought it would be pretty handy to have around.
 
Did you guys take off your skid plates to pry off the axel from the diff? Will definitely go this route if it makes the job significantly easier or less messy but since I will be doing the work at the top of my parking deck & car maintenance work is not allowed, I want to try & do this as quickly as possible without cutting any corners.
 
Is having the brake depressed (either with someone stepping on it or having something wedged onto it) the only way I can remove the hub nut if the truck is lifted?

Either that or use an impact. Hub nut torque is 175 ft-lbs I believe. If you think you are going to want more than just an impact I would go Milwaukee. Much larger tool selection.

As far as skid plates I'm not sure. You might be able to leave the front one on but the second plate will need to come off I think. I don't remember.
 
As Kevin said you should remove the back plate to access the CVs.

If you haven't started yet, I'd pick one of these up at Lowes. It makes getting the knuckle caps off much easier, and helps as well when prying the old CVs out of the diff:
Shop Bostitch 8-in Moulding Bar at Lowes.com

Also, when putting the new ones in, if they are giving you problems going in, try and get them lined up as straight as possible, even using long zip ties loosely tied to the coil and around the new axle shaft as you hit the upper lip to get it in the diff.

Before knocking the caps back on grease the lip so it will be easier next time to remove.
 
Either that or use an impact. Hub nut torque is 175 ft-lbs I believe. If you think you are going to want more than just an impact I would go Milwaukee. Much larger tool selection.

If I'm using an impact, can the hub nut be removed with the wheel off the ground? Mentioned the ingersoll rand only b/c it seemed to have more reviews on amazon but was also looking at the milwaukee.

As Kevin said you should remove the back plate to access the CVs.

If you haven't started yet, I'd pick one of these up at Lowes. It makes getting the knuckle caps off much easier, and helps as well when prying the old CVs out of the diff:
Shop Bostitch 8-in Moulding Bar at Lowes.com

Sounds good, will be picking up one of those bad boys tomorrow since I plan on doing everything this friday as long as all my parts come in from toyota on time. When you say knuckle caps, are you referring to the black dust cap that covers the hub nut?

Also, when putting the new ones in, if they are giving you problems going in, try and get them lined up as straight as possible, even using long zip ties loosely tied to the coil and around the new axle shaft as you hit the upper lip to get it in the diff.

Before knocking the caps back on grease the lip so it will be easier next time to remove.

Are the zip ties meant to try and hold/support axle to keep it straight?...especially if I'm not going to have an extra set of hands to assist?
 
Is having the brake depressed (either with someone stepping on it or having something wedged onto it) the only way I can remove the hub nut if the truck is lifted?...just trying to be as time efficient as possible.

You can do the brake method, I like to just stick a good sized screwdriver in the rotor cooling splines so that the screwdriver levers against the brake caliper. Much easier. That's my favorite method without an impact.

I did both of mine in about 1 hour with my impact gun. I didn't even undo the tie rod end. Just undid the axle nut, and 2 bolts and 2 nuts holding the lower ball joint together. I also loosened the through bolt for the UCA so that it would go back together. Got the truck back on the ground and tightened the UCA through bolt up. The 4Runner is seriously the easiest CV axle I've ever replaced. When I put the 2 bolts and 2 nuts in for the lower ball joint, I used grease to prevent further rusting.

X2 on getting the axle straight. If it's not straight, it will have a tough time going in. This is harder than it sounds because of the CV joint closest to the diff. I just stand on the far end of the CV axle, line it up and put it in the diff. After that, I make the axle straight and with gentle to moderate movement move it in and out (not too much because that can make the rubber boots pop off) but being more forceful putting it in. This will collapse the inner CV joint, and force it to go in once the splines are lined up. I hope that makes sense.
 
Last edited:
Exactly, you can tie a long zip tie around the coil and the new CV shaft. As Stir Fry says, you want this new CV as straight as possible. Then you can concentrate on just sliding or knocking in the new one without having to worry about it moving all over. With the passenger side I have never had to do this, just once on the driver's side (done both 3x).

I actually drop in the largest punch in this group inside the rotor to rest it against the caliper to break or tighten the CV nut:
Shop Bostitch 6-Piece Pin Punch Set at Lowes.com

Also, make sure to have your bottle jack handy to push down on the upper control arms to align the knuckle and lower ball joint after putting in the new CV.

Yep, the cap is the black one that fits over the CV nut.

Have fun, and keep us abreast of the outcome.
 
I helped out a friend change out his cv shafts and lower ball joints.
He didn't have an impact wrench to loosen the huge axle shaft nut. Instead he slipped a 5' fence post over the 1/2 inch beaker bar to use as extra leverage. To my surprise it worked. Maybe when it's time to do mines probably I'll carefully do it the same way to loosen the axle nut.
 
Last edited:
You can do the brake method, I like to just stick a good sized screwdriver in the rotor cooling splines so that the screwdriver levers against the brake caliper. Much easier. That's my favorite method without an impact.

I did both of mine in about 1 hour with my impact gun. I didn't even undo the tie rod end. Just undid the axle nut, and 2 bolts and 2 nuts holding the lower ball joint together. The 4Runner is seriously the easiest CV axle I've ever replaced. When I put the 2 bolts and 2 nuts in for the lower ball joint, I used grease to prevent further rusting.

X2 on getting the axle straight. If it's not straight, it will have a tough time going in. This is harder than it sounds because of the CV joint closest to the diff. I just stand on the far end of the CV axle, line it up and put it in the diff. After that, I make the axle straight and with gentle to moderate movement move it in and out (not too much because that can make the rubber boots pop off) but being more forceful putting it in. This will collapse the inner CV joint, and force it to go in once the splines are lined up. I hope that makes sense.

Makes perfect sense...very clear, thanks! Good tip about the screw driver in the rotor.

Also, make sure to have your bottle jack handy to push down on the upper control arms to align the knuckle and lower ball joint after putting in the new CV.

Ahh, this is probably why I had such a difficult time getting the knuckle/LBJ back together. I tried muscling it back together at first but ended up using my hydraulic jack to push up on the lower control arm. Using the bottle jack to push down on the UCA seems like it'll be easier.

Have fun, and keep us abreast of the outcome.
Most definitely
 
Ahh, this is probably why I had such a difficult time getting the knuckle/LBJ back together. I tried muscling it back together at first but ended up using my hydraulic jack to push up on the lower control arm. Using the bottle jack to push down on the UCA seems like it'll be easier.

You don't need a bottle jack. Just loosen the 19mm nut/bolt holding the UCA to the truck. It will swing right down. Leave loose until you get the car back on the ground then tighten. Super easy.
 
Replaced both axle shafts over the weekend. I edited my first post with a few pics. I think I'm going to hang onto my original toyota axles and have them rebuilt so I can have spares. A couple questions on having them rebuilt:

1. Do I take it to toyota for this or any independent axle shop? My concern with an independent shop is knowing for sure if they are going to use OEM parts. I googled a few local shops but they didn't have many reviews.

2. What price range should I expect if I go this route? I did a super quick search and I think I saw anywhere from ~$75-150+ per axle...
 
I wouldn't take it to Toyota. I would just find a good indy shop. If by rebuilding you mean rebooting why not do it yourself? It's not hard just messy. Will cost less than $100 for parts and tools.

http://www.toyota-4runner.org/3rd-gen-t4rs/120439-reboot-your-cv-axles.html

Yea good point, guess i was just trying to minimize the mess by rebuilding it myself since i dont have a garage and dont want to dirty up any family/friends driveways or my parking deck since im technically not supposed to do maintenance work at my place. But i'm sure i can make it semi clean if i plan ahead. Appreciate the link and advice man. I actually referred to your write up several times when i was deciding to rebuild it myself. Very nice write up!
 

Members online

Forum statistics

Threads
278,316
Messages
3,554,111
Members
248,016
Latest member
Advally Service

Trending content

Back
Top



