Daniel's 2000 5-speed 4x4 SR5 Rescue, Restoration and Maintenance Thread

Got the rear passenger window back on the regulator track. Applied 3M Window Weld to track and inserted window. Seems to work great now just need to clean up rest of tape residue PO had used instead of going the extra two steps to actually fix the issue.

39c5709bf0c55e8e0d393c0de336a57a.jpg


f41df489f237f7cb949b45012c96d6b6.jpg


https://vimeo.com/162980701

Getting in there was quite easy, only thing that was difficult was getting the door handle off, but once I understood how it worked it was easy.

273c6a0c1b2efc04c367bf76585f7694.jpg
 
Next on the list window wise is the sunroof...could use some guidance there...

Video below shows its current state. Stuck closed with the motor doing "something" when buttons are pressed. I removed a wind reflector from the top that had caused a large buildup of dirt at the front of it and had the two secure pieces stuck on either side since I can't tilt it or slide it to get them out.

Otherwise I can't see anything from the top or bottom. Don't know where to start. Glad it stuck closed at least, but really want to fix it. Rolling with the rear/side windows down with the sunroof open shiftin' gears is a wonderful experience in these things.


https://vimeo.com/162981845
 
Not much to report this weekend. Although I did prep her for her detail. Although, when I did the test spot I got black transfer on the pad. Which led me to ask around about her having single stage paint...seems like the consensus is yes.

Does anyone on here know if the 2000 Black sr5s were single stage?

Don't see any evidence of clear coat failure and a good amount of luster did return after just one run of polish in the test spot. Just scared me to see the color on the pad. Never worked with it at all. Seems pretty straightforward. People said to try wet sanding but I'll probably just go with polish and a cutting pad. Really don't have time for wetsand.

01083950a9ce904d2aa2291b7a4a27d6.jpg


354d9111a61d7918d466973cde467b03.jpg


Test spot on right.
 
Next on the list window wise is the sunroof...could use some guidance there...

Video below shows its current state. Stuck closed with the motor doing "something" when buttons are pressed. I removed a wind reflector from the top that had caused a large buildup of dirt at the front of it and had the two secure pieces stuck on either side since I can't tilt it or slide it to get them out.

Otherwise I can't see anything from the top or bottom. Don't know where to start. Glad it stuck closed at least, but really want to fix it. Rolling with the rear/side windows down with the sunroof open shiftin' gears is a wonderful experience in these things.


Any luck getting the sunroof working? I have a similar issue to you and couldn't solve it.
 
Any luck getting the sunroof working? I have a similar issue to you and couldn't solve it.


No luck as of yet. I'm taking a simple/one step at a time approach. Going to investigate and hopefully clean it out when I start getting her paint freshened up. Lot of dirt and all around the sunroof and probably on the tracks.

I saw a video on YouTube where a guy was saying his Lexus sunroof motor was making the same clicking and moving sounds as mine allegedly.

He took the motor out and cleaned the inside pieces and it worked again.

Idk if I can take the motor out without dropping the headliner which I would rather not do. I REALLY want the sunroof fixed though and could kill two birds with one stone and follow the sound dampening guide on 4runners.org and put some in the roof while I'm in there.
 
You can wiggle it out when you remove the sunglass holder. I removed mine to keep anyone from messing with it and possibly leaving it stuck opeb


Sent from my iPhone using Tapatalk
 
You can wiggle it out when you remove the sunglass holder. I removed mine to keep anyone from messing with it and possibly leaving it stuck opeb


Sent from my iPhone using Tapatalk


Alright well I'm going to try that then. The way I feel about a lot of these things is that I have nothing to lose. It's already stuck closed and doesn't appear to be leaking.

Might as well try and see if a weird simple fix will do it before spending more money and/or time.

I'll take some pics and report back, I'll post the video later but it was one of the first ones when I searched Toyota 4Runner sunroof repair on yt
 
See so many posts on the fb group of peoples trucks leanin'...preventative maintenance...Lower Ball joints ordered. Part numbers: 43330-39585 (Right), 43340-39465 (Left), 90080-10066 (bolts, x8). Added maintenance log to page one/first post.

balljoint.jpg
 

Attachments

  • balljoint.jpg
    balljoint.jpg
    120.7 KB · Views: 1,079
feelsgood.jpg

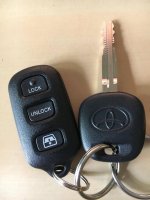
Got the set today, just need to try the programming instructions...hopefully they work...

13170016_3431467156710_1144425204_o.jpg
 

Attachments

  • 13170016_3431467156710_1144425204_o.jpg
    13170016_3431467156710_1144425204_o.jpg
    132.1 KB · Views: 1,270
I have read that the black paint is single stage. Mine really needs a polish and I hope you will soon provide inspiration. I just got new ball joints and I'm creeping up to 200k. Good thread.
 
I have read that the black paint is single stage. Mine really needs a polish and I hope you will soon provide inspiration. I just got new ball joints and I'm creeping up to 200k. Good thread.

Thanks man! And yeah, May is the month for detailing. Just need to find time...I definitely am ready to do it. Done a lot of research with the single stage paint and am looking forward to applying it. Will post pics/updates.

Where in VA are you? Once I get her squared away I can't wait to take her out with the rest of us VA folks to GWNF, etc.
 
05/15/2015 - 151,850 - Removed and replaced TB intake boot (was rock solid), the main boot clamps, and PCV Valve and grommet. Cleaned MAF sensor with CRC MAF cleaner. Cleaned throttle body with CRC Throttle Body cleaner. Adjusted throttle cable to reduce pedal slack. Greased clutch assembly but will need to address the bearing in some fashion at some point. Cleaned VC and tightened bolts.

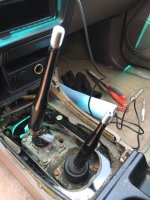
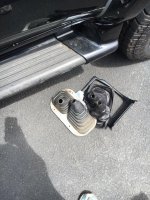
Idle has smoothed out, but codes P1135 and P1071 still present. Air Fuel sensor nuts are ****ED so did not move forward with that install today. Need to wait to use a pair of vice grips on them. Shifter boots and assembly looks like it comes apart easily to reach the electrical socket so that is good to know.
 
Timing belt, water pump, tensioners and idler pulley replaced. Thermostat and gaskets. Toyota Red coolant flush, new spark plugs and wires as well as brake fluid flush done today. She's come a long way...runs so smooth. Had the original plugs...

9e0519fd960c34905565071c3aef9589.jpg


5bff70afefd432bef18fcf362f4bf72e.jpg


4b83869d54c7cf27166c10b4df9c33e9.jpg


db93e76ab6ba9b6ad72ab0b3cfbc6a34.jpg


8f33c44bd40435b137153a62692a6d19.jpg


19abe04ffab4dc34b3455fed483b6e42.jpg


80ec17a86271d945726873d237db8787.jpg
 
Last edited:
Put the cherry on top of my months long wave of maintenance for this thing. Bringing her back to life. Check engine light is GONE. No pending codes after test driving today. Very happy owner and a VERY VERY happy 4runner.

Upstream Air/Fuel Ratio Sensor replaced. Used Denso 234-9003 which is the correct part for a 2000 Toyota 4runner SR5 5-speed Manual 4x4 with California spec emissions.

Got it off amazon for a good price:

Amazon.com: Denso 234-9003 Air Fuel Ratio Sensor: Automotive

13393989_3453438705985_6948908829030168089_n.jpg

13315674_3453438785987_3615987904764010440_n.jpg

13315609_3453438945991_4747117355479934408_n.jpg

13406994_3453439065994_1459261791010639710_n.jpg
 

Attachments

  • 13393989_3453438705985_6948908829030168089_n.jpg
    13393989_3453438705985_6948908829030168089_n.jpg
    85.8 KB · Views: 1,159
  • 13315674_3453438785987_3615987904764010440_n.jpg
    13315674_3453438785987_3615987904764010440_n.jpg
    121.9 KB · Views: 1,173
  • 13315609_3453438945991_4747117355479934408_n.jpg
    13315609_3453438945991_4747117355479934408_n.jpg
    115.1 KB · Views: 1,151
  • 13406994_3453439065994_1459261791010639710_n.jpg
    13406994_3453439065994_1459261791010639710_n.jpg
    72.2 KB · Views: 1,143
Amazing what a little TLC will do with these trucks. You're doing a great job. Looks like you're in it for the long haul and most importantly, you have your priorities in line. All else is secondary after the neglected and preventive maintenance. Nice job. sub'd.
 
Amazing what a little TLC will do with these trucks. You're doing a great job. Looks like you're in it for the long haul and most importantly, you have your priorities in line. All else is secondary after the neglected and preventive maintenance. Nice job. sub'd.


Thanks man! And yes, it's been fun seeing how each thing I do brings her one step closer to my standards and vision of her.

Now that the engine is squared away, I'll start focusing in on the cosmetic stuff.

Have done a lot of research on the single stage paint. Going to do a full clay, polish and seal soon. THAT will make for the ultimate before and after pics.

She already looks pretty good...just need to get rid of the oxidation and wax her for her to shine even more.

93b455ddeb77aeb6fc3d10f6d40aed78.jpg


e3f7b09ad209f50feba4c7af9941ebb2.jpg
 
This is great to see. Just picked up a 1998 black with a similar sort of story. Previous owner "loved" the truck, but focused more on quick fixes (added keyless entry, rather than rekey, tinted window but rear window doesn't work), than maintenance!
 

Members online

Forum statistics

Threads
278,317
Messages
3,554,128
Members
248,016
Latest member
Advally Service

Trending content

Back
Top