Derpiful's Build and Adventure Thread

I had a 97 with a e locker. The truck got totaled, a mate is swapping the locker and such into a 1st gen, but I can probably grab the cluster for you if you'd like it.
 
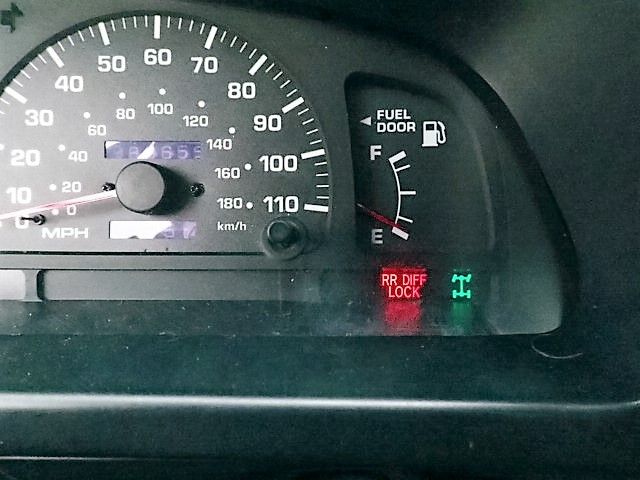
Yup 01-02's were never offered with a diff lock so they scratched the light from the clusters. Depending on the switch you got you can run power to a lighted switch the show when it's engaged. Just won't look as factory.

Yeah, that's what the backup plan is. That was actually the plan to begin with before I even realized I could somehow splice into the factory light (....if it had one).

I would imagine you could get just that little piece of plastic from an older cluster in the classifieds.

That's the next step, to look around for just that piece and see if it would work.

Around here there's sometimes a damaged cluster to borrow parts from and, judging from the pic of the 96's cluster, seems JBurt's idea is a good one. If you go for it grab a few bulbs too.
(this one is busy being in the 96)

The only thing I'm worried about is how it seems that the 4wd light is where the fuel light is on mine. I'll be looking into it a bit more to see if they had any other variations of it.

I had a 97 with a e locker. The truck got totaled, a mate is swapping the locker and such into a 1st gen, but I can probably grab the cluster for you if you'd like it.

Thanks for the offer, I'll try and figure this out and let you know!
 
The only thing I'm worried about is how it seems that the 4wd light is where the fuel light is on mine. I'll be looking into it a bit more to see if they had any other variations of it.

You're correct, the 4wd light in the 96 is where your fuel light is,
P2021572_zpssxqvjw6v.jpg~original

I'll be happy to check the 99 when it comes home from work.

You could be the only kid on the block with a 4wd low fuel indicator- or find a way to modify a version like yours so you get a light, like remove a small circle of the black light blocker and use something like red fingernail polish on the back so it shines through red....or whatever color. Definitely I would try something like that on a spare! You wouldn't have the picture, but you'd have the light....

If you do nab a panel and a bulb also get a pin with length of wire from the connector too, to add the needed wire for the locker light. They are available new too, but since you're in there anyway....
 
Last edited:
Locked!

Spent the past 2 weekends getting the locker and new bearings in, and it is finally done! Took quite a bit of time- setting up the gears took much longer than I thought it would. A few pictures:

First step was pulling the axle and painting it. It wasn't too terrible to pull, and most of the bolts gave up pretty easily (used plenty of PB Blaster, though). I bed-lined the axle, as I've found that to hold up best to constant road abuse, mag chorlide, etc.
<a data-flickr-embed="true" href="https://www.flickr.com/photos/derpiful/32645443140/in/dateposted-public/" title="179.locker"><img src="https://c1.staticflickr.com/1/779/32645443140_e1a4c3a73d_b.jpg" width="1024" height="683" alt="179.locker"></a><script async src="//embedr.flickr.com/assets/client-code.js" charset="utf-8"></script>
<a data-flickr-embed="true" href="https://www.flickr.com/photos/derpiful/32986041686/in/dateposted-public/" title="181.locker"><img src="https://c1.staticflickr.com/1/331/32986041686_44f1c6e061_b.jpg" width="1024" height="683" alt="181.locker"></a><script async src="//embedr.flickr.com/assets/client-code.js" charset="utf-8"></script>

Made a few custom tools to make this all work. For example, here's the simple clamp we made to hold the flange while the pinion nut got torqued on.
<a data-flickr-embed="true" href="https://www.flickr.com/photos/derpiful/32871978562/in/dateposted-public/" title="183.locker"><img src="https://c1.staticflickr.com/3/2888/32871978562_e82f5c7b4c_b.jpg" width="1024" height="683" alt="183.locker"></a><script async src="//embedr.flickr.com/assets/client-code.js" charset="utf-8"></script>

Setting the backlash:
<a data-flickr-embed="true" href="https://www.flickr.com/photos/derpiful/32871977172/in/dateposted-public/" title="184.locker"><img src="https://c1.staticflickr.com/3/2525/32871977172_c025c81868_b.jpg" width="1024" height="683" alt="184.locker"></a><script async src="//embedr.flickr.com/assets/client-code.js" charset="utf-8"></script>

Here's the final pattern I could get after playing with it for a while. Not too happy with it, and seems to be running deep, but for used gears with 200k+ on them it'll do. The pinion had a decent pattern though. Even after trying a few different setups for it, this is the closest I could get. We'll see how it works...
<a data-flickr-embed="true" href="https://www.flickr.com/photos/derpiful/32871975952/in/dateposted-public/" title="185.locker"><img src="https://c1.staticflickr.com/3/2256/32871975952_b9ed9c50b2_b.jpg" width="1024" height="683" alt="185.locker"></a><script async src="//embedr.flickr.com/assets/client-code.js" charset="utf-8"></script>

Backlash measurements, along with preload measurements.
<a data-flickr-embed="true" href="https://www.flickr.com/photos/derpiful/32871974432/in/dateposted-public/" title="186.locker"><img src="https://c1.staticflickr.com/3/2798/32871974432_435e46e11e_b.jpg" width="1024" height="683" alt="186.locker"></a><script async src="//embedr.flickr.com/assets/client-code.js" charset="utf-8"></script>


Another one of the custom tools we made. This one has different bolts at both ends of the steel piece, each which were spaced differently to tighten both side adjustment rings.
<a data-flickr-embed="true" href="https://www.flickr.com/photos/derpiful/32871967872/in/dateposted-public/" title="188.locker"><img src="https://c1.staticflickr.com/3/2144/32871967872_9f7754c8d7_b.jpg" width="1024" height="683" alt="188.locker"></a><script async src="//embedr.flickr.com/assets/client-code.js" charset="utf-8"></script>

Housing cut, drilled, and tapped. Worked well.
<a data-flickr-embed="true" href="https://www.flickr.com/photos/derpiful/32871963252/in/dateposted-public/" title="190.locker"><img src="https://c1.staticflickr.com/3/2179/32871963252_60de09015b_b.jpg" width="1024" height="683" alt="190.locker"></a><script async src="//embedr.flickr.com/assets/client-code.js" charset="utf-8"></script>

Mounted the third member up, wired it, and tested the locker! It works!
<a data-flickr-embed="true" href="https://www.flickr.com/photos/derpiful/32871959332/in/dateposted-public/" title="191.locker"><img src="https://c1.staticflickr.com/3/2043/32871959332_8e60b47412_b.jpg" width="1024" height="683" alt="191.locker"></a><script async src="//embedr.flickr.com/assets/client-code.js" charset="utf-8"></script>

Done and installed!
<a data-flickr-embed="true" href="https://www.flickr.com/photos/derpiful/32901086941/in/dateposted-public/" title="194.locker"><img src="https://c1.staticflickr.com/3/2193/32901086941_a09aef288b_b.jpg" width="1024" height="683" alt="194.locker"></a><script async src="//embedr.flickr.com/assets/client-code.js" charset="utf-8"></script>

I wasn't able to reinstall my rear sway bar, as it hit the locker motor. Haven't looked into it much, but something interesting to note. Wiring all the way into the cabin and to my switch will happen soon, I just haven't gotten around to it.

I've driven about 150 miles on this since I installed it, and so far I have no weird noises, vibrations, etc. Curious to see how it holds up in the long run.
 
I believe to prevent the sway bar contact with the locker motor you need the brackets SS includes in their lift kits. I don't think they sell them separately but it would be easy to make a set from some bar stock steel and a tap.
 
What bulb # did you use for the climate control panel?

These look great, could you give more detail, maybe part number on the cluster bulbs and temp bulbs. There were so many on that superbrightled site to choose from. Great build man! Thanks for sharing
 
Is your right rear lower control arm bent or is that just the pic? Excellent job getting your locker and gears in, up and running.
 
I believe to prevent the sway bar contact with the locker motor you need the brackets SS includes in their lift kits. I don't think they sell them separately but it would be easy to make a set from some bar stock steel and a tap.

Hmmm, that would make sense. I'm sure I can get something to work...

These look great, could you give more detail, maybe part number on the cluster bulbs and temp bulbs. There were so many on that superbrightled site to choose from. Great build man! Thanks for sharing

Here was my order:

Qty Product/Options Price/Ea
3 NEO4-WHP: 4mm NEO4-xHP Cool White 1.95
3 24-WHP: Cool White 2.49
4 74-CWHP3: Cool White 2.49
2 NEO3-WHP: 3mm NEO3-xHP Cool White 1.95

Hopefully that helps!

Is your right rear lower control arm bent or is that just the pic? Excellent job getting your locker and gears in, up and running.

It is bent from a rock. It's been that way for well over a year now and I've just been too lazy to fix it... Hopefully I can get some better links sometime soon.
 
Locker is wired and working! I made a wiring harness from the Toyota plugs on the locker side, 16 gauge wire, and a DPDT momentary Contura V switch. I sleeved the entire thing, making it nice and pretty.

I also took off the Toyota brackets near the rear end, as I could never get them to line up how I liked. Ended up just zip-tying it to my rear diff breather hose, and running it into the hatch under the rear seat. It was a bit tough to run all that wiring along the rest of the harness under the panels, but I made it work. The locker actuates perfectly and I can't wait to use it.

<a data-flickr-embed="true" href="https://www.flickr.com/photos/derpiful/33257161286/in/dateposted-public/" title="195.lockerwiring"><img src="https://c1.staticflickr.com/1/581/33257161286_a524dfcb60_b.jpg" width="1024" height="683" alt="195.lockerwiring"></a><script async src="//embedr.flickr.com/assets/client-code.js" charset="utf-8"></script>

Ignore the extra wire, that is for the indicator light that I haven't wired yet.

<a data-flickr-embed="true" href="https://www.flickr.com/photos/derpiful/32915146510/in/dateposted-public/" title="196.lockerswitch"><img src="https://c1.staticflickr.com/4/3871/32915146510_beaffda78a_b.jpg" width="1024" height="683" alt="196.lockerswitch"></a><script async src="//embedr.flickr.com/assets/client-code.js" charset="utf-8"></script>
 
Spent spring break this year in Moab with [MENTION=78892]Fishwerks[/MENTION], [MENTION=82211]TCMach[/MENTION], [MENTION=94888]EatonKyleH[/MENTION], [MENTION=122219]Twenman4[/MENTION], and [MENTION=67615]Dirtco[/MENTION]!

The full album of photos (105 of them) can be found here: https://www.flickr.com/photos/derpiful/albums/72157678512051374

Day 1: Sevenmile Rim

<a data-flickr-embed="true" href="https://www.flickr.com/photos/derpiful/33687624275/in/album-72157678512051374/" title="sb2017-1"><img src="https://c1.staticflickr.com/4/3782/33687624275_712f049e37_b.jpg" width="1024" height="683" alt="sb2017-1"></a><script async src="//embedr.flickr.com/assets/client-code.js" charset="utf-8"></script>
<a data-flickr-embed="true" href="https://www.flickr.com/photos/derpiful/33531235132/in/album-72157678512051374/" title="sb2017-4"><img src="https://c1.staticflickr.com/3/2827/33531235132_390a6e764d_b.jpg" width="1024" height="683" alt="sb2017-4"></a><script async src="//embedr.flickr.com/assets/client-code.js" charset="utf-8"></script>
<a data-flickr-embed="true" href="https://www.flickr.com/photos/derpiful/33646796896/in/album-72157678512051374/" title="sb2017-7"><img src="https://c1.staticflickr.com/3/2838/33646796896_d3d32b51e1_b.jpg" width="1024" height="683" alt="sb2017-7"></a><script async src="//embedr.flickr.com/assets/client-code.js" charset="utf-8"></script>

Kyle ended up breaking his u-joint on an obstacle, so he pulled the rear driveshaft and turned around to head back to town. On the bright side, it still looked good even in 1wd!
<a data-flickr-embed="true" href="https://www.flickr.com/photos/derpiful/33558239201/in/album-72157678512051374/" title="sb2017-13"><img src="https://c1.staticflickr.com/3/2833/33558239201_9bbd4c7640_b.jpg" width="1024" height="683" alt="sb2017-13"></a><script async src="//embedr.flickr.com/assets/client-code.js" charset="utf-8"></script>

Wipeout Hill:
For whatever reason I was getting incredibly tippy. My front driver wheel wanted to lift the second I tried to do anything, and caused me to nearly flop it. Not the best moment..
<a data-flickr-embed="true" href="https://www.flickr.com/photos/derpiful/33303684110/in/album-72157678512051374/" title="sb2017-35"><img src="https://c1.staticflickr.com/3/2915/33303684110_bbccdc7dbb_b.jpg" width="1024" height="683" alt="sb2017-35"></a><script async src="//embedr.flickr.com/assets/client-code.js" charset="utf-8"></script>

I ended up winching up the obstacle, which is where [MENTION=67615]Dirtco[/MENTION] broke his diff

On the bright side, the sunset was incredible!
<a data-flickr-embed="true" href="https://www.flickr.com/photos/derpiful/33646780806/in/album-72157678512051374/" title="sb2017-41"><img src="https://c1.staticflickr.com/4/3928/33646780806_0e25b4c3fd_b.jpg" width="1024" height="683" alt="sb2017-41"></a><script async src="//embedr.flickr.com/assets/client-code.js" charset="utf-8"></script>


Day 2: Hell's Revenge
This is my 5th? time on the trail, but it's a classic, and I always love it.

<a data-flickr-embed="true" href="https://www.flickr.com/photos/derpiful/33531206972/in/album-72157678512051374/" title="sb2017-46"><img src="https://c1.staticflickr.com/3/2829/33531206972_cdff655606_b.jpg" width="1024" height="683" alt="sb2017-46"></a><script async src="//embedr.flickr.com/assets/client-code.js" charset="utf-8"></script>
<a data-flickr-embed="true" href="https://www.flickr.com/photos/derpiful/33646778736/in/album-72157678512051374/" title="sb2017-47"><img src="https://c1.staticflickr.com/3/2948/33646778736_6c69463683_b.jpg" width="1024" height="683" alt="sb2017-47"></a><script async src="//embedr.flickr.com/assets/client-code.js" charset="utf-8"></script>

Chris on Tipover Challenge
<a data-flickr-embed="true" href="https://www.flickr.com/photos/derpiful/33558219631/in/album-72157678512051374/" title="sb2017-57"><img src="https://c1.staticflickr.com/3/2898/33558219631_d7e9e2c856_b.jpg" width="1024" height="683" alt="sb2017-57"></a><script async src="//embedr.flickr.com/assets/client-code.js" charset="utf-8"></script>


Day 3: Gold Bar Rim/ Golden Spike

My spindle gets used as a slider often, but takes it like a champ:
<a data-flickr-embed="true" href="https://www.flickr.com/photos/derpiful/33531193292/in/album-72157678512051374/" title="sb2017-68"><img src="https://c1.staticflickr.com/4/3947/33531193292_ac4490f109_b.jpg" width="1024" height="683" alt="sb2017-68"></a><script async src="//embedr.flickr.com/assets/client-code.js" charset="utf-8"></script>

The waterfall is getting bigger and bigger every year, and soon it will be too much
<a data-flickr-embed="true" href="https://www.flickr.com/photos/derpiful/33531192112/in/album-72157678512051374/" title="sb2017-70"><img src="https://c1.staticflickr.com/3/2881/33531192112_63f72d0a7a_b.jpg" width="1024" height="683" alt="sb2017-70"></a><script async src="//embedr.flickr.com/assets/client-code.js" charset="utf-8"></script>

Chris managed to get both back wheels off the ground coming down it
#HitchLife
<a data-flickr-embed="true" href="https://www.flickr.com/photos/derpiful/33303657360/in/album-72157678512051374/" title="sb2017-71"><img src="https://c1.staticflickr.com/4/3836/33303657360_54019bcfb8_b.jpg" width="1024" height="683" alt="sb2017-71"></a><script async src="//embedr.flickr.com/assets/client-code.js" charset="utf-8"></script>
<a data-flickr-embed="true" href="https://www.flickr.com/photos/derpiful/33558212171/in/album-72157678512051374/" title="sb2017-73"><img src="https://c1.staticflickr.com/3/2890/33558212171_3b91e2ac66_b.jpg" width="1024" height="683" alt="sb2017-73"></a><script async src="//embedr.flickr.com/assets/client-code.js" charset="utf-8"></script>
<a data-flickr-embed="true" href="https://www.flickr.com/photos/derpiful/33687576985/in/album-72157678512051374/" title="sb2017-79"><img src="https://c1.staticflickr.com/4/3849/33687576985_17b420fd8a_b.jpg" width="1024" height="683" alt="sb2017-79"></a><script async src="//embedr.flickr.com/assets/client-code.js" charset="utf-8"></script>

Golden Crack:
<a data-flickr-embed="true" href="https://www.flickr.com/photos/derpiful/32874300513/in/album-72157678512051374/" title="sb2017-88"><img src="https://c1.staticflickr.com/4/3755/32874300513_3228c3e07c_b.jpg" width="1024" height="683" alt="sb2017-88"></a><script async src="//embedr.flickr.com/assets/client-code.js" charset="utf-8"></script>
<a data-flickr-embed="true" href="https://www.flickr.com/photos/derpiful/32874299723/in/album-72157678512051374/" title="sb2017-90"><img src="https://c1.staticflickr.com/3/2931/32874299723_bb2f7052d4_b.jpg" width="1024" height="683" alt="sb2017-90"></a><script async src="//embedr.flickr.com/assets/client-code.js" charset="utf-8"></script>
<a data-flickr-embed="true" href="https://www.flickr.com/photos/derpiful/32844775554/in/album-72157678512051374/" title="sb2017-91"><img src="https://c1.staticflickr.com/4/3955/32844775554_35c05f862c_b.jpg" width="1024" height="683" alt="sb2017-91"></a><script async src="//embedr.flickr.com/assets/client-code.js" charset="utf-8"></script>

I ran this trail in 2015 at Rock Therapy, and was able to take a bigger line than last time. These 35s are sweet!
<a data-flickr-embed="true" href="https://www.flickr.com/photos/derpiful/32874297943/in/album-72157678512051374/" title="sb2017-94"><img src="https://c1.staticflickr.com/3/2857/32874297943_2ebede1092_b.jpg" width="1024" height="683" alt="sb2017-94"></a><script async src="//embedr.flickr.com/assets/client-code.js" charset="utf-8"></script>
<a data-flickr-embed="true" href="https://www.flickr.com/photos/derpiful/32844770994/in/album-72157678512051374/" title="sb2017-97"><img src="https://c1.staticflickr.com/4/3849/32844770994_bfa8ba4f36_b.jpg" width="1024" height="683" alt="sb2017-97"></a><script async src="//embedr.flickr.com/assets/client-code.js" charset="utf-8"></script>

I had a great time as always and can't wait to go back!
 
Update time! It's been a while, sorry for the delay.

I broke my femur in a go-kart accident in late April, and have been out for a while. I wasn't able to drive for 6 weeks, and still haven't been able to do much work on it. It's been a slow process (and basically killed most of my summer plans), but it'll get there!

-----------------------------------------------

Anyways, I found a used winch at a good price so I picked it up. It's a Smittybilt X2O 12,000 lb, with synthetic line and a wireless remote. I never intended to get a 12k, but for $300, I don't see why not.

With the help of a few friends (mostly them doing the work and me telling them how to), we were able to get it installed and spooled!

The solenoid is basically just sitting behind the grill, still waiting on a better spot to put it. I just need to make a bracket to mount it permanently. I ended up routing the wireless on/off switch inside, but unfortunately do not have pictures. It works well- flip the switch, turn on the remote, and it spins!

With the Addicted bumper, it's a suuuper tight fit. I had to notch the grill in the slightest (if you look closely in the pictures, you can see it at the bottom), but it fits with no major cutting.

I did have to remove the lightbar, as the mounts I welded on a long time ago were in the way. I've got a replacement in the works, as soon as I can weld some new brackets on.

Ignore how dirty the bumper is, it hasn't gotten a wash in a while..

<a data-flickr-embed="true" href="https://www.flickr.com/photos/derpiful/34757636084/in/dateposted-public/" title="197.winch"><img src="https://c1.staticflickr.com/5/4200/34757636084_3f66c42a57_b.jpg" width="1024" height="683" alt="197.winch"></a><script async src="//embedr.flickr.com/assets/client-code.js" charset="utf-8"></script>
<a data-flickr-embed="true" href="https://www.flickr.com/photos/derpiful/35560132726/in/dateposted-public/" title="198.winch"><img src="https://c1.staticflickr.com/5/4249/35560132726_02418b73a3_b.jpg" width="1024" height="683" alt="198.winch"></a><script async src="//embedr.flickr.com/assets/client-code.js" charset="utf-8"></script>

-----------------------------------------------

This past weekend I was about to get out of the house for the first time and went to Great Sand Dunes National Park! This was my 3rd trip here- this time of year is great down there. The creek is flowing decently strong and it isn't too hot yet!

<a data-flickr-embed="true" href="https://www.flickr.com/photos/derpiful/34757635394/in/dateposted-public/" title="199.sanddunes"><img src="https://c1.staticflickr.com/5/4247/34757635394_c0dcc3d6ba_b.jpg" width="1024" height="683" alt="199.sanddunes"></a><script async src="//embedr.flickr.com/assets/client-code.js" charset="utf-8"></script>
<a data-flickr-embed="true" href="https://www.flickr.com/photos/derpiful/35560131606/in/dateposted-public/" title="200.sanddunes"><img src="https://c1.staticflickr.com/5/4250/35560131606_941ee933db_b.jpg" width="1024" height="683" alt="200.sanddunes"></a><script async src="//embedr.flickr.com/assets/client-code.js" charset="utf-8"></script>
 
Sorry to here about the bone man. They heal. I broke my calcaneus(heel) about six years ago in the beginning of May. It hurt more to loose a summer climbing in the mountains then the actual break did. I rehabbed hard and was back at it by the end of that summer.

I've never looked through the first page of your thread. That OP is great. The fact that you linked all the stuff to it's location in the build thread is so incredibly useful. Have fun with the new winch. I got a 12k Engo for about the same as you payed for the Smitty. It may be overkill but I like having it when needed.
 
Sorry to here about the bone man. They heal. I broke my calcaneus(heel) about six years ago in the beginning of May. It hurt more to loose a summer climbing in the mountains then the actual break did. I rehabbed hard and was back at it by the end of that summer.

I've never looked through the first page of your thread. That OP is great. The fact that you linked all the stuff to it's location in the build thread is so incredibly useful. Have fun with the new winch. I got a 12k Engo for about the same as you payed for the Smitty. It may be overkill but I like having it when needed.

Thanks man. Yeah, I'm pretty bummed about missing out on all the 14ers I had hoped to climb, but that's just life.

Glad you like it! I even use it myself sometimes to go back and look at everything haha. Nice snag on the winch, I was looking at those for a while too.
 
Thanks man. Yeah, I'm pretty bummed about missing out on all the 14ers I had hoped to climb, but that's just life.

Peak bagging or rock climbing? Look up Mt Humphrey's East Arete. Technically it's only 13986 or so feet but it's one of the funnest "easy" rock climbs in the Sierra's. If you ever make it out here put it on the short list.
 
Last edited:
Peak bagging or rock climbing? Look up Mt Humphrey's East Arete. Technically it's only 13986 or so feet but it's one of the funnest "easy" rock climbs in the Sierra's. If you ever make it out here put it on the short list.

Peak bagging. Working on knocking all of the 14ers out. I'll definitely look it up, and put it on the list!
 

Members online

Forum statistics

Threads
278,312
Messages
3,554,086
Members
248,016
Latest member
Advally Service

Trending content

Back
Top