HokieRunner
New member
I custom built a mountain bike last spring and my girlfriend got a mountain bike around the same time so I found myself in need of a good MTB rack. I looked at the normal tail hitch options and roof options and after seeing a few guys running interior mounts, felt that was the best option for me.
The reasons I chose to go with the interior rack vs. the more traditional options:
1. Security. If I'm going to hit the trails after work the bike isn't hanging around on the outside and is mostly out of sight and locked securely inside.
2. Ease of loading/unloading
3. Gear is out of the elements
4. Safety - nothing hanging off the back or potentially falling off the roof
Obviously for a road trip or going biking with more than 2 folks, this isn't a good solution. But other than that, it met my needs for 95% of the riding I do.
My only other objective was to have it be quickly installed/removed. To serve that purpose I drilled holes in the rear tray (barely visible when uninstalled) and mounted threaded t nuts underneath that remain there at all times. Installation takes 30 seconds and same for removal. Just screw in the three plastic handles until snug and roll in the bikes!
This was a pretty easy project with the most time consuming parts being test fitting and getting the parts spaced properly. Best part is when I'm just rolling around with my bike inside, I can still have 2 of the 3 second row seats up.
As for cost, with some shopping around, all the materials came in around $90.
Now onto the details. Here are the materials I used:
-1 - 43" length of 1"x1" steel (holed). I bought a 4' length and cut it down
-2 - 3" lengths of 1"x1" alum square (for side feet)
-2 - tire mounts
-2 - bike fork mounts (locking)
-3 - plastic T handles with threaded insert
-3 - 4" lengths of threaded rod
-3 - threaded t inserts
and an assortment of bolt/nylon nut hardware.
Here are all the parts laid out after test fitting for component spacing and painting the steel bar.

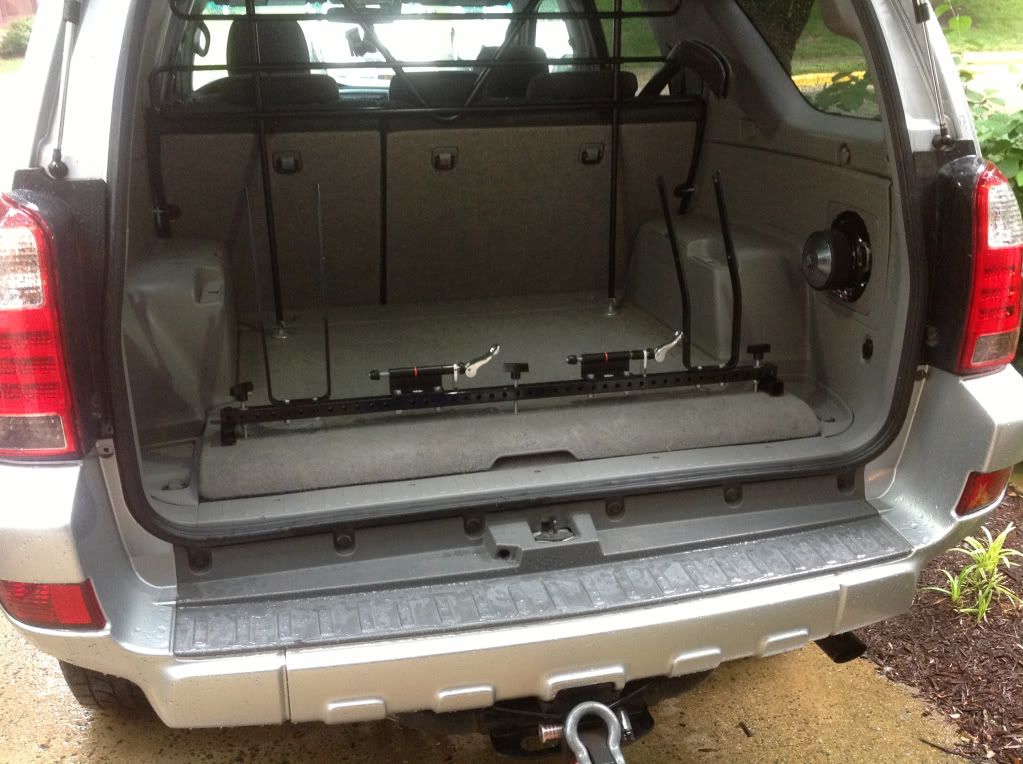
Everything bolted up:

Installation - just insert threads into holes in the tray and tighten:

Ready for bikes:
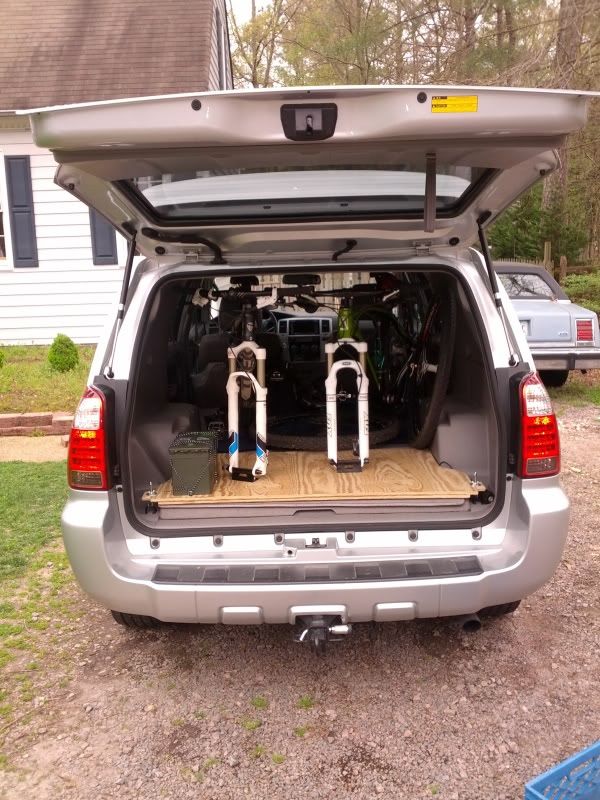
This is the only pic I have w/ the bike mounted but I'll throw up a more recent one later on:

Anywho, hope this helps out some folks looking for a different option for a bike rack. It mounts up fast and is surprisingly strong.
If there's something I forgot to mention or should add, just let me know.
The reasons I chose to go with the interior rack vs. the more traditional options:
1. Security. If I'm going to hit the trails after work the bike isn't hanging around on the outside and is mostly out of sight and locked securely inside.
2. Ease of loading/unloading
3. Gear is out of the elements
4. Safety - nothing hanging off the back or potentially falling off the roof
Obviously for a road trip or going biking with more than 2 folks, this isn't a good solution. But other than that, it met my needs for 95% of the riding I do.
My only other objective was to have it be quickly installed/removed. To serve that purpose I drilled holes in the rear tray (barely visible when uninstalled) and mounted threaded t nuts underneath that remain there at all times. Installation takes 30 seconds and same for removal. Just screw in the three plastic handles until snug and roll in the bikes!
This was a pretty easy project with the most time consuming parts being test fitting and getting the parts spaced properly. Best part is when I'm just rolling around with my bike inside, I can still have 2 of the 3 second row seats up.
As for cost, with some shopping around, all the materials came in around $90.
Now onto the details. Here are the materials I used:
-1 - 43" length of 1"x1" steel (holed). I bought a 4' length and cut it down
-2 - 3" lengths of 1"x1" alum square (for side feet)
-2 - tire mounts
-2 - bike fork mounts (locking)
-3 - plastic T handles with threaded insert
-3 - 4" lengths of threaded rod
-3 - threaded t inserts
and an assortment of bolt/nylon nut hardware.
Here are all the parts laid out after test fitting for component spacing and painting the steel bar.

Everything bolted up:

Installation - just insert threads into holes in the tray and tighten:

Ready for bikes:

This is the only pic I have w/ the bike mounted but I'll throw up a more recent one later on:

Anywho, hope this helps out some folks looking for a different option for a bike rack. It mounts up fast and is surprisingly strong.
If there's something I forgot to mention or should add, just let me know.