W8kbrder
New member
I know this has been mentioned in several threads but I figured I would do a more detailed write-up/information for those that have never ventured down that path. **NOTE: This is not so much of a detailed write-up how to but more of a heads up kind of thread to prepare you for the install. The directions that come with the rack are highly detailed with plenty of easy to follow diagrams.
Either way, hope this clarifies things for those with the questions.
1.) Order your rack: There are several spots to pick up a Gobi roof rack. I decided to go with Philip Day at Trail Duty. Super nice guy. Outstanding customer service. I'm in no way affiliated with them but they are who I used and they ended up not only having a great deal but great service as well.
I was able to get the Sunroof Insert, Wind Deflector, and Ladder for free...not to meniton Free Shipping. The turnaround time ended up being around 6 weeks between placing the order and receiving the rack. I'm sure this will differ from person to person but thats what it was for me.
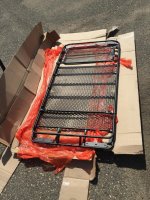
2.) Upon receipt of the rack, I discovered that it was a pretty heavy package combined with the wooden crate bottom, padding/packaging material, etc. After about 15 min of unpacking, I was able to get started.
Everything provided is separated nice and neatly into labeled heavy duty zip lock bags. The directions provided are detailed and heavy with diagrams. I think they did a great job explaining everything step by step. I think my only disappointment was the top plate that hooks onto the top of the rear gate to hold the ladder (see picture/ladder description further below for reason). Not a huge deal but other than that, the craftsmanship and supplies/directions provided were fantastic and over the top. After going to a recent Toyota ralley and seeing so many different roof racks in one spot, the Gobi (IMO) was no comparison. Clean, sleak, low-profile, well built.
3.) Since I had previously removed my factory rack and installed tabs, see my DIY: Factory Roof Rack Removal thread for directions on removing.
4.) Grab a 10mm socket and slowly unloosen the two bolts. I always alternate between the bolts...whether tightening or loosening. Once your bolts are removed, use a rag to clean up any debris/residue. I then used some Denatured Alcohol to wipe down the area for a final clean (make sure to wear a mask and be in an open/ventilated area if using this stuff. Its vapors are strong).

5.) Waterproofing: The rubber seals that come with the rack should suffice for waterproofing according to Gobi. However I go over the top when preparing something. Save yourself the time of having to uninstall for water leaks by picking up any kind of Marine grade Silicone. The little plastic tubes that go through the roof need to be sealed up around the edges IMO. Two slogans to live by when working on cars: "Better safe than sorry." and "Tight is tight enough." Apply the silicone around the tubes. I also covered the area that the first rubber seal sits on. Since this is the lowest point on the roof rack system, I figured it would be the area most likely to have contact with water/moisture for long periods of time.
Once you set the seal down, press down on it with your fingers while moving it around a bit to make sure the silicone spreads out underneath. I used a socket adapter to push down.


6.) The next few pictures should explain the order of risers/gaskets that will be placed Scooby-Doo Sandwich style. I also added Silicone between each layer for good measure. Everyone does it different. This is how I did it.


7.) Once you've completed the layers previously pictured, a metal plate will be placed down along with another 3rd rubber gasket on top of it.
**NOTE: your rain gutter seals will slide front to back. Everything with the Gobi rack is only snugged down until everything is lined up and ready to complete. Make sure your rain gutter seal is slightly under the bracket. If the seal is too far forward or backward, it will be under one rack tower...but not under the other. I did a lot of mocking up just to make sure everything looked right.


8.) Finally the tower brackets that attach to the roof rack bottom go next. I did a bit more water proofing to the provided roof bolts themselves by using some leakproof pipe thread compound paste.


9.) Next, the front plates are snugged onto the rack using a 9/16 wrench, prior to lifting it onto the roof.


10.) Grab a friend. You're gonna need someone to help you lift this thing up onto the roof. If you have a 3" lift like me, it will help to have someone tall as you will have to lift the rack over your heads and each person will walk down the sides of the runner while holding it over your head. Once its lined up, set'r down easy onto the towers. Rubber seals will go in between the towers and the rack. Snug down using provided hardware and that 9/16 gear wrench.
11.) The front feet are loose. These do not bolt down to the vehichle. They basically rest there and have sticky pads on the bottom. **Make sure you mock these up several times and have them where you want them before you peel those stickie pads. I used blue painters tape to mark exactly where I wanted them. As you can see in the picture, the feet can be brought all the way to the edge of the rain gutter wall....but remember over time of it moving around, I'm sure it will scratch that paint. I installed mine a few cm from the edge just so it wouldn't' rub. Not sure if this was the right thing to do but haven't had any issues yet after walking around on it.
**Also make sure you clean the area that you tape off with Denatured Alcohol. You want the surface to be as clean as possible for the stickie pads.


12.) Once the front feet are in place, you will have use your elbow to as leverage to hold the front of the rack up 1/4" while you tighten the front feet bolts. That way once you let go, there is pressure pushing down on the front feet. The directions say to use another person. I didn't have anyone at the time so my elbow seemed to work fine.
13.) Ladder: This requires no drilling or unbolting of factory bolts just so you know. A provided upper and lower plate attach to the gate without any intrusive drilling/bolting, etc. They did a good job with this design.
Measure over 3 3/8" as pictured to determine placement of the left side of the top plate that the ladder will attach to. Tape off the mark with blue tape. Install the plate (mock it up...do not remove stickie pad) temporarily so you can hang the ladder and make sure it is verticle and plum. Tape the edges of the bottom as well so you know where ladder is going. Remove ladder and the top plate. Now you're going to clean the spot where the top plate will go with Denatured Alcohol. Once you have it mocked up to where the ladder will be centered and verticle, re-install the top plate but with the stickie pad exposed. Its super stickie so do a practice run or two prior to removing the stickie! Once the upper plate is installed, press down on it for 30 seconds to make sure the stickie pad has adhered.
Hang the ladder again and make sure its lined up to the bottom tape. There is a stickie pad on the bottom of the ladder that sticks to the bottom portion of the ladder. Directions call to pull down on the ladder before sticking. Once you stick it, you are suppose to have a 2nd person tighten the rear bolts of the ladder to the provided then metal plate. This plate sticks to the back side of the lift gate lip so the ladder can wrap under. The bolts on the bottom back of the ladder lip tighten into the metal strip that you adhere to the backside lip of the lift gate. Again, no scratching or drilling into the vehicle itself.


See the little gap below the bottom of the ladder? Once you peel the adhesive stickie pad on the back of the bottom part of the ladder, you are going to have to pull down on the ladder to make that gap disappear prior to letting the bottom stickie pad stick to the tailgate. I had to pull down with one hand while putting pressure on the bottom at the same time to make sure the stickie pad stuck. You can't let off pulling down on the ladder or the ladder will pull up and pull away/tear the stickie pad. It calls for two people doing this. I did it solo. I made sure to have the bottom metal bracket, bolts, and socket ready to go so once I started pulling down on the ladder, I could bolt up the bottom plate and tighten it down with one hand. Its not easy and I highly recommend using two people. I was impatient but luckily it turned out good.


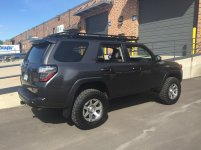
Hope this thread helps some of you to some degree. Overall it was pretty straight forward. Gobi's instructions say to snug everything until its all lined up...then tighten down...but I never really had to line anything up. It fit perfectly from the get go. Overall I'm highly satisfied and have had quite a few comments from random people about it.
Either way, hope this clarifies things for those with the questions.
1.) Order your rack: There are several spots to pick up a Gobi roof rack. I decided to go with Philip Day at Trail Duty. Super nice guy. Outstanding customer service. I'm in no way affiliated with them but they are who I used and they ended up not only having a great deal but great service as well.
I was able to get the Sunroof Insert, Wind Deflector, and Ladder for free...not to meniton Free Shipping. The turnaround time ended up being around 6 weeks between placing the order and receiving the rack. I'm sure this will differ from person to person but thats what it was for me.
2.) Upon receipt of the rack, I discovered that it was a pretty heavy package combined with the wooden crate bottom, padding/packaging material, etc. After about 15 min of unpacking, I was able to get started.
Everything provided is separated nice and neatly into labeled heavy duty zip lock bags. The directions provided are detailed and heavy with diagrams. I think they did a great job explaining everything step by step. I think my only disappointment was the top plate that hooks onto the top of the rear gate to hold the ladder (see picture/ladder description further below for reason). Not a huge deal but other than that, the craftsmanship and supplies/directions provided were fantastic and over the top. After going to a recent Toyota ralley and seeing so many different roof racks in one spot, the Gobi (IMO) was no comparison. Clean, sleak, low-profile, well built.
3.) Since I had previously removed my factory rack and installed tabs, see my DIY: Factory Roof Rack Removal thread for directions on removing.
4.) Grab a 10mm socket and slowly unloosen the two bolts. I always alternate between the bolts...whether tightening or loosening. Once your bolts are removed, use a rag to clean up any debris/residue. I then used some Denatured Alcohol to wipe down the area for a final clean (make sure to wear a mask and be in an open/ventilated area if using this stuff. Its vapors are strong).

5.) Waterproofing: The rubber seals that come with the rack should suffice for waterproofing according to Gobi. However I go over the top when preparing something. Save yourself the time of having to uninstall for water leaks by picking up any kind of Marine grade Silicone. The little plastic tubes that go through the roof need to be sealed up around the edges IMO. Two slogans to live by when working on cars: "Better safe than sorry." and "Tight is tight enough." Apply the silicone around the tubes. I also covered the area that the first rubber seal sits on. Since this is the lowest point on the roof rack system, I figured it would be the area most likely to have contact with water/moisture for long periods of time.
Once you set the seal down, press down on it with your fingers while moving it around a bit to make sure the silicone spreads out underneath. I used a socket adapter to push down.


6.) The next few pictures should explain the order of risers/gaskets that will be placed Scooby-Doo Sandwich style. I also added Silicone between each layer for good measure. Everyone does it different. This is how I did it.


7.) Once you've completed the layers previously pictured, a metal plate will be placed down along with another 3rd rubber gasket on top of it.
**NOTE: your rain gutter seals will slide front to back. Everything with the Gobi rack is only snugged down until everything is lined up and ready to complete. Make sure your rain gutter seal is slightly under the bracket. If the seal is too far forward or backward, it will be under one rack tower...but not under the other. I did a lot of mocking up just to make sure everything looked right.


8.) Finally the tower brackets that attach to the roof rack bottom go next. I did a bit more water proofing to the provided roof bolts themselves by using some leakproof pipe thread compound paste.


9.) Next, the front plates are snugged onto the rack using a 9/16 wrench, prior to lifting it onto the roof.


10.) Grab a friend. You're gonna need someone to help you lift this thing up onto the roof. If you have a 3" lift like me, it will help to have someone tall as you will have to lift the rack over your heads and each person will walk down the sides of the runner while holding it over your head. Once its lined up, set'r down easy onto the towers. Rubber seals will go in between the towers and the rack. Snug down using provided hardware and that 9/16 gear wrench.
11.) The front feet are loose. These do not bolt down to the vehichle. They basically rest there and have sticky pads on the bottom. **Make sure you mock these up several times and have them where you want them before you peel those stickie pads. I used blue painters tape to mark exactly where I wanted them. As you can see in the picture, the feet can be brought all the way to the edge of the rain gutter wall....but remember over time of it moving around, I'm sure it will scratch that paint. I installed mine a few cm from the edge just so it wouldn't' rub. Not sure if this was the right thing to do but haven't had any issues yet after walking around on it.
**Also make sure you clean the area that you tape off with Denatured Alcohol. You want the surface to be as clean as possible for the stickie pads.


12.) Once the front feet are in place, you will have use your elbow to as leverage to hold the front of the rack up 1/4" while you tighten the front feet bolts. That way once you let go, there is pressure pushing down on the front feet. The directions say to use another person. I didn't have anyone at the time so my elbow seemed to work fine.
13.) Ladder: This requires no drilling or unbolting of factory bolts just so you know. A provided upper and lower plate attach to the gate without any intrusive drilling/bolting, etc. They did a good job with this design.
Measure over 3 3/8" as pictured to determine placement of the left side of the top plate that the ladder will attach to. Tape off the mark with blue tape. Install the plate (mock it up...do not remove stickie pad) temporarily so you can hang the ladder and make sure it is verticle and plum. Tape the edges of the bottom as well so you know where ladder is going. Remove ladder and the top plate. Now you're going to clean the spot where the top plate will go with Denatured Alcohol. Once you have it mocked up to where the ladder will be centered and verticle, re-install the top plate but with the stickie pad exposed. Its super stickie so do a practice run or two prior to removing the stickie! Once the upper plate is installed, press down on it for 30 seconds to make sure the stickie pad has adhered.
Hang the ladder again and make sure its lined up to the bottom tape. There is a stickie pad on the bottom of the ladder that sticks to the bottom portion of the ladder. Directions call to pull down on the ladder before sticking. Once you stick it, you are suppose to have a 2nd person tighten the rear bolts of the ladder to the provided then metal plate. This plate sticks to the back side of the lift gate lip so the ladder can wrap under. The bolts on the bottom back of the ladder lip tighten into the metal strip that you adhere to the backside lip of the lift gate. Again, no scratching or drilling into the vehicle itself.


See the little gap below the bottom of the ladder? Once you peel the adhesive stickie pad on the back of the bottom part of the ladder, you are going to have to pull down on the ladder to make that gap disappear prior to letting the bottom stickie pad stick to the tailgate. I had to pull down with one hand while putting pressure on the bottom at the same time to make sure the stickie pad stuck. You can't let off pulling down on the ladder or the ladder will pull up and pull away/tear the stickie pad. It calls for two people doing this. I did it solo. I made sure to have the bottom metal bracket, bolts, and socket ready to go so once I started pulling down on the ladder, I could bolt up the bottom plate and tighten it down with one hand. Its not easy and I highly recommend using two people. I was impatient but luckily it turned out good.


Hope this thread helps some of you to some degree. Overall it was pretty straight forward. Gobi's instructions say to snug everything until its all lined up...then tighten down...but I never really had to line anything up. It fit perfectly from the get go. Overall I'm highly satisfied and have had quite a few comments from random people about it.
Last edited: