
So here is the story. It can be repaired with no manual, no transfer case removal, and no "timing" required. Just a few tools and some common sense.
The story (skip if you just want the DIY part)
About 4-5 months ago I went off-roading like any good 4Runner owner. While out there I ran into some water obstacles that had some depth but not much difficulty. A few months later I try to engage the 4WD system to discover it is not operational. So I get onto this outstanding website to troubleshoot. After finding out all sorts of things about the transfer case actuator, I go back out to my Runner to lightly tap on the actuator and within 10 taps or so it engages. I'm elated that it just seized a little and came right back. I also noted the breather tube on top had a hole in it so I fixed it. About a month later the same things happens again with the same repair working, this time it took quite the few taps, a drive, a few more taps, then it all started working again.
About another month later it happens again and no amount of tapping, driving, twisting or turning will make it engage. I hear the single click from the 4WD ECU in the vehicle trying but nothing is happening so I decided to get serious.
I took off the bottom cover for the actuator. I then poured the rusty,dirty, water like substance in the actuator onto myself as I opened the case. Immediately I realized that the breather tube's hole allowed water in the last time I got into water and it has been in there since having no where to go. As I'm looking at the inside, it appears the only thing corroded was the 4Hi DC motor, but at least I know why it doesn't work now. I perform the below steps I made up as I went and reassemble. It now works flawlessly and better than it ever did. Fully functioned check multiple times for all operations, 2Hi, 4Hi, 4Lo and both 4WD functions with center diff lock. Verified on jack stands as well.
Steps for Repair, broken down in 2 levels because the gears may not have to come out.
I put the 4Runner on jackstands because I just barely squeeze under my non-lifted truck and I also wanted to be able to spin driveshafts but it's not required.
1)Remove the steel shield on the bottom of the transfer case actuator. Beware what might come out.
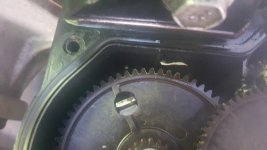
2)Mark the gears. As you can see from the pics I marked the position of every gear I knew was going to fall/ come-out. There are only 2 marks that matter. The large gear at the top w/ the metal tabs and the blue pointer on the position switch. The large gear must be aligned with the actual case, don't use another gear.
If you don't remove the 2 screws on the left/ rear holding the position switch it will hold all of the gears in place and nothing will move.
3)If you are not getting any sound out of the motor and it doesn't appear to be trying, you can turn the key on and switch it to 4Hi. The bottom connector of the DC motor is the positive and you can use the transfer case as a ground to see if power is going there. Mine had power but was completely seized. Be warned the cover holds the gear shafts in place and they will bind if it runs while open, it isn't likely to hurt anything but you will then HAVE to set the gears back to the correct positions.
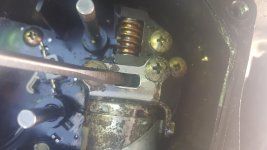
3a)Use the widest screwdriver that will fit into the hole that I am putting a screwdriver into in the pic. It's hard to see, but there is a plastic connection where the DC motor connects to the brass worm gear. It is not one shaft. Gently turn the motor, perhaps with the help of some WD-40 or PB Blaster. Mine was extremely stiff so I worked it about 10 times for 1/8 turn and it suddenly freed up and I could then spin in using my finger on the worm gear. Mind you I had all the gears off, you won't get much motion. You might be able to "lift" that gear away from the worm to spin it. No worries, it just drives the others, timing or position doesn't matter. Direction of rotation doesn't matter for the DC motor either while you're trying to free it.
That is end of of the first level. Installation is the reverse of removal and be gentle putting the cover back on. It is getting serious now. Read all before attempting.
4)Remove those 2 screws on the left/ back holding in the position switch. Gently pull it down. There is a long piece that goes into the plug at the top and it sleeves over those 2 posts so it takes a little effort. You should have already marked the top of that gear so spin it and make sure you feel some resistance in a few places where it switches. This switch tells the ECU in what mode the transfer case is in.
5)Once that position switch has been removed the gears shouldn't just fall out but they are free to do so. The gear driven by the worm gear and the other plastic one can be removed. They just drive the gear w/ metal tabs so they make no difference and all the shafts are smooth, nothing keyed.
6)When the first gear comes out, the metal tabbed gear will fall along with the metal gear beneath it and the 4WD Hi shift rod will be visible. No worries about timing with the metal gear, it can only attach one way to the gear that was on top of it.
7)I exercised the shift rod to ensure it was free (which it was). It can move all the way out with no ill effects (ie you can't pull it out too far). I then put it back all the way in and verified it was in 2WD by spinning the front driveshaft.
8)This is where I stuck the screwdriver in and freed to motor then spun it with my finger while lubricating (WD-40).
9)I reinstalled the position switch and lined it up with my mark. I did this so the ECU would power the DC motor so I could verify operation. I turned the key on and switched from 2Hi to 4Hi and it spun the motor. There is no limit switch so as long as the vehicle's switch is in 4HI it will run continously and I sprayed some more lube on the motor.
10)I reached up and changed the position of the switch counter-clockwise until the DC motor stopped spinning. At which time you should hear the ADD on the front differential engage. I did the same thing with 4Lo which it engaged with no issue. 4Lo has its own position switch which is visible in the pics. I did not go into the 4Lo system/ gears since it was well above the water that got into the case and was working just fine. This step also verified the operation of that position switch since mine had some rusty water on it and was slightly corroded.
Here is the reassemby, clean and lubricate parts as necessary.
11)Put the metal gear and its plastic top gear back together.
12)Make sure the shift rod is all the way back in towards the transfer case and rotated the right way with the geared side at about the same angle as the actuator. Rotate the front driveshaft if necessary.
13)Put the gear assembly back into position, however you marked it. It has some freeplay because of the little gear engagement onto the shift rod. Had I known this when I took it apart I would've paid attention to exactly where it was but it didn't turn out to be too critical.
14)Place the worm's driven gear back into position.
15)Place the last gear on top, again its position doesn't matter as long as it engages the other gears.
16)This one matters. Put the position switch back into position and make sure that gear engages the top of the metal gear assembly. Then make sure both of your marks still line up.
17)Don't test it with the cover off, it will bind the gears and you'll have to do it all again, believe me I did it. Replace the cover but just use the 3 screws in case you have to try again.
18) Op check. If it's up on jackstands put it in neutral, turn the key on and go from 2Hi to 4Hi. Then you can get under it and rotate the driveshafts around until it engages. That spring on the metal gear can delay the engagement of 4Hi until it lines up (that is its purpose). So if you hear that after the DC motors have stopped turning don't worry about it.
Hints, tips, and tricks
If at anytime you get all the 4WD lights to blink, turn off the key, reset the 4WD switch and try again. It will get angry if it gets unplugged with power on or if the ignition is on without it plugged in. It resets immediately.
The actuator must tell the ECU that it is in 4WD prior to it attempting to engage the ADD on the front diff. So the ADD will not prevent the actuator from operating.
The shift rods are bathed in gear oil during operation. I highly doubt that they will ever seize from non-use. When people loosen the 3 bolts and wiggle the actuator it is just moving the gears inside enough to free the DC motor(s).
If a few love taps fix the actuator and it starts working, I would immediately take the cover off and spray some WD-40 on things, especailly that 4WD Hi DC motor.
It took me 3 tries to get the gears perfect. First time I had the cover off when I tried to work it and the gears got jammed up, no damage done. The second time the shift rod wasn't all the way back in from the first attempt and I didn't notice. 3rd time was the charm.
If your 4Runner is stuck in 4Hi, I'd do all of the above and put the shift rod to the 2Hi position (all the way in). The switch (5th pic) on the "floor" of the actuator is moved by the metal gear as it rotates. You could get very close to the correct timing by making sure that switch is free (like the pic) when you reinstall that metal gear assembly, it can't be more than 1 tooth off either way with that in the correct position.
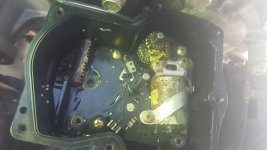
1st pic - You can still see the corrosion on the DC motor and this was after cleaning several times. Underneath is the 4Lo gears and position switch (white half moon). 4Hi shift rod in on the left.
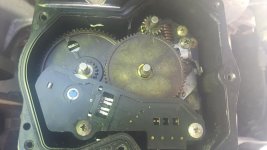
2nd pic - "Before" As it came off the line.
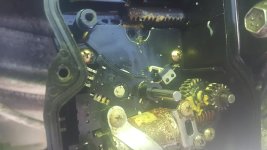
3rd pic - shift rod fully in (2Hi)
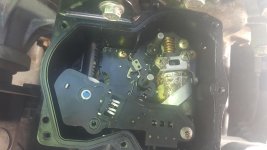
4th pic - Position switch in place w/o gears
5th pic - Where the screwdriver goes to free the DC motor
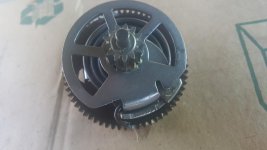
6th pic - Close-up of the metal gear. The "flat" of the metal wheel is where the "floor/ white armed" position switch goes. That is for people who are stuck in 4Hi and won't have 2Hi timing marks.
7th pic - My markings on the big gear. I used the tab on the side of the case so I only had to mark the gear and it was easy to see.
Hope this helps someone. I have more pics if needed.
The story (skip if you just want the DIY part)
About 4-5 months ago I went off-roading like any good 4Runner owner. While out there I ran into some water obstacles that had some depth but not much difficulty. A few months later I try to engage the 4WD system to discover it is not operational. So I get onto this outstanding website to troubleshoot. After finding out all sorts of things about the transfer case actuator, I go back out to my Runner to lightly tap on the actuator and within 10 taps or so it engages. I'm elated that it just seized a little and came right back. I also noted the breather tube on top had a hole in it so I fixed it. About a month later the same things happens again with the same repair working, this time it took quite the few taps, a drive, a few more taps, then it all started working again.
About another month later it happens again and no amount of tapping, driving, twisting or turning will make it engage. I hear the single click from the 4WD ECU in the vehicle trying but nothing is happening so I decided to get serious.
I took off the bottom cover for the actuator. I then poured the rusty,dirty, water like substance in the actuator onto myself as I opened the case. Immediately I realized that the breather tube's hole allowed water in the last time I got into water and it has been in there since having no where to go. As I'm looking at the inside, it appears the only thing corroded was the 4Hi DC motor, but at least I know why it doesn't work now. I perform the below steps I made up as I went and reassemble. It now works flawlessly and better than it ever did. Fully functioned check multiple times for all operations, 2Hi, 4Hi, 4Lo and both 4WD functions with center diff lock. Verified on jack stands as well.
Steps for Repair, broken down in 2 levels because the gears may not have to come out.
I put the 4Runner on jackstands because I just barely squeeze under my non-lifted truck and I also wanted to be able to spin driveshafts but it's not required.
1)Remove the steel shield on the bottom of the transfer case actuator. Beware what might come out.
2)Mark the gears. As you can see from the pics I marked the position of every gear I knew was going to fall/ come-out. There are only 2 marks that matter. The large gear at the top w/ the metal tabs and the blue pointer on the position switch. The large gear must be aligned with the actual case, don't use another gear.
If you don't remove the 2 screws on the left/ rear holding the position switch it will hold all of the gears in place and nothing will move.
3)If you are not getting any sound out of the motor and it doesn't appear to be trying, you can turn the key on and switch it to 4Hi. The bottom connector of the DC motor is the positive and you can use the transfer case as a ground to see if power is going there. Mine had power but was completely seized. Be warned the cover holds the gear shafts in place and they will bind if it runs while open, it isn't likely to hurt anything but you will then HAVE to set the gears back to the correct positions.
3a)Use the widest screwdriver that will fit into the hole that I am putting a screwdriver into in the pic. It's hard to see, but there is a plastic connection where the DC motor connects to the brass worm gear. It is not one shaft. Gently turn the motor, perhaps with the help of some WD-40 or PB Blaster. Mine was extremely stiff so I worked it about 10 times for 1/8 turn and it suddenly freed up and I could then spin in using my finger on the worm gear. Mind you I had all the gears off, you won't get much motion. You might be able to "lift" that gear away from the worm to spin it. No worries, it just drives the others, timing or position doesn't matter. Direction of rotation doesn't matter for the DC motor either while you're trying to free it.
That is end of of the first level. Installation is the reverse of removal and be gentle putting the cover back on. It is getting serious now. Read all before attempting.
4)Remove those 2 screws on the left/ back holding in the position switch. Gently pull it down. There is a long piece that goes into the plug at the top and it sleeves over those 2 posts so it takes a little effort. You should have already marked the top of that gear so spin it and make sure you feel some resistance in a few places where it switches. This switch tells the ECU in what mode the transfer case is in.
5)Once that position switch has been removed the gears shouldn't just fall out but they are free to do so. The gear driven by the worm gear and the other plastic one can be removed. They just drive the gear w/ metal tabs so they make no difference and all the shafts are smooth, nothing keyed.
6)When the first gear comes out, the metal tabbed gear will fall along with the metal gear beneath it and the 4WD Hi shift rod will be visible. No worries about timing with the metal gear, it can only attach one way to the gear that was on top of it.
7)I exercised the shift rod to ensure it was free (which it was). It can move all the way out with no ill effects (ie you can't pull it out too far). I then put it back all the way in and verified it was in 2WD by spinning the front driveshaft.
8)This is where I stuck the screwdriver in and freed to motor then spun it with my finger while lubricating (WD-40).
9)I reinstalled the position switch and lined it up with my mark. I did this so the ECU would power the DC motor so I could verify operation. I turned the key on and switched from 2Hi to 4Hi and it spun the motor. There is no limit switch so as long as the vehicle's switch is in 4HI it will run continously and I sprayed some more lube on the motor.
10)I reached up and changed the position of the switch counter-clockwise until the DC motor stopped spinning. At which time you should hear the ADD on the front differential engage. I did the same thing with 4Lo which it engaged with no issue. 4Lo has its own position switch which is visible in the pics. I did not go into the 4Lo system/ gears since it was well above the water that got into the case and was working just fine. This step also verified the operation of that position switch since mine had some rusty water on it and was slightly corroded.
Here is the reassemby, clean and lubricate parts as necessary.
11)Put the metal gear and its plastic top gear back together.
12)Make sure the shift rod is all the way back in towards the transfer case and rotated the right way with the geared side at about the same angle as the actuator. Rotate the front driveshaft if necessary.
13)Put the gear assembly back into position, however you marked it. It has some freeplay because of the little gear engagement onto the shift rod. Had I known this when I took it apart I would've paid attention to exactly where it was but it didn't turn out to be too critical.
14)Place the worm's driven gear back into position.
15)Place the last gear on top, again its position doesn't matter as long as it engages the other gears.
16)This one matters. Put the position switch back into position and make sure that gear engages the top of the metal gear assembly. Then make sure both of your marks still line up.
17)Don't test it with the cover off, it will bind the gears and you'll have to do it all again, believe me I did it. Replace the cover but just use the 3 screws in case you have to try again.
18) Op check. If it's up on jackstands put it in neutral, turn the key on and go from 2Hi to 4Hi. Then you can get under it and rotate the driveshafts around until it engages. That spring on the metal gear can delay the engagement of 4Hi until it lines up (that is its purpose). So if you hear that after the DC motors have stopped turning don't worry about it.
Hints, tips, and tricks
If at anytime you get all the 4WD lights to blink, turn off the key, reset the 4WD switch and try again. It will get angry if it gets unplugged with power on or if the ignition is on without it plugged in. It resets immediately.
The actuator must tell the ECU that it is in 4WD prior to it attempting to engage the ADD on the front diff. So the ADD will not prevent the actuator from operating.
The shift rods are bathed in gear oil during operation. I highly doubt that they will ever seize from non-use. When people loosen the 3 bolts and wiggle the actuator it is just moving the gears inside enough to free the DC motor(s).
If a few love taps fix the actuator and it starts working, I would immediately take the cover off and spray some WD-40 on things, especailly that 4WD Hi DC motor.
It took me 3 tries to get the gears perfect. First time I had the cover off when I tried to work it and the gears got jammed up, no damage done. The second time the shift rod wasn't all the way back in from the first attempt and I didn't notice. 3rd time was the charm.
If your 4Runner is stuck in 4Hi, I'd do all of the above and put the shift rod to the 2Hi position (all the way in). The switch (5th pic) on the "floor" of the actuator is moved by the metal gear as it rotates. You could get very close to the correct timing by making sure that switch is free (like the pic) when you reinstall that metal gear assembly, it can't be more than 1 tooth off either way with that in the correct position.
1st pic - You can still see the corrosion on the DC motor and this was after cleaning several times. Underneath is the 4Lo gears and position switch (white half moon). 4Hi shift rod in on the left.
2nd pic - "Before" As it came off the line.
3rd pic - shift rod fully in (2Hi)
4th pic - Position switch in place w/o gears
5th pic - Where the screwdriver goes to free the DC motor
6th pic - Close-up of the metal gear. The "flat" of the metal wheel is where the "floor/ white armed" position switch goes. That is for people who are stuck in 4Hi and won't have 2Hi timing marks.
7th pic - My markings on the big gear. I used the tab on the side of the case so I only had to mark the gear and it was easy to see.
Hope this helps someone. I have more pics if needed.
Attachments
-
 20161021_105710.jpg125.1 KB · Views: 50,950
 -
 20161021_104747.jpg131.5 KB · Views: 47,747
 -
 20161021_105725.jpg127 KB · Views: 44,964
 -
 20161021_113945.jpg128.5 KB · Views: 47,180
 -
 20161021_114027.jpg124.7 KB · Views: 46,786
 -
 20161021_114237.jpg121.5 KB · Views: 44,243
 -
 20161021_104704.jpg128.1 KB · Views: 48,050


