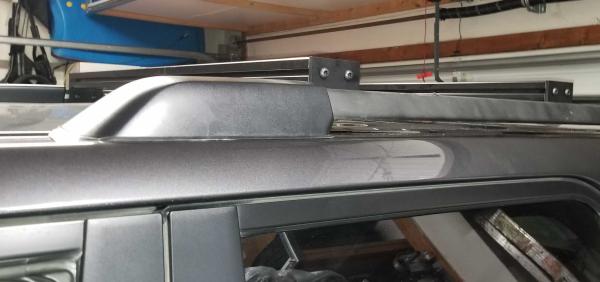
DIY: Ultra Low Profile Custom Rack / Crossbars for OEM TE Roof Rails

Oh yeah, that makes sense. The shoulder looks like (from CAD) it's about 10.5 mm (.416") across the shoulder and has a dept of 3mm (.118").

Why not back drill a 1/2" hole on the mount, to thickness of the rail plus a bit of margin. Probably like 2 mm (.079"). Even 3mm (~.125") or all the way through the plate it should be fine because the nut will clamp the aluminum plate to the rail. It might be a bit of a sloppy fit if you drill all the way though?

Back drill with a 1/2" endmill bit . $20 at HD.

That should work. If you are real careful you can cut your hole a few thousandths larger than your shoulder and your shoulder may support it as well, if not... like you said it will be a sloppy fit.

I also looked at the cam locks. Due to the limited size of the stud you’d have to thread it on it may be difficult. I didn’t want to be trying to figure out how to cut a bunch of bolts precisely also, I haven’t moved my bars so that and a knob would have been wasted.
 
That should work. If you are real careful you can cut your hole a few thousandths larger than your shoulder and your shoulder may support it as well, if not... like you said it will be a sloppy fit.

I also looked at the cam locks. Due to the limited size of the stud you’d have to thread it on it may be difficult. I didn’t want to be trying to figure out how to cut a bunch of bolts precisely also, I haven’t moved my bars so that and a knob would have been wasted.

The camlock makes sense you would need a long bolt.

I think have a simple solution, it's inexpensive and can be done in a garage.
Note: This is only the math and I have not tested it.

Use a length of 3/8" Inside Width U-channel (McMaster-Carr) and 3/8" square head bolts (McMaster-Carr).

  1. Cut to to your desired length.
  2. Drill two 3/8" holes to match your bracket spacing
  3. Insert bolts to holes
It should be a snug fit. If you want them to be a bit more secure, you can use a dab of silicon or epoxy to keep them in from falling out. There is no stress on the "glue" so you could probably even use masking tap to hold it there while you slide in place if you need to.

This may allow use of cam locks with longer bolts.

Thoughts?
 
The camlock makes sense you would need a long bolt.

I think have a simple solution, it's inexpensive and can be done in a garage.
Note: This is only the math and I have not tested it.

Use a length of 3/8" Inside Width U-channel (McMaster-Carr) and 3/8" square head bolts (McMaster-Carr).

  1. Cut to to your desired length.
  2. Drill two 3/8" holes to match your bracket spacing
  3. Insert bolts to holes
It should be a snug fit. If you want them to be a bit more secure, you can use a dab of silicon or epoxy to keep them in from falling out. There is no stress on the "glue" so you could probably even use masking tap to hold it there while you slide in place if you need to.

This may allow use of cam locks with longer bolts.

Thoughts?

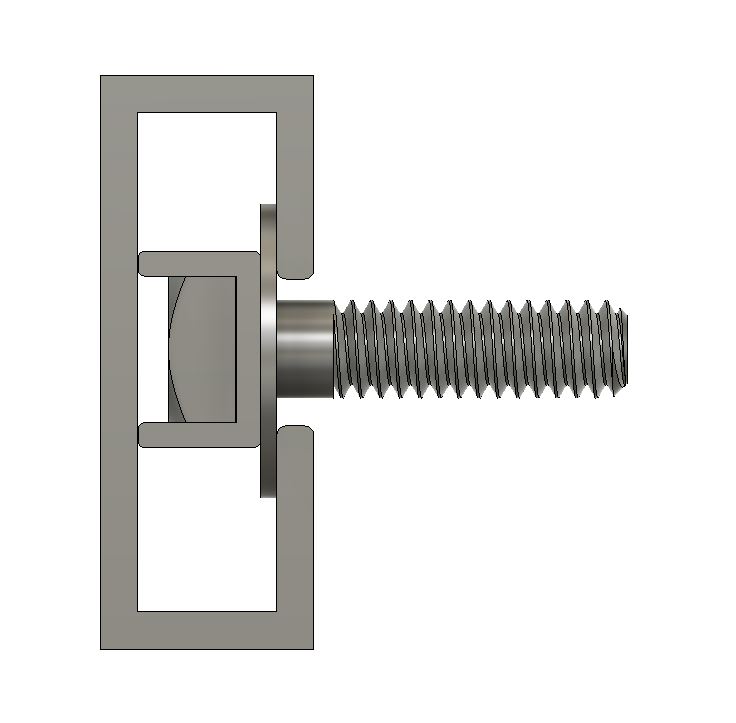
I've got some good news and some bad news. The channel will fit and if you put a 3/8" washer in front of it will distribute the loads so you don't pull the channel through the slots. Problem is a 3/8 square head won't fit in the slot. A 1/4-20 bolt will and it all fits "perfectly" with no room to spare. If there is any manufacturing variation in anything you'll need to get the file out and make some "clearance".

It looks like this when it's fitted up.
Rail-Detail.jpg
 
I've got some good news and some bad news. The channel will fit and if you put a 3/8" washer in front of it will distribute the loads so you don't pull the channel through the slots. Problem is a 3/8 square head won't fit in the slot. A 1/4-20 bolt will and it all fits "perfectly" with no room to spare. If there is any manufacturing variation in anything you'll need to get the file out and make some "clearance".

It looks like this when it's fitted up.

Edit:
What's the clearance on the lid? I haven't dissembled mine yet.It a few weeks old and I was hoping to wait until I broke something. ;)
 
Last edited:
OK I popped mine of and it looks like it about .360 deep. I didn't find a combo of u-channel/screw that dropped in and cleared. But it's aluminum and can be ripped on the table saw pretty easy.
 
OK I popped mine of and it looks like it about .360 deep. I didn't find a combo of u-channel/screw that dropped in and cleared. But it's aluminum and can be ripped on the table saw pretty easy.

The drawing I did is dimensionally correct with the McMaster Carr channel you listed. Also, the rail is correct. I pulled it out and measured it out exactly.The bolt is also a McMaster Carr bolt and the washer is too. If you buy those things it will fit exactly like the drawing depending on manufacturing tolerances.
 
[/ATTACH]here are a few pictures, first time posting files so let's see how this goes. What's the trick to attaching multiple pictures?

Hey 4Rcrusing, what's the exact length you have these rack bars cut to, and where did you get the brackets you mounted them with to the roof rails?
Thanks!
 
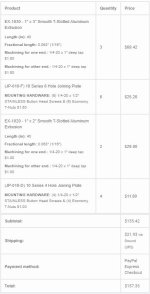
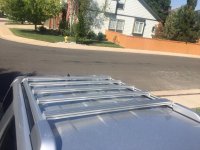
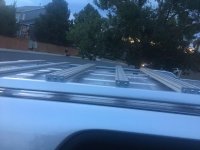
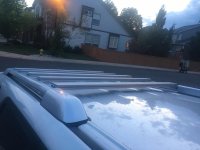
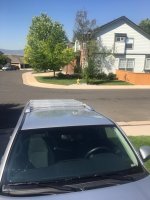
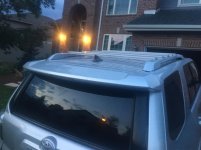
This is a great thread. I ended up going through TNutz for all parts except the 1/4 20 screws (home depot) I used to mount the brackets to the cross bars. In total, I decided to go with 5 cross bars. 3 by 3" wide and 2 x 2" wide. TNutz allows you to specify the exact length you want. I went with 40 1/16" just to be on the safe side. I would recommend going with 40 1/8" instead if you do the TNutz brackets. I had a little room to spare. i also went with the brackets I did so that the bars would sit higher than the side rails so I can carry stuff on the roof that is wider than the side rails. Otherwise, the order in total with shipping was $157. If you just go with a 3 x 3" bar setup without the extra 2 2" bars, the cost drops to about $100. Also, you can do the order in anodized black instead of the silver. It will just be a bit more expensive. I've been on the highway with the setup, and I don't have any noise. Here are some pics of the order breakdown and the rack in case it's of use to anyone.
 

Attachments

  • TNutz Order.JPG
    TNutz Order.JPG
    45.2 KB · Views: 903
  • IMG_3299.jpg
    IMG_3299.jpg
    135.1 KB · Views: 878
  • IMG_3284.jpg
    IMG_3284.jpg
    131.5 KB · Views: 899
  • IMG_3285.jpg
    IMG_3285.jpg
    127.1 KB · Views: 854
  • IMG_3301.jpg
    IMG_3301.jpg
    135 KB · Views: 848
  • IMG_3282.jpg
    IMG_3282.jpg
    132.2 KB · Views: 925
This is a great thread. I ended up going through TNutz for all parts except the 1/4 20 screws (home depot) I used to mount the brackets to the cross bars.

That looks great and sturdy too.

Can you elaborate on how you mounted the plates to the factory rails? What did you use inside the rails, stud or nut, what size?

This is really the mystery that everyone is trying to solve.
 
That looks great and sturdy too.

Can you elaborate on how you mounted the plates to the factory rails? What did you use inside the rails, stud or nut, what size?

This is really the mystery that everyone is trying to solve.

Check out this thread.

Installed: Rola low-profile mounts on 5th Gen

The 4xInnovations brackets fit the 4th and 5th gen factory side rails using a bolt, with a threaded square piece that goes inside the channel. I used to have a Rola rack and used these brackets which came with hardware.
 
That looks great and sturdy too.

Can you elaborate on how you mounted the plates to the factory rails? What did you use inside the rails, stud or nut, what size?

This is really the mystery that everyone is trying to solve.

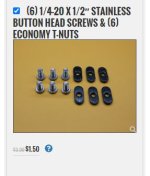
The brackets I ordered from TNUTZ ( (JP-010-F) 10 Series 6 Hole Joining Plate | TNUTZ ) come with the option to include hardware for a little more money. I went with the 1/4 20 x 1/2" stainless button head screw & (6) economy t-nuts option. They don't seat tight inside the rail from top to bottom (they're a bit shorter than the height of the opening on the inside of the rail), but I tightened them down and they haven't come loose in two days time. Time and weight, of course, will tell. If I need to come up with something more robust, I'll go down that path then.
 

Attachments

  • bracket tnuts.JPG
    bracket tnuts.JPG
    22.3 KB · Views: 856
Last edited:
I went with the 1/4 20 x 1/2" stainless button head screw & (6) economy t-nuts option. They don't seat tight inside the rail from top to bottom (they're a bit shorter than the height of the opening on the inside of the rail), but I tightened them down and they haven't come loose in two days time.

Thanks for the info.

It's a 10mm (~3/8") slot. If I go with the 45 series it's 18mm wide over a 10mm slot and will give me about 4mm on each side, or a bit more than 1/8 of an inch. I could add a washer too.
McMaster-Carr

It will be a custom bracket though, but I can drill holes.
 
This is a great thread. I ended up going through TNutz for all parts except the 1/4 20 screws (home depot) I used to mount the brackets to the cross bars. In total, I decided to go with 5 cross bars. 3 by 3" wide and 2 x 2" wide. TNutz allows you to specify the exact length you want. I went with 40 1/16" just to be on the safe side. I would recommend going with 40 1/8" instead if you do the TNutz brackets. I had a little room to spare. i also went with the brackets I did so that the bars would sit higher than the side rails so I can carry stuff on the roof that is wider than the side rails. Otherwise, the order in total with shipping was $157. If you just go with a 3 x 3" bar setup without the extra 2 2" bars, the cost drops to about $100. Also, you can do the order in anodized black instead of the silver. It will just be a bit more expensive. I've been on the highway with the setup, and I don't have any noise. Here are some pics of the order breakdown and the rack in case it's of use to anyone.

Winner winner, chicken dinner! Socomanche wins the prize for building on the previous posters' great work and coming up with the best value engineering approach so far (and no cutting, filing, or drilling required).

I was looking at the Tnutz website today, saw the 6-hole plate and thought "Why don't I just use those?". And by the time I reached the end of this thread I find that you did it already.

So how much clearance did you end up with at the middle of the roof?
 
Last edited:
I was so inspired by Socomanche's approach, I decided to adopt it, but with a few changes:

- Higher stiffness, load capacity, and beefier construction using 1530 (1.5" x 3") rails instead of 1030 (1" x 3") rails and thicker (1/4") Series 15 side plates
- High-strength M8 hardware on both the factory side rails and the cross rail attachments (because it's so wrong to have to lug two sets of tools around)

adventureman-albums--the-rhino--picture58839-roof-rack-rails-made-type-15-aluminum-extrusions.jpg


The Series 15 rails are 1/2" taller than the Series 10 rails, but laying flat they're also 2 1/2 times stiffer (1530-ULS vs 1030-S). And the slots are wider than the Series 10 to allow larger 8mm (or 5/16") hardware. Yes, they're also a bit heavier; a set of 3 rails with side plates and fasteners come in at a total of 19 lbs. With shipping the parts for 3 rails came in under $145, all from Tnutz.com.

Just like Socomanche's approach, no drilling, filing, or rubbing. There is 1 1/4-1 3/8" of clearance between the bottom of the rails and the roof, and the top surface of the rails ends up higher than the stock fin antenna at the back of the roof (by about 5/8"). One could re-drill the side plates if they wanted to position the rails up to 1/2" lower and still provide adequate roof and antenna clearance.

I managed to use the 45 Series "Drop-in Tnuts w/ Leaf Spring" to bolt the side plates to the factory roof rails with a perfect fit in the rail slots; no filing or washers required. However, armed with M8 bolts they didn't want to "drop-in" to the roof rail slots, so they had to be slid in from the end of the rails. At least the leaf springs held them in place in the slots.

If anyone wants a detailed list with rail specs and hardware, let me know.

p.s. You already knew this in your heart, but black anodized parts are going to get scratched pretty easily. That's what an "ano pen" (black Marks-A-Lot/Sharpie) is for...
 
Last edited:
Within a couple minutes, I got a request for the parts list(!).

Here is the parts list FOR ONE RAIL (so you will need to multiply it by the number of rails you want to build):

qty 1 - Rail:
EX-1530UL-BLACK - 1.5"" x 3"" Ultra-Light Smooth T-Slotted Aluminum Extrusion - Black Anodized.
Length (in): 40
Fractional length: 0.000"
Machining for one end.: M8 x 1.25 x 30mm deep tap $1.00
Machining for other end.: M8 x 1.25 x 30mm deep tap $1.00​

qty 4 - 20mm bolts (for side plates to rail ends):
Metric Button Head Socket Cap Screw
Thread Size: M8 x 1.25
Length: 20mm​

qty 2 - Side plates:
(JP-015-D-BLACK) 4 Hole Joining Plate - Black Anodize
No Hardware Required​

qty 4 - 8mm Tnuts for factory side rails:
(DT-045) 45 Series Drop-in Tnuts Leaf Spring
Thread Size: M8 x 1.25​

qty 4 - 16mm bolts (side plates to factory side rails/tnuts):
Metric Button Head Socket Cap Screw
Thread Size: M8 x 1.25
Length: 16mm​

Of course, you can also order the aluminum extrusions and plates in silver. If you do, please post a picture.

You will also want to go ahead and buy some Series 15 Tnuts to attach your accessories to the cross rails. All the fastener nuts in the Tnutz Series 15 fastener section are going to fit way better than anything you're going to get at Home Depot or Lowes, and save a lot of finger tips (from making your own slot nuts). I like the ones with spring-loaded ball bearings to push the nut into the slot and also give a bit of resistance to sliding.

adventureman-albums--the-rhino--picture58844-2020-08-21-12-35-52-c.jpg


Some build notes:
- Some people have found that the factory roof rails are just a skooch closer together at the rear. I measured the three rails and used the shortest one (maybe just a fraction of a mm shorter, because tolerance) at the rear and the other ones further forward. I also loosened the bolts which hold the rear of the factory rails to the roof, just to get a little wiggle room and try to avoid the inevitable "anodization scratch" (microfiber towels are your friends). If you are nervous you could order the rear most bar 1/16" shorter (Length 39", Fractional Length 15/16"), but by loosening the rear rack bolts to bump the width, my 40" bars all fit perfectly. Don't forget to tighten the bolts back up.

- As mentioned before, the combination of the Series 45 Tnut attached to an 8mm bolt won't drop-in/roll-in to the factory rail slot. So you were going to remove the rear rack caps and rubber slot bumpers so you could load the nuts through the rear of the rail anyway. BTW, the Series 45 Tnut I chose was the only one that Tnutz carries that has a shallow enough slot step (< 2.5mm) to not stick out of the rail slot.

- I spaced the side plates on a 19.5" pitch with an 8mm gap between the factory rail end caps and the side plates (just stuck an 8mm bolt in the gap and pushed the plate against it, just like an old carpenter). You will find since the side rail bolts are below the cross rails, it's easier to tighten the plates to the side rails first, then attach and tighten the cross rails. It's still possible to loosen/tighten the side rail bolts when the cross rails are in, it just takes more time to do it without scratching the roof (I'll probably move one or more of the rails when it comes time to mount traction boards, etc.).

- I also moved the rubber bumper at the rear of the factory rail slot way back so that the rearmost bar could almost reach the rear end cap.

- In order to preserve the black finish, I didn't use any locknuts on the rail bolts. When the rail positions are somewhat finalized, I think it would be a good idea to put a dab of blue threadlock on the rail bolts for final assembly.

 
Last edited:
questions

I was so inspired by Socomanche's approach, I decided to adopt it, but with a few changes:

- Higher stiffness, load capacity, and beefier construction using 1530 (1.5" x 3") rails instead of 1030 (1" x 3") rails and thicker (1/4") Series 15 side plates
- High-strength M8 hardware on both the factory side rails and the cross rail attachments (because it's so wrong to have to lug two sets of tools around)

adventureman-albums--the-rhino--picture58839-roof-rack-rails-made-type-15-aluminum-extrusions.jpg


The Series 15 rails are 1/2" taller than the Series 10 rails, but laying flat they're also 2 1/2 times stiffer (1530-ULS vs 1030-S). And the slots are wider than the Series 10 to allow larger 8mm (or 5/16") hardware. Yes, they're also a bit heavier; a set of 3 rails with side plates and fasteners come in at a total of 19 lbs. With shipping the parts for 3 rails came in under $145, all from Tnutz.com.

Just like Socomanche's approach, no drilling, filing, or rubbing. There is 1 1/4-1 3/8" of clearance between the bottom of the rails and the roof, and the top surface of the rails ends up higher than the stock fin antenna at the back of the roof (by about 5/8"). One could re-drill the side plates if they wanted to position the rails up to 1/2" lower and still provide adequate roof and antenna clearance.

I managed to use the 45 Series "Drop-in Tnuts w/ Leaf Spring" to bolt the side plates to the factory roof rails with a perfect fit in the rail slots; no filing or washers required. However, armed with M8 bolts they didn't want to "drop-in" to the roof rail slots, so they had to be slid in from the end of the rails. At least the leaf springs held them in place in the slots.

If anyone wants a detailed list with rail specs and hardware, let me know.

p.s. You already knew this in your heart, but black anodized parts are going to get scratched pretty easily. That's what an "ano pen" (black Marks-A-Lot/Sharpie) is for...

been thinking of this myself , in the 10 size, for a lower cross bar height, what do you think a 8 hole side bracket with counter sunk holes to the crossbar, so the screw head would fit flush, and a 1/4 round piece to the front, for a 4 inch total bar, it should only stick up above the factory rail 1/4 inch. 2 of these one front one rear, then 2 more with 6 hole bracket with 2" bar with a 1/4 round for 3" bars in the middle???? mount 1/4 round with flat side up.
 
Well, that's why I was asking #Socomanche what roof clearance he got using Series 10 bars on 2" high plates. If you drop it too low, the minute a load deflects the bar it will touch the roof. Dropping the 1" bars 3/4" and you could be getting very close. I think that's what happened to the OP, and he and everyone since him raised the bars up higher (top of the rails at least 5/8" above the side rails).

Also, putting two bars side-by-side will only make them stiffer if they are tied together along their length, or the load is sitting flat on both of them (and the increase in stiffness will only be "additive", meaning it will take twice as much metal side-by-side to make it 2x stiffer). It depends on what kind of load you are trying to design for. I got a substantial increase in vertical stiffness (> 2.5x) just by using a 1/2" taller bar (because of the increased vertical moment of inertia). I designed it that way so I could stand on it.

I think most of the people who've worked on this approach feel the 1/4 round 1" bar is only useful on the very front (unless you've got data to prove otherwise). Like putting an air deflector just on the front of any other rack (and nowhere else). Assuming the air is undisturbed when it hits the front bar, it will most definitely be turbulent behind that. I'm mostly concerned with wind noise, and if I end up with some, I will insert some slot covers or make some kind of deflector for the front bar to deal with it. If you're trying to get the lowest drag, you need something slim and air-foil shaped -- like the factory cross rails.

If you really want it LOW, then you should look at Artec Industries cross rails, which are flush with the factory side rails and have curved bottoms to clear the roof, but the general feedback is that there is a definite tradeoff between slimness and stiffness...
 
Last edited:

Members online

Forum statistics

Threads
278,317
Messages
3,554,129
Members
248,016
Latest member
Advally Service

Trending content

Back
Top