Doc's CS144 alternator upgrade.

Adding for information, as I'm knee deep in this install...

Couldn't get the belt to go over, push alternator to the side and heard a clunk / can't push anymore.

Look through wheel well, it's hitting my oversized oil filter (20195 Purolator PureONE). So looks like I'm off to get oil change stuff with regular filter. No big deal, due for a change anyway. Just figured I'd pass that along.

Edit changed oil, got alternator in, broke tensioner bolt :| But good write up, my gorilla strength on an old bolt was the only surprise.

You replace that bolt? What spec was it? I'm just going to get one now because that is the stuff that usually happens to me when I get to wrenching.
 
You replace that bolt? What spec was it? I'm just going to get one now because that is the stuff that usually happens to me when I get to wrenching.

I may as well come clean. I have a relatively clean tool box that I was throwing the nuts and bolts in to (there are only a couple). When it came time to put everything back together, I couldn't find the long tensioner bolt. Moments later I find a long bolt that threads perfectly but looks too clean to be the one I was seeking.

"Oh well, it must be it!" Wrong. That bolt had an unthreaded portion in the middle that I hit before everything was completely snug. Took it apart, found the REAL tensioner bolt, but the threads were already damaged of the female piece. So yeah, I snapped it. I have read of others snapping it without making foolish mistakes though.

But if you want to be prepared...

IF YOU BROKE YOUR ALTERNATOR TENSIONER BOLTS IN ANY WAY, HERE ARE THE TOYOTA PART NUMBERS:

90119-08493 = Long tensioner Bolt

16385-62020 = Short Stud that goes through the alternator, with threaded hole for long bolt
 
Was thinking about spraying some Kroil on all of the bolts, bad idea? Would it screw up the current alternator, or anything around it?
 
Was thinking about spraying some Kroil on all of the bolts, bad idea? Would it screw up the current alternator, or anything around it?

Just put a rag over the openings for the alt when you go to spray it. I would recommend this - 80 1206 Chill Out Ultra Penetrant Freeze Action 9 oz Kimball Midwest | eBay - My buddy at the Ford Store got some off the tool truck and has had amazing success at removing bolts that PB Blaster and Kroil wouldn't budge. This stuff is used by power line workers to break rusty bolts loose.
 
I can't even believe it. Parts were like $5 for a new tensioner bolt and then the receiving end, $10 shipping from Camelback. So that sucked, but then I got an email saying they were out of stock. Several days later it shipped and I received over a week later.

The bolts honestly looked too shiny - not the grade 8 darkened appearance I'm used to. Installed and was happy as hell since my brand new Ram has an exhaust leak that conveniently seeps in to the cab flooding me with diesel exhaust. Turned on, no squealing from the belt, Torque showed the battery at like 14.5v at idle up from like 13.5ish.

Took it for a spin to get a blow torch at Home Depot for big 3 upgrade (solder in lug ends) and after a couple stop signs I heard that damn squeal. Went away after I gave it some gas but came back many times for a few seconds. Looked underneath in the Home Depot parking lot and...TADA!

20141231_132345_zpsbbw9abjx.jpg~original


So I grabbed some bolts, guessing on threading and size- none have the perfect threading match so they'll screw in 1/4" and then stop. So now I'm SOL once again. I don't know how the hell it happened, I know I didn't cross thread - it went in easy, tightened up fine. Didn't gorilla arm it either.
 
:shocked: Damn dude!

My install took a few hours with no hangups.... putting that belt over the new alternator 6 ring was the biggest PIA!
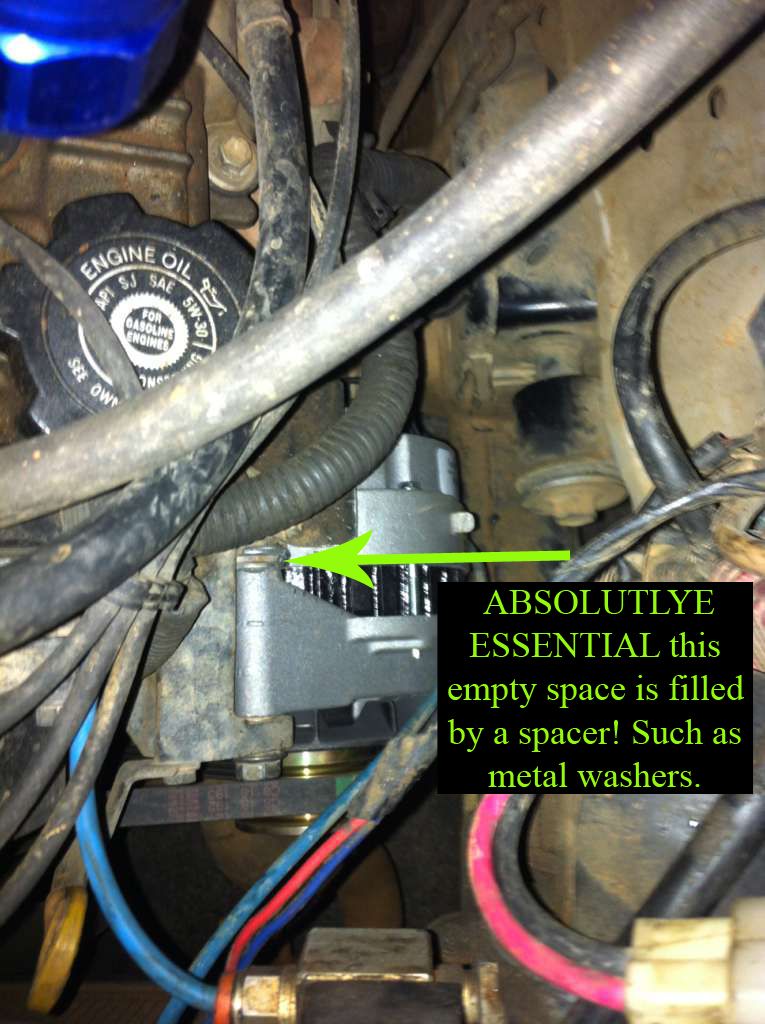
Bending that bolt makes me wonder, are the spacers on the top mount of your alternator taking up most of the gap, or is there a large air gap in there?

ahejahyt_zps1813c856.jpg~original
 
Yeah, used three washers and there's no gap. I have no idea what the deal is but have two bolts on the way to a local dealership to avoid camelback shipping fee and wait. Should be in Monday.

Super sucky
 
Great thread. Doc can you measure the washer stack? Washer stack will work no question. For those of us who may want to go another route knowing the spacer length would be great.
 
:shocked: Damn dude!

My install took a few hours with no hangups.... putting that belt over the new alternator 6 ring was the biggest PIA!
Bending that bolt makes me wonder, are the spacers on the top mount of your alternator taking up most of the gap, or is there a large air gap in there?

ahejahyt_zps1813c856.jpg~original

so I will need washers to act as a spacer on top of the alternator as well as on the bottom of the alternator on the adjusting bracket ?
 
This will be added to my build thread, and mod thread, at some point. Doing this from my phone on Tapatalk, and the site on my iPhone is being stupidly slow. Thought that when people search, this would be a good way for them to see it, without having to dig through a bunch of BS.

There have been many things going around.

First, work. My new schedule blows. I've got so much stuff I need to get done, but not enough time to do it.

Second, time. Seems to get away from me all the time.

I need to get my tank done, my shocks mounted, all that jazz.

Took the truck out today, and wouldn't ya know it, the damn alternator shat the bed. Well, IDK if it really did, I probably could just clean it up, but what the hell. Didn't want to risk it going out again with the girl and baby in the car.(Read PERFECT time to do an upgrade.)

So. I upgraded.

Went to Advanced Auto and got a CS-144 from a 1995 Cadillac Deville with the heated windshield. Also bought the harness for the alternator.

The stock alternator will put out 85 Amps. The Cadillac one will put out 140.

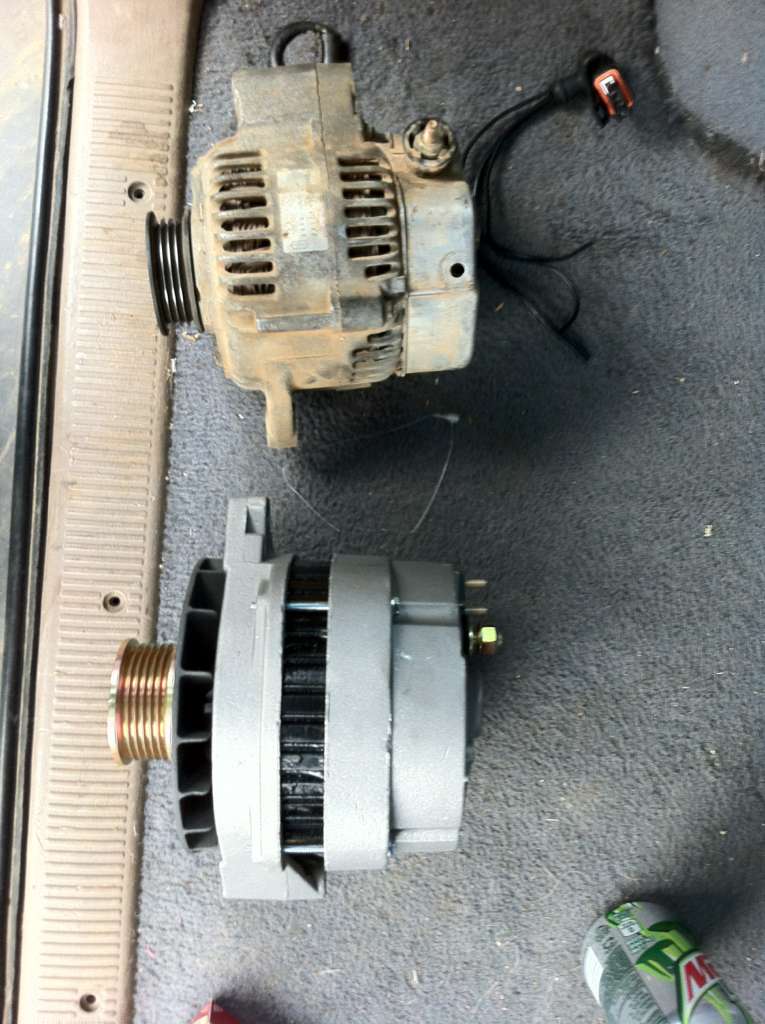
Step 1 is to remove the stock alternator. Here's a shot of the two next to each other.

ju8y6yje.jpg


umaje9e9.jpg


u7e8egur.jpg


There is a nice size difference in the two.

Here was the tricky part.

The harness I got from the store was one color. All black. The wires, plug, it all was black.

With a little research, I figured it out.

If you look on the plug, there is an S, F, L, and a P.

S is the Sense wire. This is also the thickest wire. This wire goes to the white wire on the Toyota harness.

The F wire is the field/ignition wire. This will go to the red wire on the Toyota harness.

The L wire is the lamp wire. This will go to the yellow wire on the Toyota harness.

P is the stator wire, though there isn't one. It's used to run older style tachs.

There are 4 prongs, but only three wires. Don't ask me why.

Now, you can do two different things here.

You can work in the small area I the engine compartment and try to splice the wires together.

OR, you can do what I did.

I cut the Toyota connector of the harness. :o

Then, I stripped all the wires. I mean ALL the wires. All 9.

Then, I took the CS144 harness, and attached it to the Toyota connector. I stripped the white wire further than the rest, because I had to solder the white wire on to the thick wire of the CS144 harness. Didn't take a pic of this part.

With the other two wires, I just twisted them together.

Then, I bought some weather proof butt connectors, and put them on the end of the CS144 harness. Here's what I had:

tubu9uha.jpg


Then, I brought that over to the front, and put the harness on the other side and crimped it down.

ja9uvata.jpg


The only wire you NEED to connect is the yellow wire to the L wire. I just went ahead and did all three.

Now, those "weather proof" connectors are basically shrink wrap. So, the obvious comes into play here. Shrink it.

The reason for keeping the stock connector was incase I ever decide to go back to a stock alternator.

Now, when you put the alternator in, you're going to run into a space problem. Simply solution for this.

Loosen the bottom bracket bolt from the block. Here's a pic. It's a 14mm bolt. The bolt is in the socket, the big silver thing. ;)

8uve2a5y.jpg


Now that that's out of the way, the alternator will slide in easy.

Now, you need a spacer. I used three washers, and tacked them together. A pic:

4u2ajaqy.jpg


You need to do one of two things with the post connector. You can either drill it out and bend the tabs, or cut it off and put a different connector on there.

I chose to drill and bend.

After that, put the bolts in, put the tensioner back, plug it in, and you've got a upgraded alternator. More pics.

ahejahyt.jpg


agu4etyg.jpg


The CS144 has a 6 rib pulley on it.

The Toyota has a 4 rib pulley.

You can see if you can replace the pulley; you'll need a pulley with a 17mm hole, the size of the bolt on the CS144.

when you say drill and bend the post connector, are you referring to the top mounting bracket of the alternator or the single electrical post on the back of the alternator
 
when you say drill and bend the post connector, are you referring to the top mounting bracket of the alternator or the single electrical post on the back of the alternator

Neither. You don't want to drill or bend either of those.

On the back of the alternator, there is a stud. A 12mm nut keeps a ring terminal attached to that post. That ring terminal wire goes to the fuse box.

You want enlarge the hole for the RING TERMINAL. Nothing else.
 
[MENTION=76419]Doc2012[/MENTION] I want to say thank you for this write up I just did this yesterday and because of your tip on loosening the lower bracket I saved what I thought was going to be a fiasco.

I am curious, did you ever go to a larger belt? I am contemplating using one that way the front has two belts that are similar instead of three that are all different.
 
[MENTION=76419]Doc2012[/MENTION] I want to say thank you for this write up I just did this yesterday and because of your tip on loosening the lower bracket I saved what I thought was going to be a fiasco.

I am curious, did you ever go to a larger belt? I am contemplating using one that way the front has two belts that are similar instead of three that are all different.


Glad it helped you out man. If one of my write-ups does that, then I'm happy.

As far as the belt, haven't done anything with it. Same one as stock.
 
Please help!

Ok now I've done the cs144 upgrade twice. Putting all the parts completely back together each time. Both installs had the same results... Battery light on...
I used the plug adapter I drilled out the hole to the main wire, the first test resulted in 16.5 volts being made, thought I had a faulty alternator. Swapped it out and did it again....
But now I don't know why the light is on as I don't have a battery/alt/starter tester.

Opinions ? Advice?
 
crap....was going to do this today....got all the parts
somehow legal crap with splitting with my wife got in the way
her choice...not mine
something like .....I cant grow up
somehow fishing, back roads, 4wd is not a good thing.....
it was when we first met
somebody hand me a rod and a brewski
 
Last edited:
since I have to wait till next weekend to do this.......

if you use the power steering belt, which is longer...can you then use the longer oil filter ?

as I read in posts that people had to switch back to the std short filter when using this alternator

some say that getting the stock alt belt on is a pain, but switching and using the p/s belt is an easier fit

one of the reason I ask, is I have about 4 or 5 of the long filters on my shelf....ordered a bunch months back from camelback when I was getting suspension parts
if not, then Ill have to get a short filter for next weekend alt swap

crossing fingers the stock alt lasts that long, only needs to go about another 300 miles
 

Members online

Forum statistics

Threads
278,309
Messages
3,554,074
Members
248,016
Latest member
Advally Service

Trending content

Back
Top