
You are using an out of date browser. It may not display this or other websites correctly.
You should upgrade or use an alternative browser.
You should upgrade or use an alternative browser.
Drum Brake Shoe Replacement
- Thread starter mtbtim
- Start date
Register to hide this ad


RAD4Runner
Senior Member
Awesome, detailed video. Thanks, guys!Hey Dudes,
[MENTION=102606]infamousRNR[/MENTION] and I have another video for you. ...
I would like to add a lesson I learned as a heads-up...
This could happen to rear brake cylinders when brake shoes and/or brake fluid have/has not been replaced for a long time... Rusting of wall of brake cylinder where the rubber cups do not scrape anymore as shoe gets thinner...
http://www.toyota-4runner.org/classic-t4rs/242466-rear-brake-system.html#post2771979

Rock_Rat
Senior Member
I applaud you for your hard work on this video. If you do it "by the book" it's a great step-by-step instructional video.
However, it only takes two hours max to do your rear brakes without any special tools, clamps etc.
The easiest way to install the rear brakes is to pre-assemble them and slide them over the axle. If you have a washer compressor tool, cool, use it, if not you can still get them installed with pliers or even a socket. Add the anchor spring and the short cable and use a screw driver if needed for your adjuster.
Here's a link to my rear brake installation from quite a while back. Rock Rats Rear Brake Installation
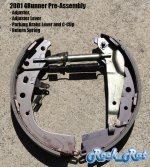
Here's a pic of the pre-assembled brakes ready to go. Trust me, this is the best way to do rear brakes. I've done more than one set in my lifetime.
Good video though, just years of experience talking to you.
However, it only takes two hours max to do your rear brakes without any special tools, clamps etc.
The easiest way to install the rear brakes is to pre-assemble them and slide them over the axle. If you have a washer compressor tool, cool, use it, if not you can still get them installed with pliers or even a socket. Add the anchor spring and the short cable and use a screw driver if needed for your adjuster.
Here's a link to my rear brake installation from quite a while back. Rock Rats Rear Brake Installation
Here's a pic of the pre-assembled brakes ready to go. Trust me, this is the best way to do rear brakes. I've done more than one set in my lifetime.
Good video though, just years of experience talking to you.
Attachments
Last edited:

JRZEE2000TR4LTD
Senior Member
I applaud you for your hard work on this video. If you do it "by the book" it's a great step-by-step instructional video.
However, it only takes two hours max to do your rear brakes without any special tools, clamps etc.
The easiest way to install the rear brakes is to pre-assemble them and slide them over the axle. If you have a washer compressor tool, cool, use it, if not you can still get them installed with pliers or even a socket. Add the anchor spring and the short cable and use a screw driver if needed for your adjuster.
Here's a link to my rear brake installation from quite a while back. Rock Rats Rear Brake Installation
Here's a pic of the pre-assembled brakes ready to go. Trust me, this is the best way to do rear brakes. I've done more than one set in my lifetime.
Good video though, just years of experience talking to you.
Rock Rat hit the nail on the head with this. I actually accidentally discovered this when I was re installing the shoes and didn't have the bottom spring on and pushed up on the assembly to reseat the shoes in the wheel cylinder and the whole assembly just about came out. Also, makes putting that freaking spring on easier as you put it in place and completely turn in the adjuster and sneak it in place. Furthermore, that tool for the springs is easier but if you don't have it, with a pair of pliers you can put it all in place and reach behind the backing plate and hold the pin in place and push and turn the whole thing on with the pliers.

BoomSticks
Member
Thanks for the in depth walkthrough of adjusting the rears with the parking brake.
After doing the TBU, my brake pedal was squishier than I wanted, and this was the key final piece I missed.
After doing the TBU, my brake pedal was squishier than I wanted, and this was the key final piece I missed.

LittleCaesar
New member
Nice job as always Tim. Those have to be the cleanest set of used drums and shoes I have ever seen.....

mtbtim
Elite Member
I applaud you for your hard work on this video. If you do it "by the book" it's a great step-by-step instructional video.
However, it only takes two hours max to do your rear brakes without any special tools, clamps etc.
The easiest way to install the rear brakes is to pre-assemble them and slide them over the axle. If you have a washer compressor tool, cool, use it, if not you can still get them installed with pliers or even a socket. Add the anchor spring and the short cable and use a screw driver if needed for your adjuster.
Here's a link to my rear brake installation from quite a while back. Rock Rats Rear Brake Installation
Here's a pic of the pre-assembled brakes ready to go. Trust me, this is the best way to do rear brakes. I've done more than one set in my lifetime.
Good video though, just years of experience talking to you.
Thanks for the tips Mike. I appreciate it!

2ndhandyotaman
Member
I've actually watched a few of the 'Tim the toolman' vids right after I got my 2001 4runner. One of the runners that I was considering buying had a leaky steering rack. Your vid of R&Ring a rack reassured my guess as to what was involved in replacing one. The owner wouldn't budge on the price even though it needed an expensive part replaced so I kept looking and eventually found the one that I purchased.
If I could make a request for a vid- could you show how to identify which one of the stock front brake pads is the outboard pad? I literally spent hours trying to find out that one bit of important information, never found it. I used the process of elimination to get them orientated correctly. The last person that touched them didn't put too much effort into doing anything correctly. Each side had the pads in a different order...
If I could make a request for a vid- could you show how to identify which one of the stock front brake pads is the outboard pad? I literally spent hours trying to find out that one bit of important information, never found it. I used the process of elimination to get them orientated correctly. The last person that touched them didn't put too much effort into doing anything correctly. Each side had the pads in a different order...

JZiggy
Senior Member
I applaud you for your hard work on this video. If you do it "by the book" it's a great step-by-step instructional video.
However, it only takes two hours max to do your rear brakes without any special tools, clamps etc.
The easiest way to install the rear brakes is to pre-assemble them and slide them over the axle. If you have a washer compressor tool, cool, use it, if not you can still get them installed with pliers or even a socket. Add the anchor spring and the short cable and use a screw driver if needed for your adjuster.
Here's a link to my rear brake installation from quite a while back. Rock Rats Rear Brake Installation
Here's a pic of the pre-assembled brakes ready to go. Trust me, this is the best way to do rear brakes. I've done more than one set in my lifetime.
Good video though, just years of experience talking to you.
Cool idea!! Never thought of that before.
JZiggy
Senior Member
One of the questions that arose during our brake job was, "why is all the wear on the bottom of the leading shoe?" Some folks have responded to the video stating that they see the same wear patterns.
One of my textbooks has a treatment on drum brakes and it turned out to be a helpful resource. It models the drum brake system as shown below assuming that the bottom of the shoes is a pinned hinged.

There are two important things we can learn from the model:
1) There is an ideal pressure distribution along the length of the shoe. It is zero at the ends and highest in the center.
2) The leading shoe does more than 2x the braking work as the trailing shoe (the leading shoe is the front one)

This tells us why the front shoe gets the brunt of the wear, but why the *bottom* of the front shoe? My suggestion is that this is because the brake shows are actually not pinned but instead just have a sliding surface. Because the bottom support can't provide any upward resisting force (Rx) the downward motion of the drum on the shoe drags it downward and shifts the pressure distribution downward as well. Here's my sketch of the situation:

Enjoy :fish:
One of my textbooks has a treatment on drum brakes and it turned out to be a helpful resource. It models the drum brake system as shown below assuming that the bottom of the shoes is a pinned hinged.
There are two important things we can learn from the model:
1) There is an ideal pressure distribution along the length of the shoe. It is zero at the ends and highest in the center.
2) The leading shoe does more than 2x the braking work as the trailing shoe (the leading shoe is the front one)
This tells us why the front shoe gets the brunt of the wear, but why the *bottom* of the front shoe? My suggestion is that this is because the brake shows are actually not pinned but instead just have a sliding surface. Because the bottom support can't provide any upward resisting force (Rx) the downward motion of the drum on the shoe drags it downward and shifts the pressure distribution downward as well. Here's my sketch of the situation:
Enjoy :fish:
LittleCaesar
New member
And people ask why we need math. Some people.
That is why it is imperative to make sure when doing a brake job, whether using pads or shoes, always moves freely and is clean ( a la no diff fluid on shoes here). Don't forget the lube too.
That is why it is imperative to make sure when doing a brake job, whether using pads or shoes, always moves freely and is clean ( a la no diff fluid on shoes here). Don't forget the lube too.
mtbtim
Elite Member
One of the questions that arose during our brake job was, "why is all the wear on the bottom of the leading shoe?" Some folks have responded to the video stating that they see the same wear patterns.
One of my textbooks has a treatment on drum brakes and it turned out to be a helpful resource. It models the drum brake system as shown below assuming that the bottom of the shoes is a pinned hinged.
There are two important things we can learn from the model:
1) There is an ideal pressure distribution along the length of the shoe. It is zero at the ends and highest in the center.
2) The leading shoe does more than 2x the braking work as the trailing shoe (the leading shoe is the front one)
This tells us why the front shoe gets the brunt of the wear, but why the *bottom* of the front shoe? My suggestion is that this is because the brake shows are actually not pinned but instead just have a sliding surface. Because the bottom support can't provide any upward resisting force (Rx) the downward motion of the drum on the shoe drags it downward and shifts the pressure distribution downward as well. Here's my sketch of the situation:
Enjoy :fish:
Jordan, Thank you for taking the time to reference your textbooks and draw up diagrams to explain what is happening with our rear brake system. I'm not in the least bit an engineering genius but it does make sense to me. Awesome Tech Brother Jordan!

RysiuM
New member
1) There is an ideal pressure distribution along the length of the shoe. It is zero at the ends and highest in the center.
2) The leading shoe does more than 2x the braking work as the trailing shoe (the leading shoe is the front one)
This tells us why the front shoe gets the brunt of the wear, but why the *bottom* of the front shoe? My suggestion is that this is because the brake shows are actually not pinned but instead just have a sliding surface. Because the bottom support can't provide any upward resisting force (Rx) the downward motion of the drum on the shoe drags it downward and shifts the pressure distribution downward as well.
Hi Jordan, Thanks for the post and the brake job video (Tim's). This and long chat with Tim actually made me checking rear brakes on my 95 Tacoma (318k miles on original rear brakes).
Here is the picture what I found after I removed the brake drum for the first time

And the same image after I used the whole bottle of brake pads cleaner on it
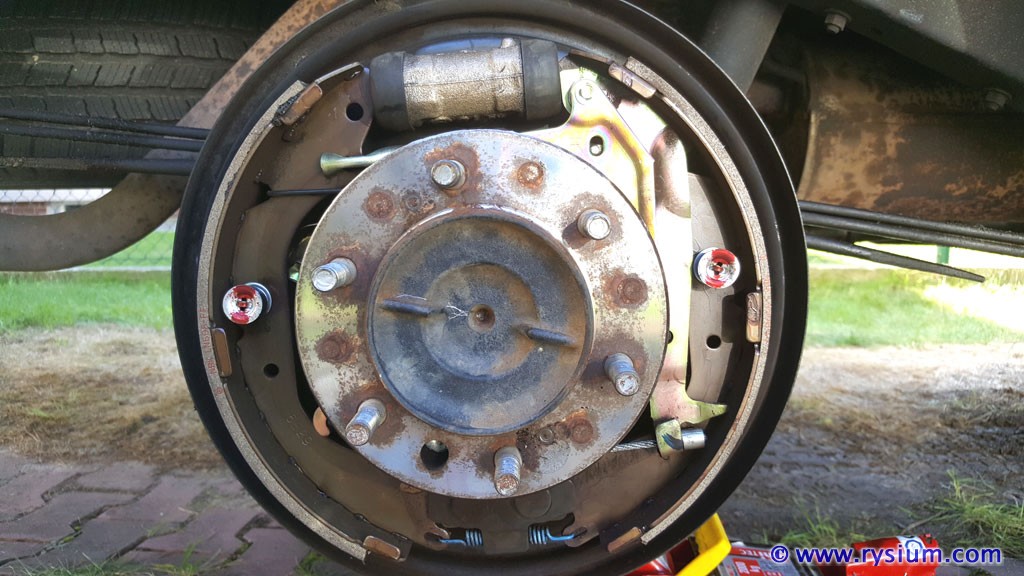
For your enjoyment here is the pad thickness in all 6 locations.
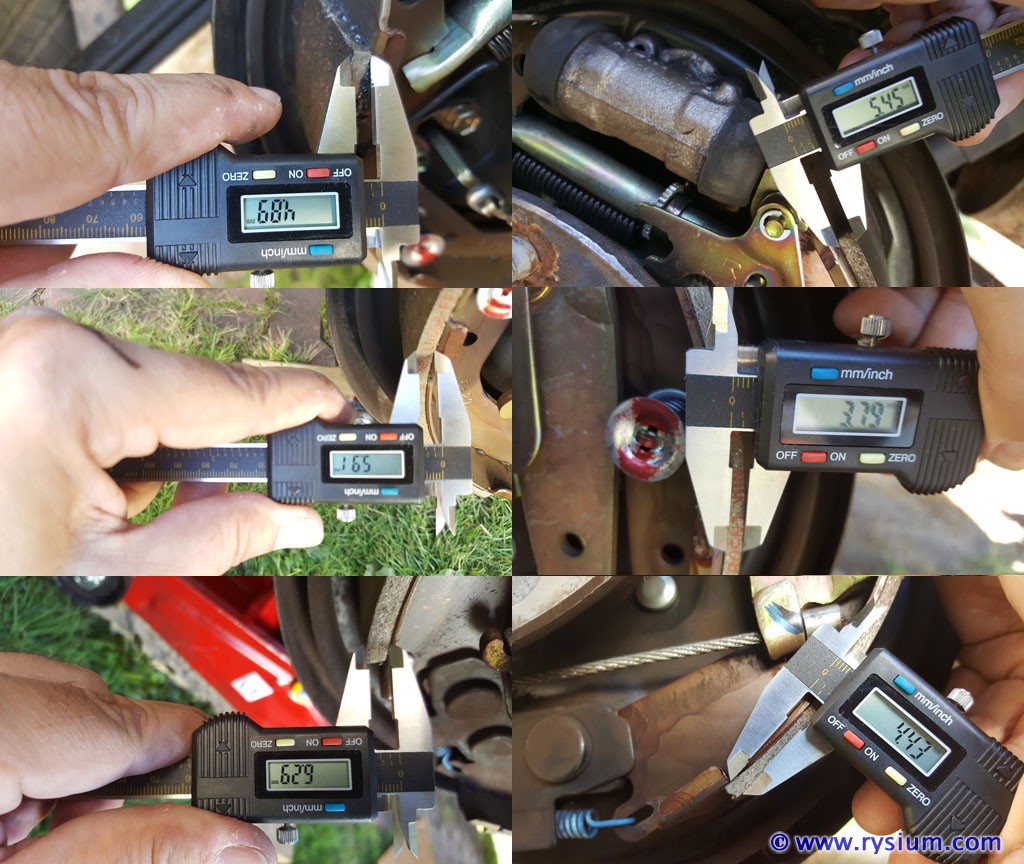
This is the living proof of your statements:
1. Front pad is used much more than the rear pad. I think this is because the top of the front pad (leading edge when wheel is rolling forward) is grabbed by the drum and pushed down increasing the braking force on the pad. The rear pad's "leading edge" is close to pivoting point so the pad is pushed away from the drum therefore braking force there is much smaller.
2. The most wear on the front pad is on the center part of the pad then the bottom (trailing edge). The rear pad because it is almost not worn at all it shows the most wear on the top part (the trailing edge) and the center. I'm sure that after next 300k miles my front pad will show almost no material left, and the rear pad will have the most wear at the center and at the top.
I think you are right on the spot with the "sliding force" theory. Front and rear pads wear pattern confirm that. Your post let me worry less about the big difference between wear pattern of front and rear shoe. I was worried that there is something wrong with my rear brakes but after reading this I'm sure it is normal. I am good for next 300k miles.
Last edited:
JZiggy
Senior Member
Hi Jordan, Thanks for the post and the brake job video (Tim's). This and long chat with Tom actually made me checking rear brakes on my 95 Tacoma (318k miles on original rear brakes).
Here is the picture what I found after I removed the brake drum for the first time
And the same image after I used the whole bottle of brake pads cleaner on it
For your enjoyment here is the pad thickness in all 6 locations.
This is the living proof of your statements:
1. Front pad is used much more than the rear pad. I think this is because the top of the front pad (leading edge when wheel is rolling forward) is grabbed by the drum and pushed down increasing the braking force on the pad. The rear pad's "leading edge" is close to pivoting point so the pad is pushed away from the drum therefore braking force there is much smaller.
2. The most wear on the front pad is on the center part of the pad then the bottom (trailing edge). The rear pad because it is almost not worn at all it shows the most wear on the top part (the trailing edge) and the center. I'm sure that after next 300k miles my front pad will show almost no material left, and the rear pad will have the most wear at the center and at the top.
I think you are right on the spot with the "sliding force" theory. Front and rear pads wear pattern confirm that. Your post let me worry less about the big difference between wear pattern of front and rear shoe. I was worried that there is something wrong with my rear brakes but after reading this I'm sure it is normal. I am good for next 300k miles.
Your wear pattern is exactly the same as what I saw on my rear brakes which were, to the best of my knowledge, original at 230k miles.
Thanks for the thoughtful feedback :hatsoff:
SodiumFlouride
New member
SodiumFlouride
New member
And people ask why we need math. Some people.
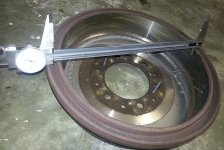
The math I had to use was to googe for a inches-to-millimeter converstion on the web in order to convert inches to millimeters to find out that the drums I measured were about 2mm under the limit molded into the inside of the drum!
The two 2-inch long M8x1.25 bolts you see in that photo were absolutely essential to getting the drum off!
Attachments
Last edited:
Hey Dudes,
[MENTION=102606]infamousRNR[/MENTION] and I have another video for you. If you were looking for a comprehensive tutorial on how to do a rear brake job on your 3rd Gen, we've got it right here.
Here's the video and Enjoy the Show!
Great video. Where'd you get that sweet little lube gun?
Similar threads
- Replies
- 3
- Views
- 3K


