deejayshag
New member
Thanks for the great idea.
I've got miles of led strip lights around (ok, not really miles--- but a whole bunch), so using you're brilliant Idea, I added them under my hood and the difference is like night and day... literally.
I went with a pin-switch to trigger them because I like trying to catch the lights coming on and going off-- like the light in the fridge when you were a kid, remember? Actually, I just didn't want to have to fumble around in the dark to find the switch, and thought it would just be more convenient to always come on when I open the hood.
I tend to be a bit anal at times, and spent entirely too much time trying to decide exactly where I wanted to mount the switch.
The dilemma I faced was that I didn't want to put the switch in a position where it could snag on something (me) if I happened to be careless enough to lean over it with a loose shirt, but I also wanted to make sure that the location I chose was reinforced well and made solid contact with the hood, so that I wouldn't have to worry about rubbing, or a poor connection over time.
My solution was to mount the pin-switch inside one of the rubber hood stops...
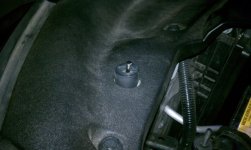
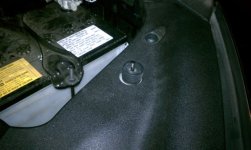
First, I had to drill a hole through the middle of the stopper so the switch could go all the way through and open/close without rubbing at all (since the switch has to move freely in order to complete the circuit when the switch springs up).
Since the pin-switch is normally grounded by the very nature of it being mounted securely to the bare metal, the fact that I was embedding it in a reasonably solid chunk of rubber meant I had to come up with some other way to ground it, or find some way to defy everything I knew about electricity.
I ended up taking the lazy way out (hint--- I didn't defy any principles of electricity).
To ground the switch, I ended up soldering a length of wire to the pin-switch housing using a propane torch then attached that wire to a pre-existing hole in the metal radiator support (but not yet).
With the Rubber stopper taken out (it unscrews-- it's actually designed to adjust the height of the hood when closed-- go figure!) I pushed the pin switch in so that the pin was a bit higher than the top of the bumper, but made sure that there was more travel left in the switch below the top of the bumper. I still wanted the bumper to support the weight of the hood when closed instead of the switch, to give the switch a chance to live to a ripe old age.
Ordinarily, the pin switch needs to be fixed to the vehicle with a lock washer and nut, but in this case those were unnecessary. Since the switch was firmly seated in the middle of the rubber bumper, by the time I had replaced the bumper in it's original location (by screwing it in), the rubber was being compressed around the switch keeping it firmly embedded in place.
Once the bumper was back in place, I made sure to readjust it's height so the hood would be level when closed, then finally, after all that was done, I secured the wire (remember the one soldered to the switch housing?) to an existing hole in the radiator support.
Of course I also ran the + side of things to a fused 12V feed, but that's boring, so I'm not going to waste time on that part-- since I'm lazy.
Anyway, I know this was way longer than it probably needed to be, and the real purpose of this thread was to show how brilliant Snooperstyle's mod was, but I thought this trick for mounting the switch might come in handy for others out there looking for switch placement ideas.
Thanks again for the light idea Snooperstyle-- it is was a great solution to an odd feature omission by Toyota.
I've got miles of led strip lights around (ok, not really miles--- but a whole bunch), so using you're brilliant Idea, I added them under my hood and the difference is like night and day... literally.
I went with a pin-switch to trigger them because I like trying to catch the lights coming on and going off-- like the light in the fridge when you were a kid, remember? Actually, I just didn't want to have to fumble around in the dark to find the switch, and thought it would just be more convenient to always come on when I open the hood.
I tend to be a bit anal at times, and spent entirely too much time trying to decide exactly where I wanted to mount the switch.
The dilemma I faced was that I didn't want to put the switch in a position where it could snag on something (me) if I happened to be careless enough to lean over it with a loose shirt, but I also wanted to make sure that the location I chose was reinforced well and made solid contact with the hood, so that I wouldn't have to worry about rubbing, or a poor connection over time.
My solution was to mount the pin-switch inside one of the rubber hood stops...
First, I had to drill a hole through the middle of the stopper so the switch could go all the way through and open/close without rubbing at all (since the switch has to move freely in order to complete the circuit when the switch springs up).
Since the pin-switch is normally grounded by the very nature of it being mounted securely to the bare metal, the fact that I was embedding it in a reasonably solid chunk of rubber meant I had to come up with some other way to ground it, or find some way to defy everything I knew about electricity.
I ended up taking the lazy way out (hint--- I didn't defy any principles of electricity).
To ground the switch, I ended up soldering a length of wire to the pin-switch housing using a propane torch then attached that wire to a pre-existing hole in the metal radiator support (but not yet).
With the Rubber stopper taken out (it unscrews-- it's actually designed to adjust the height of the hood when closed-- go figure!) I pushed the pin switch in so that the pin was a bit higher than the top of the bumper, but made sure that there was more travel left in the switch below the top of the bumper. I still wanted the bumper to support the weight of the hood when closed instead of the switch, to give the switch a chance to live to a ripe old age.
Ordinarily, the pin switch needs to be fixed to the vehicle with a lock washer and nut, but in this case those were unnecessary. Since the switch was firmly seated in the middle of the rubber bumper, by the time I had replaced the bumper in it's original location (by screwing it in), the rubber was being compressed around the switch keeping it firmly embedded in place.
Once the bumper was back in place, I made sure to readjust it's height so the hood would be level when closed, then finally, after all that was done, I secured the wire (remember the one soldered to the switch housing?) to an existing hole in the radiator support.
Of course I also ran the + side of things to a fused 12V feed, but that's boring, so I'm not going to waste time on that part-- since I'm lazy.
Anyway, I know this was way longer than it probably needed to be, and the real purpose of this thread was to show how brilliant Snooperstyle's mod was, but I thought this trick for mounting the switch might come in handy for others out there looking for switch placement ideas.
Thanks again for the light idea Snooperstyle-- it is was a great solution to an odd feature omission by Toyota.
Attachments


Last edited:


 olice: