enginerd4ni's build thread

As a fellow gEEk, I am thoroughly impressed! Currently working my own harness, however I am realizing mine is not nearly as well thought out as yours. I thought it was until I found your build thread...

Also, if you ever plan on selling those overland computers...I'm totally in for one! Outstanding designs and thought.


Sent from my iPad using Tapatalk
 
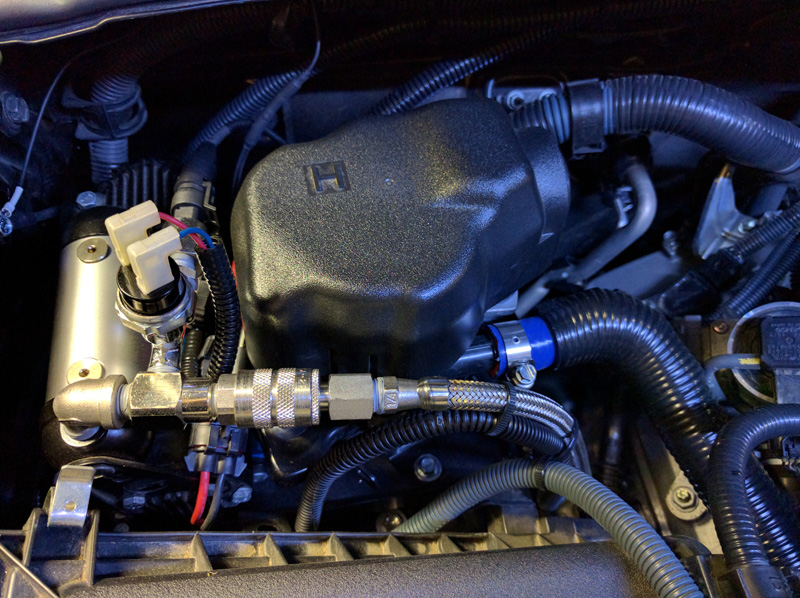
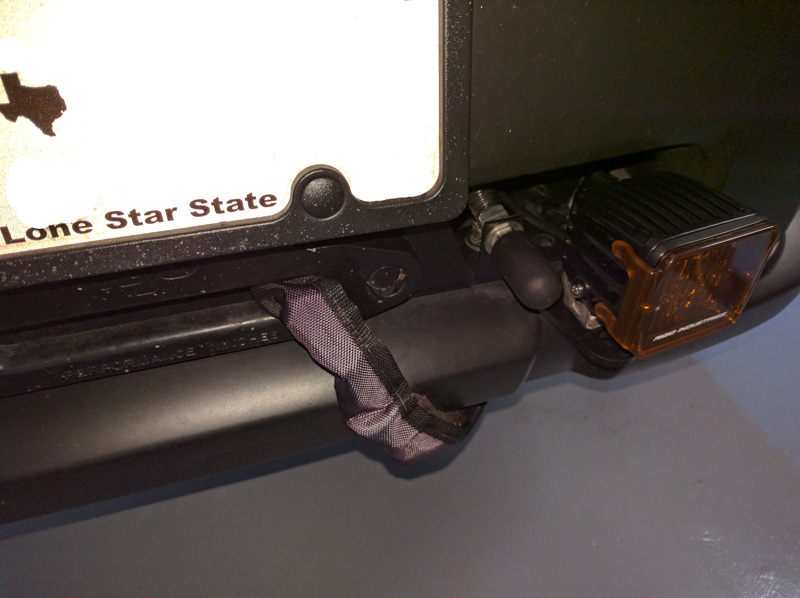
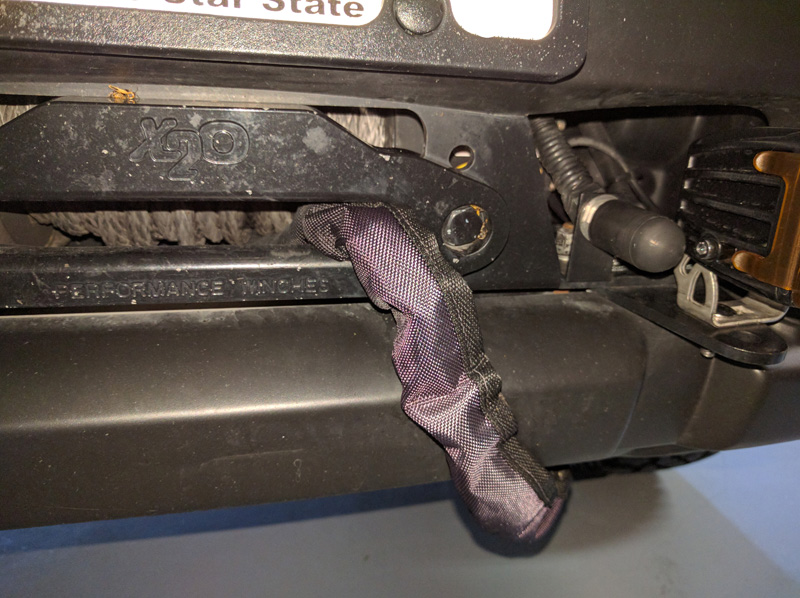
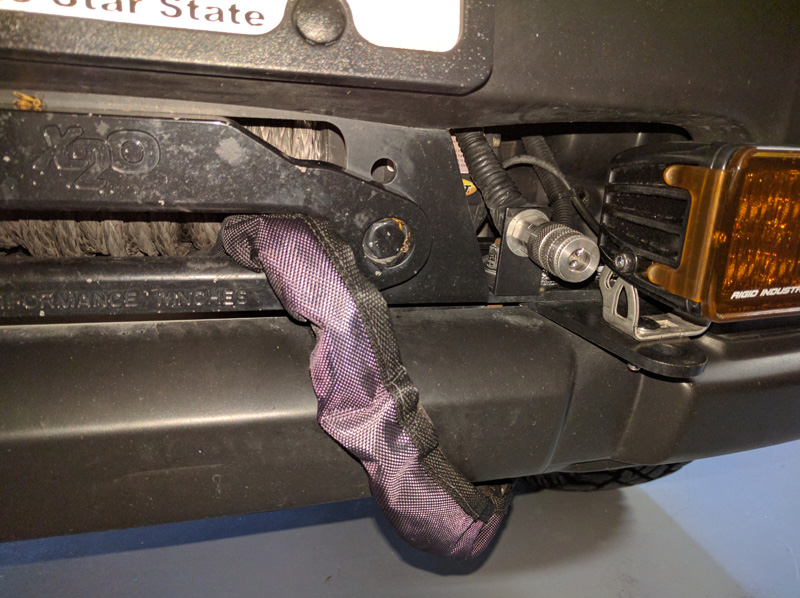
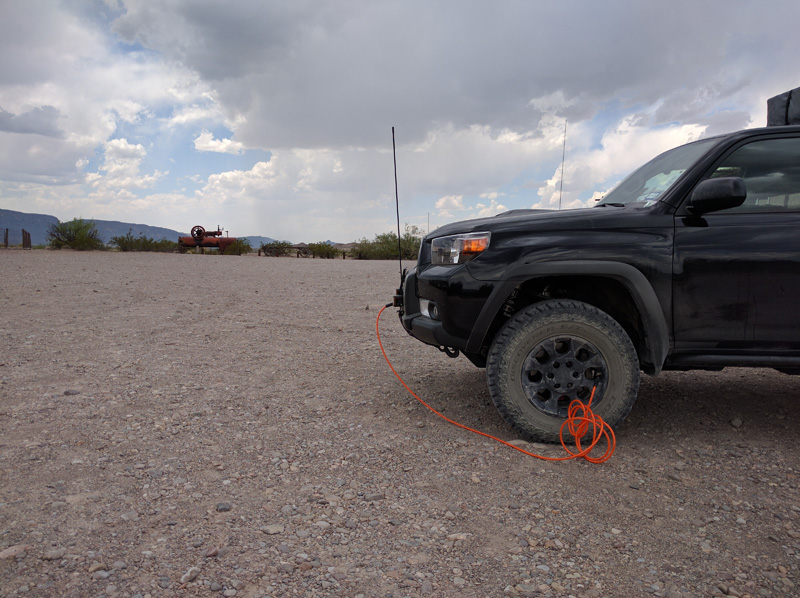
...I decided to run a stainless hose to the front of the truck and mount a quick disconnect. No more hood, no more gloves. I aired up my 285s from 16 to 38 psi in about 5-7 minutes in the 100+°F heat and the compressor didn't hit thermal cutoff ...
smog_20.jpg


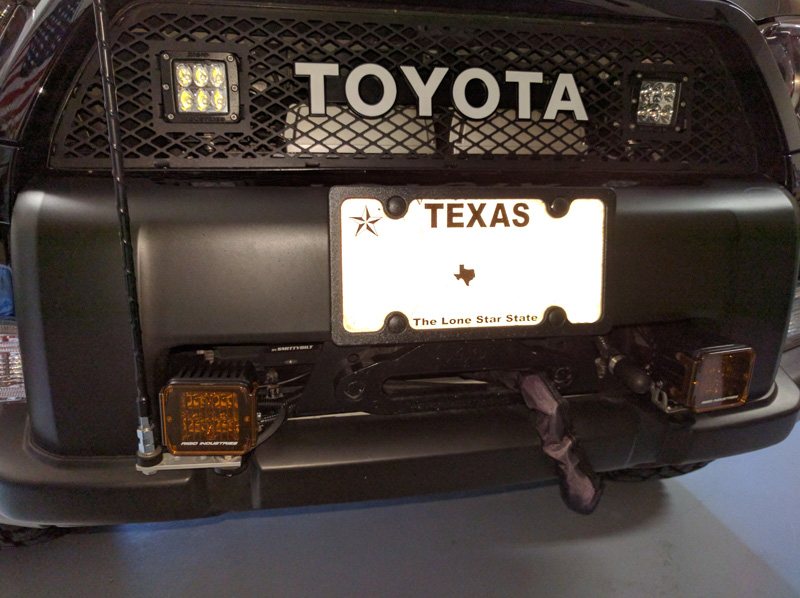
I also added some Rigid DOT approved fog lights which work well but are not very bright compared to the D2 (no big surprise there).

comp_01.jpg


comp_02.jpg


comp_03.jpg


The rubber cap fits snugly and just pulls off when you are ready to access the quick disconnect. I haven't tried fording water/muck to see if the fitting gets gunked up but worst case, I can still quick disconnect it at the pump.
comp_04.jpg


comp_05.jpg

Can you tell me where you got this much stainless air line? Where from? How long is it? and a fittings list would be helpful if possible. I am about to reroute my air source for the same reasons you have here (heat, burn yourself, ease of access, etc.) and i am curious about where you got this air line. I am having a hard time finding hoses longer than 22"...
 
Can you tell me where you got this much stainless air line? Where from? How long is it? and a fittings list would be helpful if possible. I am about to reroute my air source for the same reasons you have here (heat, burn yourself, ease of access, etc.) and i am curious about where you got this air line. I am having a hard time finding hoses longer than 22"...

McMaster-Carr
5680K61 72" Hose (316 is adequate, 321 in theory offers better corrosion at high temps but is overkill for this application)
Some of the fittings:
6718K84
6718K26
6718K52

I also used some tee fittings, right angles, etc. Just come up with a plan that meets your needs and browse McMaster.

In general, I recommend stainless if you have the budget. 321>316>304 concerning corrosion due to higher chromium content. 304 is generally adequate but sometimes I splurge.

Also, you'll want to figure out a "port" or bracket to present your coupling. Mine was just a piece of aluminum angle with some holes drilled in it for the coupling and mounting.

Bonus: Here's the rubber cap that fits the coupling just right →6448K34

PM me know if you'd like additional help.
 
I tried posting this on the previous post but it seemed to mess things up so here it is again:

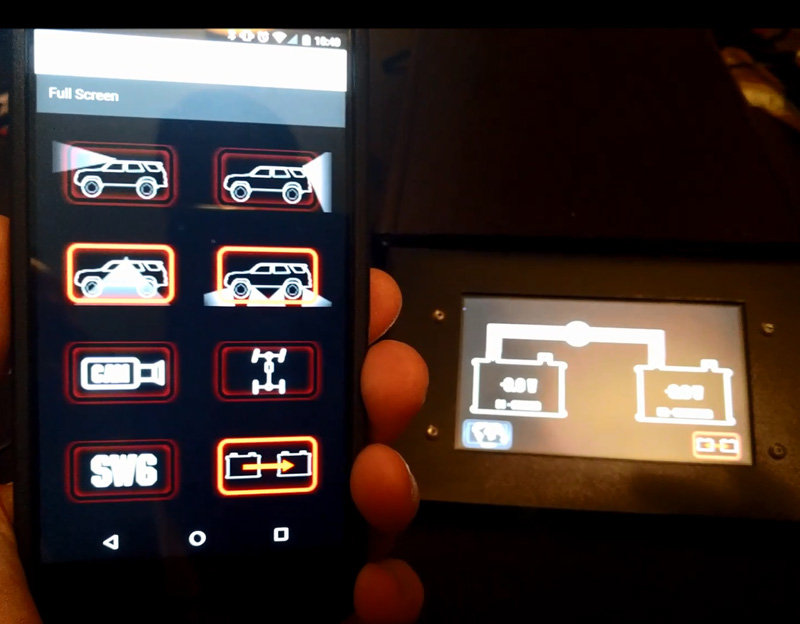
Here is a proof of concept showing some of the platform capabilities of the Overland Computer.

Problem: I'm in my roof top tent and I want to turn on or off some lights without having to climb down into the cabin.

Overly complicated solution:
Basically, the sbRIO system running LabVIEW RT can also host a web service to interact with the data running on the application. Since the web service can host html, java script, style sheets, bootstraps, images, etc., all you need is an internet browser and a shared wi-fi connection to get and put from the application. A friend of mine at work did the heavy lifting to develop some java script that I could adapt to my needs. I wanted a button press on the mobile browser to not only turn on that particular digital output (controlling the relay), but also for that new state to be reflected on the Amulet display panel mounted in the cabin. Also, I wanted a button press inside the cabin to show up on the mobile device. This turned out to be harder than I thought when implementing into the state machine running on the computer but I hacked it together and it seems to work now.

I think this solution isn't practical for real deployment so I probably won't set it up in the truck. It would work better if it was just a simple bluetooth connection running from an android app but that requires me to actually know how to program stuff. However, it demonstrates the capabilities. I'd like to be able to log in to my overland computer remotely from anywhere in the world so now my research is heading toward mobile modems and GPRS like stuff.

Anyway, here's a simple demonstration of the system in action:

remote_panel_screen1.jpg


Okay. I am subscribing to your build thread for the fact that you know what an HMI is alone... never mind the rest of your thread if filled with great information.


...like this:


McMaster-Carr
5680K61 72" Hose (316 is adequate, 321 in theory offers better corrosion at high temps but is overkill for this application)
Some of the fittings:
6718K84
6718K26
6718K52

I also used some tee fittings, right angles, etc. Just come up with a plan that meets your needs and browse McMaster.

In general, I recommend stainless if you have the budget. 321>316>304 concerning corrosion due to higher chromium content. 304 is generally adequate but sometimes I splurge.

Also, you'll want to figure out a "port" or bracket to present your coupling. Mine was just a piece of aluminum angle with some holes drilled in it for the coupling and mounting.

Bonus: Here's the rubber cap that fits the coupling just right →6448K34

PM me know if you'd like additional help.

:thumb: Excellent build!
 
In my experiences designing electronics products that need to survive harsh environmental conditions such as high and low temperature, shock/vibration, and ingress protection from the elements, I've decided to apply some of those principles to the mods in my 4Runner. This post will discuss my approach to underhood fuses and relays as well as switches residing on the other side of the firewall.

Step 1: Define system requirements and features
I considered as many of the electrical systems I thought I might eventually want over the next 5 years and made a list of current (amperes) requirements and switching requirements. I then sorted the list based on whether the systems should be supplied by the main starter battery while the engine is running or by the aux battery if needed when the engine isn't running. After that, I decided whether I wanted the relays to be actuated by mechanical switches or by digital switches from my overlanding computer. For the dual battery system, I listed out the desired features and calculated the amount of linked power I might need based on my other desired systems.

Step 2: Evaluate the market for OTS products that meet my requirements
Fuses and Relays-
I like the Blue Sea fuse holders but they don't offer integrated relay options and I wanted the relay terminals neatly organized and protected from the elements. I then looked at the S-POD system which has some really nice features and has good reviews. However, the system is expensive, not IP66+, and did not easily meet my needs for two separate battery sources along with easily customizable switches that could fit inside the OEM switch blanks to create a clean interior look. What I did find are the Cooper-Bussmann RTMR boxes. These boxes can be arranged to accommodate various system wiring options. They have excellent temperature ratings (-40°C to +125°C) and with proper assembly, ingress protection that can withstand my eventual water fording needs (IP66/67).
Switches-
For the switches, I considered Contura products because of the numerous color and graphic options but I didn’t think I could find a good spot to cleanly mount them. Then I noticed the Qing Sheng switches that neatly fit into the OEM switch blanks. AOB offers them with similar graphics and colors.
Dual Battery-
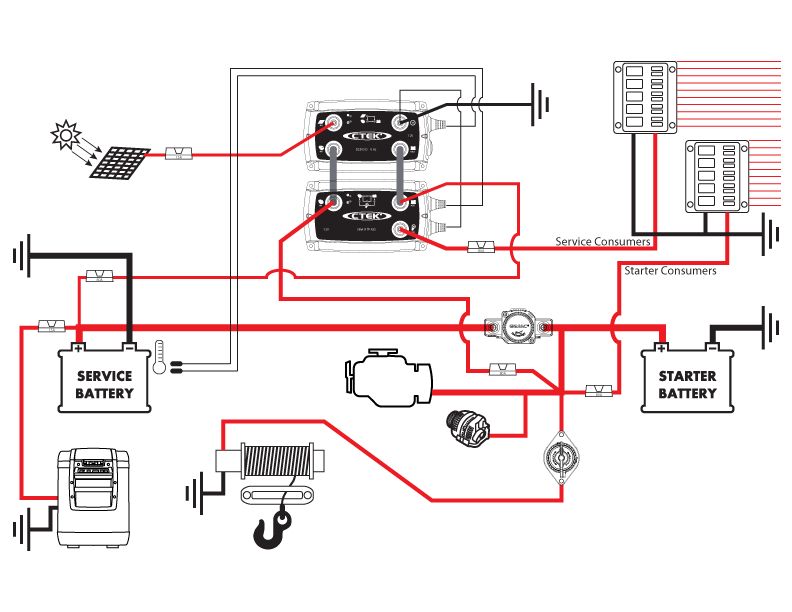
Here’s the controversial piece. I’m not a battery expert by any means so I tried to educate myself on proper charging fundamentals for a deep cycle (substantial discharge) auxiliary battery. I did an exhaustive search and found many great products out there. There are many systems that automatically detect when the engine is on (alternator is putting out) and then link the two batteries to allow the consumer battery to draw from the alternator. I researched the particular voltage thresholds for these types of systems and made my own linking setup using a high current relay and a real time controller. After more research, however, I found that charging a deeply discharged battery from just the voltage level that an alternator puts out does not fully recharge it and can lead to decreased life expectancy. The higher end chargers ramp up the voltage and ramp down the current in a particular fashion to maximize the acceptance of the charge as well as maintain a proper floating charge when full. Some can even automatically detect sulfated batteries and pulse the voltage and current to de-crystallize a battery. I wanted a system that could power my consumers from the alternator while driving such that the auxiliary battery could properly charge at the needed voltages without those higher voltages affecting my consumers. Oh yeah, I also thought it would be neat to have a solar panel input with automatic Maximum Power Point Tracking capabilities so my consumers could run and batteries charge from solar power. But I still wanted to be able to link my two batteries in case a) I needed to jump start myself or b) during winching to reduce the strain on the primary battery and alternator. So does such a system exist? No. But the closest I could find is made by battery charging experts C-TEK. The D250S DUAL and the SMARTPASS combine to provide all the features listed above (except high current linking for jump starting). The SMARTPASS gives up to 80A from either the starter or consumer batteries to power the consumers depending on which battery is charging and the D250S handles the charging and provides up to 20A from solar panel input. The system is pretty incredible and though a little pricey, it is packed with excellent overlanding features. The Achilles heel of the system, however, is that the electronics are rated to only -20°C to +50°C (-4°F to +122°F) and the enclosure is only IP 65. I don’t have perfect solutions to those problems but I’ll later discuss my mitigations and contingencies.
High Current Relay for Linking-
It’s later. I selected a high current relay from Gigavac. The MX12 series is IP 69K, temperature rated from -55°C to 100°C and can do 800A for 10 seconds (jump starting) , and 200A continuously (sharing the load while winching or powering the engine entirely if the primary battery has failed). If my charging system has failed, then I can still link the two batteries using this relay and allow the alternator to charge the auxiliary battery.

Step 3: Make a plan
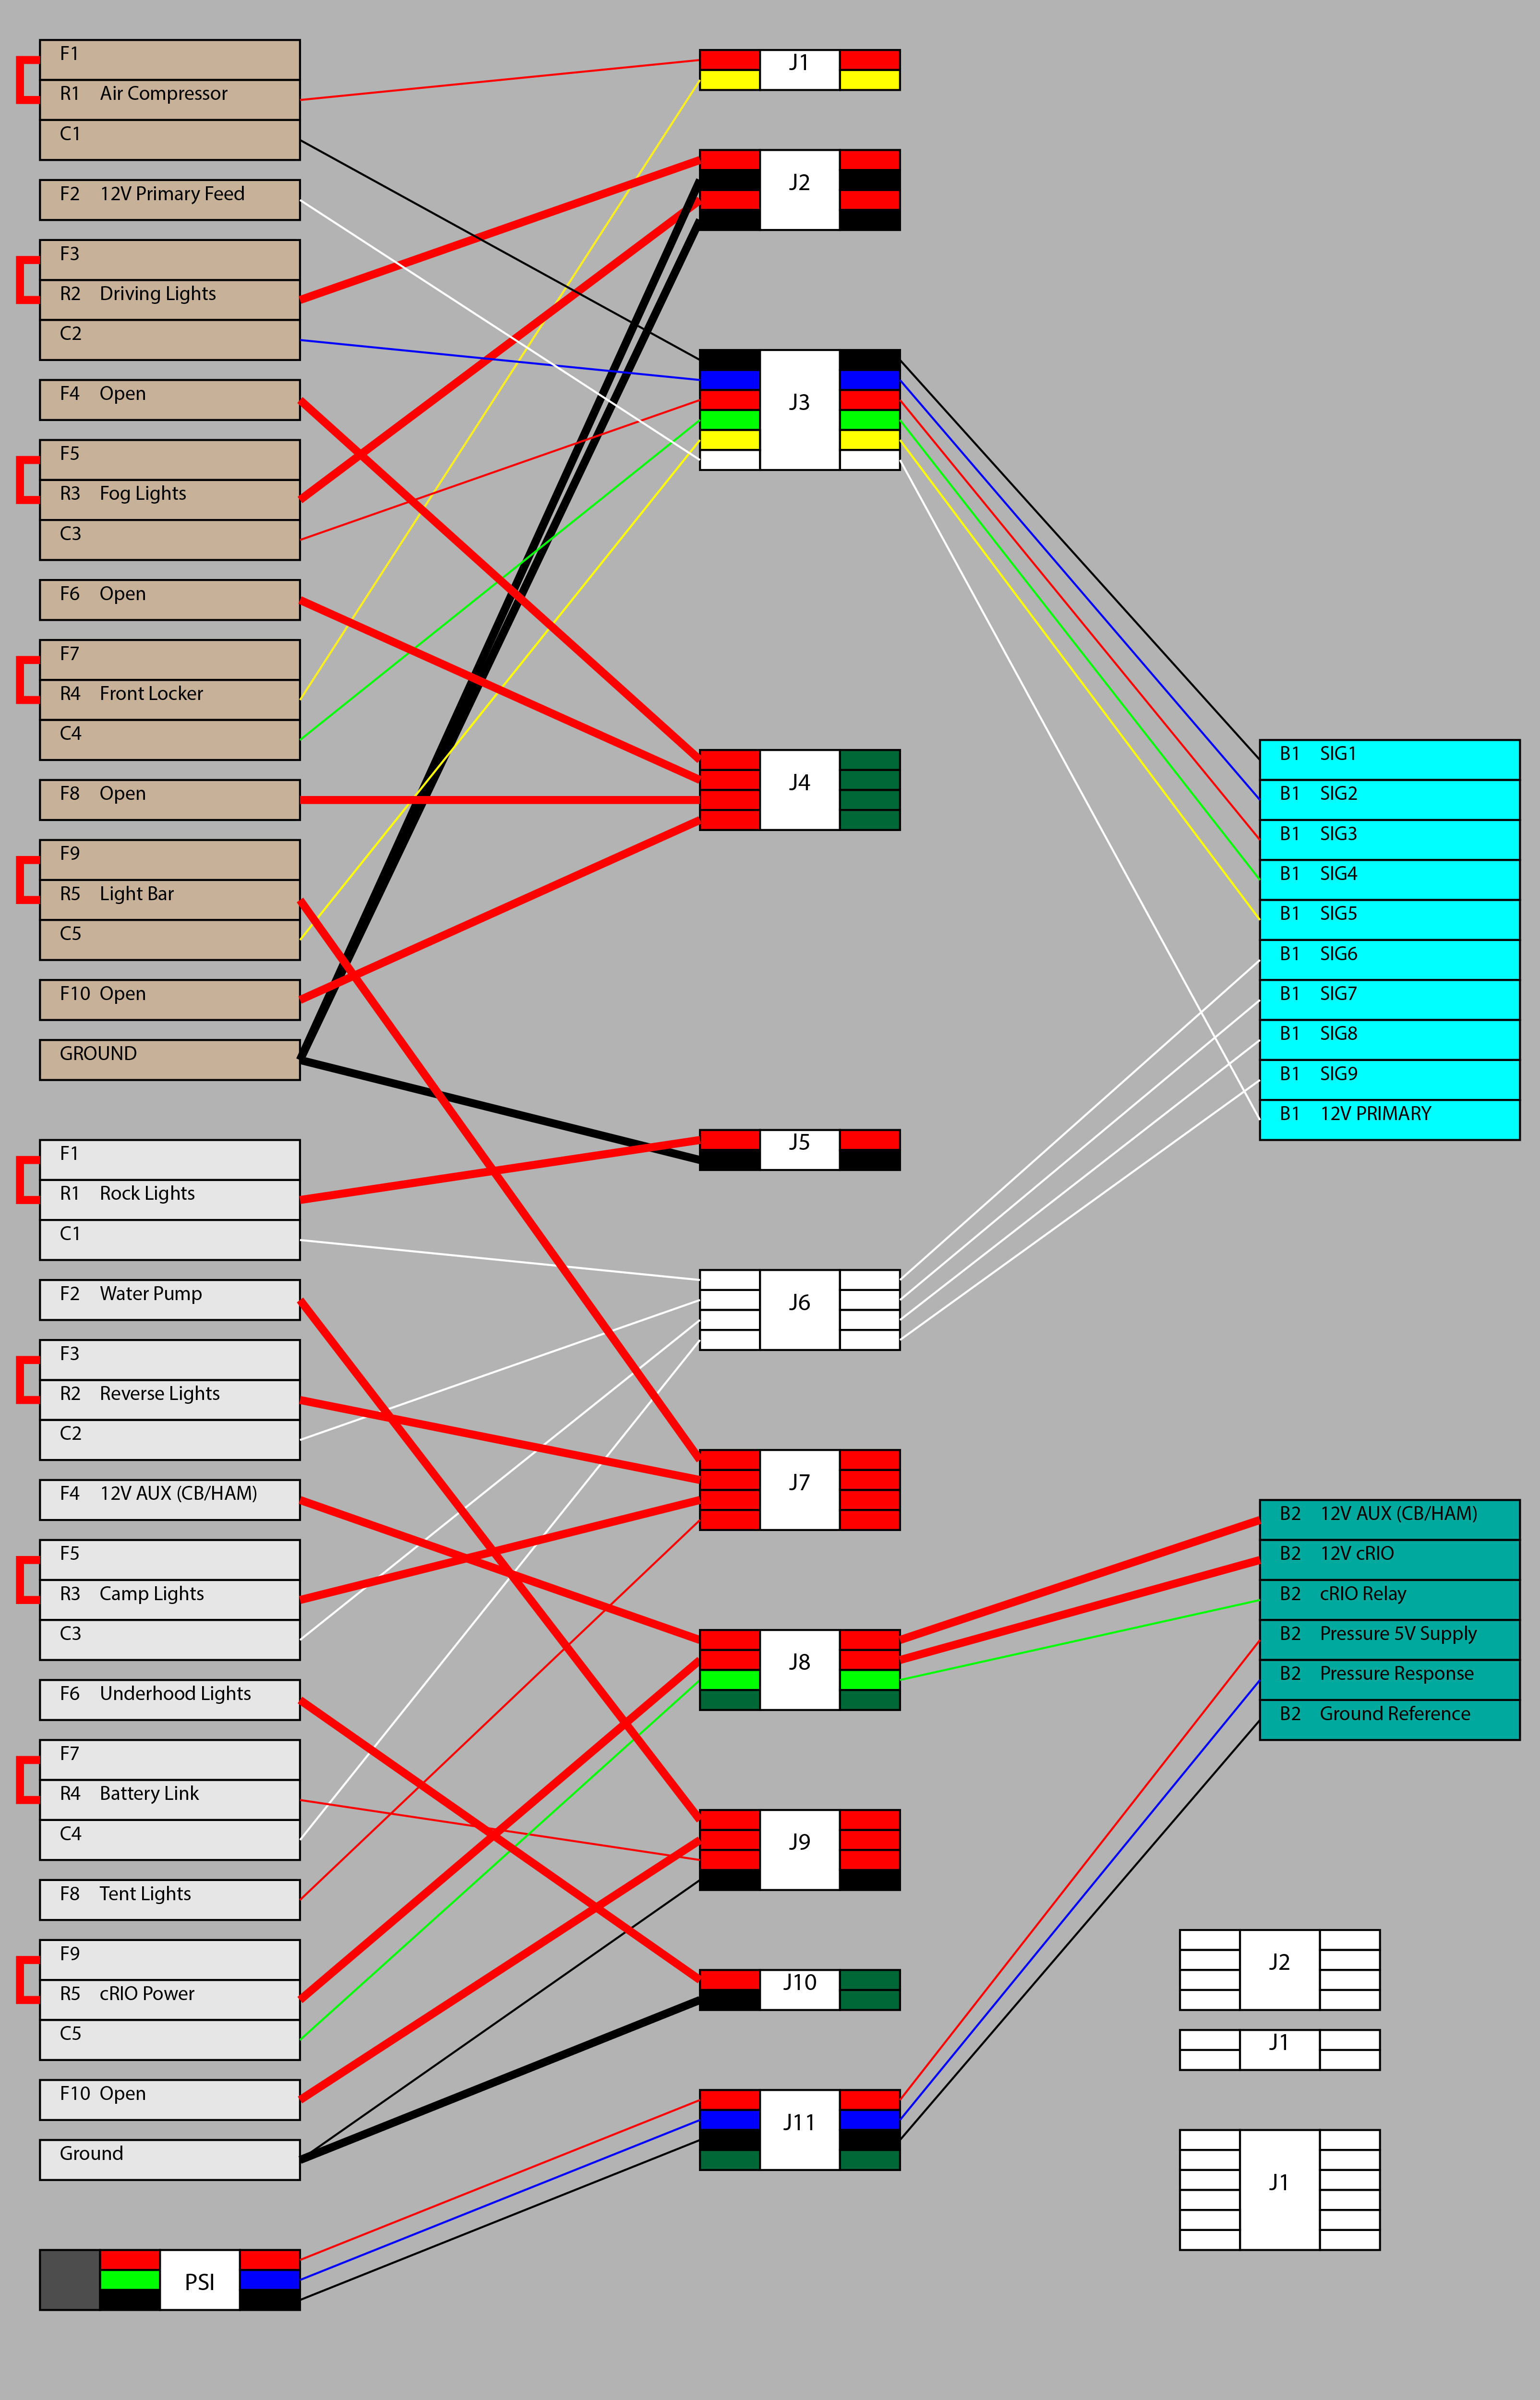
Going down the custom road takes more effort but the results can be closer to the desired goals. Here is a basic depiction of the wiring plan.


An initial draft of my schematic showing the use of one RTMR powered by the primary battery.


A later wiring diagram showing both RTMR connections and the necessary bundles of cables going to quick disconnects.

I think I posted in the wrong place so i will try again:

Fantastic write up. How has the system performed now over time? Why did you go with the Smart Pass with only one extra battery? I'm thinking about going this route but the location of where to put the CTEK is difficult for me. My second battery will be passenger firewall.

I am either going this route with stock starter battery and Odyssey 34 Aux, or I will get 2 Odysseys and use a Blue Sea ACR. What do you think of the Voltge booster fuses that add 0.5V? Would that be safe for stock electronics?

Thanks in advance
 
Diggin the ctek setup. I run the ctek in my dual and im digging your location for mounting. Do you happen to have anymore pics on that mount you made for the modules? Bolting location? Curious how you bolted all this up.
 
Diggin the ctek setup. I run the ctek in my dual and im digging your location for mounting. Do you happen to have anymore pics on that mount you made for the modules? Bolting location? Curious how you bolted all this up.

Sorry, I didn't take many pics as I was in a hurry to get it mounted.
 
Cargo Deck and Fridge/Stove Slide

slide01.jpg


Sorry I haven't been updating my build thread in quite some time.

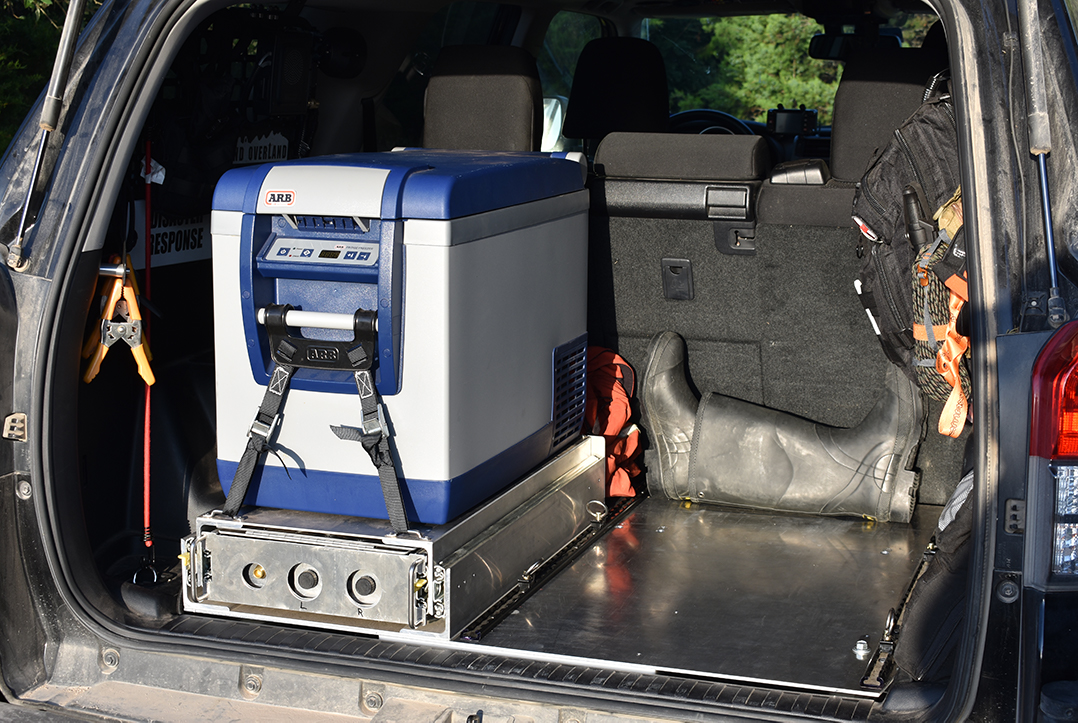
Here is my prototype slide/deck system that I am now trying to sell.

Video Walkthrough

Deck Plate
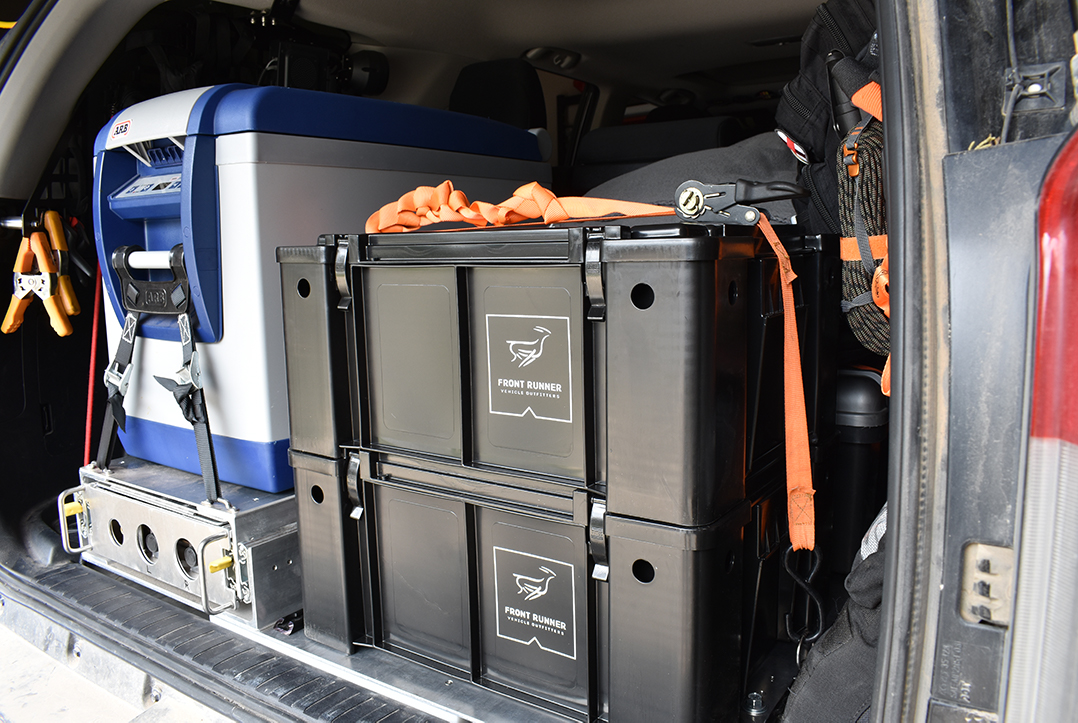
Aluminum (raw 6061) deck plate and complete mounting bracket kit for secure multipoint attachment to vehicle body hard points (I use all ten available hardpoints so this thing is bomber). Why aluminum? High strength/weight ratio, superior attachment of threaded fasteners for secure mounting, corrosion resistant and immune to water damage/mold. Feel free to coat with your own choice of liner (Line-X, truck bed liner, etc.) or leave natural. Deck plate has genuine PEM press-in inserts for secure mounting of the slide system. Next to the slide system are two aircraft track rails for secure tie down of your gear. These are sized to fit FrontRunner Wolf Pack storage containers and many other common storage options. You can also add your own threaded inserts later if you decide to reconfigure the passenger side for drawers or something else.

slide08.jpg


Fridge/Stove Slide System
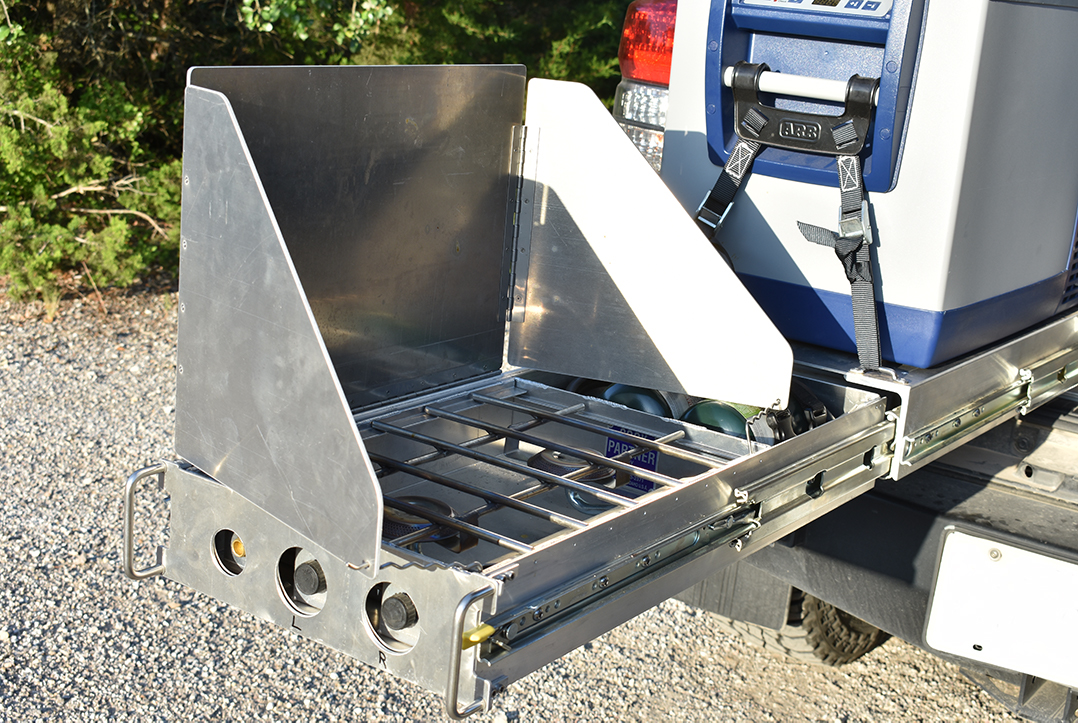
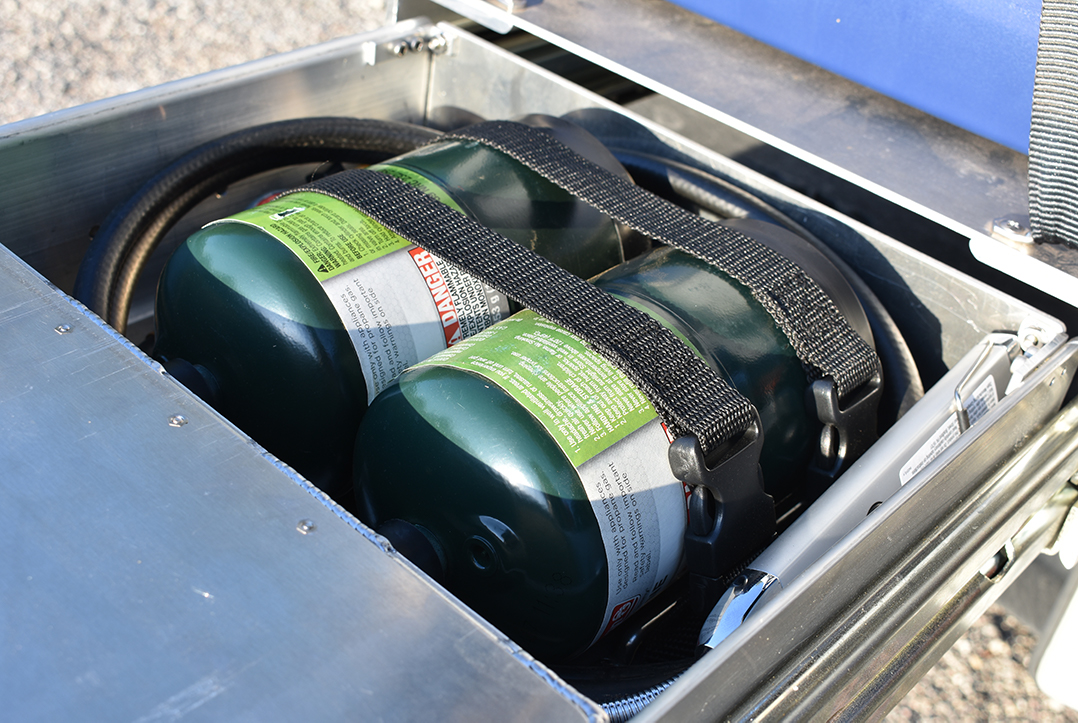
Aluminum construction and stainless hardware. I overdesigned this to be exceptionally strong and stable when fully extended. Most slides on the market are disappointing to me how flimsy they can be so I designed this one to fix that. The downside to this extra beef is a little extra weight. It is about 15-20 pounds heavier than it could be but I accept the tradeoff. The fridge platform is set up for the ARB 50 but can fit most similarly sized fridges. What size fridge will fit? 26.875" fridge length flush at the base, ~28" fridge length (ARB 50) fits perfectly in the 5th gen 4Runner. Currently has holes for permanent mounting of the ARB 50, but can also use the ARB Fridge/Freezer Tie Down System with integrated footman loops. Footman loops can secure most other fridges as well. (Fridge not included with this system) The stove drawer fits the AT Overland custom edition "JK" Cook Partner 2 burner stove. This stove is the same 18" stove but with the controls/supply on the side and can only be ordered through AT Overland. The drawer has an attached wind screen that can also be used as a flat surface/table when folded flat. The drawer also accommodates room for the supply hose/regulator and two "Coleman" gas bottles with included buckle straps for secure stowage. If you don't want the Cook Partner stove, the drawer will just act as a regular drawer and I can remove the wings from the wind screen so you still have the flat surface or I can remove the wind screen entirely. The slides are genuine Accuride and come with left and right locking levers. They also lock in the "opened" position so your dinner doesn't slide around while you are cooking it. (If that is happening, you might have some other issues to look into)
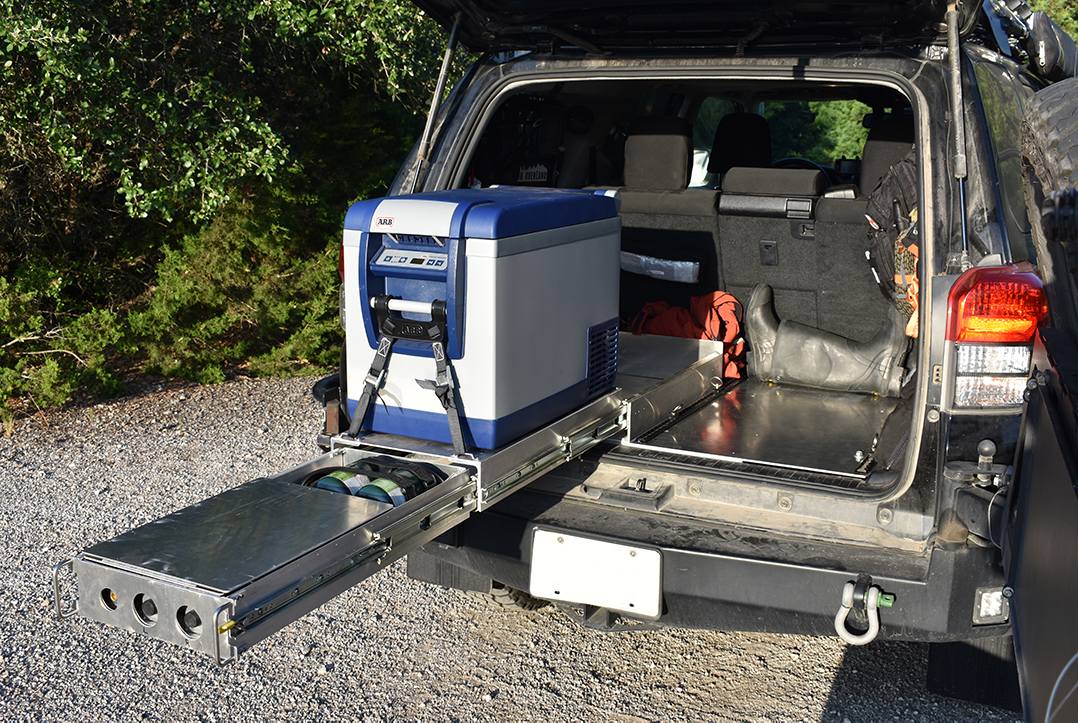
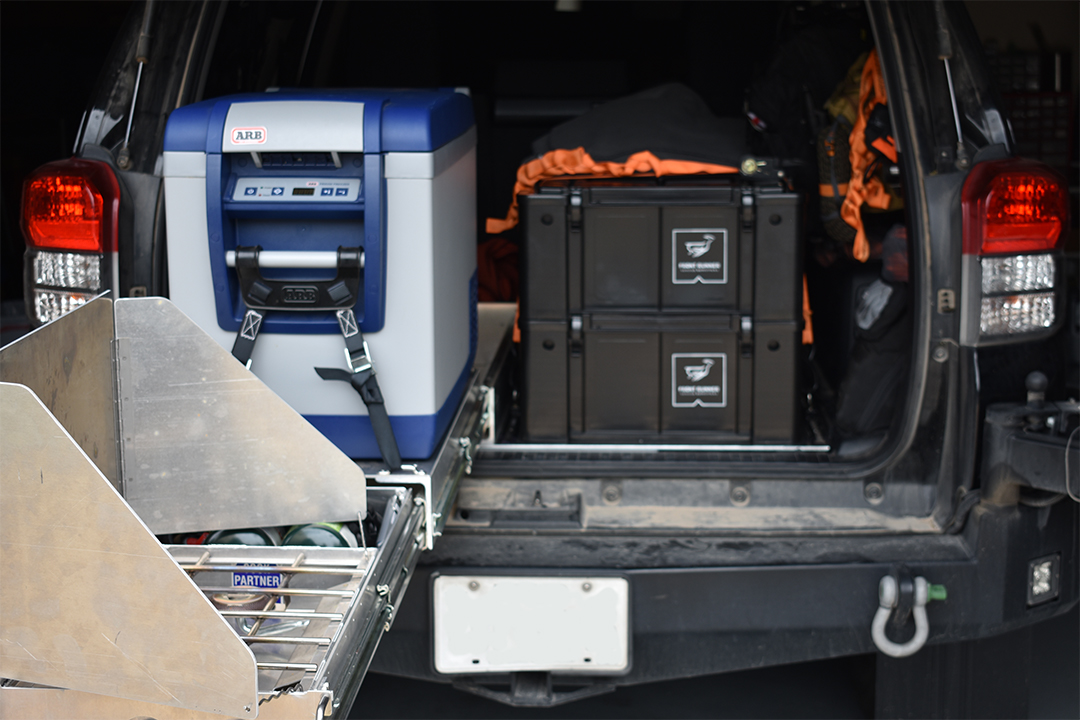
slide02.jpg


slide03.jpg


slide06.jpg


slide07.jpg


Configurations I'm willing to sell:
Deck Plate + Fridge/Stove Slide System + Cook Partner Stove (w/ regulator hose, adapter, bottles) = $1600

Deck Plate + Fridge/Stove Slide System (no stove) = $1200

At this time, I am not willing to sell the deck plate by itself. If the stove is not purchased with the slide system, I will use it for my revision 2.0 design coming soon. (So no, the stove is not for sale by itself)

Shipping:
Not at this time

Installation
I will install for free if you drive to my house near Austin, TX. This should fit any 5th gen 4Runner but I can't guarantee it because I haven't torn down every year and version (SR5, Trail/TRD, Limited, 3rd row seats, slide out cargo tray, backup parking sensor, etc.) but I know it fits the 2013 Trail with slide out cargo tray. That being said, it isn't hard to remove the factory cargo floor and check to see that the hardpoints are in the same spots. Just send me some pictures of the cargo area and I can confirm.
Note that if you plan to run a fridge, it would be wise to run your electrical prior to installation of the deck and slide system. Wiring is obviously not included but I can give you some advice on how to do it. I would also recommend to buy a roll of your favorite sound damping material and we can put that in during the install.


Compare to:
Goose Gear 4Runner Plate System $495 (mounts to existing carpet, made of polymer)
Goose Gear 4Runner Plate System

– AT Overland Equipment


AT Combo Slide $799 (stove not included)
AT Combo Slide

– AT Overland Equipment


JK Stove (same exact stove purchased from AT) $528
JK Stove

– AT Overland Equipment


JK Stove Wind Shield $85
Removable Windscreen, JK Stove

– AT Overland Equipment


Goose Gear CampKitchen 2.1 28" $1795 (stove not included)
https://atoverland.com/collections/storage/products/campkitchen-2-1-28-deep-module

Why am I selling something I put so much time into designing and fabricating?
This is my prototype and it worked out very well for several years of use. I have now modified my design slightly to add drawers, a sink, water tank, pump, etc. The new design needed different modular mounting locations on the deck plate and thus is incompatible. There is nothing broken or damaged about this system. But it is a prototype and the aluminum is unfinished so it scuffs and scratches as you load gear. If you don't like that, there are many coatings available or you could glue down some marine carpet. The sales price is fair and reasonable. I will be losing money on the deal but such is the way with prototypes. My design isn't set up for mass production, rather, optimized for the tools and equipment I have readily available (fasteners and brackets vs. sheet metal bends or welds). This lends the system to be somewhat field repairable and if you ever have an issue, I can work with you to figure out a solution.

 

Members online

Forum statistics

Threads
278,309
Messages
3,554,066
Members
248,016
Latest member
Advally Service

Trending content

Back
Top