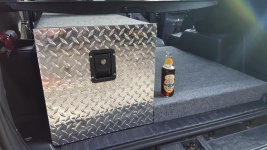
Expedition Box (inspired by the Antman)

Knight Runner

New member
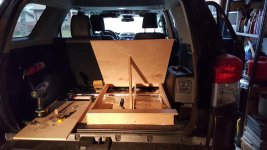
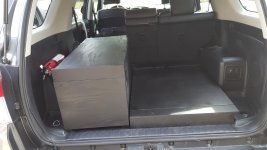
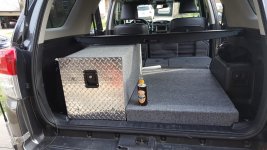
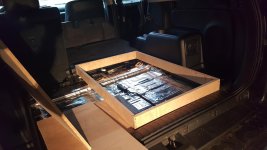
First and foremost, this is nowhere near complete, just functional. It still needs the battalion paddle latches with locks and I think I am going to need to cover it in some very low carpeting and perhaps some diamond plate as Antman did. I am also looking at some tie downs and perhaps a lip or rail on elevated portion.

I am also going to get a very nice piece of solid shelving wood to stain and seal. It will stow on left side of the cabinet between the wall of the truck. When needed, with a couple of grooves on the bottom, it will sit on top of my open drawer and create a table top work space similar to Antman's pullout.

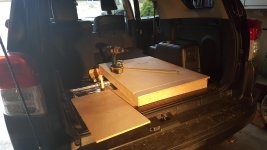
I tore out everything down to the sheet metal and laid two layers of aluminum sound deadening on the cheap from Lowes. Great investment and immediately noticeable improvement. I then tucked the existing cargo floor carpet under the sides of the bed.

I spend about a month playing with different designs on Tinkercad.com until I got to exactly what I wanted for my purposes. I also think I went about a 1/4 higher on the sleeping platform than Antman but I was really pushing for every square inch I could; I travel heavy. Once my sleeping mat is down it feels perfect.

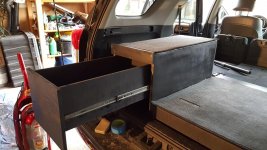
I used 3/4 inch oak plywood for the frame and cabinet and 1/2 for the top and drawer. 24 inch heavy duty sliders finished off the drawer. I went with star head 1 1/2 deck screw to lock it all together. I will tell you I intentionally went way overboard on the screws and wood glue to really lock it down and make it as secure as possible. I then used corner brackets and secured the entire frame and cabinet to the truck floor with sheet metal screws. It is rock solid and not going anywhere.

I experimented with several finishes, the best by far was was the Rustoleum Truck Bed Paint, Professional Grade. It goes very quickly though and is about $8 a can. I burned through two cans and only covered perhaps a quarter of the project. If I were to add more paint, I would definitely go with that choice but get a can and roll it on.

As mentioned I think some truck bed carpeting is going to be the final finish. Until I get some more time off to work on it, I just cut down the Toyota mat and it is working great.

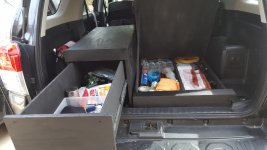
I have more storage space than expected and can change my load out in the drawer quickly as the needs of the day or mission dictate.

Again, thanks to Antman for getting me motivated and moving; I will keep you updated.
 

Attachments

  • 1.jpg
    1.jpg
    134 KB · Views: 1,507
  • 2.jpg
    2.jpg
    137.5 KB · Views: 1,505
  • 3.jpg
    3.jpg
    133.2 KB · Views: 1,499
  • 4.jpg
    4.jpg
    141.5 KB · Views: 1,495
  • 6.jpg
    6.jpg
    134.2 KB · Views: 1,536
  • 7.jpg
    7.jpg
    129.9 KB · Views: 1,519
Register to hide this ad
Very nice - but why did you put the 2 or so inch piece across the top of the drawer section? Seems like wasted space when you could have had the drawer face go up that high...
 
Thanks guys I appreciate it, still a work in process.

Do have something similar in aluminum or steel would essentially be the end all be all just outside of my scope right now.

The strip across the top of the drawer is 3 inches to allow me to get a good lock down on the three quarter inch cabinet and will actually be the section where the battalion paddle catch locks down. The other choice was a lock that went into the cabinet case itself and with the limited depth on the front of the drawer I did not think I would get a strong of a lock as 3 inch by three quarter inch essentially permanently affixed to the cabinet frame. There is still a few inches behind that section even when the drawer is fully extended so if I needed to put something extremely tall back there or snack items I do have some work space to go large.
 
Looks good overall :clap2: But being brutally honest fit and finish do not suit the vehicle IMO but it sure looks functional.
 
Last edited:
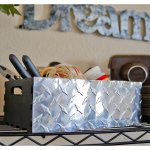
Looks good, I like it. You should cover the box's in Diamond plate. Home Depot sells steel sheets of it or you can buy the rubber Diamond sheets.
I think it would look cool with the steel Diamond plate
 

Attachments

  • Diamond plate floor roll.jpg
    Diamond plate floor roll.jpg
    8.4 KB · Views: 1,244
  • Home Depot Diamond plate.jpg
    Home Depot Diamond plate.jpg
    123.7 KB · Views: 1,238
Thanks for the shout out!

The "expedition style box" was actually my 3rd design and I'm the most happy with it. Still.... I may just do another box/design in the future. My mind has been working on it!

You will find the more you use the box the more ideas you will get for next time, lol. Throw some carpet on there and you're good to go!:yo:
 
Last edited:
In Progress.

Antman, thanks again.

Slow, I agree with you as it sits, but as mentioned it is not complete and the fitment, at this stage, is an intentional design element. Once the exterior plating or carpet is complete and the handles are in place it will look much better.

Fact of the matter is, form follows function and this is exactly what I need. It is very secure and under a $200 project budget.

Since no one makes what I needed for the Runner I would have had to go to a custom built box. I did look at a couple, but could not touch anything for under $1500 in metal and that was just the 16 inch portion.

Updates to follow when I wrap this tour.
 
Antman, thanks again.

Slow, I agree with you as it sits, but as mentioned it is not complete and the fitment, at this stage, is an intentional design element. Once the exterior plating or carpet is complete and the handles are in place it will look much better.

Fact of the matter is, form follows function and this is exactly what I need. It is very secure and under a $200 project budget.

Since no one makes what I needed for the Runner I would have had to go to a custom built box. I did look at a couple, but could not touch anything for under $1500 in metal and that was just the 16 inch portion.

Updates to follow when I wrap this tour.

I have an idea for you...:)

You said you wanted to get some wood for a shelf (workspace) to sit on top of your open drawer, and you were going to keep that wood on the side of the platform when not in use.

Why not mount that shelf on a reverse slide inside your drawer- at the top. Think of it as a lid for the drawer. Cut out the back of the drawer at the top to allow the lid/shelf to slide into the open space of the box when you want to access your supplies. That way everything is contained- storage space and work shelf. I would also make the lid out of poly so you can use it as a cutting board...

Hope that makes sense. It would be pretty cool and functional! Just a thought. :bounce:
 
Sliding shelf

Of course that sounds like a great idea and simple. Not sure why I did not think of that but of course I am not Antman.

I will take a look at the specs when i get a minute but as I think of it, it should not really cost me any storage...

Waiting on battalion paddle latch.......
 
Expedition Box Follow Up, Phase 2

All,

After a bit of globe trotting and a successful conclusion to the latest deployment I am back at it. Spring break with my girls has allowed a little time to finish phase two of the design.

A special shout out to Mya who really helped as my second set of hands, particularly working with the sheet metal.

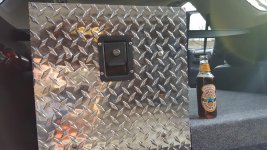
As mentioned, this is how it was intended to look. I will add the lock to the low section today and pick up the wood for the counter top portions of the drawer.

Antman hit me with a great idea for a sliding counter top on rails. In this version I am opting to pass on it. I will show and explain why when I get the shelf portion of the unit finished, hopefully today or at least by the weekend.

The carpet is a hint lighter than what I wanted, but it is what Lowes had in what I wanted. This is ultra high traffic indoor/outdoor but specifically is a rubber backing. This is two fold in design. First and foremost, it has a little stretch to it and rounds the corners very nicely compared to traditional backed carpet. Secondly, it is essentially waterproof as it can be hosed off, The by-product there is it also waterproofs the cabinet to a great degree.

I used the heavy duty indoor/outdoor adhesive and did one side at a time starting from the right and used the occasional braid finishing nail and stretched as I went to get a good tight finish. The braids were very helpful in getting a good clean corner.

The drawer face is attached with lag bolts for added security and stability. I think I am going to replace the screws on the battalion latch with bolts in the near future. Just more of my over engineering for security.

And there you have it. I'll drop another photo or two when i get the last lock, over kill, and the shelf finished.

Again, the function is exactly what I needed and all else is icing on the cake.
 

Attachments

  • 20160322_170955.jpg
    20160322_170955.jpg
    140.8 KB · Views: 832
  • 20160322_171002.jpg
    20160322_171002.jpg
    141.6 KB · Views: 831
  • 20160322_171018.jpg
    20160322_171018.jpg
    146.2 KB · Views: 825
I spend about a month playing with different designs on Tinkercad.com until I got to exactly what I wanted for my purposes.

Thanks for the link to TinkerCad! I've never heard of that before. I spent 30 years doing drafting and design work, the last 18 using 3D CAD modeling. So using Tinkercad was a quick and easy way to model a storage project.

I don't have my 4Runner yet, so I made some guesstimates on size, and will adjust them once I get the vehicle. I used 3/4 stock for the framework, and 1/2" for the top. I used 42" for the width, and 40" for the depth for now, and built it 4-1/2" tall.

So, thanks for the tip!
Steve
 
Expedition Storage Box

Nice work Knight Runner. Were you ever a cabinet maker? The finished photos show you need one more element. A cup holder. :rolleyes:
[MENTION=135421]Ohio_Steve[/MENTION], I'm still drafting the old fashioned way. By hand with a pencil. I wish I knew AutoCAD. Revit in 3D is the wave of the near future.
Dave, P.E. Structural Project Engineer
 
Is the diamond plate flush around the corners?
It looks like the box is more rounded and the diamond plate sticks out some.
If that is the case, I would round those corners down now, as I guarantee you will after the first time it rips your arm or some cargo open as you reach in.
 
Great

Thanks for the link to TinkerCad! I've never heard of that before. I spent 30 years doing drafting and design work, the last 18 using 3D CAD modeling. So using Tinkercad was a quick and easy way to model a storage project.

I don't have my 4Runner yet, so I made some guesstimates on size, and will adjust them once I get the vehicle. I used 3/4 stock for the framework, and 1/2" for the top. I used 42" for the width, and 40" for the depth for now, and built it 4-1/2" tall.

So, thanks for the tip!
Steve

Looking forward to seeing what a professional comes up with. This was my first project and already thinking about another, helping a buddy with an FJ.

Bill
 
Looking forward to seeing what a professional comes up with.

Well, as a retired professional mouse driver, I can say that I've never used AutoCAD or any similar 2D product, so my Tinkercad tinkering leaves lot to be desired. I started in 1984 with Intergraph IDGS then EMS on dual screen InterPro VAX (UNIX) workstations. Much later, we moved to Window NT (and later XP Pro) based CAD using Intergraph's Solid Edge modeling system. Having been gone for six years, what I remember is probably long obsolete now.

So a couple hours fiddling with Tinkercad I came up with this:

3D_design_Storage_Box_2_%7C_Tinkercad-20160325-161820.jpg


The right side flips open like [MENTION=65614]Antman[/MENTION]'s, and the left side has a sliding top for my Yeti 50 cooler. Below the slide is a sliding table/cutting board.

Keep in mind that I don't even have my 4Runner yet, so all of the above is just approximations. The lift gate lip may be too high for a slide out table/cutting board, or the whole thing may be too far to the left for the Yeti to slide out past the curved opening. I'll tweak or scrap the whole thing once I get my 4Runner.

But it was a fun and interesting exercise, and I got to play with CAD for the first time in quite a while. I can see using this for other things around the house. Thanks again for the link!

Steve
 
Expedtion Box

Steve,

That looks great.

You definitely have more design aptitude than I. As mentioned, I have a very specific need for mine being designed the way it is.

Can't wait to the the end product.

Bill
 

Members online

Forum statistics

Threads
278,312
Messages
3,554,085
Members
248,016
Latest member
Advally Service

Trending content

Back
Top