Front brake caliper & pad replacement

Kmvreter

New member
I searched and found many threads about replacing brake pads and finding frozen caliper pistons. I'm starting a new thread to capture specific items about my ongoing front brake job, to consolidate several points and to create a lessons learned summary.

I am diligent about monitoring pad wear so I recently replaced the front pads and found the inside lower piston on the passenger side to be hard to move. It did free up with some persuasion. I then found a totally frozen lower inside piston on the driver side. I stopped the pad change and am getting items together to do a caliper change. I was originally thinking of rebuilding the caliper myself but thought the better of it for 2 reasons: (1) It isn't really any cheaper than a factory rebuilt part once you buy the entire overhaul kit and individual pistons (if I had more time I could shop around and wait for delivery but this is my daily driver.) (2) This is safety related in being able to stop the vehicle. I won't think twice about R&R of parts but rebuilding something brake related has a certain level of risk for an amateur.

On with the task at hand for the coming w/e and some prework questions...
I have attached 2 pdf's from the FSM related to the front brakes (see posts below.) The R&R is straight forward but I have brake line and system bleeding questions:

1) On page 32-17 they say to use a Special Service Tool (SST 09023-00100) to "disconnect the brake tube". What's so special about this? Can't I just use an open end wrench or will I damage something?

2) Will I lose all my brake fluid out of the reservior (by gravity) and potentially introduce air into the other brake lines? Or will there be minimal fluid loss just from this line?

I have the rebuilt caliper (came with new pins and clips), 2 new anti-squeal shims (will be replacing both damaged inner shims), brake fluid and brake grease.

I'm open to any answers, suggestions and insights with this.
 
Last edited:
Register to hide this ad
I thought I wrote something up but I can not find it.

I changed both front calipers and used a set from Rockauto. They where cheap.

When you remove the caliper you then replace the master cylinder cap so that as the fluid level drops, it will pull a slight vacuum in the headspace and slow the amount of dripping or fluid lost when you disconnect the line. Place the line in a glass jar and so that the open end gets submerged in old brake fluid; which you discard later.

Once you replace the caliper (with the brake line attached) open the bleed screw and let it fill up by gravity. Loosen the master cylinder cap. It when begin to drip out. I let it drip out for 20 minutes or so. It drips real slow. This will help displace the air. Now for the most important thing!!! There is a right and left caliper. DO not mix them up. You ID them by installing the calipers so that the bleed screw is oriented on top of the caliper and not on the bottom. Otherwise you will never get the air out!

Then once both calipers are on, you bleed the system with the ignition key in the run position (do not start the engine) This activates the servo motor for the master cylinder and pressurizes the system. Then pump the sh_t out of the brakes and proceed as one would with any other brake bleeding system.

I have not been on the forum in awhile as I am very busy re-wiring my entire kitchen for 20 amp service. So shoot me a PM or email me at [email protected] if you have any questions.
 
Last edited:
greasefingers,
Thanks for the suggestions. I'm only doing one caliper and I double checked before I left the counter that the shop gave me the correct side. I'm planning the other caliper at a later date (I may even try the rebuild after shopping the parts) because it isn't frozen but the inner lower piston is suspect. I'll do as you suggested with the cap for the bleeding. I'm hoping to take the brake line from the old to the new caliper in a single move to minimize the exposure of getting air in the line. Regardless, I have to bleed the line.

I looked further through the FSM and found that the SST is actually a crowfoot ratchet end. A 10 mm open end will do the same thing.

I also took a better look at the OEM shim kit they gave me. It comes as a full set to do all 4 pads. It's an upgrade because the current ('04 factory) setup is a single shim. The new set is 2 shims per pad, one solid, the other with slots and a "rubber" coating on the pad contact side (I'll post pics later when I do the work.) Does anyone that has done their brakes recently know if they upgraded to this as the factory shim setup on later model years?
 
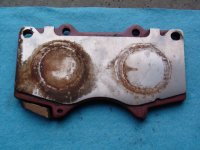
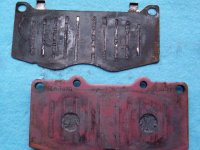
Here are some pics of the used inner pad and damaged shim (bent and rusted) from the frozen lower inner piston.
 

Attachments

  • t4rfrbr06.jpg
    t4rfrbr06.jpg
    104 KB · Views: 46,760
Last edited:
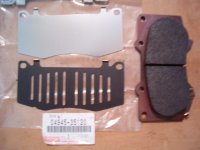
Here is what the new 2 part shims look like with the part number.
 

Attachments

  • t4rfrbr08.jpg
    t4rfrbr08.jpg
    67.4 KB · Views: 45,490
Last edited:
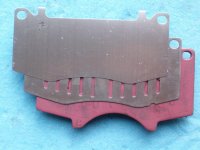
Here is the sequence of how they go together. I used the supplied anti-sieze between the shims at the time of assembly.
 

Attachments

  • t4rfrbr09.jpg
    t4rfrbr09.jpg
    99.3 KB · Views: 46,740
Last edited:
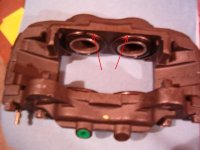
Here is a pic of the reman caliper. It's a direct bolt on. The one improvement over the stock unit is the use of snap rings (red arrows) to hold each dust boot onto the caliper. This may somewhat help for the possible prevention of a future frozen piston.
 

Attachments

  • t4rfrbr01.jpg
    t4rfrbr01.jpg
    30.3 KB · Views: 46,725
Last edited:
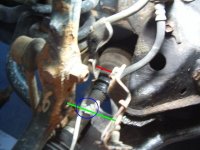
The actual R&R of the caliper is relatively easy with the right tools. Start by removing the wheel and put two of the lug nuts back on to hold the rotor in place. Then remove the brake clips, pins, pads and shims. Use a 10mm socket to remove the bolt that holds the brake sensor wire bracket to the brake hose bracket (red line.) Use a flat screwdriver to pop open the clip that is holding the sensor wire (blue circle.) Then use a 12mm socket to remove the bolt that holds the brake hose bracket to the spindle (green line.)
 

Attachments

  • t4rfrbr02.jpg
    t4rfrbr02.jpg
    42.8 KB · Views: 48,704
Last edited:
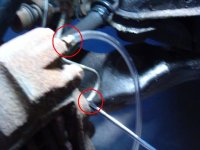
Attach a length of tubing to the bleeder. Use a 10mm open wrench to crack open and close the bleeder nipple (upper red circle) to relieve pressure (but don't drain anything yet.) Also crack open the brake line fitting (lower red circle.) Do this while the caliper is still bolted in place (it's easier that way.)
 

Attachments

  • t4rfrbr03.jpg
    t4rfrbr03.jpg
    34.9 KB · Views: 45,508
Last edited:
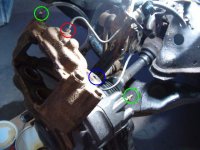
Use a 17mm socket to remove the 2 caliper mounting bolts (blue circle shows location of one of the mounting holes on old caliper.) Watch out not to drop the caliper or twist a hose once it's loose. Set the old caliper on top of the rotor. Bolt the new caliper in place. Move the tubing to the new bleeder (green circles), screw it open. Remove the plastic cover from inside the hose fitting hole on the new caliper. Remove the hose fitting from the old caliper (red circle) and immediately thread it into the new. The fluid loss will be minimal and will start to force air, then drain fluid, out the bleeder. Put the plastic plug into the old caliper and set it aside. Open and close the bleeder several times to get most of the air out.
 

Attachments

  • t4rfrbr04.jpg
    t4rfrbr04.jpg
    45.6 KB · Views: 59,345
Last edited:
Finish up by torquing the caliper mounting bolts to 91 ft-lbs. Install the pads & shims, pins and clips. Reinstall the 2 bracket bolts you removed earlier and reclip the sensor wire in place. Then do a brake bleeding with an assistant, as greasfingers suggested, with the power on but engine off. I didn't remove or loosen the master cylinder cap during this whole process and lost very little fluid. I'm down half way between min and max (I'll end up doing a whole system flush by bleeding all 4 lines in the near future.)
Reinstall the wheel and you're good to go.
 
Last edited:
Maintenance lessons I've learned about the brakes.

I'll take a few extra minutes to do the following twice a year when I do the summer/winter tire change.

- Monitor brake pads for even wear between pads (inboard vs. outboard) as well as within the pad (upper vs. lower piston.)
- Keep the pad pins free moving by removing and greasing them.
- Check the piston free play by depressing each end of the pad. Use a channel lock plier at the outer corner of the pad at the pin hole while the pin is removed. This will also move the brake fluid around inside the piston to help avoid internal corrosion.
- Pull the pads with shims to check for shim damage that is an indicator of piston problems.

I'll also bleed the brakes every 2 years (as others have suggested) to minimize the risk of boiling moisture in the inner piston position causing internal corrosion.

Last lesson.
I saved a bundle over the stealership or shop doing the work.
Getting my hands on the wrenches on the truck, priceless!
 
Last edited:
Great write-up!! Nice job circling the various components too. Are you using Photoshop?

The shim kit is the way to go (greasing the kit lightly will help keep it from corroding) I bought the kit which also comes with new pins. The brakes sure take a beatin!! It ranks number one in my book as far as maintenance is concerned.
 
The original inner shims were bent, because of the frozen and stuck piston, and rusted where it seperated from the pad surface. I'll take your hint about lightly greasing the open face. Turns out this 2 part shim kit is an upgrade due to earlier noise issues (found this in a service bulletin, BR004-06, attached.)

Overall, I'm pleased with the T4R 4 piston system and brake life but I'm disappointed with the "high" maintenance aspect. Need to keep a closer eye on them. My prior GM needed brakes more often but you definitely needed to lube the slide pins (just like the Toy rears.) I guess it's a wash in the comparison.


(Just using Microsoft Paint to edit the pics.)
 

Attachments

Last edited:
Kmvreter said:
... I'm planning the other caliper at a later date ... because it isn't frozen but the inner lower piston is suspect...

Changed out the winter wheels and did the semi-annual brake maintenance as per my lessons learned earlier above in this thread.

Found the lower inner piston on the passenger side, that was suspect before, was now frozen solid. Caught this in time before there was any noticeable uneven pad wear or damage to the shims. Got my parts together and did the caliper replacement this weekend. Noticed that this reman replacement didn't have the piston boot retainer spring clips like the previous one so I'll be going back to Carquest and see if they can order them.

No other issues and as good as new.
 
Last edited:
I was under the impression that Toyota has a fix for this now? Kmreveter, are you getting new calipers?
 

Members online

Forum statistics

Threads
278,307
Messages
3,554,054
Members
248,016
Latest member
Advally Service

Trending content

Back
Top