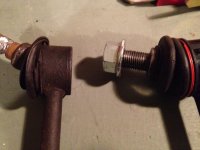
Heavy Duty Tie Rod Ends

Your 4Runner Handleing

  • good but not perdictable

    Votes: 0 0.0%
  • loosy goosy

    Votes: 0 0.0%

  • Total voters
    10
  • Poll closed .

talonjade

New member
DEEZA TYL666 Shipped
DEEZA TYL664 Shipped
DEEZA LEL623 Shipped (2) (Last 2 available)


Just purchased some Heavy Duty grease-able link ends from Rock Auto.

$75 for all 4, + I upgraded the sway bar bushings to grease-able Prothane bushings!

Link to bushing upgrade: http://www.toyota-4runner.org/4th-gen-t4rs/34115-swaybar-bushing-upgrade-10.html#post921277

I will post pictures when I start putting everything together, but for now I just wanted to throw this out there for some feed back: Pro's and Con's welcome!

getimage.php

front Links
 
Register to hide this ad
I LOVE the ability to grease bushings. Some people hate them because they fail. But they ONLY fail when you forget to grease them. If you grease them every oil change then they should last the life of the vehicle. The new sealed units are less of a hassle...but after 250k miles they need replacing. I had to replace the ones on my 98 Pathfinder after about 220k miles. I replaced mine with Moog and they came with fittings also. I could have gotten them without fittings if I wanted.
 
nice find, greasable is always way better, just a pesky FYI you should've named the thread heavy duty sway bar end links, tie rod end links would be refering to the steering link arm that connects each wheel to the steering rack. They should def last alot longer, keep em greased but dont pack to much or you'll blow the seals out of the new ball joint boots.
 
I have to agree! One more part that only needs occasional greasing is better then a part that just wears out over time. All 4 of mine are seeping not sure if thats normal but what the heck; I had such a good experience with the bushing upgrade, I decided to finish it off the right way.

LEO98 also did this upgrade and when I asked him how it was holding up he said: "No issues at all. Most of the time I've forgotten I've replaced them."

But to be fair the ones I purchased are a little more Heavy Duty than the ones he purchased.
 
All 4 of mine are seeping not sure if thats normal

not normal lol def. very worn out haha but mine looked the same way when i took my sway bar out. and i know they had been worn way before removal so i can't say that anything bad would come of worn links just a ride preference some like loose steering some like tight steering. but my OME springs are so stiff up front i can't even notice a difference without it so i never bothered looking into replacements ill probably be picking up a set of these myself if an when i see the need for a sway bar again perhaps when i get some steel bumpers ill need that extra stability.
 
I liked the design of my 90 Pathfinder.

None of the tire-rods or ball-joints needed to be greased. However there were little 2mm bolts that you could remove and replace with Zerks. Nissan even have a diagram of what zerks to use and where (like straight, 45 degree or 90 degree). I put in zerks after I owned it a year. Then just greased them every other oil change. Never had a problem with any of those parts when my daughter finally sold it with close to 400k miles.
 
Installed and Review

OK so here is how it all went:

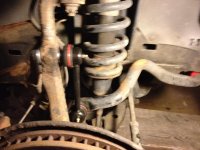
I came to realize that nearly all of the bolts needed to be hacked off. Not too hard if you got a dremel tool and a few HD cutting blades.

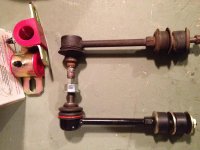
As I stated previously all of my ends were SHOT; and instead of replacing them with parts that eventually fail, I spend $75 for a total hookup and replaced the sway bar bushings and tie-rod ends with Super Heady Duty parts from Deeza.

I will complete this post with a bunch of pictures detailing my process in general.

**All in all it made a much greater improvement then I could have predicted. Before when I made a turn or changed lanes I seemed to feel a little out of control. I have much less shake on the the highway when cruising and less wandering too! This upgrade has firmed up the turns and sways into a solid predictable precise maneuver. It really is laser sharp, and knowing they are grease-able and really tough (as shown in the pictures below) is an added bonus. I feel like it's a different car all together! Small bumps that would normally result in "bump steer" are reduced 80%... Its remarkable how my 4runner feels as nimble and tight as a sports car. HAHAH:party::party::party:

It would be cool to get this sticky'ed after my pictures have been added for other who are looking to improve the handling of their 4Runners.
 

Attachments

  • photo.jpg
    photo.jpg
    136.8 KB · Views: 3,453
  • photo(1).jpg
    photo(1).jpg
    140.4 KB · Views: 3,112
  • photo(2).jpg
    photo(2).jpg
    131.8 KB · Views: 3,121
  • photo(3).jpg
    photo(3).jpg
    134.1 KB · Views: 3,071
  • photo(4).jpg
    photo(4).jpg
    140.4 KB · Views: 3,174
I felt the same way at first but I really don't have a better solution.

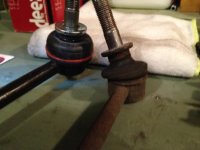
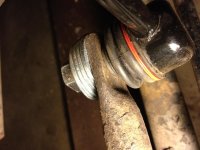
The new one's had a lot of space so I put the washers on the outside (not in-between; there is a good example on 4th pic) just to close the space. The fit is snug and feels more than adequate, I don't think warping of the washers will be an issue and I certainly don't plan on jumping a mountain top with my runner. The amount of force that will be applied to those washers seems safe enough for 3 or 4 washers to handle... I will be keeping an eye on it when I start doing a little more Offroad stuff.

I just want people to be aware of this mod, I had great results in the handling and ride department, my truck feels beefed up and making maneuvers takes less consideration for my part and especially when passing or high speed tuns this truck (mind you, I did drive it stock) feels WAY MORE like I am driving a tank its flat and solid.

I think this mod would be less noticeable if your 4runner already has a lift kit, but based on my results it should still add greater stability. I could not be happier. Please feel free to post comments good or bad!
 
Last edited:
Why so many washers?


:cheers: because it was better then leaving 1" gap at the end link.

I see no problem with it considering the angles and forces being applied. 4 washers should hold up and support the endlink without warping and since I am rust proofing I will give them a coat and seal the deal. If I happen across a better solution than a few washers I may change it out. But until they show any signs of concern I will pass. Besides some people are taking the Sway Bar off altogether, its choice and preference. I do lots of Hwy driving and wanted less swerving and bump steer... I got it.

Regards,
 
Washers

So the center needs a chuck to tighten down the bolt without turning the boot end...I hope that makes sense. I could not get a chuck piece to tighten down the bolt so I filled the remaining gap with washers and "Bingo" gap filled, washers snug and end link tightened and installed. if you got the right tools for the job you might be able to do it without the need for washers, I didn't find this to be the case and had to improvise, in all actuality I think it will last the test of time and I will not be messing with is again.

If you can get the right chuck to hold the center from spinning freely then do it right but if you gotta do it like mine I think it will hold up about the same.:roadkill:
 
You could probably find a steel spacer to replace the washers at your local hardware store or tractor supply... or online.
 
what are those pink brackets?

Those Pink (actually they are RED despite the image) brackets are the sway bar bushings I ordered to replace the old ones. They are special type of rubber compound that is called prothane.

The prothane bushings are soo much better then the factory bushings they are quiet and have a zerks for greasing. Do them both for maximum effect!

There is an additional link to the Prothane bushing upgrade on the original post at the top of this page.
 
You could probably find a steel spacer to replace the washers at your local hardware store or tractor supply... or online.

I scoured the Home Depo but came up empty, most of the spacers I found were made of inferior metals and would probably compress and loosen... I bet if I look hard enough I could find something that would better fill the need.

Thanks!
 
3/4" steel tubing with an 1/8" wall has a 1/2" I.D. you could cut a short maybe 3/8" piece and paint it black..
 
Hahahah!!

ALLL OF YOUR HANDLING ARE BELONG TO MEEEE!!!!
Seriously my handeling is OVER 9000!!@!!!>!!>>>!!....!:jaw drop:

:lol::lol::lol::lol::lol::lol::lol::lol::lol:
 
Last edited:

Members online

Forum statistics

Threads
278,316
Messages
3,554,111
Members
248,016
Latest member
Advally Service

Trending content

Back
Top