Hoppy’s build thread - 2022 ORP

The project this past weekend was to do some radio swaps. The Midland GMRS MTX575 came out of the 4Runner and went into my son’s Jeep JKU.

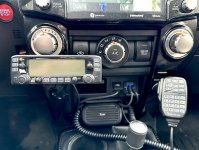
I installed the Icom 2730a into the 4Runner and it works excellent. I used the mount I installed for the Midland mic, but with the Icom magnetic bracket to mount the radio display. It’s an ideal position, does not interfere with any vehicle controls, and falls to hand nicely.

The mic is plugged into the main radio unit under the drivers seat, using an Ethernet extension cord.

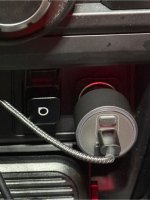
The Icom external speaker is well positioned in the lower dash cubby, with the bracket attached via strong Velcro.

I need to clean up the interior, but here’s a shot.

b564ee382a2b7b09ddf1e756aa947104.jpg
 
Last edited:
I apologize for the late reply, I didn’t get a notification of the reply.

No, I didn’t have any issues with error codes or lights coming on.

I hope yours is sorted now and working well. It’s a great upgrade.

For the CTH heated steering wheel kit, is the pushbutton momentary or latching?

Thanks!
 
For the CTH heated steering wheel kit, is the pushbutton momentary or latching?

Thanks!

It appears to remain on, although it’s likely there is some type of timer to prevent overheating. I suggest you contact CTH for clarification. Thanks.
 
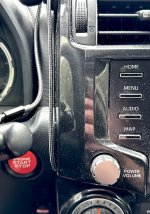
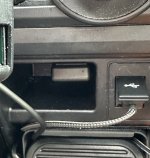
I cleaned up the radio & phone cords a bit. Drilled holes behind the upper & lower cubby holes in the lower console. Ran the Icom & Apple CarPlay cords through the lower cubby to behind the dash. Routed the CarPlay cord to come out to the left and just below the radio, to eliminate the cord being draped in front of the dash. I used a braided Anker cord for durability.

I decided to the Mob Armor mount for the Icom mic, which makes it even more convenient.

Also remounted the Wilson WeBoost cell booster interior antenna to the upper cubby area, attached with 3M tape. (last photo).

This all helps clean up the appearance of the dash.

* photos will be added when I figure out how, since it’s different with Tapatalk not working on this forum. I figured out how, but photos are resized. Hopefully they get Tapatalk working again.
 

Attachments

  • dash.JPG
    dash.JPG
    111.4 KB · Views: 3
  • phone cord.JPG
    phone cord.JPG
    133.3 KB · Views: 3
  • antenna.JPG
    antenna.JPG
    124.1 KB · Views: 3
Last edited:
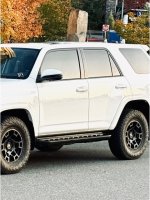
With virtually all my driving being on highways and dirt/grave, and no plans for serious off-roading, I decided to swap the tires. While the BFG K02 is undeniably a strong, durable tire, I’ve also found it hard riding and lacking wet weather grip.

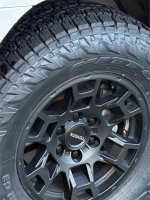
I went with the new Nitto Terra Grappler G3 and this has been an outstanding choice so far. I’ve experienced less noise, more compliant ride & handling, and significantly better wet weather traction. They still look aggressive too. We did the same swap on my son’s Jeep JK and experienced the same results.

When making the swap I also removed the TRD center caps and installed some that originally came on the Tundra special edition. The silver TOYOTA part nicely matches the silver letters on the TRD Pro heritage grille.

I’m having trouble getting photos to load, so photos will be coming when I figure that out.
 
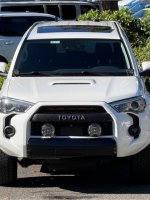
I’ve decided the black WeatherTech hood protector needed to go. At the same time, I removed the black TRD Pro (OEM) hood scoop.

I then had the hood wrapped with PPF.

Photos to follow.

Near this same time we removed the CTH TRD Pro style front skid plate and the Stainless Steel MillerCat catalytic converter shield. The skid plate was strong and substantial, but the Cat shield was no bueno. It was too flimsy, rattled, and often worked itself loose.

We installed a full RCI skid plate package, including the front piece between bumper and engine skid. In short, I’m very pleased with the integration of these plates, their appearance, and ease of install. I’ll likely add the fuel tank skid down the road, but with my use the stock one works fine.

Photos to follow.
 
The project this past weekend was to do some radio swaps. The Midland GMRS MTX575 came out of the 4Runner and went into my son’s Jeep JKU. cdn.com/20240506/b564ee382a2b7b09ddf1e756aa947104.jpg[/IMG]

I had the icom 2730a. good radio. fun to use. I ended up removing it but I miss it. how did you mount antenna?
 
I had the icom 2730a. good radio. fun to use. I ended up removing it but I miss it. how did you mount antenna?

Yes, I enjoy the 2730.

NMO mount through the roof. I did it about even with the shark fin at the rear, evenly spaced between the shark fin and roof rail. On the opposite side I did the same for the Wilson cell booster antenna. There are photos earlier in the this thread.
 
Hello folks, I have some updates to share on recent modifications.

- Comms:

I swapped out the Icom 2730 for the newer Icom 2730B, which is the same radio, but a reverse display (white numbers on black background). This makes the radio match the dash gauges and is much more attractive.

I also found a wireless CarPlay adapter that really works. The Ottocast slim 2026 model has been excellent in my T4R.
OTTOCAST Mini Slim, 2026 Upgrade... https://www.amazon.com/dp/B0FQ5FPG8L?ref=ppx_pop_mob_ap_share

The wireless CarPlay enabled me to swap the head of my phone mount for one with wireless charging. It’s MagSafe compatible and works great in my T4R and my kids vehicles. ArmolabX on Amazon
ARMOLABX Magnetic Wireless... https://www.amazon.com/dp/B0FV8169BB?ref=ppx_pop_mob_ap_share

Lighting:

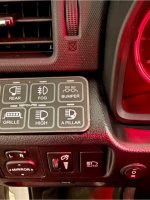
I never used the Dr. KDSS module, so I removed it and this opened up a spot on my SwitchPros controller. I decided rear fog lamps would be useful in the mixed weather we get in the PNW.

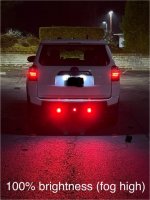
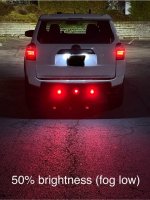
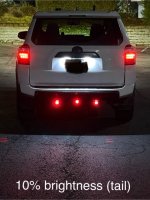
I’ve been running the Diode Dynamics hitch mounted tail/brake/reverse pod light for a couple years now and love it. With that said, I contacted Diode Dynamics and discussed options. I decided on using the same C1R modules because they are compact and would provide the desired output, while remaining compact and unobtrusive. These pods have tail/brake and reverse capability, but I didn’t want the extra tail lights. Since I’ve already significantly upgraded reverse lighting, that wasn’t needed either. Diode Dynamics assured me these pods could be run in the brighter brake light mode continuously to function as a rear red fog lamp. With that in mind…..

I wanted to keep things simple, I went with a basic wiring harness from DD (Light Duty Dual Output 4-pin Wiring Harness) that we ran up through the opening between rear bumper and tail light, then forward to the driver’s side dash, under the carpet.

While the C1R pods are supposed to be bold on to existing holes, I found the were a little too close to the spare tire, so we drilled holes in the frame equally spaced apart. This was easy and also gave a little more distance between the lamps.

The main power wire is connected to the SwitchPros module (position 3). We drilled a very small hole to the area just to the right of the auto high beam switch, then fitted a two position toggle to the dash.

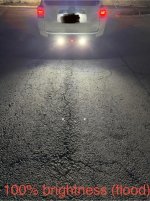
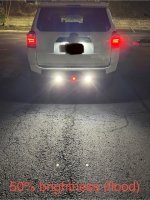
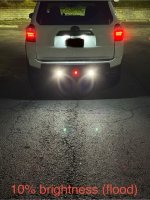
With the toggle switch set to position 1, a press of the SwitchPros switch activates the red rear fog lamp at 100% and it’s perfect fo that use. A flip of the toggle switch to position 2 and I have bright white flood lights, ideal for roadside repairs, setting up camp, or any other needs that may arise.

The SwitchPros controller also has a few nice features in their app, giving even more versatility, including the ability to dim the pods to 50% or 10% as desired. Additionally, the app offers both flash and strobe modes, which could be helpful if additional hazard warning lights are helpful.

I’m extremely pleased with the results and thankful for my buddy Mike’s help with my build. Photos will be posted when I’m able.

Thanks -

Hoppy

 
I also removed the stock roof rails and used the Toyota roof rail delete kit. I prefer the slick top look, which more closely resembles the original TLC.
 

Attachments

  • IMG_5690.jpeg
    IMG_5690.jpeg
    127.3 KB · Views: 0
  • IMG_5689.jpeg
    IMG_5689.jpeg
    102.9 KB · Views: 0
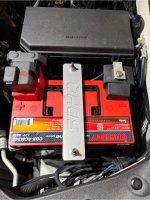
Another recent addition was the Odyssey AGM battery, SDHQ billet terminals, and SDHQ billet hold down kit. I also used the VoltageBooster Pro to let the AGM receive the voltage it prefers. Simple swap and all plug & play.
 

Attachments

  • IMG_5693.jpeg
    IMG_5693.jpeg
    118 KB · Views: 2
Photos of aforementioned recent mods.
 

Attachments

  • IMG_5695.jpeg
    IMG_5695.jpeg
    115.7 KB · Views: 1
  • IMG_5696.jpeg
    IMG_5696.jpeg
    128.8 KB · Views: 1
  • IMG_5697.jpeg
    IMG_5697.jpeg
    114.8 KB · Views: 1
  • IMG_5700.jpg
    IMG_5700.jpg
    68 KB · Views: 1
  • IMG_5699.jpeg
    IMG_5699.jpeg
    132.8 KB · Views: 1
  • IMG_5698.jpeg
    IMG_5698.jpeg
    134.8 KB · Views: 1
  • IMG_5702.jpeg
    IMG_5702.jpeg
    104.2 KB · Views: 1
  • IMG_5692.jpeg
    IMG_5692.jpeg
    83.6 KB · Views: 1
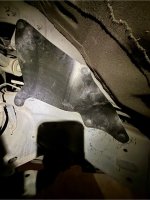
After hearing a tapping type sound at the left front corner while driving, I was concerned about possible light engine ping. Some research led me to posts about the inner fender liner pieces and potential loose clips that can allow movement, causing similar sounds at speed.

I ordered the thick replacement pieces from Rad Rubber Designs and installed them in about 15-20 minutes. Noise is gone. Great upgrade.

Also had a bad squeak from rear lately. Once again the internet to the rescue! Some white lithium grease on the tailgate latch and hinges and that problem is solved.
 

Attachments

  • IMG_5694.jpeg
    IMG_5694.jpeg
    112.4 KB · Views: 3
For the CTH heated steering wheel kit, is the pushbutton momentary or latching?

Thanks!

The CTH heated steering-wheel switch is <b>LATCHING</b>. It will stay on forever after you turn it on. There is an external box that modulates the heat, cycling the heater off and on. So, it never overheats (in fact, the first cycle is usually the warmest / nicest, and once it enters the ON/OFF cycling, it's usually a bit less-warm - but still very nice! This "latching" feature is actually quite nice if you plan ahead the night before (anticipating cold morning) and pre-turn it on... thus, your morning-remote-start gives you a nice, warm wheel.

It's not like the one-shot pushbutton with a timer, that some other vehicles have. ie it's not like our rear-window defogger / side-mirror heaters.

(and actually there are two circuits inside the CTH heated steering wheel switch: one for the actual steering wheel heater, and another for the light. It is possible, with a weak press, to get the switch into a "confused" state where the light may be off but the heater is on. Cycle the switch a few times to un-confuse it).
 

Members online

Forum statistics

Threads
278,309
Messages
3,554,070
Members
248,016
Latest member
Advally Service

Trending content

Back
Top