1998 3.4 Timing Belt Woes - Misfire - Wrong Belt or Installation?

All went well until fitting the timing belt. Everything at 12, Toyota belt marks (arrows pointing to front and held with binder clips) aligned with cams. CR belt mark wouldn’t reach, 1 tooth short on the pulley with a some slack between. No matter how hard I kept it tight I couldn’t get the mark to reach the pulley indentation, so tried doing it first, same result on RH cam – 1 tooth short. Ignored the CR mark. The cams were at 12 but the CR would be off by a tooth or the CR aligned and the cams didn’t or all would be off. I spent two days fighting this. Slackening or removing top idler only pulled the alignment out. Same for tensioner. I eventually got it on by rotating cams and CR to compensate for them moving when prying belt over bottom pulley whilst simultaneously holding RH cam with wrench to try and stop it moving, but it was so tight all round pulling the pin made no difference. The cam marks were still slightly off.
Rig was off the road for weeks as I did oil cooler gasket, replaced all the coolant hoses, engine mounts (more fun times) and valve cover gaskets so in my haste I just buttoned everything up and hoped for the best.
Needless to say, it misfired badly and I fear I’ve done damage.
Why does no one talk about this fight? I watched about a 6-7 YT videos and they all say it it’s a little tough to slip over the bottom pulley but jeez!!

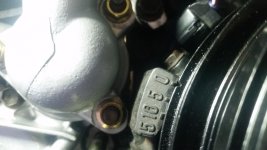
The genuine Toyota belt had a 13568-69095 sticker on the sealed bag but the belt was printed 13568-62050 is this the same thing?? Google can’t confirm for sure.
I used a Aisin water pump, Koyo LAT 200B top pulley and NSK 62STD67T12DDWA18 tensioner pulley and a new Toyota tensioner.

Where did I go wrong? Is the belt the correct one? Have I damaged anything? I did everything possible to install correctly

I foolishly didn’t compare the old belt with new and am tempted to put it back on when I pull apart again.
Help and thanks if you got this far!
 
Last edited:
Register to hide this ad
Sounds like you got the wrong belt there, I compared my new and old belt before installing just to make sure both had the same amount of teeth.
Might be worth getting a new belt from Rock auto and have handy when you tear into this to check it. I feel your pain, just take your time and re- check everything.
 
Thankfully these rigs are non interference motors so you haven't screwed anything up internally. It seems the wrong belt was packaged but put the old belt on top of the new belt and make sure the teeth count are correct and the circumference of the belt is the same. If not then the new belt was packaged wrong. One tooth off should not make it misfire like crazy. I've heard some that run one tooth off because never able to get all marks lined up. Try installing the new belt just barely on all the pulleys instead of fully seated on both cam pulleys. Then work it down on all pulleys in small increments. Make sure the teeth on the crankshaft pulley are in good shape as some have nicked them and have had bad problems with running cause the sensor uses those teeth to read the rotation of the motor.
 
Thankfully these rigs are non interference motors so you haven't screwed anything up internally. It seems the wrong belt was packaged but put the old belt on top of the new belt and make sure the teeth count are correct and the circumference of the belt is the same. If not then the new belt was packaged wrong. One tooth off should not make it misfire like crazy. I've heard some that run one tooth off because never able to get all marks lined up. Try installing the new belt just barely on all the pulleys instead of fully seated on both cam pulleys. Then work it down on all pulleys in small increments. Make sure the teeth on the crankshaft pulley are in good shape as some have nicked them and have had bad problems with running cause the sensor uses those teeth to read the rotation of the motor.

The teeth on the back of the pulley are good. I used a puller to remove. Because of the lips on the edge cam sprockets you have to seat fully and not loosely as you suggest. Interesting to note that there shouldn't be a misfire one tooth out. My cam alignments were like 1.5mm approx. to the right out. The pink dot on the CR aligned perfectly with the arrow and was at 0 deg when the bottom cover was reinstalled and after 360 deg rotation of cam sprockets.
 
Toyota part sites list 13568-YZZ03, 13568-69095 and 13568-62050 for the 3.4 so It would appear I have the correct belt. It's weird though the CR belt mark wouldn't align and why it was incredibly tight when installed and the pulled pin had no effect on the tension. If my cam marks are only slightly off I'm now wondering why it's running badly.
 
Sorry for the misinformation on the cam pulleys. After I wrote that I got to thinking they have lips on them. The belt shouldn't be really tight like you describe. If the cam marks are off just a bit just turn them back before installing the belt nothing will be hurt internally. I'd check the dimensions again with the old belt to make sure the new belt is correct. When pulling the pin you should be able to tell that some slack on the tensioner side of the belt gets tighter.
 
To get the cam pulleys to align this would have to be done without the belt on. The new belt should be removed to verify the correct amount of teeth as compared to the old one. Are there any codes present?
 
I'll add this info, with oem/aftermarket belts and marks I never go off of them. Ever. There are timing marks on the cam sprocket and metal timing belt cover and the crank sprocket has a mark and as well as the oil pump. Those are the only marks that matter.

I had to fight on a tacoma 5vz and ended up loosening the idler pulley about 3 threads till it falls out, loosen the hydraulic tensioner about 3/4. Then I had to "slightly" roll the crank to walk the belt on. Then worked the belt on everything else (slipped on easily) then tightened the idle pulley, tensioner and pulled the pin. Rotated 3-4 times checked physical timing marks, spot on!
 
Drained rad and pulled top cover. The belt is so tight there is like zero play in it. There was a fine residue on the top idler pulley. I need to pull fully apart.

Tried slackening top pulley but as soon as I apply any pressure to fully engage belt there or bottom pulley it pulls the cam sprockets or CR pulley off the marks.

Will report back.
 
I do belt by putting the cams on first and use little c clips or large black paper clips to hold those in place. The timing belt tensioner has to be locked with its pin holding it the entire way in. Just like 2TH4IST stated. The timing tensioner has to be just about ready to fall out only a few threads holding it in. Or completely out ( sometimes That makes it easier) With the timing belt locked onto the cams you can have the belt on the top. Then you can easily slide the belt onto the crankshaft in the proper position. Slight rocking of the crankshaft may help. I use medal bicycle tire irons to slide the belt on the crankshaft pulley gear. I have done 4 timing belts so far on the 5VZ-FE. The last one was the fastest after i used c clamp on the cams and working all the slack to the bottom for the crankshaft makes it easier to slide on as well. :-)
 
This is how I got mine on properly. Hope it makes sense

I found another old post suggesting to leave the upper idler loose, so it tips up a few degrees providing some slack. Then I took up that slack by rotating the driver side cam clockwise a little bit and also pulled the crank gear toward the front of the truck a bit so it was better aligned with the front edge of water pump pulley. I slipped it onto the tensioner pulley, then pulled it onto the water pump. All the marks line up now but I have a feeling it will skip a tooth when I tighten the tensioner and crank it around a couple times. But now I at least can get it on so that part is solvable.

It didn't skip a tooth. I also had the tensioner loose.

And FWIW even when it was all done properly, my cam marks did NOT line up perfectly perfect with their marks. But everything was correct.
 
Last edited:
Thanks for responses but I did mention I'm acquainted with the tricks and nuances for the belt install having watched many YT videos and noting [MENTION=10169]TheDurk[/MENTION] comments on other threads. What I'm asking, in a convulsed way, should the belt be so tight to install that final engagement will turn cams and crankshaft. I was able to fit belt by using a lever at lower pulley with one hand whilst holding RH cam steady with wrench to minimise it's movement with the other hand?

Pulling the pin on the tensioner made no difference as it was already super tight. This doesn't happen on the vids I watched.

Came across this video today. This guy fitted the belt with one hand and it doesn't look bionic (one for the younger members!) Jump to around 14mins

WTF

I am going to pull all apart but worried about engine damage. Weekend can't come quick enough I pulled top cover last night and found residue on top pulley and both cams were pointing the same way. I had only buttoned it up the day before and tried starting 3 times for a duration of 10 secs each time.
 
My unstated point was that this is how I did it and I didn't have any of the the problems you are having.

Admittedly, this was my solution to a different problem: getting all the slack out so I didn't come up one tooth short on the crank gear.
 
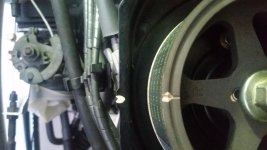
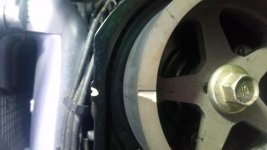
Looking more closely both cams are off by the thickness of a tooth which is about 3.5mm. Guess this is enough to through timing off.

Also, the tensioner pulley was coated in belt residue too. Odd, after minimal cranking.
 

Attachments

  • 20250115_175015.jpg
    20250115_175015.jpg
    128.2 KB · Views: 335
  • 20250115_175155.jpg
    20250115_175155.jpg
    133.3 KB · Views: 345
  • 20250115_175107.jpg
    20250115_175107.jpg
    129.5 KB · Views: 345
Still can’t get the belt and marks to align perfectly. Saw the recent thread of member having similar issues. [MENTION=120071]mtbtim[/MENTION] you rotated left cam slightly (which also pulls the right cam in your vid off it’s marks too) to gain slack but you didn’t explain how the marks align perfectly when you use your metal rule. Regardless, this method didn’t help. I still had o fight to get the belt over the tensioner pulley which rotates the crank.
I also tried this method alternative method
Thought I'd cracked it but the rh cam didn’t return to it’s mark when fully tightening top pulley and when I refit the tensioner it pulls the cams of their marks. I’m losing my mind with this.

I asked before but got no response, how far can the cams be off their marks?? The best I got was a tooth width (excluding the valley, just the width of a tooth which is a few mm)
I got a badly running engine with no codes ( maybe I need to run it longer). If a few mm is acceptable I’m beginning to wonder if something went awry with the valve cover gasket job I did at the same time I cannot for the life of me get all 3 marks perfect.
 
A tooth off is to much. It will throw the timing off a bit. What brand timing belt or belt kit did you buy?

If your looking straight at the engine, when installing the timing belt, the right side of the timing belt has to have tension or zero slack. Left side of the timing belt needs slack (the tensioner takes up that slack).

Use those big black paper clip things to hold belt on the cams or they will skip.

If you can't get the marks to line up (cam sprockets, crank sproket) there is something wrong. I know it's frustrating, but pull it apart get everything lined up again, reset the tensioner and put the pin in. Work the left cam first, loosen the idler pulley (it will give you a little more play) then under the idler, over the left cam (might need to rotate the cam to the right to grab a tooth, then rotate left to get mark to line up) there needs to be ZERO slack between the cam, idler, and cam, full tension here. Then over the water pump. And over the crank, again might need to rotate it to grab a tooth and rotate back to get tensioned and the mark lined up.

With the hydraulic tensioner off you should have enough slack to get the belt on the tensioner. Once done, walk the belt on completely. When the belt is on, make sure the right side is tensioned and the left is slack and all the marks line up. Once that is done tighten the idler pulley and reinstall the hydraulic tensioner. Pull the pin. Rotate engine 3-4 times. I recommend removing the spark plugs to make it easier. Then recheck the marks.
 
[MENTION=405460]2TH4IST[/MENTION] Check out the pics on post #15. The cam marks where out, in old money, just over a 1/4". I've since pulled it all apart and tried Timmy's method, the old link in prev. post, removing tensioner, slackening tensioner, removing top pulley, slackening top pulley. Yeah I used binder clips, Toyota parts and all new.

Haven't driven rig since last Aug. and if I can't get the belt to line up properly tomorrow I'm sorely tempted to set it on fire.
 
Sorry I missed the pics. Looking at them, they look spot on. But camera angles might be off. Did you remove coil packs and plug wires? By any chance did you get the plug wires mixes up? Or the coil packs not plugged in?
 
Sorry I missed the pics. Looking at them, they look spot on. But camera angles might be off. Did you remove coil packs and plug wires? By any chance did you get the plug wires mixes up? Or the coil packs not plugged in?

I did remove both coil packs and wires. The wires are correct as I removed them with clips in their entirety so they only went back in one way so to speak. I did double check with that diagram that's posted on the forum often.
I also numbered the packs and put them back in the same place. The funny thing is I have some newer spare ones that i didn't fit incase I created a misfire!!! I did a visual check of everything and all looked ok. I figured I'd get the belt on perfectly so i could eliminate that as being cause of misfire, then delve deeper into packs, plugs and wiring. Tomorrow I'll try the belt again and move on from there. I just wasn't sure how far off the cam marks could be as all I read is a "little off" is fine and a tooth and valley is too much.
 

Members online

Forum statistics

Threads
278,317
Messages
3,554,128
Members
248,016
Latest member
Advally Service

Trending content

Back
Top