How To: Clean Bolt Holes For TRD PRO Skid -- Alternative Method!

Sconnie

New member
If you’re looking to an alternative to the plug tap / thread chaser method look no further. Super simple!

Let’s dive in shall we?

Step 1: acquire supplies

Supplies needed:

45cal gun bore brush. Here is a pack of four for $9.95. I only needed one brush for two holes. It was pretty well smashed down when I was finished so I would say these would be a one time use thing. Next time you need to clean your holes use a new brush.

Gun Bore Brushe Set - 45 Cleaning Brush - 45 Brush Set with Solid Metallic Storage Box - 410 Cleaning Brush, 410 bore Brush, 40 Caliber bore Brush 45 Amazon.com: Gun Bore Brushe Set - 45 Cleaning Brush - 45 Brush Set with Solid Metallic Storage Box - 410 Cleaning Brush, 410 bore Brush, 40 Caliber bore Brush 45: Kitchen & Dining

Some gun cleaner solvent. I used OTIS 085 CLP All in One. $4.19 I slathered this shit on in and around my hole ([emoji6]) and have like 95% left. This will last a long time.

Otis 085 CLP Gun Cleaner Amazon.com : Otis 085 CLP Gun Cleaner : Sports & Outdoors

A power drill/driver to attach your 45cal brush too.

858e7d17c32dd4c226bd70729694a810.jpg


Step 2: give your rear holes an enema

Attach 45 cal bore brush to your drill/driver

Slather bore cleaner on the brush as best ya can. It’ll be a little drippy.

Slide that brush into your rear holes and go to town. In and out. Faster and slower. Keep it well lubricated. I squirted solvent from the top down while the brush was inside the hole.

You’ll at first notice the bore brush threading itself into the hole. It’s a snug fit. Eventually the brush will get mashed down. Use some muscle, turn your drill to full speed and hold that drill at wide open throttle and keep it steady centered in the hole. Run your drill backwards (lefty loosey) and a bunch of solvent and debris will fly out of the hole and spin off the brush. Just keep at it for several minutes. I think I went five minutes or so for each hole and pretty much full speed the entire time and that was all I needed. I have a 2021 with 2k miles so YMMV.

Now after a thorough cleaning I was able to thread the new longer bolts in by hand about half way. At that point I met some resistance (again I was just using my fingers) so then I attached my socket and ratchet and was able to EFFORTLESSLY tighten the bolt the remainder of the way.

I then used my drill with a socket attached to spin the bolt in and out EFFORTLESSLY. Here is video proof!

https://www.youtube.com/watch?v=sXHV3HgwoiE&feature=youtu.be

Step 3: install skid

Contort your body however you need to get the skid into position. After I cramped up I caved and grabbed my floor jack. I hoisted the plate up into position and threaded the bolts in by hand. Easy peasy.

Installing the skid was a breeze at this point. The bolts hand tightened all the way to the skid plate. Then just a few quick turns with the ratchet and GOOD TO GO.

This is my alternative method for those weary about a plug tap. Each will work and take about the same amount of time. But now you have options! [emoji482]

a56b6b937fb9049ef1ba2fdc52654d53.jpg


Sent from my iPhone using Tapatalk no
 
Last edited:
Register to hide this ad
If you’re looking to an alternative to the plug tap / thread chaser method look no further. Super simple!

Let’s dive in shall we?

Step 1: acquire supplies

Supplies needed:

45cal gun bore brush. Here is a pack of four for $9.95. I only needed one brush for two holes. It was pretty well smashed down when I was finished so I would say these would be a one time use thing. Next time you need to clean your holes use a new brush.

Gun Bore Brushe Set - 45 Cleaning Brush - 45 Brush Set with Solid Metallic Storage Box - 410 Cleaning Brush, 410 bore Brush, 40 Caliber bore Brush 45 Amazon.com: Gun Bore Brushe Set - 45 Cleaning Brush - 45 Brush Set with Solid Metallic Storage Box - 410 Cleaning Brush, 410 bore Brush, 40 Caliber bore Brush 45: Kitchen & Dining

Some gun cleaner solvent. I used OTIS 085 CLP All in One. $4.19 I slathered this shit on in and around my hole ([emoji6]) and have like 95% left. This will last a long time.

Otis 085 CLP Gun Cleaner Amazon.com : Otis 085 CLP Gun Cleaner : Sports & Outdoors

A power drill/driver to attach your 45cal brush too.

858e7d17c32dd4c226bd70729694a810.jpg


Step 2: give your rear holes an enema

Attach 45 cal bore brush to your drill/driver

Slather bore cleaner on the brush as best ya can. It’ll be a little drippy.

Slide that brush into your rear holes and go to town. In and out. Faster and slower. Keep it well lubricated. I squirted solvent from the top down while the brush was inside the hole.

You’ll at first notice the bore brush threading itself into the hole. It’s a snug fit. Eventually the brush will get mashed down. Use some muscle, turn your drill to full speed and hold that drill at wide open throttle and keep it steady centered in the hole. Run your drill backwards (lefty loosey) and a bunch of solvent and debris will fly out of the hole and spin off the brush. Just keep at it for several minutes. I think I went five minutes or so for each hole and pretty much full speed the entire time and that was all I needed. I have a 2021 with 2k miles so YMMV.

Now after a thorough cleaning I was able to thread the new longer bolts in by hand about half way. At that point I met some resistance (again I was just using my fingers) so then I attached my socket and ratchet and was able to EFFORTLESSLY tighten the bolt the remainder of the way.

I then used my drill with a socket attached to spin the bolt in and out EFFORTLESSLY. Here is video proof!

https://www.youtube.com/watch?v=sXHV3HgwoiE&feature=youtu.be

Step 3: install skid

Contort your body however you need to get the skid into position. After I cramped up and grabbed my floor jack and hoisted the plate up into position and threaded the bolts in by hand. Easy peasy.

Installing the skid was a breeze at this point. The bolts hand tightened all the way to the skid plate. Then just a few quick turns with the ratchet and GOOD TO GO.

This is my alternative method for those weary about a plug tap. Each will work and take about the same amount of time. But now you have options! [emoji482]

a56b6b937fb9049ef1ba2fdc52654d53.jpg


Sent from my iPhone using Tapatalk no

An excellent alterntive to the "tap" method.
NOW. Look up Sakar's stud thread and loose the bolts in favor of threaded studs. Makes install and removal stoopid simple.
 
An excellent alterntive to the "tap" method.
NOW. Look up Sakar's stud thread and loose the bolts in favor of threaded studs. Makes install and removal stoopid simple.

Yup! That is on the shortlist of next to do mods :D
 
Sconnie,

Just a suggestion. Since you mention that your .45cal brush gets distorted after a few holes, it might be best to use a smaller brush.
I don't know the thread size for your Skids but as a guess, I'm thinking 13mm wrench size which would be 8mm thread. If you stick with bore cleaning brushes, the closest size would be .32cal. (Approx 5/16").

The main reason I'm bringing this up is brushes work better if only the tips of the bristle are contacting the work.


Cap Screws
Thread Pitch ----- Wrench Size
M6 x 1 ___________10mm
M7 x 1.0__________11mm
M8 x 1.125________13mm
M10 x 1.0_________17mm
M10 x 1.25________17mm
M10 x 1.50________17mm
M12 x 1.50________19mm
M12 x 1.75________19mm
M14 x 2.00________21mm
M16 x 2.00________24mm
M20 x 2.50________30mm
M24 x 3.00________36mm
 
Last edited:
Sconnie,

Just a suggestion. Since you mention that your .45cal brush gets distorted after a few holes, it might be best to use a smaller brush.
I don't know the thread size for your Skids but as a guess, I'm thinking 13mm wrench size which would be 8mm thread. If you stick with bore cleaning brushes, the closest size would be .32cal. (Approx 5/16").

The main reason I'm bringing this up is brushes work better if only the tips of the bristle are contacting the work.


Cap Screws
Thread Pitch ----- Wrench Size
M6 x 1 ___________10mm
M7 x 1.0__________11mm
M8 x 1.125________13mm
M10 x 1.0_________17mm
M10 x 1.25________17mm
M10 x 1.50________17mm
M12 x 1.50________19mm
M12 x 1.75________19mm
M14 x 2.00________21mm
M16 x 2.00________24mm
M20 x 2.50________30mm
M24 x 3.00________36mm

TRD Skid Plate bolts are M10x1.25 for information purposes only.
 
Sconnie,

Just a suggestion. Since you mention that your .45cal brush gets distorted after a few holes, it might be best to use a smaller brush.
I don't know the thread size for your Skids but as a guess, I'm thinking 13mm wrench size which would be 8mm thread. If you stick with bore cleaning brushes, the closest size would be .32cal. (Approx 5/16").

The main reason I'm bringing this up is brushes work better if only the tips of the bristle are contacting the work.


Cap Screws
Thread Pitch ----- Wrench Size
M6 x 1 ___________10mm
M7 x 1.0__________11mm
M8 x 1.125________13mm
M10 x 1.0_________17mm
M10 x 1.25________17mm
M10 x 1.50________17mm
M12 x 1.50________19mm
M12 x 1.75________19mm
M14 x 2.00________21mm
M16 x 2.00________24mm
M20 x 2.50________30mm
M24 x 3.00________36mm

I started out with 30 caliber. That wasn't enough. Then went to 40cal. That seemed perfect. The brush retained its form and I felt like it was doing something. But then "just to see" I used a 45cal and that really dug into the hole. I was intrigued. It threaded itself up and down as I ran the drill. I was able to alternate left/right and hold the drill steady and get the crap out of there with that method. When changing directions the brush bristles would also reverse direction they were matted down, thus putting a lot of "elbow grease" into the threads. So for the second hole I purely used the 45cal brush and had it licked in five minutes. Not exactly by the book method for bore cleaning but I think the too large brush helped put extra OOMPH into the threads and get them cleaned out well.
 
I started out with 30 caliber. That wasn't enough. Then went to 40cal. That seemed perfect. The brush retained its form and I felt like it was doing something. But then "just to see" I used a 45cal and that really dug into the hole. I was intrigued. It threaded itself up and down as I ran the drill. I was able to alternate left/right and hold the drill steady and get the crap out of there with that method. When changing directions the brush bristles would also reverse direction they were matted down, thus putting a lot of "elbow grease" into the threads. So for the second hole I purely used the 45cal brush and had it licked in five minutes. Not exactly by the book method for bore cleaning but I think the too large brush helped put extra OOMPH into the threads and get them cleaned out well.

I'll admit that "theory" (Looks good on paper) sometimes doesn't hold up against experience.

The knee jerk reason I commented was your comment that the brushes will quickly wear out.

Visualizing what's happening (be the brush), the bristles on your .45cal brush are laying down inside the flanks of the thread form. Although this seemed to work for you, it still seems like a slightly smaller brush, say 5/16" would give you more mechanical action.

Don't get me wrong, I like your idea. I think its safer for the average person and if what's making the bolt hard to thread in by hand is gunk and dirt, it's probably a better solution than a thread chasing tap. IMO if you're not careful, frankly anal with using a tap, you stand the chance of clogging up the tap if not backed out constantly and cleaned.

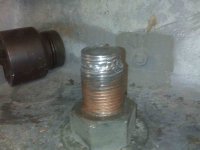
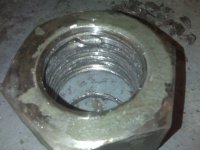
You may end up with a problem like this photo below when using a tap. This is one of my screw ups although I had the entire Maintenance Dept standing around watching the whole thing. That socket is around 4-1/2" X 2-1/2" Sq, Drive. The stud is around 3". LockNut is torqued to 26K ft/lbs.

Forgot to remove the Cold Galv Paint prior to removing the locknut.

https://www.toyota-4runner.org/atta...lternative-method-web-reduced-holcim-stud-jpg

https://www.toyota-4runner.org/atta...trd-pro-skid-alternative-method-1-big-nut-jpg
 

Attachments

  • Web-Reduced-Holcim-Stud.jpg
    Web-Reduced-Holcim-Stud.jpg
    35.1 KB · Views: 426
  • 1 big nut.jpg
    1 big nut.jpg
    129.7 KB · Views: 409
I'll admit that "theory" (Looks good on paper) sometimes doesn't hold up against experience.

The knee jerk reason I commented was your comment that the brushes will quickly wear out.

Visualizing what's happening (be the brush), the bristles on your .45cal brush are laying down inside the flanks of the thread form. Although this seemed to work for you, it still seems like a slightly smaller brush, say 5/16" would give you more mechanical action.

Don't get me wrong, I like your idea. I think its safer for the average person and if what's making the bolt hard to thread in by hand is gunk and dirt, it's probably a better solution than a thread chasing tap. IMO if you're not careful, frankly anal with using a tap, you stand the chance of clogging up the tap if not backed out constantly and cleaned.

You may end up with a problem like this photo below when using a tap. This is one of my screw ups although I had the entire Maintenance Dept standing around watching the whole thing. That socket is around 4-1/2" X 2-1/2" Sq, Drive. The stud is around 3". LockNut is torqued to 26K ft/lbs.

Forgot to remove the Cold Galv Paint prior to removing the locknut.

https://www.toyota-4runner.org/atta...lternative-method-web-reduced-holcim-stud-jpg

https://www.toyota-4runner.org/atta...trd-pro-skid-alternative-method-1-big-nut-jpg

Absolutely. I appreciate the suggestion. It may save brushes for others! I can only speak on what worked for me and thats the 45cal. However, if I were a betting man I'd also put money on the 40cal being probably the exact/ ideal size brush though.

I was quite apprehensive about the tap method. I KNOW it works. I read dozens (hundreds?) of posts on the forum(s) and watched several YOUTUBE videos as well. I even went to ACE and bought the appropriate tap, T handle and cutting fluid. I was fully prepared to give it a shot too. But went with the less invasive approach first just to see. And it worked :D
 
Very useful! Did you use the existing rear screws or the longer ones that come with the TRD skid plate? I'm more willing to try this method first versus using a tap because I'm paranoid about messing up the threads/holes with a tap on my 6,000 mileage 4Runner lol. Thanks again for this alternative method and for the video (watching it now).
 
Very useful! Did you use the existing rear screws or the longer ones that come with the TRD skid plate? I'm more willing to try this method first versus using a tap because I'm paranoid about messing up the threads/holes with a tap on my 6,000 mileage 4Runner lol. Thanks again for this alternative method and for the video (watching it now).


My pleasure!

I was in the same boat having a brand new truck and being apprehensive about the tap method.

I used the new longer rear bolts that came with the TRD skid plate.


Sent from my iPhone using Tapatalk
 

Members online

Forum statistics

Threads
278,316
Messages
3,554,111
Members
248,016
Latest member
Advally Service

Trending content

Back
Top