How to disassemble rear wheel well tray(s)

Tgrds

New member
I would like to install a fire extinguisher over the left rear wheel well in the trunk area of my TE; however, I am not so sure how to get the plastic tray removed. More specifically I would like to bolt down my fire extinguisher bracket to/thru the left rear wheel well tray. I just need to get that tray off without destroying the interior like a bear after honey. :)

Anyone know how to remove these plastic wheel well trays?

Harper7...?
 
Register to hide this ad
I would like to install a fire extinguisher over the left rear wheel well in the trunk area of my TE; however, I am not so sure how to get the plastic tray removed. More specifically I would like to bolt down my fire extinguisher bracket to/thru the left rear wheel well tray. I just need to get that tray off without destroying the interior like a bear after honey. :)

Anyone know how to remove these plastic wheel well trays?

Harper7...?


If you download the repair manual (mental note, I need to tip the nashman), you can see where the bolts, clips, screws, are and the order in which to remove the side trim boxes. The trays in the Trail appear to have two bolts holding them in place, which can't be accessed without taking off the whole interior quarter panel.
 
If you download the repair manual (mental note, I need to tip the nashman), you can see where the bolts, clips, screws, are and the order in which to remove the side trim boxes. The trays in the Trail appear to have two bolts holding them in place, which can't be accessed without taking off the whole interior quarter panel.

Good lord what a nightmare!!!

Step 41. REMOVE DECK TRIM SIDE PANEL ASSEMBLY LH
Vehicle Interior/Interior Panels Trim/Roof Headlining/Removal/

(1) Remove the bolt and disconnect the rear No. 1 seat outer belt floor anchor. (NO PROBLEM)
(2) Remove the 3 bolts and 2 screws. (NO PROBLEM)
(3) Detach the 7 clips, 5 claws and 2 guides. (MY EYES ARE BLEEDING)
(4) Detach the 6 claws and 2 guides, pass the rear seatback lock control lever base through the deck trim side panel and remove the deck trim side panel. (NOW MY EYES ARE BLEEDING WORSE)

Then

Step 72. REMOVE SIDE TRIM BOX LH
Vehicle Interior/Interior Panels Trim/Roof Headlining/Removal/

(1) Remove the 2 screws. (NO PROBLEM)
(2) Detach the 8 claws and remove the side trim box. (CLAWS ARE THE DEVIL)


Many thanks SeattleMike for the link and Nashman for putting this together. Good thing it is Friday as this is going to be a heck of a weekend project. All I can say is what the heck were they thinking having to remove the entire quarter panel just to get a little side trim box tray removed! :redbrick:

 
Good lord what a nightmare!!!

Step 41. REMOVE DECK TRIM SIDE PANEL ASSEMBLY LH
Vehicle Interior/Interior Panels Trim/Roof Headlining/Removal/

(1) Remove the bolt and disconnect the rear No. 1 seat outer belt floor anchor. (NO PROBLEM)
(2) Remove the 3 bolts and 2 screws. (NO PROBLEM)
(3) Detach the 7 clips, 5 claws and 2 guides. (MY EYES ARE BLEEDING)
(4) Detach the 6 claws and 2 guides, pass the rear seatback lock control lever base through the deck trim side panel and remove the deck trim side panel. (NOW MY EYES ARE BLEEDING WORSE)

Then

Step 72. REMOVE SIDE TRIM BOX LH
Vehicle Interior/Interior Panels Trim/Roof Headlining/Removal/

(1) Remove the 2 screws. (NO PROBLEM)
(2) Detach the 8 claws and remove the side trim box. (CLAWS ARE THE DEVIL)


Many thanks SeattleMike for the link and Nashman for putting this together. Good thing it is Friday as this is going to be a heck of a weekend project. All I can say is what the heck were they thinking having to remove the entire quarter panel just to get a little side trim box tray removed! :redbrick:

LOL!! Only way to really learn. I hav'nt did it yet but you see you cant really tell someone how to do it ,just have to go for it.It's all in Nashman's repair manual ,under Interior as you found.

Clips ,claws, screws and guides hold the whole dang interior together.I think it would be easier if you take out the sliding tray first?Then you could get under them panels to get them started. Work bottom to top.

We'd love to see some pics of what your doing!!!
 
Good lord what a nightmare!!!

...

Many thanks SeattleMike for the link and Nashman for putting this together. Good thing it is Friday as this is going to be a heck of a weekend project. All I can say is what the heck were they thinking having to remove the entire quarter panel just to get a little side trim box tray removed! :redbrick:

Yes, a nightmare. I think they want to keep people from jamming stuff into the spaces behind the plastic. Which makes no sense as it would just be easier to mold them into the plastic in the first place. Maybe they were found to be popping out too easily.

Enjoy your weekend and make sure to take lots of pics ;)
 
which extinguisher did you get? i got this one:
Amazon.com: Kidde 21006287 Auto Fire Extinguisher, 5BC, Silver: Home Improvement

if you got one similar, are you going to use the mount that came with it?

post some pictures, this will be my next project. ;)

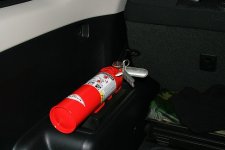
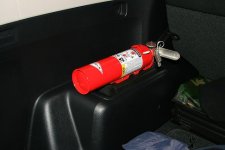
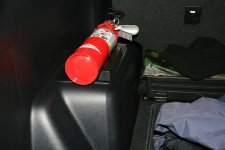
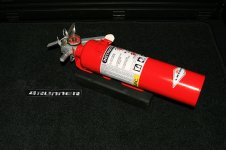
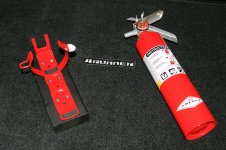
I am attempting to install a rechargeable 5lb 15" x 3" AMEREX B417 ABC Fire Extinguisher seen in the attached photo's. Note I already have the bracket mounted to a piece of painted 2"x4" board.

I bought this fire extinguisher from a local fire suppression company for around $35 and it is tagged to be good for five years. After that the guy said to just discharge it and bring it back in for a recharge which is normally $12. However, he said if I use the fire extinguisher to help save a vehicle or someone he said they would recharge it for free.

Anywho what I got:

1) Wife gone for the weekend (check)
2) Camera (check)
3) Repair Manual (check)
4) Tools (check)
5) Sawzall for when I get pissed off (check)
6) Fifth of whiskey to keep me from using the sawzall (check)
7) Cigar for pending victory (check)
 

Attachments

  • IMG_0002.JPG
    IMG_0002.JPG
    53.5 KB · Views: 1,746
  • IMG_0003.JPG
    IMG_0003.JPG
    57.8 KB · Views: 1,764
  • IMG_0004.JPG
    IMG_0004.JPG
    120.2 KB · Views: 1,804
  • IMG_0007.JPG
    IMG_0007.JPG
    102.2 KB · Views: 1,824
  • IMG_0008.JPG
    IMG_0008.JPG
    134.7 KB · Views: 1,839
When you go to remove the sliding tray, pull the covers off from the "top" rather than from the bottom closest to you, they seem to come out easier that way. You can also remove the flip-up divider while you are at it if you want.
 
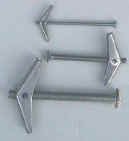
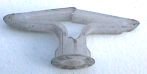
I don't know how much room you have under that plastic shelf or what lies beneath it, but did you ever think of using either of these items to secure the 2x4 to the plastic? Would save a lot of time and whiskey but might make that cigar go faster unless it was a Churchill of course! On the toggle bolt I would remove the bolt, place a rubber washer on the bolt and then reattach the bolt to the toggle so that when the wings open they can rest on the rubber washer for a little extra cushioning around the hole (if you could fold a metal washer then I'd use that instead :biggrin2:). :thumb3:

Mike :artist2:
 

Attachments

  • toggle1.jpg
    toggle1.jpg
    1.7 KB · Views: 1,653
  • plasticwing2.jpg
    plasticwing2.jpg
    2.4 KB · Views: 1,614

Members online

Forum statistics

Threads
278,316
Messages
3,554,120
Members
248,016
Latest member
Advally Service

Trending content

Back
Top