robguitargod1
New member
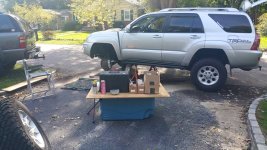
2005 SR5 4.0L
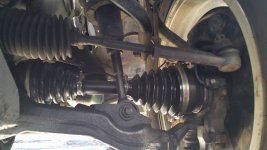
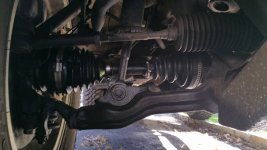
So both my front inner CV boots were torn. This is easily identifiable by the amount of grease covering everything in the vicinity. Some boots tear, some clamps fall off but the result is the same: Moisture and dirt contaminate the joint and the grease in the joint. Over time this will lead to premature wear and ultimately failure if you don't fix it.
Nearly everyone says, "Replace the half-shafts (front axles), it's more cost efficient." Those people are lying. The difference is $50. Doesn't sound like much but I'd rather keep $50 in my pocket and learn a little about my vehicle at the same time.
The cheapest Rock auto front axles are $40.79. A pair shipped is $110.02 with the 5% discount. Replacing the boots costs $60 and that's with the boot clamp tensioning tool included.
More Information for APWI TO8342

The inner boots are $11.38. A pair shipped is $27.65 with the 5% discount. Part number 1032957
http://www.rockauto.com/catalog/moreinfo.php?pk=1378672&cc=1431016&jnid=522&jpid=1

Tools you'll need:
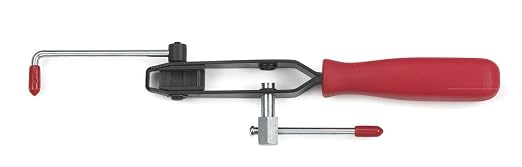
CV boot band/strap/clamp tool. There are 2 kinds. Mine required the less common tension tool. THIS TOOL CAN NOT BE RENTED. IT MUST BE PURCHASED! I used NAPA part number 3191:
Here's how to use it:
https://www.youtube.com/watch?v=IxqsKbXrYyY
This is a combination tension tool and cutter in one. The other variation of this too does not have the cutter attached but works equally well. You just have to cut the excess band yourself after you tighten it. Looks like this:

36mm socket. I rented a set of 4 different sized from Advance. Any auto parts stores has them

Now to the repair. First remove the wheel and start removing the caliper:

Remove the caliper with these 2 bolts:

DO NOT LET THE CALIPER HANG BY THE ASB SENSOR WIRE!!! SUSPEND IT FROM SOME ROPE OR A BUNGEE CORD:

Unplug the ABS sensor and tape it over to keep dirt out:

Remove the center dust cover and remove the axle nut with the 36mm socket you've rented.

To remove that nut just put the tire on the ground and break it loose with a 1/2" breaker bar and extension pipe. It's not very difficult but your impact might not be able to break it loose.
Use a mini sledge hammer to tap the axle out of the hub:

Remember to use a pan to catch the gear oil that will leak out. You'll replace it later.
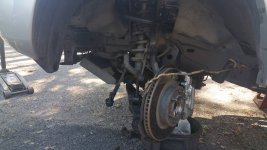
Remove the 2 19mm bolts on both sides of the ball joint in order to move the whole knuckle out of the way:

Now use a long screw driver or pry bar and the mini sledge to drive the axle out of the front diff. It'll take a few good blows but it'll come out.
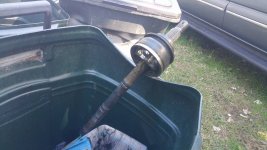
Now you have the axle out:

And that was the end of the night for me. Unfortunately I fell out of the vehicle forgetting it was 2' off the ground. Broke my nose and spent the night in the ER.


Point is, pay attention.
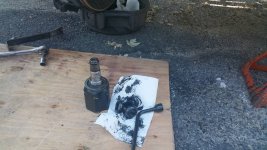
Next day. Now cut the bands and boot off and you'll see why this needed to be fixed:

Lots of water contamination. The grease should be very thick, not runny.
Next pull the cup off and inspect the rollers:

Clean the grease up so you can find and remove the snap ring that's holding them onto the shaft:

Now tap the roller off. Here's what they look like sitting inside the cup:

Clean all of the old grease. Now instal the new CV boot:

So both my front inner CV boots were torn. This is easily identifiable by the amount of grease covering everything in the vicinity. Some boots tear, some clamps fall off but the result is the same: Moisture and dirt contaminate the joint and the grease in the joint. Over time this will lead to premature wear and ultimately failure if you don't fix it.
Nearly everyone says, "Replace the half-shafts (front axles), it's more cost efficient." Those people are lying. The difference is $50. Doesn't sound like much but I'd rather keep $50 in my pocket and learn a little about my vehicle at the same time.
The cheapest Rock auto front axles are $40.79. A pair shipped is $110.02 with the 5% discount. Replacing the boots costs $60 and that's with the boot clamp tensioning tool included.
More Information for APWI TO8342
The inner boots are $11.38. A pair shipped is $27.65 with the 5% discount. Part number 1032957
http://www.rockauto.com/catalog/moreinfo.php?pk=1378672&cc=1431016&jnid=522&jpid=1
Tools you'll need:
CV boot band/strap/clamp tool. There are 2 kinds. Mine required the less common tension tool. THIS TOOL CAN NOT BE RENTED. IT MUST BE PURCHASED! I used NAPA part number 3191:
Here's how to use it:
https://www.youtube.com/watch?v=IxqsKbXrYyY
This is a combination tension tool and cutter in one. The other variation of this too does not have the cutter attached but works equally well. You just have to cut the excess band yourself after you tighten it. Looks like this:
36mm socket. I rented a set of 4 different sized from Advance. Any auto parts stores has them
Now to the repair. First remove the wheel and start removing the caliper:

Remove the caliper with these 2 bolts:

DO NOT LET THE CALIPER HANG BY THE ASB SENSOR WIRE!!! SUSPEND IT FROM SOME ROPE OR A BUNGEE CORD:

Unplug the ABS sensor and tape it over to keep dirt out:

Remove the center dust cover and remove the axle nut with the 36mm socket you've rented.

To remove that nut just put the tire on the ground and break it loose with a 1/2" breaker bar and extension pipe. It's not very difficult but your impact might not be able to break it loose.
Use a mini sledge hammer to tap the axle out of the hub:

Remember to use a pan to catch the gear oil that will leak out. You'll replace it later.
Remove the 2 19mm bolts on both sides of the ball joint in order to move the whole knuckle out of the way:

Now use a long screw driver or pry bar and the mini sledge to drive the axle out of the front diff. It'll take a few good blows but it'll come out.
Now you have the axle out:

And that was the end of the night for me. Unfortunately I fell out of the vehicle forgetting it was 2' off the ground. Broke my nose and spent the night in the ER.


Point is, pay attention.
Next day. Now cut the bands and boot off and you'll see why this needed to be fixed:

Lots of water contamination. The grease should be very thick, not runny.
Next pull the cup off and inspect the rollers:

Clean the grease up so you can find and remove the snap ring that's holding them onto the shaft:

Now tap the roller off. Here's what they look like sitting inside the cup:

Clean all of the old grease. Now instal the new CV boot:

Last edited:


 hehe.
hehe.