MuddyWater
New member
Hello! Based on multiple reads supporting positive results from the SeaFoam treatment and since there was not a clear and dedicated simple how-to thread for 3rd gen V6 4Runners. I've decided to put one out there specifically for us 3.4 V6, 3rd generation, 4Runner owners. I've gathered information from other threads as well as the manufacturer. There are 3 points of engine treatment where it is recommended to see results. It is recommended that 1/3 of the bottle be used for each of the 3 points of treatment.
1) PCV Hose
2) Crank Case (Oil)
3) Gas Tank
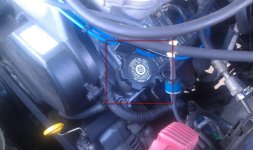
I will go through the PCV treatment first which seems to be the most confusing to some, especially the non-mechanically inclined. Although it is specified to use the break booster hose, on our trucks this will only provide treatment to one cylinder. By using the hose specified in the picture you will increase the likely hood of the treatment reaching all cylinders.
Part I: Treatment via PCV Hose - To clean deposits from the tops of cylinders and the backs of intake valves
Step 1: On V6 3rd Gens you want to use the vacuum hose specified in my picture below. Also take note of the red arrow as this is the entry point where you will make the disconnection and will be using this as the point of entry for SeaFoam to the intake system. Once you have given some thought as to how you will be supplying SeaFoam to this hose (some have disconnected the existing hose to utilize a temporary longer one for ease of application). I purchased the spray bottle (14oz) so I will be either guessing 4.6oz (x3) or spraying it into a clear container for a more accurate measurement. The small plastic bottle that I am referring to can be purchased at a Harbor Freight or other local hardware store.
Step 2: Once you are ready to proceed with the treatment. Warm up the truck and while the truck is still idling, disconnect the PCV hose from the point indicated in the picture. You will immediately hear the vacuum noise that is created by the suction which is normal. At this point, you will want to dip the hose into the container holding the SeaFoam and allow it to vacuum all of the SeaFoam (1/3 of bottle) OR pour it into the hose (SLOWLY). I say slowly because of reading that there is a risk of hydrolock if it is poured too quickly. During the treatment the truck will start to idle rough. You may need an assistant to maintain idle as you are pouring/spraying/vacuuming the SeaFoam into the PCV hose.
Step 3: After your have completed adding 1/3 of the SeaFoam. Shut down and reconnect the vacuum hose to the engine and allow it to sit. The manufacturer specifies allowing it to sit for 5 minutes but I will allow it to sit for 10 for good measure to allow the SeaFoam ample time to loosen dirty deposits.
Final Step 4: After 5-10 minutes. Fire up the engine and allow it to run with periodic revs to clean out the combustion deposits. At first, it will smoke a little but it will eventually become a significant amount of white smoke. This is normal since it means that the treatment is doing its job in getting rid of the dirty deposits. This will continue for a while (5-10mins) and eventually dwindle. Once the amount of smoke has dropped you may take it for a ride to see if you personally notice any improvement. Some have even driven aggressively (but legally, 2-5miles) during the smoke out period, but that is up to you if you want to the whole neighborhood to see how environmentally conscious you are. I live in California so...
NOTE: As mentioned this treatment WILL result in a considerable amount of smoke being exhausted and if your neighbors are a little sensitive about the environment or want to avoid them calling the local FD. You may want to consider doing it at night. More importantly, Tom P. as stated in his comment below, has brought up a good point. Consider doing this part of the treatment prior to a tune-up or simply change the spark plugs and O2 sensor after treatment. The reason is that after treatment, there will be a sudden increase of carbon deposits which will increase the possibility of fouled spark plugs and clogging to the O2 sensor.
1) PCV Hose
2) Crank Case (Oil)
3) Gas Tank
I will go through the PCV treatment first which seems to be the most confusing to some, especially the non-mechanically inclined. Although it is specified to use the break booster hose, on our trucks this will only provide treatment to one cylinder. By using the hose specified in the picture you will increase the likely hood of the treatment reaching all cylinders.
Part I: Treatment via PCV Hose - To clean deposits from the tops of cylinders and the backs of intake valves
Step 1: On V6 3rd Gens you want to use the vacuum hose specified in my picture below. Also take note of the red arrow as this is the entry point where you will make the disconnection and will be using this as the point of entry for SeaFoam to the intake system. Once you have given some thought as to how you will be supplying SeaFoam to this hose (some have disconnected the existing hose to utilize a temporary longer one for ease of application). I purchased the spray bottle (14oz) so I will be either guessing 4.6oz (x3) or spraying it into a clear container for a more accurate measurement. The small plastic bottle that I am referring to can be purchased at a Harbor Freight or other local hardware store.
Step 2: Once you are ready to proceed with the treatment. Warm up the truck and while the truck is still idling, disconnect the PCV hose from the point indicated in the picture. You will immediately hear the vacuum noise that is created by the suction which is normal. At this point, you will want to dip the hose into the container holding the SeaFoam and allow it to vacuum all of the SeaFoam (1/3 of bottle) OR pour it into the hose (SLOWLY). I say slowly because of reading that there is a risk of hydrolock if it is poured too quickly. During the treatment the truck will start to idle rough. You may need an assistant to maintain idle as you are pouring/spraying/vacuuming the SeaFoam into the PCV hose.
Step 3: After your have completed adding 1/3 of the SeaFoam. Shut down and reconnect the vacuum hose to the engine and allow it to sit. The manufacturer specifies allowing it to sit for 5 minutes but I will allow it to sit for 10 for good measure to allow the SeaFoam ample time to loosen dirty deposits.
Final Step 4: After 5-10 minutes. Fire up the engine and allow it to run with periodic revs to clean out the combustion deposits. At first, it will smoke a little but it will eventually become a significant amount of white smoke. This is normal since it means that the treatment is doing its job in getting rid of the dirty deposits. This will continue for a while (5-10mins) and eventually dwindle. Once the amount of smoke has dropped you may take it for a ride to see if you personally notice any improvement. Some have even driven aggressively (but legally, 2-5miles) during the smoke out period, but that is up to you if you want to the whole neighborhood to see how environmentally conscious you are. I live in California so...
NOTE: As mentioned this treatment WILL result in a considerable amount of smoke being exhausted and if your neighbors are a little sensitive about the environment or want to avoid them calling the local FD. You may want to consider doing it at night. More importantly, Tom P. as stated in his comment below, has brought up a good point. Consider doing this part of the treatment prior to a tune-up or simply change the spark plugs and O2 sensor after treatment. The reason is that after treatment, there will be a sudden increase of carbon deposits which will increase the possibility of fouled spark plugs and clogging to the O2 sensor.
Attachments
Last edited: