
You are using an out of date browser. It may not display this or other websites correctly.
You should upgrade or use an alternative browser.
You should upgrade or use an alternative browser.
I found "The One", 2001 Sport Ed. TRD SC'd
- Thread starter BigFishAllDay
- Start date

I am new here, but I have been involved in many forums for my cars in the past...that being said, I think this is the most amazing thread I have ever come accross, seriously, its friggen insane! Thanks for taking the time to post all the detail on pretty much everything, just awesome


00_4runner
New member
Wow... Great work as usual! Your skids look amazing, how much for a set?? 

BigFishAllDay
New member
Nice.
Skids look great!
Looks beefy as hell :thumb3:
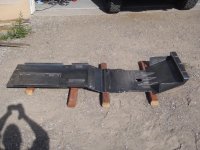
You know it's good work when even the shadow's giving you a standing ovation! You've got skills
Thanks, gentleman! Jacob, that comment made me laugh. I was standing back, holding the camera up high, and using the zoom trying NOT to get my shadow in the picture, but I ended up w/the "standing ovation" shadow, so I guess that's OK.
Man, you never cease to amaze me. You have some serious skills, I like the design and lines of your skids Nick, very impressive as always! How much clearance do you have beneath the lowest point of your transfer case and the top of the skid plate? Mine rattles ever so slightly when i am idling in 4lo.
Thanks, Nate! This is by far the biggest fabrication project I've ever taken on, and honestly they turned out much better than I expected. I can't take credit for the general design, because I loosely based my skids around the BudBuilt design, but my goal was to improve on that design based on the feedback I've heard from others.
I'll post some pictures of the clearance between the t-case and the skid, but there's a little less than 3/8". I'd heard from several people who run BudBuilts that their t-case hits the belly pan and rattles. I think Dirtco re-used the small peice of rubber on the stock t-case skid to solve that issue. Regardless, I knew it was a potential problem so I took steps to avoid it.
Very nice. I'd love to see more pics and pics of the build.
Thanks! I'll post some more pictures below.
You have pretty good taste in music. Atmosphere is very chill ..
That skid looks awesome. I can't believe you made it from scratch ...
Thanks on both counts! I was listening to some tunes while making the post and that song had just played... I thought it fit the mood of accomplishment well. BTW, I found the photos that you posted in your classified ad for your old BudBuilt helpful in planning this project... those, along w/the ones that COB posted after he bought it from you, are some of the more detailed pictures of the BudBuilt skids that are available.
Very nice skids! What steel thickness did you use?
Thanks Bandit! That's a high compliment coming from a fabricator with your level of skill. The skids are built completely out of 3/16".
BFAD: you have no idea how jealous I am of that skid. That is easily one of the most "form fitting" skids I've seen for the 3rd gens, it really protects closely, it seems. Designed super well too, you did awesome! Must be a quick learner with that welder!
Jon, thanks a ton for the feedback and the compliments. I did my best to keep it tight to the undercarriage while still providing clearance between the skids and the components they are trying to protect. The HH 140 is a great little welder... it has it's quirks but it's very user friendly.
The biggest challenge I ran into this time was running out of welding wire. This was a big enough project that I ran through what was left of my first 2lb. spool, and a second, and now I'm on my 3rd. When the spools of wire get down to the last couple wraps they don't feed well and that results in some less than attractive welds.
I am new here, but I have been involved in many forums for my cars in the past...that being said, I think this is the most amazing thread I have ever come accross, seriously, its friggen insane! Thanks for taking the time to post all the detail on pretty much everything, just awesome
4yotaguy, wow man, that's a hell of a compliment. I appreciate you taking the time to check it all out, and comment. I've really put alot of work into it over the years, so the recognition is always appreciated.
NickBuilt?
In all seriousness, they look great. The extra bracing is going to pay for itself 10 fold when you get to Moab. My BudBuilt belly pan isn't very happy due to the lack of bracing.....
Awesome job as always Nick!
That's funny Addison, you read my mind! I told my Wife as I was finishing up that I should make a sticker that says "NickBuilt" for the front. As I mentioned above, I did base my design loosely on Bud's skids because had I chosen to buy some, those would have been my choice. I chose to build my own instead after reading all the accounts of BudBuilts bending easily, being difficult to re-install, and owners wishing they had added some bracing. I really thought about buying Bud's skids and modifying them for extra strength, but ultimately decided that if I was going to go through the trouble I'd get more satisfaction out of building my own. Thanks for the compliments.
Wow... Great work as usual! Your skids look amazing, how much for a set??
Thanks alot, man! I appreciate you stopping by to have a look. I don't think anyone could make a viable go at the metal fabrication business without a serious investment in tooling or outsourcing of the metal shaping.
I've only got about $80 worth of materials in those skids, but I spent about 35 hours building them, start to finish. With that kind of labor cost, there's no way I could sell these for anything resembling a profit.

4ever4running
New member
Beef, it's what's for T4R's. Awesome looking skids man!
heck yeah man, its awesome! I am still not all the way through it, I'm takin notes! From the Big Three to the CBI rear bumper- something I really want to get, very helpful info. Slides are awesome. Man I have to move out of the NYC area, het a small house and learn how to weld...
BigFishAllDay
New member
In continuing my preparation for the Moab trip, I addressed some cooling issues that I've observed over the last year. I'm not sure if anyone remembers the trip to CO that I posted last year, but my Wife and I ran a bunch of high passes near Ouray/Telluride. On those trips I saw some coolant/trans fluid temps that were a little higher than I'd like, and knowing that it will be much warmer in Moab, I decided to add some cooling capacity.
First up, I added a B&M 70264 (which has the highest cooling capacity among their three trans cooler offerings) in series with my TRD transmission cooler.

TRD cooler alone, the inlet is at the top, the outlet @ the bottom.

And now, with the B&M in series. I routed the lines so that the send line from the transmission feeds the B&M at the bottom. The fluid then comes out @ the top of the B&M and feeds the TRD cooler at the bottom. Last the fluid comes out @ the top of TRD cooler and back to the transmission. I reversed the top/bottom arrangement of the inlets/outlets to keep any air from collecting in the tops of the coolers.

While I was in there, I replaced the send line with some new hose. The first time around I used fuel line instead of transmission oil cooler hose, which is a no-no because the fuel line can soften and rupture over time. Now the setup is all T.O.C. hose.
I also moved the temperature sensor for my AutoMeter trans temp gauge from the send line to the return line. The Scangauge 2 already allows for monitoring of temps @ the send line (this is where the factory sensor resides), so now I can see both hot temps leaving the transmission and the cooler temps coming out of the oil coolers. This should give me a better idea of how efficiently my trans oil coolers are working, and show me the true temperature of the fluid going back to the trans.

A couple shots of the line routing... all the lines are sheathed where they pass over any metal edges...


The highest trans fluid temps that I was seeing with the TRD cooler alone were somewhere between 220-230 degrees, and only for brief instances. The highest sustained temps were 200-210 degress. This new setup should easily keep even peak temps below 200 degrees, and it will probably be overkill during the cooler months, keeping the trans a little too cool. I have plans to replace the radiator eventually, at which point I'll change this setup again to go radiator cooler > TRD cooler > B&M 70264, which should be ideal.
As far as install issues, everything was easy enough, except that I had to lose one of my horns. There was no way to make it fit behind the grille with that fatty B&M cooler sitting back there. I honked the horn with both horns plugged in, then did it again with only the horn I could keep and it sounded the same, so.... :shrug:
First up, I added a B&M 70264 (which has the highest cooling capacity among their three trans cooler offerings) in series with my TRD transmission cooler.
TRD cooler alone, the inlet is at the top, the outlet @ the bottom.
And now, with the B&M in series. I routed the lines so that the send line from the transmission feeds the B&M at the bottom. The fluid then comes out @ the top of the B&M and feeds the TRD cooler at the bottom. Last the fluid comes out @ the top of TRD cooler and back to the transmission. I reversed the top/bottom arrangement of the inlets/outlets to keep any air from collecting in the tops of the coolers.
While I was in there, I replaced the send line with some new hose. The first time around I used fuel line instead of transmission oil cooler hose, which is a no-no because the fuel line can soften and rupture over time. Now the setup is all T.O.C. hose.
I also moved the temperature sensor for my AutoMeter trans temp gauge from the send line to the return line. The Scangauge 2 already allows for monitoring of temps @ the send line (this is where the factory sensor resides), so now I can see both hot temps leaving the transmission and the cooler temps coming out of the oil coolers. This should give me a better idea of how efficiently my trans oil coolers are working, and show me the true temperature of the fluid going back to the trans.
A couple shots of the line routing... all the lines are sheathed where they pass over any metal edges...
The highest trans fluid temps that I was seeing with the TRD cooler alone were somewhere between 220-230 degrees, and only for brief instances. The highest sustained temps were 200-210 degress. This new setup should easily keep even peak temps below 200 degrees, and it will probably be overkill during the cooler months, keeping the trans a little too cool. I have plans to replace the radiator eventually, at which point I'll change this setup again to go radiator cooler > TRD cooler > B&M 70264, which should be ideal.
As far as install issues, everything was easy enough, except that I had to lose one of my horns. There was no way to make it fit behind the grille with that fatty B&M cooler sitting back there. I honked the horn with both horns plugged in, then did it again with only the horn I could keep and it sounded the same, so.... :shrug:
Last edited:
BigFishAllDay
New member
Next it was time to address my engine cooling. The normal operating temps that I've observed via the ScanGauge range from 198 to 209 once the engine is fully warmed up. Usually it hovers within 1 degree of 202, but when I'm off road, or ascending long uphill stretches of highway, it always creeps up into that 207-209 range.
Considering the '01 has all the TRD goodies, I figured it would have the TRD 160 degree thermostat when I bought it, but obviously that is not the case.
After draining the radiator, removing the Dynamic Tensioner and the thermostat housing, this is what came out:
An OEM 180 degree T-stat.... The jiggle valve was installed at the 10 o'clock position, but I'm not sure if that had anything to do with it running a little warm.

82 Celcius = 180 Fahrenheit


The thermostat housing looked pretty clean, no buildup or gunk... The coolant appears to be green in this picture, but that is misleading.

This is the coolant that I drained from the system... clearly it's red/pink. I would assume that it is Toyota Red coolant.

Just shy of 9 quarts drained out, including what I emptied out of the overflow reservior.

For the new thermostat I decided to go with a Stant 170 degree unit for $18 @ NAPA versus paying $60+ for the TRD 160 degree unit. The NAPA part # is THM-17. I also picked up a fresh gasket for $2.
Link to the NAPA T-Stat: NAPA THM-17 170 Degree Thermostat


For coolant, I went with Zerex Asian Vehicle 50/50. It was $14/gallon at NAPA, which was the ONLY place I could find it. This stuff is equivalent to Toyota coolant, for a little less money. Check out the link below for more info, and to download the MSDS with all the specs.
Valvoline.com > Products > Zerex > Antifreeze Zerex > Zerex® Asian Vehicle Antifreeze / Coolant

A bottle of this went in too, just for good measure...

I buttoned everything up, filled and bled the system, and checked for leaks. After topping everything off, it took just a tad more than 9 quarts to re-fill the system, which is right in line w/the specs in the owners manual/FSM for a 4Runner w/the rear heater.
I ran the engine up to operating temperature, and it pegged right at 182 degrees. Normally it would head right up to 200-202. Looks like a success to me, but I'll follow up with more observations after I've had some significant time behind the wheel with the new setup.
Considering the '01 has all the TRD goodies, I figured it would have the TRD 160 degree thermostat when I bought it, but obviously that is not the case.
After draining the radiator, removing the Dynamic Tensioner and the thermostat housing, this is what came out:
An OEM 180 degree T-stat.... The jiggle valve was installed at the 10 o'clock position, but I'm not sure if that had anything to do with it running a little warm.
82 Celcius = 180 Fahrenheit
The thermostat housing looked pretty clean, no buildup or gunk... The coolant appears to be green in this picture, but that is misleading.
This is the coolant that I drained from the system... clearly it's red/pink. I would assume that it is Toyota Red coolant.
Just shy of 9 quarts drained out, including what I emptied out of the overflow reservior.
For the new thermostat I decided to go with a Stant 170 degree unit for $18 @ NAPA versus paying $60+ for the TRD 160 degree unit. The NAPA part # is THM-17. I also picked up a fresh gasket for $2.
Link to the NAPA T-Stat: NAPA THM-17 170 Degree Thermostat
For coolant, I went with Zerex Asian Vehicle 50/50. It was $14/gallon at NAPA, which was the ONLY place I could find it. This stuff is equivalent to Toyota coolant, for a little less money. Check out the link below for more info, and to download the MSDS with all the specs.
Valvoline.com > Products > Zerex > Antifreeze Zerex > Zerex® Asian Vehicle Antifreeze / Coolant
A bottle of this went in too, just for good measure...
I buttoned everything up, filled and bled the system, and checked for leaks. After topping everything off, it took just a tad more than 9 quarts to re-fill the system, which is right in line w/the specs in the owners manual/FSM for a 4Runner w/the rear heater.
I ran the engine up to operating temperature, and it pegged right at 182 degrees. Normally it would head right up to 200-202. Looks like a success to me, but I'll follow up with more observations after I've had some significant time behind the wheel with the new setup.
Last edited:

tyr0981
New member
i guess i should have put a trans temp gauge on when i put my B&M in, but it was cold and had just finished the ARB/ XRC8 install... in short i didn't, and have noticed a much happier "feeling" transmission, i haven't towed anything major since YET... but the Laser Temp gauge says the B&M cooler never goes above 150 degree's so i'm guessing an internal of ~180....??
i'll take a pic ASAP, but i followed somebody's advice and installed an engine cooling fan from a motorcycle, a Yamaha R1 on the back of the cooler, and it has TONS of air moving capacity! it looked to have doubled the air inflow in conjunction with the OEM fan, and the laser temp reader was around 120 when i drove back on the trail i was 'Temperature testing' on...
so if double coolers don't handle the heat issue, you should look into some easy fan mounting metal working, and cheap fans on eBay, just what's worked for me! Still a Beautiful rig man!
:bravo:
i'll take a pic ASAP, but i followed somebody's advice and installed an engine cooling fan from a motorcycle, a Yamaha R1 on the back of the cooler, and it has TONS of air moving capacity! it looked to have doubled the air inflow in conjunction with the OEM fan, and the laser temp reader was around 120 when i drove back on the trail i was 'Temperature testing' on...
so if double coolers don't handle the heat issue, you should look into some easy fan mounting metal working, and cheap fans on eBay, just what's worked for me! Still a Beautiful rig man!
:bravo:
tyr0981
New member
so the Red/ Black cables, and the Flexible wire loom near the top of the frame is the power cable to the winch and wires to the lights, and of course the air conditioner radiator in the background. it could be cleaner, but it' hidden behind the front grill and not noticeable. The only trick is to make sure the fan mount is sturdy, any play in it, and it will rattle or move around (neither a good option).
<img src="http://imageshack.us/a/img221/7861/20130516184730.jpg" alt="Image Hosted by ImageShack.us"/><br/>
Big Piture:
FULL SIZE PITURE
<img src="http://imageshack.us/a/img221/7861/20130516184730.jpg" alt="Image Hosted by ImageShack.us"/><br/>
Big Piture:
FULL SIZE PITURE

quicksilvr
New member
That Zerex is great coolant. I've been running it for 20k miles in both my toyota's.
I have not messed with my thermostat at all, because it goes to 184 and sits there like a rock. It's the only 4runner I've owned that has been that consistent all the time.
I'll be interested to see what your trans temp does for you in Moab with that setup. Nice work.
I have not messed with my thermostat at all, because it goes to 184 and sits there like a rock. It's the only 4runner I've owned that has been that consistent all the time.
I'll be interested to see what your trans temp does for you in Moab with that setup. Nice work.

DavidAlexander
New member
Congrats on all of your improvements. Those skids are some real quality work and I really like the way you ran the b&m in series with your trd tran cooler. Let us know how the Moab trip goes!
BigFishAllDay
New member
More Moab prep...
After I got done addressing my cooling systems, it was time to move on to these piles of parts:
2 x TRD "O" Throttle Body Gaskets, and 2 x OEM CV Joint Inner Boot Kits

Uniden Pro520XL, 18ft. 95% shielding coax, right angle adapter, quick disconnect, HD spring, aluminum mount, Everhardt Tiger 4ft tuneable fiberglass antenna, and a couple of SWR meters I borrowed from my buddy [MENTION=57546]4-Ripcord[/MENTION].
The pulley on the right will be discussed in greater detail down the road... it's not on yet, and it's not for the S/C, but it does make more "power".

The '01 was already running an "O" throttle body gasket, but it has been leaking for some time (as evidenced by a buildup of oily residue around the TB/SC joint). Old vs. New:
Note the new gasket is manufactured by Cometic... good gaskets right there.

The throttle body wasn't in terrible shape, but it was a little dirty inside, so I gave it a good cleaning.

I replaced the gasket because it was leaking, but I was rewarded with a MOST RIGHTEOUS SIDE BENEFIT!!!! Cleaning the throttle body & replacing the gasket fixed my low idle issue!!! :rockon:
The low idle has been my NUMBER 1 pet peeve with this truck for as long as I've owned it, and it's finally fixed. The '01 has always idled at about 450 rpm when in gear, and at that speed the alternator does not generate current, so the lights dim, fans slow down, and the whole truck runs off the battery.... including the ignition system. This led to a sometimes funky idle and occasional stalling.
But no more... 1100 initial RPM on cold starts, settles out to 800-ish idling in Nuetral, and sits at around 650 in gear... freakin PERFECT. And the alternator charges at 650 rpm, so life is good. If you can't tell, I am STOKED to have this fixed. imp:
imp:

The set of spare CV's that I re-booted went into the '97, so I had the OEM CV's out of the '97 sitting in the garage as my new spares. The boots were old and cracked, so I re-booted both of them and will be taking them to Moab as spares.

I also got my in cab winch control dialed in. I connected all the wires and everything works exactly as planned. I made these labels for the OEM power mirror switch... I wasn't sure if I wanted solid arrows, or outlined, so I made both.

And applied one of them to the switch like so.. (went with solid arrows)

BADA----BING!!!
It works real smooth-like. See the top switch, which would normally select the right or left mirror, is now a safety switch. Far left is OFF, center is OFF, far right is ON/Activated. Once the top switch has been activated, it's as easy as pressing left or right on the switch to winch to my heart's content.

After I got done addressing my cooling systems, it was time to move on to these piles of parts:
2 x TRD "O" Throttle Body Gaskets, and 2 x OEM CV Joint Inner Boot Kits
Uniden Pro520XL, 18ft. 95% shielding coax, right angle adapter, quick disconnect, HD spring, aluminum mount, Everhardt Tiger 4ft tuneable fiberglass antenna, and a couple of SWR meters I borrowed from my buddy [MENTION=57546]4-Ripcord[/MENTION].
The pulley on the right will be discussed in greater detail down the road... it's not on yet, and it's not for the S/C, but it does make more "power".
The '01 was already running an "O" throttle body gasket, but it has been leaking for some time (as evidenced by a buildup of oily residue around the TB/SC joint). Old vs. New:
Note the new gasket is manufactured by Cometic... good gaskets right there.
The throttle body wasn't in terrible shape, but it was a little dirty inside, so I gave it a good cleaning.
I replaced the gasket because it was leaking, but I was rewarded with a MOST RIGHTEOUS SIDE BENEFIT!!!! Cleaning the throttle body & replacing the gasket fixed my low idle issue!!! :rockon:
The low idle has been my NUMBER 1 pet peeve with this truck for as long as I've owned it, and it's finally fixed. The '01 has always idled at about 450 rpm when in gear, and at that speed the alternator does not generate current, so the lights dim, fans slow down, and the whole truck runs off the battery.... including the ignition system. This led to a sometimes funky idle and occasional stalling.
But no more... 1100 initial RPM on cold starts, settles out to 800-ish idling in Nuetral, and sits at around 650 in gear... freakin PERFECT. And the alternator charges at 650 rpm, so life is good. If you can't tell, I am STOKED to have this fixed.
imp:
The set of spare CV's that I re-booted went into the '97, so I had the OEM CV's out of the '97 sitting in the garage as my new spares. The boots were old and cracked, so I re-booted both of them and will be taking them to Moab as spares.
I also got my in cab winch control dialed in. I connected all the wires and everything works exactly as planned. I made these labels for the OEM power mirror switch... I wasn't sure if I wanted solid arrows, or outlined, so I made both.
And applied one of them to the switch like so.. (went with solid arrows)
BADA----BING!!!
It works real smooth-like. See the top switch, which would normally select the right or left mirror, is now a safety switch. Far left is OFF, center is OFF, far right is ON/Activated. Once the top switch has been activated, it's as easy as pressing left or right on the switch to winch to my heart's content.
BigFishAllDay
New member
On to the CB radio...
On Monday, I started on the CB install. I did a mock install and took a drive to an empty lot to check my SWR's before I commited to a final install location.
Due to grounding issues that come with mounting to a swing away tire carrier, it took some experimentation to make my chosen antenna location work out properly, but I finally got it dialed in on Tuesday afternoon.
For a power connection, I chose to tap the existing wiring for the AUX 12V power ports. Whenever I visit the junk yard I grab a couple sections of OEM wiring harness with plugs... I find them very useful for building OEM-looking harnesses for aftermarket gear. In this case, I used a multi-meter to find the 12V+ to the AUX outlet, and then tapped my spare OEM plug into the existing wiring.

Female end gets soldered to the radio's wires..

Easy as pie, and clean as a whistle...

Time to cut up the ashtray slot. It took all of 60 seconds using a Dremel equipped with a cut off wheel...
Before:

After:

Mounting method used was double sided mounting tape between the top of the CB and the bottom of the arms that supported the ashtray slide. Then I wove a zip tie through the holes and around the bottom of the radio. The tape keeps it secure front to back, while the zip tie takes care of the up/down and side to side.


I took all the wiring behind the CB and tied it up and to the left (D/S) to prevent interference with the radio once installed.

And that was that for the CB... in she goes... The right angle adapter helped get the CB in there nice and flush. (Note to self... reset your clocks)
(Also, I had this CB peaked and tuned, so it's got a "little" more power than an off the shelf 520xl)

I routed the coax under the carpet to the P/S, down the door sills and along the P/S wheel well, then out the rear floor via an access plug located under the rear hatch sill trim, then out to the swing away. I had to do some grounding work to get a good antenna ground... first I ground all of the powdercoating off one of the bolt holes on the CBI to the frame. I also ground the bolt down to fresh metal, and cleaned the threads... this ensured that the bumper was grounded well to the frame. (I plan to apply RTV over the bolt head to prevent rust as soon as I can)

Now I just had to get the swing away grounded to the bumper. You might think the hinge would provide a good ground, and it does... sometimes... but it is not consistent. To provide a reliable ground between the swing away and the bumper, I built a short 8ga. ground strap and connected the two at the spindle. The powdercoat was removed at both connection points.

Antenna mount... I had to drill 4 holes in the swing away for this one. Also, notice that I omitted the quick disconnect (it was machined poorly and fit together very loosely), and the spring (the antenna has enough flex by itself).

And the 4 foot Everhardt Tiger (part # SOTT-4)... They didn't have the Firestik's in the color I wanted at the CB shop I purchased from, so I said screw it and tried something different. The Everhardts are made in the good 'ol USA and came highly recommended. So far, so good.

Final install results... a SWR of 1.6 on channel 1 and 2.0 on channel 40, with a 1.7 on channel 19, right in the middle. Anything below 2.0 is just fine, and I didn't feel like screwing with it trying to achieve perfection. I think the SWR's would be much better if the antenna wasn't sitting so close to the spare tire. I tested the setup in an empty lot and was having clear conversations with two other individuals who were 5 miles and 7 miles away... clear across town. I'm sure it will work just fine for talking to the truck 100 yards ahead of / behind me on the trail.
Also, I picked up a PA speaker, but it's not installed yet. CB DONE.
On Monday, I started on the CB install. I did a mock install and took a drive to an empty lot to check my SWR's before I commited to a final install location.
Due to grounding issues that come with mounting to a swing away tire carrier, it took some experimentation to make my chosen antenna location work out properly, but I finally got it dialed in on Tuesday afternoon.
For a power connection, I chose to tap the existing wiring for the AUX 12V power ports. Whenever I visit the junk yard I grab a couple sections of OEM wiring harness with plugs... I find them very useful for building OEM-looking harnesses for aftermarket gear. In this case, I used a multi-meter to find the 12V+ to the AUX outlet, and then tapped my spare OEM plug into the existing wiring.
Female end gets soldered to the radio's wires..
Easy as pie, and clean as a whistle...
Time to cut up the ashtray slot. It took all of 60 seconds using a Dremel equipped with a cut off wheel...
Before:
After:
Mounting method used was double sided mounting tape between the top of the CB and the bottom of the arms that supported the ashtray slide. Then I wove a zip tie through the holes and around the bottom of the radio. The tape keeps it secure front to back, while the zip tie takes care of the up/down and side to side.
I took all the wiring behind the CB and tied it up and to the left (D/S) to prevent interference with the radio once installed.
And that was that for the CB... in she goes... The right angle adapter helped get the CB in there nice and flush. (Note to self... reset your clocks)
(Also, I had this CB peaked and tuned, so it's got a "little" more power than an off the shelf 520xl)
I routed the coax under the carpet to the P/S, down the door sills and along the P/S wheel well, then out the rear floor via an access plug located under the rear hatch sill trim, then out to the swing away. I had to do some grounding work to get a good antenna ground... first I ground all of the powdercoating off one of the bolt holes on the CBI to the frame. I also ground the bolt down to fresh metal, and cleaned the threads... this ensured that the bumper was grounded well to the frame. (I plan to apply RTV over the bolt head to prevent rust as soon as I can)
Now I just had to get the swing away grounded to the bumper. You might think the hinge would provide a good ground, and it does... sometimes... but it is not consistent. To provide a reliable ground between the swing away and the bumper, I built a short 8ga. ground strap and connected the two at the spindle. The powdercoat was removed at both connection points.
Antenna mount... I had to drill 4 holes in the swing away for this one. Also, notice that I omitted the quick disconnect (it was machined poorly and fit together very loosely), and the spring (the antenna has enough flex by itself).
And the 4 foot Everhardt Tiger (part # SOTT-4)... They didn't have the Firestik's in the color I wanted at the CB shop I purchased from, so I said screw it and tried something different. The Everhardts are made in the good 'ol USA and came highly recommended. So far, so good.
Final install results... a SWR of 1.6 on channel 1 and 2.0 on channel 40, with a 1.7 on channel 19, right in the middle. Anything below 2.0 is just fine, and I didn't feel like screwing with it trying to achieve perfection. I think the SWR's would be much better if the antenna wasn't sitting so close to the spare tire. I tested the setup in an empty lot and was having clear conversations with two other individuals who were 5 miles and 7 miles away... clear across town. I'm sure it will work just fine for talking to the truck 100 yards ahead of / behind me on the trail.
Also, I picked up a PA speaker, but it's not installed yet. CB DONE.
Last edited:

LittleCaesar
New member
Everything looks good as always BFAD.
If you have kept the old T-stat, I'd be willing to bet that if you reinstalled it with the jiggle valve down between 5 and 6 oclock, the temp would be lower. Run the NAPA and be fine with it. If you still end up with warmer temps while in the mountains, look to change out the fan clutch.
Looking forward to the Moab pics. Have fun.
If you have kept the old T-stat, I'd be willing to bet that if you reinstalled it with the jiggle valve down between 5 and 6 oclock, the temp would be lower. Run the NAPA and be fine with it. If you still end up with warmer temps while in the mountains, look to change out the fan clutch.
Looking forward to the Moab pics. Have fun.

tyr0981
New member
I got the skids painted too...
Primer:


Paint:

They're going on the truck tomorrow morning... and with that I'm all caught up... it's time for bed, I'm out!

What kind of skids are those BFAD?
Man you've got such EPIC write up / install documentation, and sweet idea's!!!! very jealous of your builds!
:rockon:
BigFishAllDay
New member
Beef, it's what's for T4R's. Awesome looking skids man!
Thanks Jimmy!
heck yeah man, its awesome! I am still not all the way through it, I'm takin notes! From the Big Three to the CBI rear bumper- something I really want to get, very helpful info. Slides are awesome. Man I have to move out of the NYC area, het a small house and learn how to weld...
Right on, well it's good to know someone's reading this stuff. RE the welder, I would recommend you buy one sooner than later. I wish I had bought mine years ago when I first had the inkling. I could have built F/R bumpers too by now, and saved a ton of cash.
so if double coolers don't handle the heat issue, you should look into some easy fan mounting metal working, and cheap fans on eBay, just what's worked for me! Still a Beautiful rig man!
Thanks for the tip. After I get back from this trip I'll have a better idea of whether or not the two coolers is going to be enough. Eventually I plan to go back in line w/the radiator, but I need to put a new one in first.
so the Red/ Black cables, and the Flexible wire loom near the top of the frame is the power cable to the winch and wires to the lights, and of course the air conditioner radiator in the background. it could be cleaner, but it' hidden behind the front grill and not noticeable. The only trick is to make sure the fan mount is sturdy, any play in it, and it will rattle or move around (neither a good option).
Thanks for the pic/install notes. I'm pretty limited on room behind the grille already, so I'm not sure if that would work out the same way for me. Either way, I'll keep it in mind.
That Zerex is great coolant. I've been running it for 20k miles in both my toyota's.
I have not messed with my thermostat at all, because it goes to 184 and sits there like a rock. It's the only 4runner I've owned that has been that consistent all the time.
I'll be interested to see what your trans temp does for you in Moab with that setup. Nice work.
I'll bet you've got either a TRD 160 thermo, or an aftermarket 170 in there if that's the case. I saw your posts on the Zerex coolant when I was searching threads on what coolants people were using, and it's good to know it's worked out well for you. So far so good on the temps... It hasn't broken 150 since the dual cooler install... normal used to be around 180 for the same driving situations. Coolant temp sits around 185 so far.
Congrats on all of your improvements. Those skids are some real quality work and I really like the way you ran the b&m in series with your trd tran cooler. Let us know how the Moab trip goes!
Thanks David. I appreciate the feedback on things, and you can count on some Moab pics coming soon.
Everything looks good as always BFAD.
If you have kept the old T-stat, I'd be willing to bet that if you reinstalled it with the jiggle valve down between 5 and 6 oclock, the temp would be lower. Run the NAPA and be fine with it. If you still end up with warmer temps while in the mountains, look to change out the fan clutch.
Looking forward to the Moab pics. Have fun.
Thanks, LC! I did hang on to the old t-stat, just in case, but so far the new one is doing exactly what I'd hoped in terms of bringing down the temps. The engine warms up quicker with the new one as well. I believe the fan clutch is fine, because it's never OVER heated, in traffic or otherwise... it just ran a little warm. Thanks for the input!
That CB setup turned out really nice Nick. Well done on the mounting.
Looks like you are all good to go for Moab! Cant wait to check out these skids in person.
Thanks for your write-up Jim! It really helped. I fully intended to secure the radio the same way you did, but once I got in there and looked at it, it was pretty secure without anything holding it at all, so I omitted the mounting bracket part.
The truck is outside waiting, like a dog for a walk. I can't wait put some scratches on the skids, and I look forward to hanging out and finally doing some proper trail runs together.
What kind of skids are those BFAD?
Man you've got such EPIC write up / install documentation, and sweet idea's!!!! very jealous of your builds!
They're "NickBuilts"... I made them from scratch. Thanks for the compliments man, I definitely appreciate your feedback.
Similar threads

- Replies
- 2
- Views
- 3K

- Replies
- 0
- Views
- 293
- Replies
- 8
- Views
- 6K

- Replies
- 0
- Views
- 3K
- Replies
- 4
- Views
- 8K


