I found "The One", 2001 Sport Ed. TRD SC'd

Not sure if you're telling me this because you think I'm just winging it here, but I've done my research... countless hours worth... and I know that you do not tune using the output on the gauge. I don't remember even implying that... When I said "having the information that it provides me", I was referring to having both the info on the display, and the output to the laptop. Come on man! Maybe it's just me, but that came off as condescending.

(EDIT:

I think this is the part of my last post where you inferred that I'd be tuning off the gauge's output. I guess I could see how it came across that way, as that sentence implies that if the refresh rate was faster, I might try tuning off the SG2 output, right?)

I'm planning on using the Logworks software that's included with the Innovative W/B, the software for the URD 7th kit, and the CamStudio software that records the laptop's display to tune the vehicle.

Am I understanding you correctly in that you are saying the SG2 will connect to a laptop and output "real time instant info"? Because I was not/am not aware of the SG2 having that capability. Also, I'm familiar with the BR-3, which I plan on getting as well, mainly because the SG2 (as far as I know) will not connect to a laptop, whereas the BR-3 will so you can use the info provided on open/closed loop status, fuel trims, etc to aid in the tuning process.

No, I wasn't trying to sound condescending at all. Sorry if came off that way. I was just stating what I was sure you already knew. And, yes, it was that comment I was referring to.
 
I just went out to do the FMU mod and the vacuum line to the airbox is already plugged. the brass fitting on the back of the SC has a line coming out if it into what looks like a vacuum looking fitting. I couldnt even find the FMU AT ALL... Unless I just dont know what it looks like! Man Im pissed...I was looking forward to this mod too!

OK... normally:

(A) the Fuel Pressure Regulator (This is looking down, behind the supercharger)

62651949.jpg~original


...Is connected via a vacuum line to (B), a port on the intake tube....

2efbb0d9.jpg~original


...you need make sure (B) is plugged, and that (A) is connected to (C) below, the boost output on the S/C. That's all there is to it.

18123380.jpg~original


Now about the plugs. Lots of information for me to soak up, but the general consensus has been that the IK22's dont last long. is there another option to use? Why are you going to use them and not one of the others mentioned in that thread?

Honestly, I only bought them because that's what URD recommended, and I hadn't done alot of research on plugs at the time. I can't return them now, so I'm gonna try them out. If they give me problems, then it's back to the drawing board.

I MIGHT be able to get the 7th injector unit from the URD web site in a month or two. How soon do you think you will be taking yours off? I thought the URD 7th setup was an add on, not replacement.

There are 3 options you can buy w/regard to the 7th injector....

1. The TRD 7th injector Kit, which includes the injector, a mounting block, fuel line, fittings, all wiring, and a piggyback computer that plugs into the factory harness.

2. The URD 7th Injector Kit, which for less $ includes the injector, a mounting block, fuel line, fittings, a walbro 190lph fuel pump, the control box (called an Additional Injector Controller with Timing control), and some misc. parts for install.

3. The URD 7th Injector UPGRADE Kit, which converts the TRD 7th Kit to the URD 7th Kit. You end using the TRD injector/fuel lines/mounting block, but everything else gets removed and swapped out for the stuff in #2.

The URD upgrade gives you control over the injector and engine timing, where with the TRD Kit, you have no control, it just does what it's programmed to do and that's it, you cannot tune it. Also, you get the better fuel pump.

You should check out the links below... Just read though the pages, there's alot of good info:

Project SportRunner

Gadget's 4Runner (This 4Runner belongs to the guy who owns URD)

Welcome To The N8RWS Webppage

UltimateYota.com

No, I wasn't trying to sound condescending at all. Sorry if came off that way. I was just stating what I was sure you already knew. And, yes, it was that comment I was referring to.

Addicted,

It's all good man, I wasn't really sweating it, plus you know how it is with forums... there's tons of room for misinterpretation of what a person means with their replies because it's written, not spoken. You're a knowledgeable guy, so I'm sure you've had to answer these questions a thousand times... you see a guy going down the wrong path and you quickly correct and get them back on a straight line. Nothing but respect man, hell I'd be scared to even START talking suspension with you... It'd be like Miyagi talking to Daniel San.

 
Last edited:
Well damn it...I already had the mod done! So Im guessing that my plugs are getting worse, and thats why the ping is also getting worse.

IK22's it is!

So that URD kit is a better buy and tuneable! SOLD. i will be getting one asap!
Will the kit work without tuning, I do not trust myself to do this part!

I will read more and more and more....:bash:
 
That's correct... and the URD kit will run right out of the box because the controller comes pre-loaded with a base map that they've developed to run safely until you can tune it. If you want the most bang for your buck though, you'll want to get it tuned. A local shop quoted me $300 to do the tune on it, but I'm gonna try it on my own first.

The more you learn, the more comfortable you'll feel with the idea of tuning it.
 
That's correct... and the URD kit will run right out of the box because the controller comes pre-loaded with a base map that they've developed to run safely until you can tune it. If you want the most bang for your buck though, you'll want to get it tuned. A local shop quoted me $300 to do the tune on it, but I'm gonna try it on my own first.

The more you learn, the more comfortable you'll feel with the idea of tuning it.

I opting to get the URD kit as soon as possible. I get nervous every time I drive my baby...
another month or two and Im golden!

Would toyata install something like the URD kit? I will be working alot and might not have time to do it on my own.
 
So I read a bunch about the trans needing to be beefed up. I have never tapped into an automatic trans before and have heard it can be difficult. I dont know of any reputable tranny shops around here, not that there arent any, just not to my knowledge. How difficult is it to get the valving out to be sent to a good shop in the east coast that I have read about.

OR

Should I buy the kit from Toyota Transmissions | Toyota Torque Converter | Toyota Valve Body
and install myself or at a shop??
 
Would toyata install something like the URD kit? I will be working alot and might not have time to do it on my own.

I'm not sure, you'd have to stop in and ask them. I'm gonna do it myself. Once you get the parts, you'll see it's not that complicated.

So I read a bunch about the trans needing to be beefed up. I have never tapped into an automatic trans before and have heard it can be difficult. I dont know of any reputable tranny shops around here, not that there arent any, just not to my knowledge. How difficult is it to get the valving out to be sent to a good shop in the east coast that I have read about.

OR

Should I buy the kit from Toyota Transmissions | Toyota Torque Converter | Toyota Valve Body
and install myself or at a shop??

The "Kit" you referenced in your link from Level 10 is just a modification service. You still have to pull your valve body out and send it to them. When I get mine done, I'm gonna go with IPT... they have a better reputation, not to mention their valve body upgrade service is $100 less than Level 10's.

IPT Transmissions - Toyota A340 Series Modified Valve Body

I've never torn into an automatic either, and I'm still not sure if I'm going to do it myself. I checked with my mechanic, and they said they'd pull it for me and re-install the upgraded one for about $500, and let the truck sit at their shop until the new one comes back. Check out this writeup, in step 20 you can see the valve body right there.. it would be just a few more bolts to drop it out:

Dropping Pan And Flushing Transmission
 
Thanks for the links...So I also have a A340F type tranny in my 02, correct?

Ill try and tackle the URD 7th myself, if I have time.

Seriously man, thank you for all your help. Im sure I will be asking many more questions.
 
Time once again for the monthly update… With the holidays, it’s been slow going, but I’ve gotten all of the instrumentation installed, except for the Scangauge II. I’ve got enough information available at a glance to know what just about every aspect of the truck is doing at all times, so I’m happy.

First I had to get the bung for the wideband O2 sensor welded into the exhaust stream in front of the cats… that meant pulling out the entire cat section of the exhaust, which forced me to utilize all of my Tetris skills… It wasn’t as bad as getting the starter out, but it was tricky. I had a local tuning shop weld in the bung, and although the weld was a little messy, I thought it was a decent job for having to work in such tight quarters. While they were at it, I had them remove some obstructions in the exhaust and smooth it out to get a little better flow out of it. The obstructions were the result of a poor welding job that was done prior to me buying the truck that left part of the piping obstructing the flow at the welded joint.

2e6b3284.jpg~original


ff68f5c6.jpg~original


55410ae1.jpg~original


d6a596d2.jpg~original


I got the exhaust back on and had a major exhaust leak because this guy wasn’t sealing:

5cfba567.jpg~original


So I got a new one in there and it seems to have stopped the leak. I’ll be keeping an eye on it.

I brought the wiring for the Innovate W/B and the trans temp. sender through the firewall via the main ECU harness, which goes through the passenger side of the firewall. I took the harness apart and removed the boot from the firewall, then fished everything through with a section of coat hanger. I went ahead and ran the harness and vacuum hard line for the URD AIC while I was at it so I don’t have to fish wires again when it comes time to put that in.

In this picture you can see the shielded wiring for the Innovate/Trans temp sender coming off the main harness at the bottom center of the pic, and the 7th injector harness and vacuum hard line coming through in the upper right hand corner of the picture.

4dc637d7.jpg~original


Another angle, showing the Innovate LC1 wideband control box…

36c193a2.jpg~original


And one last shot showing the harness running down to the exhaust and the O2 sensor itself. I shielded this using aluminized heat shielding from DEI. The shielding is intended for wiring/fluid lines and worked out pretty well.

5728326e.jpg~original


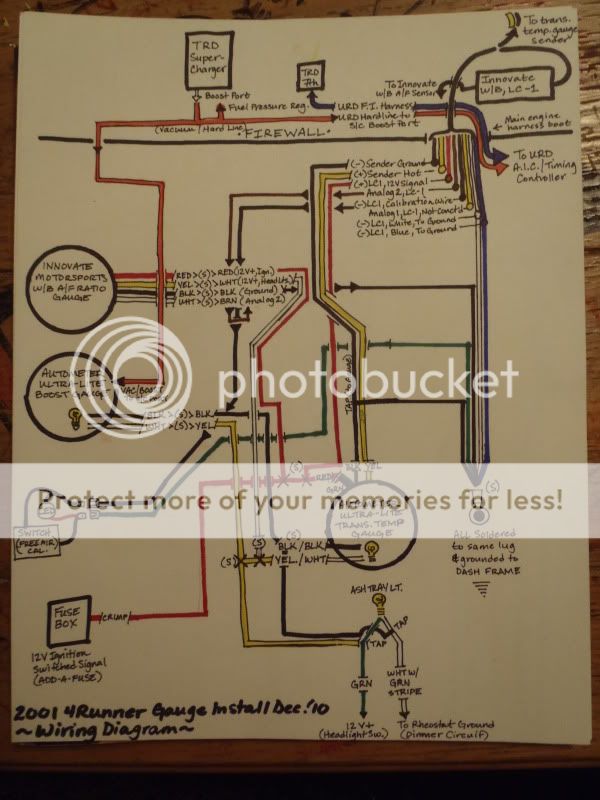
Before I got done I drew out a wiring diagram for all the wires involved with the guage installation… just in case I need to track down a gremlin in the future…

6cb56be7.jpg~original


I took a 2” hole saw to the shifter trim, and opened it up just a tad more with a Dremel sanding bit, moved around some wiring/plugs beneath the trim, and managed to get the gauge to fit perfectly where I wanted it. The silver trim on the Autometer Ultra Lite gauges matches the silver Sport interior trim pretty well in my opinion.

Day shot…

3af7fcf1.jpg~original


Night shot…

e39e146a.jpg~original
 
Last edited:
Here’s a couple overall shots of the Transmission Temperature gauge, both day and night..

1c64fb7e.jpg~original


59a72666.jpg~original


The wideband and trans temp gauges fired up flawlessly and I’m getting good readings on the wideband after a free-air calibration. I took an overall shot to show all the gauges lit up at night…

fbaea77f.jpg~original


I have always wanted an Inclinometer, and I thought about installing one of the old school units out of a 1st gen, but I don’t want to hack up my dash, nor do I want a want to modify it to get that big unit to fit. Innovate makes a digital Inclinometer, but it’s pricey. I looked at all the options, and decided to go nice and simple. I picked up a couple of these:

acf00d15.jpg~original


And mounted them here:

b3e716e6.jpg~original


And here:

9cec23f7.jpg~original


Now I’ve got the angle of tilt both side to side and front to back available quickly at a glance. These units attach via 3M double sided tape and should be easy to remove if I decide I don’t like them, but so far I don’t think that will be the case. They look nice enough, and they should perform their intended function simply and reliably, while being un-intrusive and easy to install.

Finally, here’s an overall view of all the instrumentation installed… again, minus the SG2.

bc01e4ca.jpg~original


One final thing that was bugging me was that I lost my “Oh S&%T” handle on the driver’s side when I installed the A-pillar pod. After a couple quick measurements I determined the handles in the rear are the same as the ones on the roof up front. I felt along the headliner on the driver’s side and felt two small divots where the bolt holes should be for attaching a handle to the roof on the driver’s side. A small cut with an exacto knife revealed there were indeed two threaded holes. So.. I removed the handle from the rear driver’s side…

5d674eb9.jpg~original


And moved it up to the driver’s side front. Now I have an “Oh S&%T” handle again, and something to grab onto when getting into/out of the truck. (I’m going to buy a replacement for the rear handle and install that at a later date so I don’t have the unfinished look of empty holes back there.)

adf71752.jpg~original


I’m relatively new to serious wheeling, and I’ll be the first to admit I have a lot to learn. In the interest of jumpstarting my learning, I went ahead and picked up a book that looks like it has some good info. Whether it teaches me anything or not, it should be an interesting read. I’ll let you know when I’m done.

d78d88b7.jpg~original


Finally, I had to snap a couple of quick pictures of my “Work Horse” and my “Show Horse”. Someday soon the old workhorse will get put out to pasture (aka sold to my brother) and the “Show Horse” is going to have to step up and do the work. Seeing the two together reminded me of one of those situations where the younger brother grows up to be bigger and meaner than the older brother, but the older brother is still wiser and more experienced.

578631bc.jpg~original
 
Last edited:
Looks great. I have tranny and rear diff temp gauges installed on my Dodge. It's really nice when towing or driving with a load to keep an eye on your temps. Great mods!
 
I've been waiting for the new 1.30 gigawatt model to go on sale. I've heard it allows you to travel much faster through time? The 1.21 gigawatt model is just so outdated. There is a "buy it now" on ebay right now though. :nerd:
 
New month… new update to this thread. January was another slow month, but I got a few things knocked out on the ’01.

First, I got a rear grab handle to replace the one I moved to the front. If anyone is looking at adding that second grab handle on the driver’s side roof (above the door), these are the parts you would need to get. The front and rear grab handles that mount above the doors are the same… your part numbers may vary based on interior color.

3f1a164b.jpg~original


I’ve been meaning to do the Deckplate Mod for a long time. I finally got around to doing it this month. The TRD S/C kit has you remove the elbow, so my airbox was already operating with the “Remove Elbow Mod”. I like the Deckplate Mod better and I figure more airflow can’t hurt so I went ahead and did the deckplate too. While I was at it, I took a piece of black felt and secured it over the opening on the airbox going into the fender as a sort of pre-filter. That way the engine can still breath with the deckplate in, and the pre-filter will help to keep contaminants/water spray out of the airbox while driving on dusty roads and in the rain.

066344f2.jpg~original


c1d5689a.jpg~original


afcdf2a6.jpg~original


Next I got all the gearboxes changed over to Redline 75W90, and put new gaskets on the drain/fill plugs. I’m a big fan of this stuff, and it should help just a tad with the gas mileage.

43be285d.jpg~original


Finally, I got the Scanguage 2 mounted on the steering column. I didn’t want to mount it directly to the column with Velcro because the top of the steering column has a contour to it and the SG2 is flat. Also, when mounted directly on the column, the SG2’s display is not angled directly toward the driver’s line of sight. I ended up using some sheet metal to make a little mounting bracket for it. I velcro’d the bracket to the column, and the SG2 is vecro’d in turn to the bracket. It doesn’t interfere with the view of the instrument cluster, it’s handy for changing the SG2 displays, and it’s easily visible while driving.

273cc261.jpg~original


64c55952.jpg~original


The wires coming down behind the steering column and above the gas pedal to the OBD2 port..

abfa47f5.jpg~original


Now THAT’s what I call full instrumentation. If there’s something I want to know about what this machine is doing… its right at my fingertips.

42ab15d1.jpg~original


Finally, I picked up this bad boy… (All you ARB haters, keep yo’ mouth SHUT!)

9cc5bd7e.jpg~original


f19ead3a.jpg~original


So, again, this month has been kind of slow, but February and March should be BIG!!!!! The front end of this thing will be getting a big time makeover.
I purchased the following and they are in various stages of making their way to my door:

1. Stubbs Welding HD-SKO sliders

2. BR-3 OBD2 interface (the last piece of gear I need to start tuning the URD kit, which will go on once I get the BR3)

3. Smittybilt XRC8 8k winch… I got the one with the synthetic line & aluminum fairlead. They’re selling this thing on Amazon right now for $382 SHIPPED!

4. IPF 968CSG Fog/Driving lights from good old Toytec.

5. Gamiviti Clear Bumper Lenses for the ARB bumper.

I have a question for you guys…. I’m looking for a welder to weld the sliders onto the truck, and to do the “Frame Endcap Mod”. I found a guy, but his labor rate is $85/hour and he’s quoting me 2 hours for the sliders and another 3 for the frame endcap mod. HOLY S&%T!!! For that money I could pickup up a Hobart Handler (a nice little welder) and learn to weld myself. My question is, how much should I expect to pay to have these two things done, or better yet, what is a reasonable labor estimate in HOURS to get these done? I was thinking more like 3 hours TOPS?
 
Last edited:
Congrats dude, those are some very cool mods!!! 2 hours is about right for the sliders because most of that time is mocking them up. I would make sure you're right there with the welder so you get them positioned just how you want them and they match both sides.

If they aren't sticking out far enough you don't get enough protection, but if they stick out too far, you'll hit them more often than you need to and you'll also get mud on your pants (calves) when you get out of the truck. Also put a little angle on them so they can slide off rocks easy. I've seen people get hung up on their sliders if they are to flat.

I didn't do the endcap mod on my ARB because I just did not see the point of all that work. Instead, I bolted it on how you would anyways and then I just laid 1" welds on the bottom and both sides on each frame rail. It took about 5 minutes. I laid the welds in spots where they could be easily ground with an angle grinder if I ever need to take the bumper back off. I have pushed, pulled, and strapped several vehicles with mine and it's as solid as it was the day I put it on. I honestly feel that 3" of weld on each rail is just as strong or stronger than one more bolt anyways. You shouldn't be at the welder for more than 2 hours for everything if you do it this way, maybe 3-4 if you do the actual endcap mod. BTW, J-money$$$ attached his ARB the same way I did and he has winched lots of things with it without any issus. Cheaper, easier, just as effective.
 
Brian, thank you for the detailed answer. I was hoping some of you more experienced gents would chime in. I'll definitely consider your ARB mounting solution. I like that idea.

One detail though, I got the Stubbs sliders, so they're already welded together (sliders to legs, legs to scab plates, etc, and the angles are already set up... this was a big factor in my purchase because I figured it would reduce the cost to install)... all I need to have done is have the scab plates (4 per side) welded onto the frame. So given that info, how much time do you think it would take per side?
 
Wow this thread is Awesome!

You have a very simple yet informative way of explaining the details BigFish. Its easy to see just how much time and thought you put behind every mod...

Just Awesome!

:thumb3:
 
Ok, in that case I don't see why the welder wouldn't be able to do both sides and tack the ARB on too (as long as you've already got the mounts bolted in place and if you do it the way I did) in under an hour for everything. Stubbs are nice and the leg length and angle they are preset at should be perfect already. If you end up doing the end cap mod, I would say add at least an extra hour, maybe 2 if he has to make the plates and drill/tap the holes for the bolt.

Isn't there any NM guys that can lay a few welds for him for beer and pizza? That how we do it in SoCal!
 
Sliders

good luck with the bumper
I ordered the same sliders from Stubbs, they're about an hour away so they're doing the install, lucky!
 

Members online

Forum statistics

Threads
278,316
Messages
3,554,120
Members
248,016
Latest member
Advally Service

Trending content

Back
Top