Icon coil over install

Sam1Am

New member
Basic Icon coil-over kit (part58646) to a 2017 off road premium (Magnetic Gray).

Go easy on my idiocy - i've never done anything like this before.

My first issue (there're sure to be many more!):
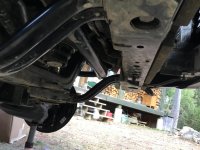
The swaybar relocation kit doesnt seem to relocate the sway bar quite right. The 'bar is is hampered by the drivers side bumper bracket thing-a-ma-jig deal. (See pic). Ive pulled and reattached the bumper bracket thing-a-ma-jig deal with the supplied thick washers (though nothing is said about using them here) but that doesn't do enough to stop the contact.

Surely some of you have tackled this install and can help!

GaFY3i

Two bumper bracket thing-a-ma-jigs. The one in the upper left has plenty of clearance. The other- you can see the sway bar making contact.
 
Last edited:
Register to hide this ad
Attach the picture. Scroll down... Manage attachments. Upload it and then no issues with external images going away...
 
Hey Sam,
Very common issue and nothing terribly tough to overcome.
I personally just notched out the OEM radiator support bracket to get full clearance. The spacers provided by Icon didn't cut it. There is a solution now on the market offered by ARB (I think) that has a support bracket angled so that the sway bar clears. Do a search and that should pop up if you want to go that route.
 
Yup notched mine as well. Just be careful though, the tubes are hollow so dont go overzealous on your grinding like i did.
 
Do you have the big thick washers spacing down the radiator support brackets at all 3 bolts? Also, pretty sure there is a left and right support. Try swapping them side to side. Think they are stamped with the correct side as L or R. R is passenger.
 
Last edited:
You guys f'ing ROCK! Thanks for the fast responses! I'll notch, add multiple washers, cross my fingers and hope for the best. Just glad i'm not the only one to butt his head against this issue, and that the solutions arent beyond me!

Thanks!!!

(Watch this space, more issues surely to come.)
 
You guys f'ing ROCK! Thanks for the fast responses! I'll notch, add multiple washers, cross my fingers and hope for the best. Just glad i'm not the only one to butt his head against this issue, and that the solutions arent beyond me!

Thanks!!!

(Watch this space, more issues surely to come.)

Make sure you check right to left.. .Never had to notch myself. There still may be some very slight contact on extreme occasions though....It won't hurt anything either way. The 4th gens did did not even have those supports.
 
Jack stand, not cylinder jack

Trying the pic again...

You've got that front wheel LCA on nothing more than a hydraulic cylinder jack. You can lift it with that but before you get down and work under it put the vehicle on a jack stand. One that has a fixed-height wide base and top plate.
Don't get crushed doing this repair.
 
You've got that front wheel LCA on nothing more than a hydraulic cylinder jack. You can lift it with that but before you get down and work under it put the vehicle on a jack stand. One that has a fixed-height wide base and top plate.
Don't get crushed doing this repair.

Good catch, Desert! Out of frame are couple jack stands holding the whole front end up; the lil' jack was just to catch the LCA/steeringing knuckle/etc when i broke it all off the UCA. But never, ever assume i know wtf I'm doing! Keep calling me out!
 
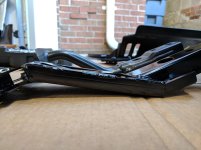
arb ome bp-51 front fit kit for the 4runner has this bracket
 

Attachments

  • IMG_20171028_173019.jpg
    IMG_20171028_173019.jpg
    125.1 KB · Views: 479
Would've nice if Icon supplied a new bracket - especially at the price. But it was nothing a few minutes with a grinding wheel couldn't sort out. Not something I'd have had the confidence to do had not shrub1 and xtremluck noted their need to do it, too.

Anyway, everything's on, all the nuts and bolts are torked, and all the left over peices () are sorted into their respective bins. As long as it doesn't all fall apart in the first few miles all that's left is an alignment.

Thanks for help, guys!
 
Would've nice if Icon supplied a new bracket - especially at the price. But it was nothing a few minutes with a grinding wheel couldn't sort out. Not something I'd have had the confidence to do had not shrub1 and xtremluck noted their need to do it, too.


Anyway, everything's on, all the nuts and bolts are torked, and all the left over peices ([emoji28]) are sorted into their respective bins. As long as it doesn't all fall apart in the first few miles all that's left is an alignment.


Thanks for help, guys!


Icon supplies you with washers in the kit for the exact purpose of spacing that bracket lower. I used them on my rig no problem. Even spaced the skid plate to match.


Sent from my iPhone using Tapatalk

Just saw where everyone else already said this, sorry haha. Congrats on the install.
 
Just installed this past weekend and ran into the same issue. I just put thicker spacers on and the OEM bolts still hold pretty deep into the threads.
 

Members online

Forum statistics

Threads
278,307
Messages
3,554,049
Members
248,016
Latest member
Advally Service

Trending content

Back
Top