
You are using an out of date browser. It may not display this or other websites correctly.
You should upgrade or use an alternative browser.
You should upgrade or use an alternative browser.
jdkilroy's Build thread
- Thread starter jdkilroy
- Start date


Register to hide this ad

jdkilroy
Member
Mechanical/Electrical
Dual Battery set-up using a National Luna Isolation controller. I swapped the 85 amp solenoid for a 200 amp. The solenoid is behind the fuse box in the picture, just to the right of the battery monitor display. Installed a high output alternator to handle the load of the winch at near full draw. The winch draws over 400 amps at full load, the alternator will put out ~ 170 amps at idle and ~ 300 amps hot at 2000 rpm. I think I got the electrical part of this covered ...
http://www.toyota-4runner.org/4th-gen-t4rs/122791-replacing-alternator-2008-v8.html
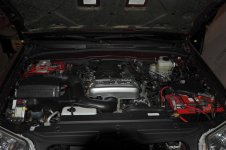
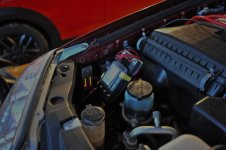
Dual Battery set-up using a National Luna Isolation controller. I swapped the 85 amp solenoid for a 200 amp. The solenoid is behind the fuse box in the picture, just to the right of the battery monitor display. Installed a high output alternator to handle the load of the winch at near full draw. The winch draws over 400 amps at full load, the alternator will put out ~ 170 amps at idle and ~ 300 amps hot at 2000 rpm. I think I got the electrical part of this covered ...
http://www.toyota-4runner.org/4th-gen-t4rs/122791-replacing-alternator-2008-v8.html
Attachments


Last edited:
jdkilroy
Member
Suspension
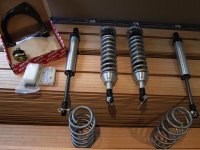
Probably one of the last complete Overland Warehouse 2.5 extended travel kits sold before closing their doors; Mark and Andries are still around though.
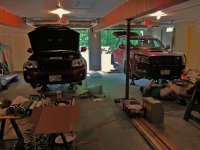
Install day !
Rear driver
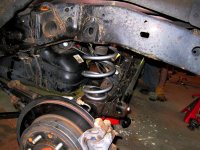
I have really enjoyed this set-up so far. I have no spacers aside from what is built in to the front CO's, no body lift and I'm currently running 33's with no rubbing issues lock to lock. The handling is very tight, the ride is stiff but not overly so with the weight I am carrying. No complaints from passengers to date.
I am considering what to do to get another 1 ~ 1.5 inches of additional clearance as I take on more technical stuff but so far this set-up is handling the granite pretty well.
Probably one of the last complete Overland Warehouse 2.5 extended travel kits sold before closing their doors; Mark and Andries are still around though.
Install day !
Rear driver
I have really enjoyed this set-up so far. I have no spacers aside from what is built in to the front CO's, no body lift and I'm currently running 33's with no rubbing issues lock to lock. The handling is very tight, the ride is stiff but not overly so with the weight I am carrying. No complaints from passengers to date.
I am considering what to do to get another 1 ~ 1.5 inches of additional clearance as I take on more technical stuff but so far this set-up is handling the granite pretty well.
Attachments



Last edited:
jdkilroy
Member
Body/Armor
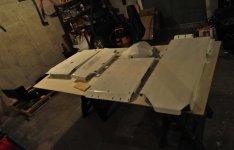
Aluminum BudBuilts from front to back with stainless rear diff skid and the aluminum gas tank skid. I won't say that installing that gear was easy but the fit of the equipment was near flawless. I did a fair bit of filing to remove all the sharp edges from every skid section so it would be more pleasant to go back under there to work. I used stainless nuts and bolts through out.
I had to use a special primer for the aluminum and then top coated using a can of two part urethane marine paint that I needed to use up. Perfect color for the underside: "Snow White" !
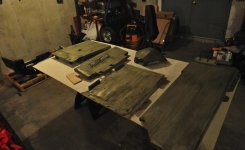
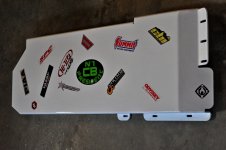
Not much for a lot of stickers so I figured I would give 'em all equal time on the underside...
Bumpers:
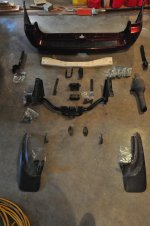
These are all the parts I removed to install the rear bumper:
Added lights in the corners to illuminate close in:
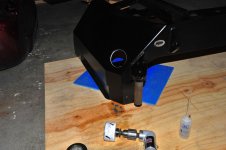
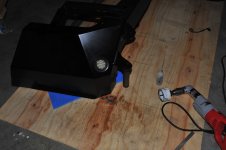
Used a floor jack with a 2 x 12 on it to move the bumper around and get it in place:
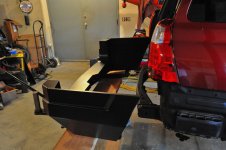
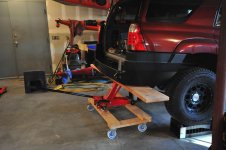
I used the OEM tow hitch bolts to mount the receiver as they were rated 11 and in great shape. The CBI rear bumper is a rugged piece of steel fabrication. It is not as strong overall as the Shrockworks front bumper but then I am rarely doing 65 mph in reverse. I feel I have great strength up front where I am most likely to need it and more than adequate strength in the back. The CBI is very well made and fits/installs really well. The swing out is well designed and operates smoothly without any play what-so-ever.
I used the Shrockworks sliders since I was able to get a great deal on a group buy. They do not extend out quite as far as I would like and I worried that they would not protect the body as well as needed from the granite. At this point, they are pretty scratched up and so far, no damage to body. Install is here: http://www.toyota-4runner.org/4th-gen-t4rs/116626-install-shrockworks-slider-yourself.html
I used the Shrockworks front bumper. Got a good deal that became a great deal when it took over 4 months to get mine. Excellent customer service and this bumper is really well made and installed without too many "therapeutic exclamations." The hella marker lights are crap so I would order with the openings for them but then use Amber LED Dualies: Pacific Dualies 30100 2 Inch Amber LED Side Marker Round Kit : Amazon.com : Automotive for the lights. The Hellas that came with my bumper both filled up with water shortly after installation.
As an indication of how rugged these Shrockworks bumpers are, I compared the recovery points on the Shrockworks vs the CBI; the 1" thick Shrockworks recovery points pass through a cut out in the face of the bumper and are welded on both the front and the back side of the bumper face. The CBI recovery points are face welded only which may be strong enough but stronger is better when it comes to recovery points in my opinion. The CBI towing receiver is bombproof and that is going to be your primary recovery point on the back side.
Aluminum BudBuilts from front to back with stainless rear diff skid and the aluminum gas tank skid. I won't say that installing that gear was easy but the fit of the equipment was near flawless. I did a fair bit of filing to remove all the sharp edges from every skid section so it would be more pleasant to go back under there to work. I used stainless nuts and bolts through out.
I had to use a special primer for the aluminum and then top coated using a can of two part urethane marine paint that I needed to use up. Perfect color for the underside: "Snow White" !
Not much for a lot of stickers so I figured I would give 'em all equal time on the underside...
Bumpers:
These are all the parts I removed to install the rear bumper:
Added lights in the corners to illuminate close in:
Used a floor jack with a 2 x 12 on it to move the bumper around and get it in place:
I used the OEM tow hitch bolts to mount the receiver as they were rated 11 and in great shape. The CBI rear bumper is a rugged piece of steel fabrication. It is not as strong overall as the Shrockworks front bumper but then I am rarely doing 65 mph in reverse. I feel I have great strength up front where I am most likely to need it and more than adequate strength in the back. The CBI is very well made and fits/installs really well. The swing out is well designed and operates smoothly without any play what-so-ever.
I used the Shrockworks sliders since I was able to get a great deal on a group buy. They do not extend out quite as far as I would like and I worried that they would not protect the body as well as needed from the granite. At this point, they are pretty scratched up and so far, no damage to body. Install is here: http://www.toyota-4runner.org/4th-gen-t4rs/116626-install-shrockworks-slider-yourself.html
I used the Shrockworks front bumper. Got a good deal that became a great deal when it took over 4 months to get mine. Excellent customer service and this bumper is really well made and installed without too many "therapeutic exclamations." The hella marker lights are crap so I would order with the openings for them but then use Amber LED Dualies: Pacific Dualies 30100 2 Inch Amber LED Side Marker Round Kit : Amazon.com : Automotive for the lights. The Hellas that came with my bumper both filled up with water shortly after installation.
As an indication of how rugged these Shrockworks bumpers are, I compared the recovery points on the Shrockworks vs the CBI; the 1" thick Shrockworks recovery points pass through a cut out in the face of the bumper and are welded on both the front and the back side of the bumper face. The CBI recovery points are face welded only which may be strong enough but stronger is better when it comes to recovery points in my opinion. The CBI towing receiver is bombproof and that is going to be your primary recovery point on the back side.
Attachments
-
 gas_tank_skid.jpg135.4 KB · Views: 4,554
 -
 primed_skids.jpg61.1 KB · Views: 4,382
 -
 painted_skids.jpg118.1 KB · Views: 4,491
 -
 removed.jpg71.5 KB · Views: 4,290
 -
 hole_drilled.jpg69.4 KB · Views: 4,355
 -
 corner_light.jpg133.3 KB · Views: 4,371
 -
 moving_in.jpg72.6 KB · Views: 4,348
 -
 in_place.jpg76.1 KB · Views: 4,383
Last edited:
jdkilroy
Member
Communication
There isn't a lot of extra room in the cockpit of these rigs so I installed a ham radio that I am hoping will satisfy all needs reasonably well. I went with the Yeasu 857 for its compact size, performance and features. There is a lot of used Ham equipment out there and these aren't hard to find. Normally, the Ham radios do not operate on the 11 meter band (CB frequencies) but they are easily modified to do so although it is not technically legal to operate this way unless you can limit your transmit power to 5w or less. This radio will let you do that with some custom programming. I am limited in which channels I can access easily though so its certainly not as easy to use as a stand-alone CB. That said, my communication capabilities are vastly more than any stand-alone CB.
I wanted to install the antenna to get maximum performance and be out of the way. The center of the roof is the ideal location on a vehicle for a variety of reasons. It can be at risk in the woods though so a spring mount is advisable. The antenna is easily removed by unscrewing it and I can throw a Firestick up there when I will only be using the CB channels.
I used a small piece of aluminum plate that a got for free from a local machine shop and then fitted it to the OEM cross bars. I use the heavy duty Thule cross bars to mount the kayak racks on so the OEM racks were perfect to create a solid base. This saved me from drilling a hole in the roof also which I did not want to do.
Modified the door of the center storage pocket to accept the Yeasu face plate. Unintended consequences: the most useful cup holders in the vehicle are now poorly suitable for large (to go) coffee cups.
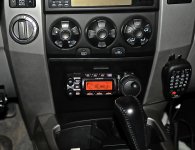
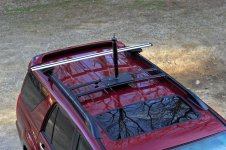
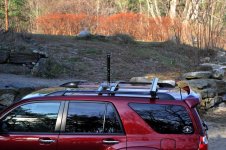
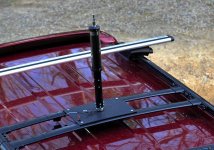
There isn't a lot of extra room in the cockpit of these rigs so I installed a ham radio that I am hoping will satisfy all needs reasonably well. I went with the Yeasu 857 for its compact size, performance and features. There is a lot of used Ham equipment out there and these aren't hard to find. Normally, the Ham radios do not operate on the 11 meter band (CB frequencies) but they are easily modified to do so although it is not technically legal to operate this way unless you can limit your transmit power to 5w or less. This radio will let you do that with some custom programming. I am limited in which channels I can access easily though so its certainly not as easy to use as a stand-alone CB. That said, my communication capabilities are vastly more than any stand-alone CB.
I wanted to install the antenna to get maximum performance and be out of the way. The center of the roof is the ideal location on a vehicle for a variety of reasons. It can be at risk in the woods though so a spring mount is advisable. The antenna is easily removed by unscrewing it and I can throw a Firestick up there when I will only be using the CB channels.
I used a small piece of aluminum plate that a got for free from a local machine shop and then fitted it to the OEM cross bars. I use the heavy duty Thule cross bars to mount the kayak racks on so the OEM racks were perfect to create a solid base. This saved me from drilling a hole in the roof also which I did not want to do.
Modified the door of the center storage pocket to accept the Yeasu face plate. Unintended consequences: the most useful cup holders in the vehicle are now poorly suitable for large (to go) coffee cups.
Attachments




Last edited:





jdkilroy
Member
'Bout time! Looking good!
What's left on the list to be done?
I know, right ... Finally got my lazy butt in gear. Thank's Matt.
Left to do: want to install lockers this winter starting with rear and see how it goes. I really don't know enough about gearing and such to make intelligent choices yet. Air vs e-locker, gear ratios etc.
I'd like to get just a little higher of the ground, maybe another inch of clearance while still maintaining a solid, all around driver and overland rig. Not sure how i want to get that yet.

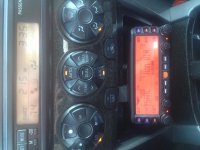
Love the way you have your FT-857 mounted! I bought an FTM-350AR and mounted it very similar. I wound up removing the door altogether though. I made a custom bracket out of sheetmetal to hold it all in place. Here's a pic if you're interested! Taken with an iPhone, so quality is as per usual.
Attachments

superman3043
Senior Member
Love this truck! One of my favorites! Great job Jon!

aha2988
New member
I know, right ... Finally got my lazy butt in gear. Thank's Matt.
Left to do: want to install lockers this winter starting with rear and see how it goes. I really don't know enough about gearing and such to make intelligent choices yet. Air vs e-locker, gear ratios etc.
I'd like to get just a little higher of the ground, maybe another inch of clearance while still maintaining a solid, all around driver and overland rig. Not sure how i want to get that yet.
The E-locker for the axle will require some axle housing modifications to fit as well will require a wiring harness setup. If you go with the air locker setup there's no housing modifications required. also its just installing a few switches and running some power wires to the compressor, and well the air line to the diff.
as far as gearing me an "superman" did the math on it and it seems a 4.11 gear ratio will put you back at factory RPM range with 33's and a 4.56 puts you in a factory rpm range running 35's. It is best to do it all at once as it's not really a job you want to do twice. Only issue with the air locker setup is finding a place to mount the air compressor. But the added bonus you wined up with on board air for inflating tires and such. The down side to regearing is with the V8 you have to do front and rear at the same time to match the gear ratio's due to the full time 4wd. (if you had a 2wd function you could just do the rear then wait a bit to do the front to prevent spending all the money at once.) anywho.. hope this helps some in your decisions on the locker and perhaps re gearing. I've personally enjoyed having the factory lb-ft back at the wheels with the 4.56's makes towing and climbing grades effortless

emelianenkov
New member
Jon, I can help with the lockers.

jdkilroy
Member
Love the way you have your FT-857 mounted!
Thanks. The 350AR is a sweet radio as well; looks like yours fit in that space a little better and you can still use your cup holders !
jdkilroy
Member
Looks great! Love it! ... and I love those horses
Thanks Terri, the horses are definitely members of the family even though I don't have much to do with them. My wife and daughter are really into them so that's good enough for me.
jdkilroy
Member
The E-locker for the axle will require some axle housing modifications to fit as well will require a wiring harness setup. If you go with the air locker setup there's no housing modifications required. ...
Hey Austin, I'll definitely be giving you a holler when time comes to actually commit. With the air locker set-up, is there an issue with traction control if nobody tells the computer to stop trying to control the drive wheels ? I'm guessing that the aftermarket e-lockers aren't wired into the ECU either. Do you just shut of traction control any time you use the lockers. Currently, I just leave it alone and lock the center diff on the trails.
Similar threads
- Replies
- 1
- Views
- 278

- Replies
- 7
- Views
- 1K


