JG's 4th Gen Build Thread

jgmx893

New member
jgmx893's 4th Gen Limited Build:

As she sits now (Oct. 2014)

20141004_170608%20-%20Copy.jpg~original


2007 Limited V6 4x4
Current:
- HCF Removal
- Running board removal
- Blacked out center wheel caps and center badges
- Interior tailgate release button
- Digital voltmeter
- Cobra 19 Radio w/Wilson flex 3' fiberglass ant.
- CBI Off Road Fab. ditch mounts
- 3" LED cubes in front, dual incandescent floods mounted in back.
-t4r.org stickers (was on a low budget and couldn't afford a supercharger)
- Flowmaster 50 Series SUV
- Fluid Film undercoating
- Cooper AT3's 265/60/18

Future:
-blacked out headlights
-some sort of 2-3" lift (undecided)
- 265/65/18's or 275/70/17's with ~- 10mm offset
-led cabin lighting
-seat covers
-flowmaster cat-back system

Anyway...here are the mods done so far as of Nov. 25, 2013:

First thing I did was remove the HCF (hydrocarbon filter). This is a pic of it removed, where it would have been:
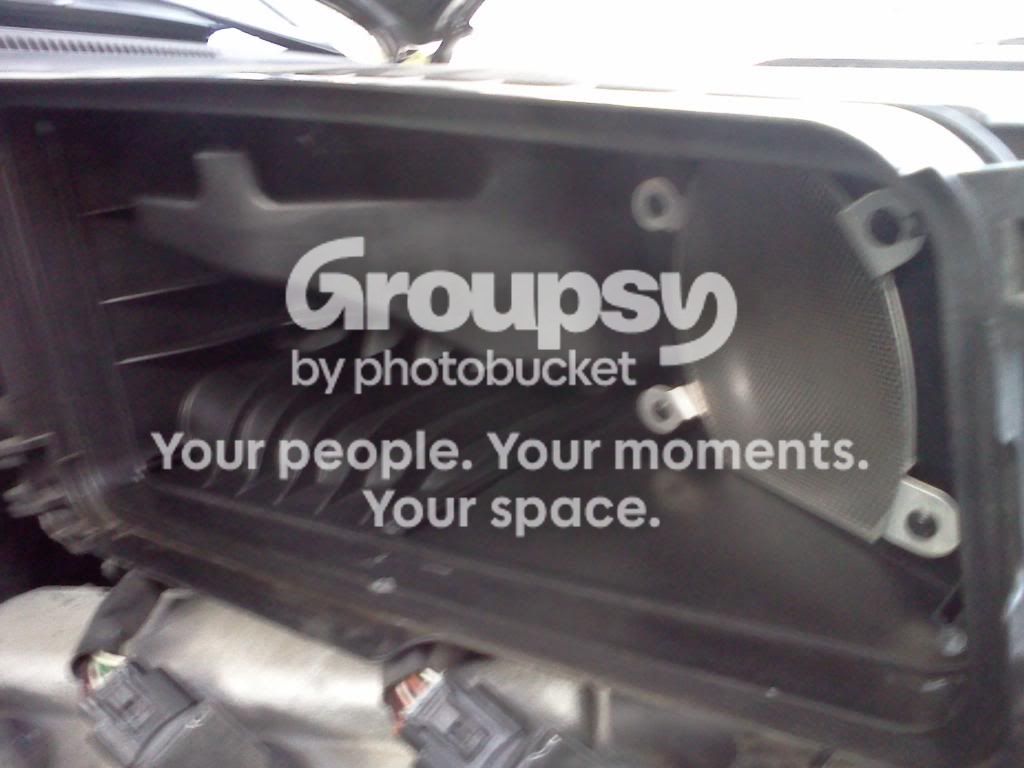


-After removing it driving around for a few days now I've noticed a definite increase in throttle response. There is much less delay between the pedal and when the vehicle actually starts using most of its power now. Before, like if I needed to hammer it quickly merging onto a ramp or something there would be a delay/restrictive feeling. Now that is mostly gone. I can see how this might be, considering when I blew through the filter with my mouth it was actually surprisingly restrictive. In terms of actual power increase, there might be a few hp but it is negligible. My truck does have a very slightly louder startup as well.

The next mod (Nov 25, 2013): Plasti dipped center caps on the wheels.
For this, I popped off all the center caps, and popped off the little toyota emblems as well. I kept track of which emblems went to which cap just to make sure everything fit back together, as I had to use a soldering iron with a small tip to break away the emblems. They had been melted in place on the backside of the cap:
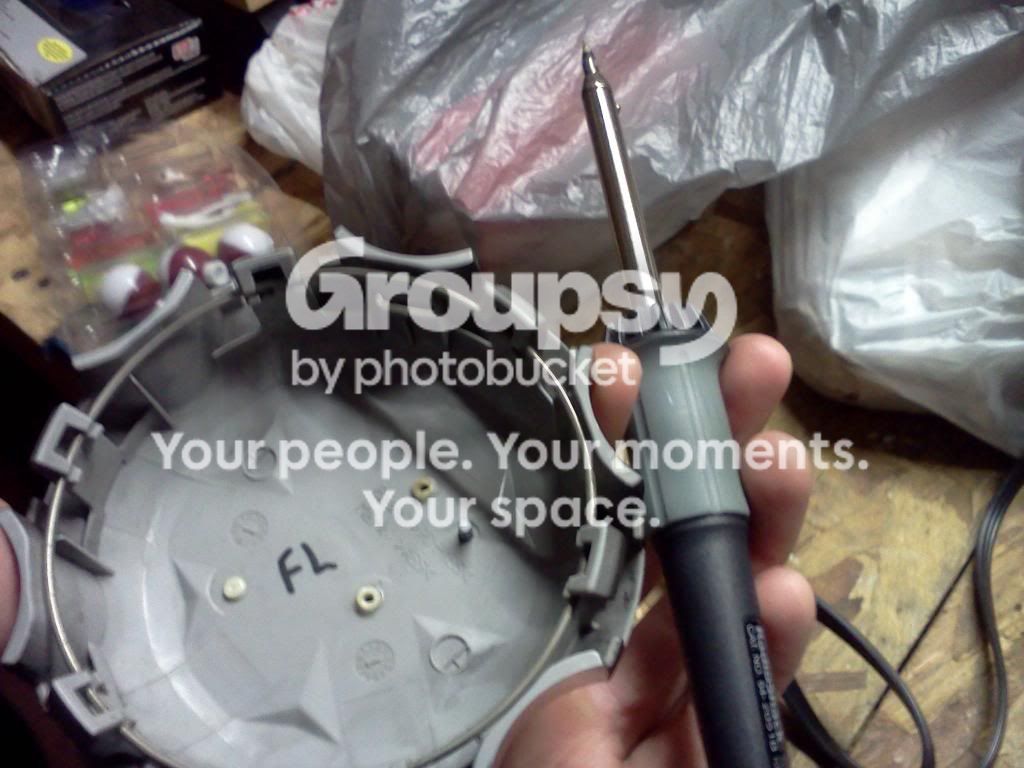
The two holes on the right were where I inserted the iron and the solid melted bit on the left is what it was like before. If you attempt this I would reccomend trying to dremel it off instead of melting as the emblems will go back on easier and cleaner.

With the emblems off the caps were plasti dipped with 3 coats. I probably should have done 4 as 3 is a little thin but still completely covers. Then I placed the emblems back on and put the caps on the truck:
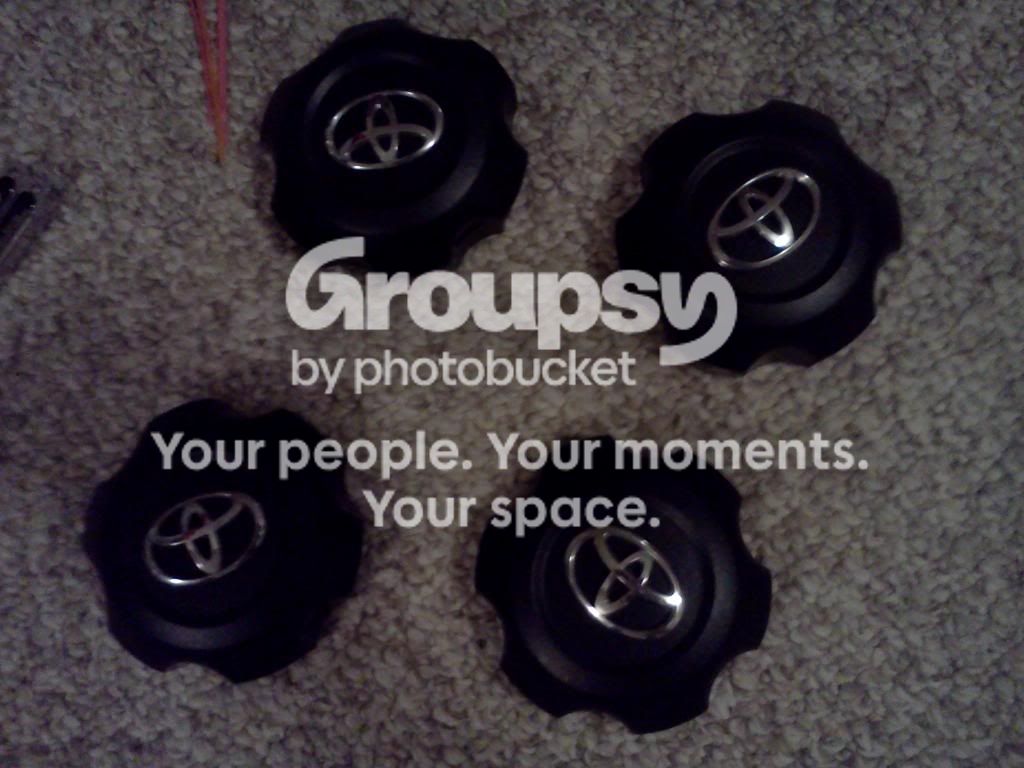
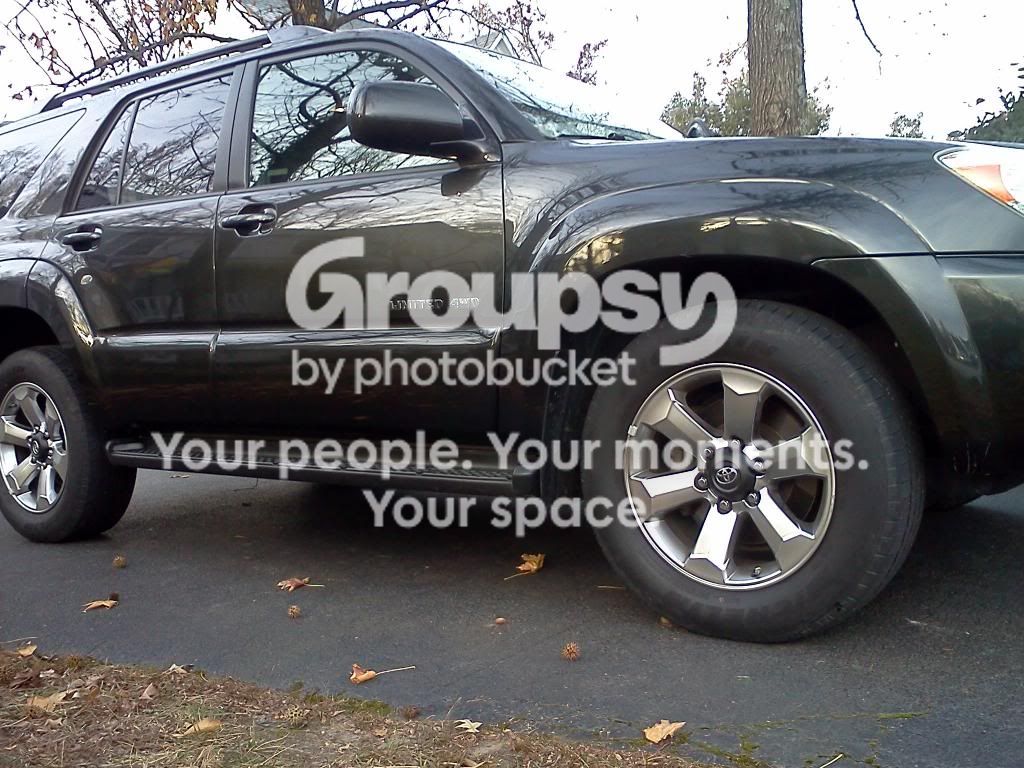


I ended up liking the look more than I thought, and it looks even better in real life.

My next mods will hopefully be the daystar or burtman front leveling spacer and some 265/65/18 bfg at's. I think I'm also gonna lamin-x the fogs yellow. Also thinking about doing an interior hatch release button as well as fixing the melted hatch release that is on it now. Maybe I can get toyota to replace it under warranty if my truck still has its warranty.
 
Last edited:
Register to hide this ad
jgmx893's 4th Gen Limited Build:

I guess it's about time I started this build thread since I've started doing various things with my truck and I thought it would be a good idea to document it.
First off a little background/info:
It's a 2007 4runner Limited in Shadow Mica, color matched grille. Got it from my grandfather beginning of last summer (july 2013) and I've really grown to love it. At first I really was set on a pickup, namely a late 90's/early 2000's ram. I was even thinking about possibly trading in the t4r for a tacoma. I ride/race motocross alot and a truck would help in that aspect. Anyway, I've actually grown to like the cabin space of the t4r, and sometimes I do wish I had a bed, but I plan on getting an open trailer/motorcyle hitch rack for it. Plus who would turn down a free vehicle, especially a 4runner!
Also, my grandfather hunts alot and disconnected the running board lights which I probably would have done anyway, so that was awesome.

Anyway...here are the mods done so far as of Nov. 25, 2013:

First thing I did was remove the HCF (hydrocarbon filter). This is a pic of it removed, where it would have been:


-After removing it driving around for a few days now I've noticed a definite increase in throttle response. There is much less delay between the pedal and when the vehicle actually starts using most of its power now. Before, like if I needed to hammer it quickly merging onto a ramp or something there would be a delay/restrictive feeling. Now that is mostly gone. I can see how this might be, considering when I blew through the filter with my mouth it was actually surprisingly restrictive. In terms of actual power increase, there might be a few hp but it is negligible. My truck does have a very slightly louder startup as well.

The next mod (Nov 25, 2013): Plasti dipped center caps on the wheels.
For this, I popped off all the center caps, and popped off the little toyota emblems as well. I kept track of which emblems went to which cap just to make sure everything fit back together, as I had to use a soldering iron with a small tip to break away the emblems. They had been melted in place on the backside of the cap:

The two holes on the right were where I inserted the iron and the solid melted bit on the left is what it was like before. If you attempt this I would reccomend trying to dremel it off instead of melting as the emblems will go back on easier and cleaner.

With the emblems off the caps were plasti dipped with 3 coats. I probably should have done 4 as 3 is a little thin but still completely covers. Then I placed the emblems back on and put the caps on the truck:


I ended up liking the look more than I thought, and it looks even better in real life.

My next mods will hopefully be the daystar or burtman front leveling spacer and some 265/65/18 bfg at's. I think I'm also gonna lamin-x the fogs yellow. Also thinking about doing an interior hatch release button as well as fixing the melted hatch release that is on it now. Maybe I can get toyota to replace it under warranty if my truck still has its warranty.

if you want help doing any mods let me know. im always open to helping forum members
 
I put an interior hatch release and a voltometer in over the past month or so (Dec 2013):

For the Interior Hatch release:

The switch, with leads:


Then I connected to the existing circuit in parallel, with crimp connectors. Shown are the leads to the switch in white and the purple and green wires that have not been paralleled with the whites yet:

Note that the correct wires are purple with a white stripe and light green with a red stripe. Then I dremmeled out a area in the back panel below the window and put the switch in.
 
For the Voltometer Install:
I wired it into an empty fuse slot with an add-a-circuit kit using a 2-amp fuse, passed it through a toggle switch, and then had the meter hanging from the headboard.


Wired it up the pillar under the airbag and had it pop out right next to it. Grounded it on the airbag mounting screw. It ended up looking really clean, right up in the top left corner of the windshield and no visible wires.
 
The next mod has been CBI's ditch light brackets. Right now I'm using the passenger side for my antenna. I had some trouble getting them in because I couldn't pull the fender back far enough at first, but eventually I figured it out. There is a "ridge" for lack of a better word that the fenders sit over, and you need to pull up and then out to get it out of the way to expose the hood mounting bolts. You also need to make sure you have taken all 4 bolts out.
3 going down the fender that mount to the engine bay, and 1 behind a rubber plug-like thing in the door jamb.
Then the brackets mount with their included hardware right on top of the hood mount.
Very pleased with the quality and fit!

20140730_182956.jpg


20140730_182918.jpg
 
Put in a few things over the past few weekends.
#1. VSC Disable Switch. Just put the switch in one of the blank spots in the console, no need for pics as this is a fairly well known mod and there are multiple threads on it.

#2. In-cabin, rear facing flood lights.
I was up at walmart recently and saw them sitting on the shelf and for $20, might as well. I decided to make use of them for back-up lighting, work lighting, tailgating/party lighting, etc. I can think of a lot of uses for them. Wired them via a 15A fuse w/illuminated switch in the cab right under the gas tank flap button. Then ran the wires under the step guards and had the y-connector for power be under the back seats.
Then, I drilled a hole in each of the clothes-hanger mounts in the back, and mounted the lights from there, running the wires down the pillar and popping out under the back seats. I grounded them to the bolts that hold the coat hanger mounts in.
20141004_170732%20-%20Copy.jpg


20141004_170747%20-%20Copy.jpg


Actually already used them, had a bonfire at a friends house and had lighting/music going from the t4r while we played some cornhole. Only beef I have with them is that they get very hot since they're just filament lights, so I'll have to keep an eye on the headliner above the lights.
 
Last edited:
Put in a few things over the past few weekends.
#1. VSC Disable Switch. Just put the switch in one of the blank spots in the console, no need for pics as this is a fairly well known mod and there are multiple threads on it.

#2. In-cabin, rear facing flood lights.
I was up at walmart recently and saw them sitting on the shelf and for $20, might as well. I decided to make use of them for back-up lighting, work lighting, tailgating/party lighting, etc. I can think of a lot of uses for them. Wired them via a 15A fuse w/illuminated switch in the cab right under the gas tank flap button. Then ran the wires under the step guards and had the y-connector for power be under the back seats.
Then, I drilled a hole in each of the clothes-hanger mounts in the back, and mounted the lights from there, running the wires down the pillar and popping out under the back seats. I grounded them to the bolts that hold the coat hanger mounts in.
20141004_170732%20-%20Copy.jpg~original


20141004_170747%20-%20Copy.jpg~original


Actually already used them, had a bonfire at a friends house and had lighting/music going from the t4r while we played some cornhole. Only beef I have with them is that they get very hot since they're just filament lights, so I'll have to keep an eye on the headliner above the lights.

not a bad idea. dont know how it will do with heat but i dont think it will be that bad. i might so something like this later on with leds. dont know if im going to do a mount inside,outside or do a magnet mount for the roof. can never have to much light

5P8A7326_zpsdf8a920c.jpg~original
 
Last edited:
jgmx893's 4th Gen Limited Build:

As she sits now (Oct. 2014)

20141004_170608%20-%20Copy.jpg~original


2007 Limited V6 4x4
Current:
- HCF Removal
- Running board removal
- Blacked out center wheel caps
- Interior tailgate release button
- Digital voltometer
- Cobra 19 Radio w/Wilson flex 3' fiberglass ant.
- CBI Off Road Fab. ditch mounts
-t4r.org stickers (was on a low budget and couldn't afford a supercharger)

Future:
-blacked out headlights
-some sort of 2-3" lift (undecided)
- 265/65/18's
-led cabin lighting
-seat covers
-flowmaster cat-back system

Anyway...here are the mods done so far as of Nov. 25, 2013:

First thing I did was remove the HCF (hydrocarbon filter). This is a pic of it removed, where it would have been:


-After removing it driving around for a few days now I've noticed a definite increase in throttle response. There is much less delay between the pedal and when the vehicle actually starts using most of its power now. Before, like if I needed to hammer it quickly merging onto a ramp or something there would be a delay/restrictive feeling. Now that is mostly gone. I can see how this might be, considering when I blew through the filter with my mouth it was actually surprisingly restrictive. In terms of actual power increase, there might be a few hp but it is negligible. My truck does have a very slightly louder startup as well.

The next mod (Nov 25, 2013): Plasti dipped center caps on the wheels.
For this, I popped off all the center caps, and popped off the little toyota emblems as well. I kept track of which emblems went to which cap just to make sure everything fit back together, as I had to use a soldering iron with a small tip to break away the emblems. They had been melted in place on the backside of the cap:

The two holes on the right were where I inserted the iron and the solid melted bit on the left is what it was like before. If you attempt this I would reccomend trying to dremel it off instead of melting as the emblems will go back on easier and cleaner.

With the emblems off the caps were plasti dipped with 3 coats. I probably should have done 4 as 3 is a little thin but still completely covers. Then I placed the emblems back on and put the caps on the truck:


I ended up liking the look more than I thought, and it looks even better in real life.

My next mods will hopefully be the daystar or burtman front leveling spacer and some 265/65/18 bfg at's. I think I'm also gonna lamin-x the fogs yellow. Also thinking about doing an interior hatch release button as well as fixing the melted hatch release that is on it now. Maybe I can get toyota to replace it under warranty if my truck still has its warranty.


When you removed the emblems from the center cap, how did you assemble them back?
 
You seem like a handy guy so this shouldn't be too tough for you.

I bought some bright ass LEDs strips from LEdlights.com and a mercury switch along with a push on/ push off button. Mounted the strip just below the plastic cover. Mounted the mercury switch under the cover, pulled power from the harness in the hatch. Ran the switch in line incase I don't want it on. The mercury switch is fickle in my truck, but works great on the wife's. I have the same setup under the hood. It's like daylight.
I've tried the amazon led strips. They're just not as bright. And they're kinda blueish.

2cd78530ba7323fa7b98178b3514d4bc_zpsf301c098.jpg~original


43a275f805de7ec551f8df11672853bb_zps4cbf6b6f.jpg~original


Disregard the light on the drivers side. I rigged up some 'rock lights/ courtesy lights' to mount on my sliders and the wires broke on the passenger side. Always tinkering.
 
When you removed the emblems from the center cap, how did you assemble them back?
Since the emblems still had some of the plastic posts on them that sticks through the caps I stuck them through and actually used hot glue on the inside to hold them in place. That way if I need to strip the plasti dip and re-apply later I can take the emblems off again.

You seem like a handy guy so this shouldn't be too tough for you.

I bought some bright ass LEDs strips from LEdlights.com and a mercury switch along with a push on/ push off button. Mounted the strip just below the plastic cover. Mounted the mercury switch under the cover, pulled power from the harness in the hatch. Ran the switch in line incase I don't want it on. The mercury switch is fickle in my truck, but works great on the wife's. I have the same setup under the hood. It's like daylight.
I've tried the amazon led strips. They're just not as bright. And they're kinda blueish.

Disregard the light on the drivers side. I rigged up some 'rock lights/ courtesy lights' to mount on my sliders and the wires broke on the passenger side. Always tinkering.

Thanks for the idea and pictures, that's definitely a nice setup.
 
Update

Been a while since I've been active around here, but figured I would make an update post. Recently I've debadged (on the sides), and blacked out my center emblems. I also put in a Flowmaster 50 Series SUV muffler which ended up sounding pretty good for being on a 4.0. If anyone wants pictures or video of that exhaust let me know and I'll try to post some stuff up.
At some point in the next couple weeks I'm gonna black my headlight housings out, so I'll be sure to post some before and after pictures from that project.

IMG_20170604_195257_01_zpsjtzzfcrl.jpg


Also, I made a new splash guard out of some 1/8" rubber sheeting. The old one was ripped to shreds from dry rot/some wheeling so I figured I might as well save some money and make my own.
The new side (passenger side):
IMG_20170604_195323_01_zpsajkztbkr.jpg~original


The drivers side (which hasn't ripped yet):
IMG_20170604_195325_01_zps4j9kexau.jpg~original
 
Last edited:
Been a while since I've been active around here, but figured I would make an update post. Recently I've debadged (on the sides), and blacked out my center emblems. I also put in a Flowmaster 50 Series SUV muffler which ended up sounding pretty good for being on a 4.0. If anyone wants pictures or video of that exhaust let me know and I'll try to post some stuff up.
At some point in the next couple weeks I'm gonna black my headlight housings out, so I'll be sure to post some before and after pictures from that project.

IMG_20170604_195257_01_zpsjtzzfcrl.jpg


Also, I made a new splash guard out of some 1/8" rubber sheeting. The old one was ripped to shreds from dry rot/some wheeling so I figured I might as well save some money and make my own.
The new side (passenger side):
IMG_20170604_195323_01_zpsajkztbkr.jpg~original


The drivers side (which hasn't ripped yet):
IMG_20170604_195325_01_zps4j9kexau.jpg~original


Nice build! My splash guards are pretty much non existent now, so i'm gonna do something similar. What clips did you use to attach it after you cut it to size?
 
Nice build! My splash guards are pretty much non existent now, so i'm gonna do something similar. What clips did you use to attach it after you cut it to size?

I reused the original plastic clips, althought they don't hold as well from ripping them out. The top two are actually 5/16" bolts with a nylock nut on the other side. I'll probably try to find some more single use plastic clips to replace the old ones soon.
 
I reused the original plastic clips, althought they don't hold as well from ripping them out. The top two are actually 5/16" bolts with a nylock nut on the other side. I'll probably try to find some more single use plastic clips to replace the old ones soon.

Would you suggest trying to keep each side one splash guard rather than having two separate ones?
 
Would you suggest trying to keep each side one splash guard rather than having two separate ones?

I would think it doesn't really matter.
If you're gonna be wheeling a lot then having one piece might cut down on the chances of stuff like sticks and mud getting caught up in the seams (which might happen if you made a two-piece).
 
Blacked out headlights

Yesterday I decided to tackle the project of blacking out my headlights, and gotta say I wish I'd done it sooner.

First, I went to the hardware store and picked out some paints to try to color match the shadow mica of my runner. I ended up using:
- (3 light base coats of satin black)
- (1 very light coat of "Carbon Mist" metallic paint)
- (1 coat of clear satin)


Here is a picture after the satin was on:


After the carbon mist/clear coat:


And back on the runner:


As for the process:
First, getting the headlights out wasn't too bad. Broke a couple plastic retaining clips on my subframe/radiator frame that hold the plastic covering on, so be weary of that. After getting the lights out, I took all rubber/plastic fittings and bulbs out, then they went in the oven at 200F for about 10 minutes. Then I peeled the housings apart and started to get to work.
I took some 1000 grit sandpaper to the chrome finish to rough it up, then washed/dried it. After that I applied the paint and let it dry for about an hour before reassembling.
In the mean time, I used a headlight restoration kit and wet sanded/sealed the outer clear housings of the lights, since they were starting to get hazy/yellowed.
After that I put both the outer (clear) housings and the other halves of the light back in the oven for about 4 or 5 minutes, still at 200F. This was enough to get the old sealant soft again so I could press the lights back together. I haven't gotten to test out they are in the rain yet, but I bought some silicon sealant to use incase I need to spread some around the seam if they start leaking.
 
Last edited:

Members online

Forum statistics

Threads
278,306
Messages
3,554,046
Members
248,016
Latest member
Advally Service

Trending content

Back
Top