Leaking CV's

Will_4R

Member
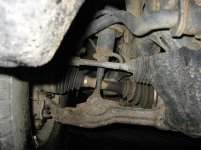
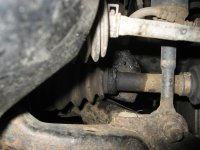
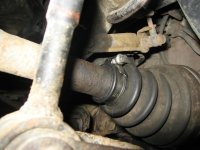
Like many others on here, I have this problem. The leaks are at both outer clamps on the inner joint. I keep an eye on them, and the leak started a somtime on my recent road trip to California. I drove back from Cali on them (>1,500 miles) without any problems. Last week I had the dealer take a look, and they told me the leaks were minor and I did not have to worry about them yet, and that I could still drive it, but that I should have them fixed sooner or later. They quoted me $800 to replace the boots on both sides. I asked if they could just replace the clamps, but they said the shafts should be pulled and the joints cleaned out properly and repacked.

From reading numerous posts on here about this problem, I have decided it makes more sense for now to just replace the clamps and maybe inject a bit more grease into the boot. If the leak is as minor as the dealer implied, then I don't think cleaning it out and repacking it is all that necessary. I figure if they keep leaking, or the problem gets worse after replaceing the clamps I haven't lost too much and can let them do a more thorough job. The concern is that there might be contaminants inside the boot already.

Any opinions? I was thinking of asking the tire shop if they could replace the clamps for me when I get new tires put on soon. Alternatively I might try the repair myself in which case I have a few questions:

After removing the old clamps, can I just push the boot back towards a joint a bit to clean the shaft before reclamping it?

What should I use to clean the area that won't get into the boot and break down the grease?

Any speacific type or size of clamp needed?

Anything else I should know or be aware of?

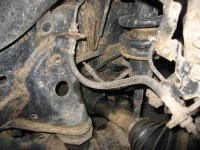
Here are some pics:
 

Attachments

  • IMG_2147.jpg
    IMG_2147.jpg
    137.4 KB · Views: 2,005
  • IMG_2148.jpg
    IMG_2148.jpg
    132.7 KB · Views: 1,898
Register to hide this ad
You could just , knowing you'll have to do more later.

Inspect the boots for rips and tears where dirt could get in. If there's none or they're minimal you could just replace the clamps for now, and plan on doing the boots later.

But if there's a lot of damage to the boots allowing a lot of dirt in, it can damage the CV joints. In which case it maybe better to have them cleaned/repacked and new boots done now.
 
... Any opinions? I was thinking of asking the tire shop if they could replace the clamps for me when I get new tires put on soon. Alternatively I might try the repair myself in which case I have a few questions:

After removing the old clamps, can I just push the boot back towards a joint a bit to clean the shaft before reclamping it?

What should I use to clean the area that won't get into the boot and break down the grease?

Any speacific type or size of clamp needed?

Anything else I should know or be aware of?...

If the boots are not torn or broken then don't listen to the stealer that wants to make a big profit swapping your half shafts. Do the clamp work yourself real cheap.

Check the link in my signature for my thread on doing the clamp repair. The main consideration is what comes out after you undo the clamp. On my driver side I had water instantly pour out so it turned into a more involved milkshake cleanup. Later, on the passenger side, all I did was the clamp because of the lack of moisture. Sounds like this is your case because you caught it early.

Basically, remove the clamp, push back the boot on the shaft, wipe it down with a rag, move the boot back and install a clamp. That simple or go the more involved route and remove both clamps on the boot to regrease. Messy but still simple and cheap.
 
If the boots are not torn or broken then don't listen to the stealer that wants to make a big profit swapping your half shafts. Do the clamp work yourself real cheap.

Check the link in my signature for my thread on doing the clamp repair. The main consideration is what comes out after you undo the clamp. On my driver side I had water instantly pour out so it turned into a more involved milkshake cleanup. Later, on the passenger side, all I did was the clamp because of the lack of moisture. Sounds like this is your case because you caught it early.

Basically, remove the clamp, push back the boot on the shaft, wipe it down with a rag, move the boot back and install a clamp. That simple or go the more involved route and remove both clamps on the boot to regrease. Messy but still simple and cheap.


Thanks for the info, I remember your thread on this.

The dealer doesn't even want to replace the half shafts, just the boots and clamps, but they insisted they had to remove the half shafts to properly clean out the joint.
 
... The dealer doesn't even want to replace the half shafts, just the boots and clamps, but they insisted they had to remove the half shafts to properly clean out the joint.

Then that's definitely an $800 ripoff.

Spread out the cardboard, DIY and smile.
 
The dealer doesn't even want to replace the half shafts, just the boots and clamps, but they insisted they had to remove the half shafts to properly clean out the joint.<!-- google_ad_section_end -->

Depends on what that means.

If they mean clean and repack the CV joint, that's a fair price (maybe a little high). There's a lot of labor to remove the shafts and repack the joints.

If they mean the clean area where the boot meets the axle and put on a new clamp, that's a ridiculous price.
 
Depends on what that means.

If they mean clean and repack the CV joint, that's a fair price (maybe a little high). There's a lot of labor to remove the shafts and repack the joints.

If they mean the clean area where the boot meets the axle and put on a new clamp, that's a ridiculous price.

They meant to remove the shaft, clean and repack the joint. Based on what people on here have said, that is in the right ball park, but I am just not sure it is really necessary. If the cheap fix doesn't work, and even worse if it destroys the joint, it probably isn't THAT much more expensive to replace the entire shaft. From what I understand, although the replacement shafts are more expensive than just the boot kit, but the labour of installing them will be less than the labour of cleaning and repacking.

The boots appear to be in good shape. I have not driven through much if any water since the leaks started. However I have done over 1,500 miles of driving, and spent a week driving offroad in the dusty/sandy desert, so there might be chance of crap inside the boot.

If I go for just the replacement clamp, should I add any (and how much) grease to joint?
 
They meant to remove the shaft, clean and repack the joint. Based on what people on here have said, that is in the right ball park, but I am just not sure it is really necessary. If the cheap fix doesn't work, and even worse if it destroys the joint, it probably isn't THAT much more expensive to replace the entire shaft. From what I understand, although the replacement shafts are more expensive than just the boot kit, but the labour of installing them will be less than the labour of cleaning and repacking.

The boots appear to be in good shape. I have not driven through much if any water since the leaks started. However I have done over 1,500 miles of driving, and spent a week driving offroad in the dusty/sandy desert, so there might be chance of crap inside the boot.

If I go for just the replacement clamp, should I add any (and how much) grease to joint?

Good thinking. Either way they have to take the shaft out so may as well wait until you actually rip a boot. I don't think anything got inside.

As for the grease, I don't think you need to do that. If you want to do it, that will involve removing the large clamp to move the boot and feed the grease inside.

Let us know how you do.
 
If I go for just the replacement clamp, should I add any (and how much) grease to joint?<!-- google_ad_section_end -->

You can't get to the CV joint to grease it with the boot on.
You could could cut-off the (larger) clamp and slide the boot over to access it, then replace both clamps. As for what size clamps, get a tape measure and measure them. Also it takes a special tool to tighten them properly, and the cheap version of the tool is crap.
 
I though there were non-OEM CV clamps that I could buy that crimp with pliers (like what Kmvreter used), or use a worm gear (like in the write up on 120). I was going to start buy going to the auto parts store tomorrow and seeing what they have.

I also thought there was a way to inject grease into the boot without removing it.
 
If you can put it off for a little while, you can go to West Marine: Home Page and they have the narrower screw type hose clamps and order them. They "marine" (boat) clamps are not as wide as the ones used on autos. Just do a search for hose clamps. I got this info off the fj cruiser forum and hopefully the ones we need are the same size as the ones used on the fj, if not, they have all sizes listed. The ones that fit the cruiser boots are: #9347493 (large ones) and #9347410 (small ones). The part numbers are the same for SAE ones and also same for the metric ones. Hope this helps.
 
If you can put it off for a little while, you can go to West Marine: Home Page and they have the narrower screw type hose clamps and order them. They "marine" (boat) clamps are not as wide as the ones used on autos. Just do a search for hose clamps. I got this info off the fj cruiser forum and hopefully the ones we need are the same size as the ones used on the fj, if not, they have all sizes listed. The ones that fit the cruiser boots are: #9347493 (large ones) and #9347410 (small ones). The part numbers are the same for SAE ones and also same for the metric ones. Hope this helps.

Thanks, that looks like what Expat used over on 120 in his write up. Certainly a better option that the wider standard hose clamps with sharp edges. Since I happen to live on the coast there is no shortage of marine suppliy shops so I will check them out today. The part number you suggest is the same one used by Expat on 120 on his 4th gen 4Runner, so it should fit.

Edit: There are two West Marine's in Vancouver, so that will be my first stop of the day.
 
Last edited:
I did the job today.

I picked up a couple of the marine hose clamps for a total of ~$3.50. I looked at some crimp style CV bands like what Kmvreter used at the autop parts store for about $1.5 each that crimp with end-cut pliers, but passed on them since I don't have the pliers and didn't feel like buying them. I also like that the worm gear clamps can be loosend so I can add grease to joint at a later time if desiered.

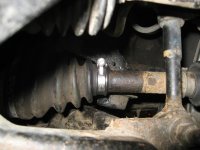
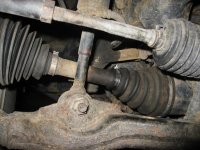
It took me about half an hour to change the outer clamp on both inner CV boots. It was straightforward and uneventful. I did notice that the driver side looked worse than the a few days, so I am glad I got to it today. I wasn't sure how much to tighten the new clamps. I tightened them reasonably tight with a screwdriver to make sure they hold.

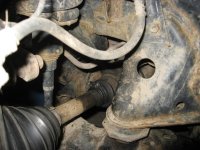
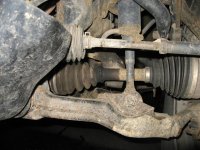
Here are some pictures:

First is the driver side looking messier than the picture in my first post. I have done about 60 city miles since the first pic was taken. (I did over 1,500 miles since noticing hte problem and taken the first pics.)

The rest are after pictures with the new clamp taken from under the front on each side, then from behind the wheel in the wheel well.
 

Attachments

  • IMG_2151.jpg
    IMG_2151.jpg
    127.1 KB · Views: 1,781
  • IMG_2155.jpg
    IMG_2155.jpg
    126.9 KB · Views: 2,289
  • IMG_2159.jpg
    IMG_2159.jpg
    136.4 KB · Views: 1,657
  • IMG_2162.jpg
    IMG_2162.jpg
    128.1 KB · Views: 1,797
  • IMG_2163.jpg
    IMG_2163.jpg
    138.7 KB · Views: 1,649
  • IMG_2166.jpg
    IMG_2166.jpg
    132.6 KB · Views: 1,682
How are you guys packing the joint and boot, and when do you know that you have enough in there? I HAVE to do this upgrade this weekend. Mine is pretty bad, I hope that I didn't cause any damage.
 
How are you guys packing the joint and boot, and when do you know that you have enough in there? I HAVE to do this upgrade this weekend. Mine is pretty bad, I hope that I didn't cause any damage.

Read up above or in the link in my signature about removing the large clamp to move the boot.
 
Replaced CV Joint Clamps

Read up above or in the link in my signature about removing the large clamp to move the boot.

Replaced CV Joint Boot clamps 2003 4runner 4.0Liter. Thank you Kmvreter!
Job went great! My inner boot was leaking on the small outer clamp. Not sure how long just recently bought vehicle. definitely lost some grease though could see it.
I bought both large and small clamps at NAPA (they gave me universal clamps that worked great!) I removed both large and small clamps by using a screw driver to pry open the two tabs on clamp then pulling up on main tab on clamp until it loosened. then i used snips to cut them off. they removed very easily, both clamps within minutes. (sorry no pics!)
Then i inspected boot. it was fine. so i pulled boot back and i found what kmveter found. The tan milkshake looking muck. I used a rag and spent over an hour meticulously cleaning it out rotating the shaft to get it the best i could. i was afraid to use brake cleaner in fear of getting some trapped in the hub part of the joint therefore contaminating the new grease.
After cleaning the bearings, shaft, and boot on the inside, I packed the grease (purchased at NAPA, i asked for CV Joint grease and they gave me a small, clear sack of black grease enough to do a side...Perfect!) i cut the corner of the sack of grease and used blue rubber gloves, squeeze grease out of the sack onto two fingers and packed the grease into the bearings until i used all the grease in the sack.
then i pulled boot into place. for large side make sure the scallops (the grooves of boot) slide into place properly and the small end "Pops" into the little slot on shaft. then i put universal clamps on by tightening until i got the small tab to snap into the tightest position on clamp. then i use front end pliers/snips (the kind of snips that have the jaws in the front) to pull the clamp to its final tight position by grasping the tab sticking up off the clamp and squeezing it until it was hard to squeeze. (this worked like a charm and saved $35 to purchase the tool!) i check to make sure clamp was tight by trying to spin the boot at clamp. no movement and it was good.
(PS i did this all with the wheel on and jacked up with jack stands so i can spin wheel and joint while working)
Then I spun the wheel for a minute or two to work in grease and then took for a test run driving slowly around the neighborhood for a while before taking out to higher speeds. It was fine. no leaks so far and everything appears great!
Scale of 1 to 10 ,ten being most difficult. this job was a 3 hardest part being the cleaning of the bearing and the hub of the CV bearing.
DEFINITELY DIY!!!! (I think Kmveter has the pics that helped me so much! and his info...thank you Kmveter! )
PSS I couldnt get my wheel off to do the job. i really pulled hard, almost off jack stands, tried to pry..gave up...ANY IDEAS how to get that wheel off???
 
Replaced CV Joint Boot clamps 2003 4runner 4.0Liter. Thank you Kmvreter!
Job went great! My inner boot was leaking on the small outer clamp. Not sure how long just recently bought vehicle. definitely lost some grease though could see it.
I bought both large and small clamps at NAPA (they gave me universal clamps that worked great!) I removed both large and small clamps by using a screw driver to pry open the two tabs on clamp then pulling up on main tab on clamp until it loosened. then i used snips to cut them off. they removed very easily, both clamps within minutes. (sorry no pics!)
Then i inspected boot. it was fine. so i pulled boot back and i found what kmveter found. The tan milkshake looking muck. I used a rag and spent over an hour meticulously cleaning it out rotating the shaft to get it the best i could. i was afraid to use brake cleaner in fear of getting some trapped in the hub part of the joint therefore contaminating the new grease.
After cleaning the bearings, shaft, and boot on the inside, I packed the grease (purchased at NAPA, i asked for CV Joint grease and they gave me a small, clear sack of black grease enough to do a side...Perfect!) i cut the corner of the sack of grease and used blue rubber gloves, squeeze grease out of the sack onto two fingers and packed the grease into the bearings until i used all the grease in the sack.
then i pulled boot into place. for large side make sure the scallops (the grooves of boot) slide into place properly and the small end "Pops" into the little slot on shaft. then i put universal clamps on by tightening until i got the small tab to snap into the tightest position on clamp. then i use front end pliers/snips (the kind of snips that have the jaws in the front) to pull the clamp to its final tight position by grasping the tab sticking up off the clamp and squeezing it until it was hard to squeeze. (this worked like a charm and saved $35 to purchase the tool!) i check to make sure clamp was tight by trying to spin the boot at clamp. no movement and it was good.
(PS i did this all with the wheel on and jacked up with jack stands so i can spin wheel and joint while working)
Then I spun the wheel for a minute or two to work in grease and then took for a test run driving slowly around the neighborhood for a while before taking out to higher speeds. It was fine. no leaks so far and everything appears great!
Scale of 1 to 10 ,ten being most difficult. this job was a 3 hardest part being the cleaning of the bearing and the hub of the CV bearing.
DEFINITELY DIY!!!! (I think Kmveter has the pics that helped me so much! and his info...thank you Kmveter! )
PSS I couldnt get my wheel off to do the job. i really pulled hard, almost off jack stands, tried to pry..gave up...ANY IDEAS how to get that wheel off???

How bad was your leak? Was it worse than mine looked in the pic? How could you tell lots of grease had been lost? I ma curious becuase i didn't open mine up to inspect it. Mine had only been leaking a few weeks, but I done several thousand miles in those few weeks, Luckily it was dry the whole time expect for a brief hosing down of the undercarraige.
 
How bad was your leak? Was it worse than mine looked in the pic? How could you tell lots of grease had been lost? I ma curious becuase i didn't open mine up to inspect it. Mine had only been leaking a few weeks, but I done several thousand miles in those few weeks, Luckily it was dry the whole time expect for a brief hosing down of the undercarraige.
Hey Will4R just looked at your pics. I am not sure how long mine was leaking bc i just bought my 4runner and noticed it about 2 weeks after buying. not sure if i overlooked it upon purchase so not sure how long it had been leaking. Mine appeared to be worse though. i had grease spattered on nearby linkage whereas yours appears to be leaking mostly at the clamp site. i would say mine was worse than yours. you came so far with installing the clamps (that can be easily removed and re-installed). i would say just pop off the large clamp, pull back your boot and take a peek. you can do this with your wheel on. if it was exposed to water it will have that tan, milkshake looking crap in there. if it is grey i would say you are ok, but might want to pack a little cv grease in the bearings by pushing it in with your fingers, then re-install the boot and then the clamp. if the milkshake crap is in there, clean it out the best you can, pack the cv grease (from NAPA for me in PA), then close up your boot. you might want to take of the small end of the boot if you have to wipe it out to make it easier to clean out. it would be good peace of mind for you and it wont take long either way. Pull that boot back and check it out! good luck! let me know if i can help any more. let me know how it goes! ps i like your ride! i am going to try to figure out how to get pics on here.
 

Members online

Forum statistics

Threads
278,304
Messages
3,554,041
Members
248,016
Latest member
Advally Service

Trending content

Back
Top