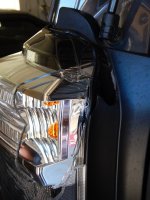
Lesson learned about hatch struts

Cutter

New member
This forum is great: lots of inspiration for mods, cool trip reports, tons of great info, etc. (Goodness knows that some of posts have cost me some money after reading them :rolleyes: ) Sometimes the posts I get the most out of are the ones when the OP is willing to fess up to their mistakes. So, along those lines:
I purchased a new light bar, and drove to the shop to pick it up. Several days earlier I had my Gobi installed, and I replaced the hatch struts to a beefier version from Lift Support Depot. It seemed like they went in without any problem, but if I'm honest with myself, I recall fiddling with one of the retention clips a little more than the other 3. I remember pulling on the struts after I installed them, and they stayed put on their mounting points. Anyway, I put the light bar in the back of the 4Runner, and while I'm closing the hatch I hear a "PING" followed by a very loud "CRUNCH". Turns out one of the retaining clips had popped off and when I brought the hatch down to close it, the lower end of the strut released from it's mounting point. (Never found where the clip flew off to ) Unfortunately, the combination of the weight of the hatch, the strength of the strut and the positioning of the 2 caused the lower end of the strut to punch right through the driver's side tail light housing.
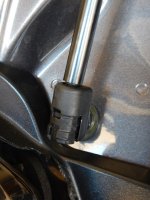
BL1.jpg
Missing retaining clip ^

BL4.jpg BL2.jpg
No Bueno ^

With only one strut holding up the weight of the rear hatch, it all came down on the skinny arm of the strut hard enough to bend it.
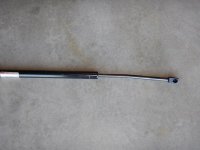
BL5.jpg

BL6.jpg

End result: new tail lamp housing (really needed to pull hard after removing the 2 nuts from behind the unit to get it out: 2 red circles show the where the tail lamp housing gets pressed into the body of the car) new strut, $250 less in my wallet and a lesson learned. I'm thinking it could have been worse: I could have screwed up the hatch, gouged the paint, a plastic shard could have poked my eye out, etc. Wanted to share this particular episode with the forum as I haven't seen this specific F***-up mentioned.
 

Attachments

  • BL1.jpg
    BL1.jpg
    95.5 KB · Views: 5,465
  • BL4.jpg
    BL4.jpg
    96 KB · Views: 5,301
  • BL5.jpg
    BL5.jpg
    73.2 KB · Views: 5,265
  • BL6.jpg
    BL6.jpg
    111 KB · Views: 5,208
  • BL2.jpg
    BL2.jpg
    99.8 KB · Views: 5,253
Register to hide this ad
Sorry to hear about your unfortunate incident, could happen to anyone in my opinion. It takes heart to post all this, I like to see people be real about their mods/repairs. I strongly considered the TRD CAI until I read between the lines on a few posts and one member who flat out said "it was one mod he regretted doing."
In the end I'm sure anyone else that reads this and is about to replace their hatch struts will be very meticulous.
 
This forum is great: lots of inspiration for mods, cool trip reports, tons of great info, etc. (Goodness knows that some of posts have cost me some money after reading them :rolleyes: ) Sometimes the posts I get the most out of are the ones when the OP is willing to fess up to their mistakes. So, along those lines:

I purchased a new light bar, and drove to the shop to pick it up. Several days earlier I had my Gobi installed, and I replaced the hatch struts to a beefier version from Lift Support Depot. It seemed like they went in without any problem, but if I'm honest with myself, I recall fiddling with one of the retention clips a little more than the other 3. I remember pulling on the struts after I installed them, and they stayed put on their mounting points. Anyway, I put the light bar in the back of the 4Runner, and while I'm closing the hatch I hear a "PING" followed by a very loud "CRUNCH". Turns out one of the retaining clips had popped off and when I brought the hatch down to close it, the lower end of the strut released from it's mounting point. (Never found where the clip flew off to ) Unfortunately, the combination of the weight of the hatch, the strength of the strut and the positioning of the 2 caused the lower end of the strut to punch right through the driver's side tail light housing.

View attachment 227433

Missing retaining clip ^


View attachment 227434 View attachment 227451

No Bueno ^


With only one strut holding up the weight of the rear hatch, it all came down on the skinny arm of the strut hard enough to bend it.

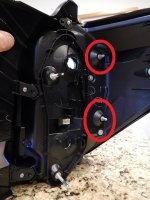
View attachment 227435


View attachment 227450


End result: new tail lamp housing (really needed to pull hard after removing the 2 nuts from behind the unit to get it out: 2 red circles show the where the tail lamp housing gets pressed into the body of the car) new strut, $250 less in my wallet and a lesson learned. I'm thinking it could have been worse: I could have screwed up the hatch, gouged the paint, a plastic shard could have poked my eye out, etc. Wanted to share this particular episode with the forum as I haven't seen this specific F***-up mentioned.

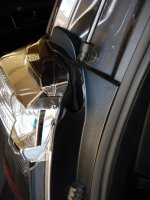


How ironic I had the exact same setup and same issue. Liftdepot heavy duty strut came off for me on both sides on different occasions. Also broke through my taillight housing.

I was so frustrated with the struts I just took them off and went back to factory installed ones. I will deal with the weaker lift capacity versus dealing with what I think are unsafe struts.

I contacted liftdepot and ironically they said don't return them and issued a refund after I said I would not use them.

Same repair costs. New tail light some paint scratches and bump on the head

Lesson learned not all Mods are good Mods.

96c8535b12dbec6701b60adbaeb06d42.jpg
1a6400fbb4ddb0a2fe3f8114937e72da.jpg


Sent from my iPhone using Tapatalk
 
Hehe, exact same thing happened to me a few months back. When I initially switched out my liftgate struts to the beefier liftsupport depot models a year or so back, I didn't watch the video and had no idea that you could just push and click them on to the ball studs. Instead I pulled the clips out with a screwdriver and pushed them back in once the ball was in the socket, drastically reducing the holding power. Earlier this summer one finally just let go (surprised they lasted that long). Initially the passenger side just let go internally and was just hanging there when I opened it up. A week or so later (while I was waiting for the new ones to arrive from the same vendor), POW!!! and right through the tail light. With USD to CDN exchange the way it is right now, it was more like $350 delivered for the new tail light assembly from go-parts.com, but found it super easy to install.
Happens to the best of us, eh? ;)

Lessons learned:
1. Do not ever take the clips out. Push the socket on to the ball stud until you hear a positive click in to position.
2. Use two hands closing the lift gate, one on either side to equalize pressure between lift struts (or one hand in the middle), as to not put too much pressure on one side.


THESE
are the new struts I installed btw.
 
Last edited:
same here, let slip for a second and crack right side black plastic. super glued it back and putty weld.
 
Something I will add, make sure if you install a rooftop accessory such as a rack, cargo carrier, ect. That your liftgate can open all the way. The shocks do not support well halfway and will fail, also replacing them when the gate can only open half way will be next to impossible without a ratchet strap.

Just ask how I know. :)
 
Can the tension be adjusted on the OEM 5th gen hatch lift support?

I recently installed about 15 lbs in the rear lift gate (10 lbs of Noice 80 + 5 lbs for toyota OEM audio plus speakers).

The lift gate is noticeably slower. It also does not open all the way on its own. It will open all the way if I help it.

Can I increase the tension on the OEM arms?

Thanks to this thread, I am thinking twice about installing non-OEM tension arms.

Vehicle is 2011 sr5 @ 130K miles. I've lived in San Diego (8 years) and Seattle (1 year), so no brutally cold winters.

I think the tension arms work as expected. I just added more weight than they're used to handling.
 
Last edited:
I recently installed about 15 lbs in the rear lift gate (10 lbs of Noice 80 + 5 lbs for toyota OEM audio plus speakers).

The lift gate is noticeably slower. It also does not open all the way on its own. It will open all the way if I help it.

Can I increase the tension on the OEM arms?

Thanks to this thread, I am thinking twice about installing non-OEM tension arms.

Vehicle is 2011 sr5 @ 130K miles. I've lived in San Diego (8 years) and Seattle (1 year), so no brutally cold winters.

I think the tension arms work as expected. I just added more weight than they're used to handling.

I wouldn’t try increase OEM even if it was possible. The lift depot struts I have added a little hook that goes around the ball to ensure it doesn’t come off. I got the heaviest duty which is for a lot of weight, that would be too much for you and even with weight I have a hard time closing with one hand. You could also get the Gobi ones, if I remember correctly they have a mount more like oem.
 
being dumb. i thought a single strut will hold the tailgate up while i changed it.. strut left a nice dent in my tailgate. my fingers nearly got crushed. and the tailgate landed on my head.. i definitely didn't think much when i did this. my lessons way worse haha
 
I wouldn’t try increase OEM even if it was possible. The lift depot struts I have added a little hook that goes around the ball to ensure it doesn’t come off. I got the heaviest duty which is for a lot of weight, that would be too much for you and even with weight I have a hard time closing with one hand. You could also get the Gobi ones, if I remember correctly they have a mount more like oem.

Could you please share this hook mod you did? Is it on top and bottom of the struts? I just installed some lift supports and then came across this horror story thread and would like to do what you did.
 
Could you please share this hook mod you did? Is it on top and bottom of the struts? I just installed some lift supports and then came across this horror story thread and would like to do what you did.

I didn’t change the strut, sorry for the confusion, the lift support depot came with that wire hook to hold them in place. Though the heavy duty ones failed in less than a year, oil everywhere, actually damaged my rear lift gate as well. I went back to Gobi, they have a more OEM like fit, though they’ve gone up in price about 40% since the first time I bought them. Sheesh!
 
What’s wrong with just replacing the struts with new factory struts ?

If adding weight to the hatch, like a ladder, the factory ones will not hold it up. It is not much weight either, like a few pounds it seems will cause issues with the factory ones.
 
For all who have tried and were disappointed with aftermarket struts, or had disastrous installation stories, look into this company. Strutwise. They repair, recondition, and refill your OEM struts. They work on struts for all sorts of high-end vehicles and airplanes from all around the world.
Strutwise Gas Strut Repair | About StrutWise Technical Services

When I had my 3rd Gen my struts were losing lifting capability especially in the winter. I called the company and spoke with the owner. He talked me through the process to remove, pack, and ship the struts to him. The company is in Canada so there’s a little customs value declaration issue he will explain. He also said he would increase the strut pressure to overcome increased weight and cold temps. The struts came back in about 10 days. Since they’re OEM all the hardware fit perfectly and they worked great, they pushed the hatch up strongly and a little faster in all weather. It did take a little more effort to close them.
IIRC the cost was about $75 for the service and shipping was about $40. It was worth it to me. This is an important mechanism, it’s gotta be done right.

BTW: When removing and installing the struts I used a ladder and a 2x4 to prop up the hatch. And a helper when raising and lowering the unsupported hatch.
 

Members online

Forum statistics

Threads
278,307
Messages
3,554,054
Members
248,016
Latest member
Advally Service

Trending content

Back
Top