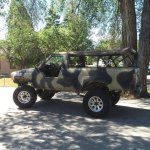
Lifted 4runner driveline vibration. CV axles or rear driveshaft?

redrunn

New member
here is the thread to my lift.

http://www.toyota-4runner.org/class...nner-4-suspension-lift-progress-pictures.html


Problem 1: One tire rubs on the UCA. Possible solution: Ordered inner, outer tie rods, adjusters and Lower Ball joints. Going to align the front to get some pos camber as well.

Problem 2: Have bad vibes at all speeds. Feel them right on take off, they harmonize for a bit between 20-40mph, and go all out steady from 55+. The pinion on the diff isn't 90 degrees like the t-case. I'm going to try lubricating the slip yoke and see if there is any difference. If anyone has any suggestions at all, please let me know.

Anything helps.
 
Register to hide this ad
I f your rear pinion is pointed upward (usual result of a lift) instead of pointed horizontal to the ground, you will have drive line vibes.
 
I just got my rear driveline installed today, and I am worried I will have issues with my angle as well.......I will find out after this weekends work.
 
It is pointed up, but i want to know how this can be fixed. The only thing i can think of, is extended lower trailing links. Do you have a lifted rear?

I f your rear pinion is pointed upward (usual result of a lift) instead of pointed horizontal to the ground, you will have drive line vibes.
 
4" suspension lift all around. The angle at the rear isn't so bad, but on the front end of my driveline, it is pretty noticeable. picture of lift height without driveline in..
 

Attachments

  • 11817068_994890410555379_8371539564231629097_n.jpg
    11817068_994890410555379_8371539564231629097_n.jpg
    139 KB · Views: 322
It is pointed up, but i want to know how this can be fixed. The only thing i can think of, is extended lower trailing links.

That's exactly how you fix pinion angle on a rear axle. Consider adjustable links instead of just extending them.

The rubbing on the upper control arm is pretty common with ball joint spacers, it's a combination of new suspension geometry and tires that are too wide/rims with not enough backspace. You can trim and box the UCA, you can push the wheels out farther with a set of hub adapters, or you can switch to a set of tires and/or wheels that fit.
 
frustration.

i hear ya,

its just that no one told me it would need all that work. i trimmed the uca to heck already. the sad part is that, they are just stock rims with stock tires.
i'm going to try get some positive camber dialed in after i replace the front tie rods (seized, parts ordered) and LBJs for good measure. Do you know if pos camber usually fixes it?

The bigger problem now is, if i move the LCA in for positive camber, I might have the shock absorbers in the front, grinding hard against the bump stop for the LCA (which i already grinded down to heck).

At this point I'm wishing i just spend the 1K CAD for the Rough Country bracket lift. Looks like getting adjustable lower trailing arms are going to be expensive. I don't have a welder, nor do I have fab skills to cut and weld sleeves in to the Lower trailing arms.

Money is tight as well..... ugh.

That's exactly how you fix pinion angle on a rear axle. Consider adjustable links instead of just extending them.

The rubbing on the upper control arm is pretty common with ball joint spacers, it's a combination of new suspension geometry and tires that are too wide/rims with not enough backspace. You can trim and box the UCA, you can push the wheels out farther with a set of hub adapters, or you can switch to a set of tires and/or wheels that fit.
 
wow

your rig looks damn good. what rims are those, and what are its specs.

4" suspension lift all around. The angle at the rear isn't so bad, but on the front end of my driveline, it is pretty noticeable. picture of lift height without driveline in..
 
Honestly, I have no idea what brand of wheels they are. My buddys Dad had them on his Taco and didn't need them. They are on loan until I get new 33" tires for my wheels. The tires are on their last season. I thought they were a very nice wheel, without being tacky.....so I will be trying to finagle them from my buddy.
I got the All Pro offroad extreme lift kit....4". with a Hy-Steer kit. I also rebuilt the motor last year. Bored .20 over, performance head w/stainless valves, 2:61 crawler cam.
Softopper, home made half doors and interior wood paneling, Delux Krylon rattle can camo, on every possible surface.....
See my thread; "And so it begins, 4runner revamp"
 
that is awesome. i'll go check it out!

Honestly, I have no idea what brand of wheels they are. My buddys Dad had them on his Taco and didn't need them. They are on loan until I get new 33" tires for my wheels. The tires are on their last season. I thought they were a very nice wheel, without being tacky.....so I will be trying to finagle them from my buddy.
I got the All Pro offroad extreme lift kit....4". with a Hy-Steer kit. I also rebuilt the motor last year. Bored .20 over, performance head w/stainless valves, 2:61 crawler cam.
Softopper, home made half doors and interior wood paneling, Delux Krylon rattle can camo, on every possible surface.....
See my thread; "And so it begins, 4runner revamp"
 
cool, let me know how it goes.

haven't installed my diff drop yet, and noticed yday that my driver side CV boot just ripped. Grease getting thrown everywhere. great.

Anyone know a good method to remove the diff carrier nut that is on the pass side? The head is stripped due to rust.

Has anyone ran any other manual hubs apart from WARN and AISIN

AVM sells one, so does "Mile Marker"
 
If vibes are bad you could have a double-cardan joint installed at the t-case end of the drive shaft and leave the pinion pointed upwards.
 
Update: Diff dropped and tie rods changed

Hey Team,

Got a quick update. Was going through exams, so I had her parked up.

Got the Diff Dropped: Lord Jesus, these jobs are never ever as easy as the instructions given by the suppliers. The diff drop was a bit more than an inch. it was unconventional and you have to deal with the lovely parabolic path of the diff itself. So the diff has 3 mounting points, two that cradle the diff to the chassis, and one swing mount (just like rear trailing arms) to the frame of the truck in the front. The diff drop is just two fat cylindrical spacers that go between the cradles to bring the diff down, consequently lowering your CV angles to stock.

PROBLEMS: 1: You need pry bars and a lot of elbow grease to move the diff into place. The parabolic path constituted by the swing mount at the front, means that the cradle mounts will move away from the chassis mount points, as the diff is lowered. What you have to do is pry the diff into place while jiggling the bolt through the mounts. My solution was to have my buddy down there with me. We both got on creepers and wrestled it into place. My diff drop was more than an inch, this is unconventional and not recommended. Stick to an inch, the next problem will solidify this.

PROBLEM: 2: The swing arm eventually hits the frame as it is being lowered. To get these unconventional drops in, we had to really pry on the diff. The swing arm mount does hit the frame. When you floor it on take off, and the front of the truck jerks upwards, there is a metal on metal knock sound. I gotta check it out, but I am pretty sure this is what it is. Nothing some grinding won't fix, but if you are planning a diff drop, it is not just r/r-ing two bolts and done.

Set aside at least 3 hours for everything to be done, IF you are dropping it a bit more than an inch. Stay within an inch or less though.

TIE RODS: Basic stuff. Instead of torching away at your old rods, just order new ones from rockauto. They are dirt cheap on there, and ship plenty fast. IMO, just order everything ( i wish i did). 4 Ball joints, pittman arm, idler arm, inner and outer tie rods and tie rod adjusters will all together cost about 100 bucks. You can't go wrong, just gitt err done. Be sure to have both, a tie rod puller, as well as a ball joint remover to make your life easy. You might think that a hammer, torch and pickle fork will work, but just save yourself all the hassle. Some of these trucks are very lightly driven for years (like mine), and are still on their original tie rods and ball joints ( like mine). No pickle fork and hammer will get them out without wrecking other components.
 
Update on vibes

Phew,

The cv angles were the cause of most of the heavy vibes. My truck had the front jacked all the way to the stoppers. I relaxed the front and took measurements after the diff drop to level it out. This also fixed the problem of the UCA rubbing the tire. An alignment will still go a long way. If anyone knows any GOOD, and cheap spots in Scarborough ON, please let me know. I remember I went to a place in Etobicoke to align my lowered e39 for $40. Shops want $100 to align the front end alone on the runner.
 
Hey Team,

Got a quick update. Was going through exams, so I had her parked up.

Got the Diff Dropped: Lord Jesus, these jobs are never ever as easy as the instructions given by the suppliers. The diff drop was a bit more than an inch. it was unconventional and you have to deal with the lovely parabolic path of the diff itself. So the diff has 3 mounting points, two that cradle the diff to the chassis, and one swing mount (just like rear trailing arms) to the frame of the truck in the front. The diff drop is just two fat cylindrical spacers that go between the cradles to bring the diff down, consequently lowering your CV angles to stock.

PROBLEMS: 1: You need pry bars and a lot of elbow grease to move the diff into place. The parabolic path constituted by the swing mount at the front, means that the cradle mounts will move away from the chassis mount points, as the diff is lowered. What you have to do is pry the diff into place while jiggling the bolt through the mounts. My solution was to have my buddy down there with me. We both got on creepers and wrestled it into place. My diff drop was more than an inch, this is unconventional and not recommended. Stick to an inch, the next problem will solidify this.

PROBLEM: 2: The swing arm eventually hits the frame as it is being lowered. To get these unconventional drops in, we had to really pry on the diff. The swing arm mount does hit the frame. When you floor it on take off, and the front of the truck jerks upwards, there is a metal on metal knock sound. I gotta check it out, but I am pretty sure this is what it is. Nothing some grinding won't fix, but if you are planning a diff drop, it is not just r/r-ing two bolts and done.

Set aside at least 3 hours for everything to be done, IF you are dropping it a bit more than an inch. Stay within an inch or less though.

I've installed two diff drops on other guy's trucks, seems like the easiest way I've found yet is to back the bolt out of the front crossmember mount first. Then a jack (or a strong helper) under the diff and remove the two vertical chassis mount bolts, stick your drop spacers in and thread the bolts loosely, leave enough slop to line up the crossmember mount and thread it loosely, then torque the chassis mounts, then do the crossmember mount last.
 

Members online

Forum statistics

Threads
278,316
Messages
3,554,121
Members
248,016
Latest member
Advally Service

Trending content

Back
Top