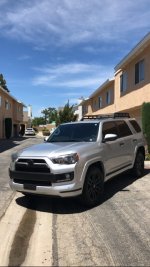
Limited Edition Mod Thread

I did it myself with spray can factory color. Base coat, pearl coat and clear coat (3 cans). Not perfect but only I notice it. I put tape over buttons then cut out with razor blade.

Did you buy all the paint from the dealer? That seems easy enough. I may dabble with bondo and fill in the divets on it as I prefer the debadged look.
 
Did you do anything to protect the buttons when you sprayed the tailgate garnish? Or did just spray right over them?

Little late to the party, but, I just sprayed over them (with the intention of pealing them) on my '13. Was fine for a couple of years but I traded it in so I don't know how it would have lasted.
 
Little less chrome.


a32ff062d4e717c3327217cbd808a260.jpg


Marty-MJ


What did you use to make the limited emblem red? Did you do it anywhere else?


Sent from my iPhone using Tapatalk
 
Dropped the front a little bit more and it helped smooth out the ride a lot, the highest setting on the Bilstein shocks was just way too much preload. It stills sits about 5/8" to the stern, but should sit perfect once the front bumper is built.

N54RuHvh.jpg

ojOnkYmh.jpg
 
Last edited:
I recently did the door fender flares and started to convert my rear end to a trail/pro bumper.

Here are some notes from the install if anyone is looking to do this in the future. I'll try to upload pictures to each section below sometime next week for some visual guidance.

Door Flares

vXvymEl.jpg


The door flares come unpainted so you'll need to have them painted. You'll also need a rivet gun to set the rubber seals on each part (2 rivets on each side). You'll be able to look at what you pull off to get an idea of where the new trim foam and rubber seals need to be placed.

The flare mouldings on the limited are held in place by a lot of clips (2 orange and a bunch of blue) in addition to a nasty thick double sided adhesive tape. I think it took me longer to remove all the adhesive than to pull and install both flares. A lot of the clips will most likely break and need to be replaced. I needed to use high leverage pliers to pull out one of the orange clips. The clips on the body can be removed by turning them 90 degrees. Also, install the clips onto the flare before pressing it into the body.
The part numbers for the flares and clips are -
7574135901 (right, unpainted)
7574235901 (left, unpainted)
7539535070 (orange clips, I believe the new flare only uses 1 on each side)
7539635020 (blue clips, I bought around 16)

There is a foam tape and rubber seal that need to be attached on each flare before installing. The rubber seal is held on by both tape and rivets.
7579735050 (right, rubber seal padding)
7579835020 (left, rubber seal padding)
7576735090 (foam tape, you need one for each side for a total of 2)
9026904047 (rivets, you need 2 for each side for a total of 4)

Rear Bumper

Rw4p4Vl.jpg


When you remove the rear bumper, there are rubber washers on both sides of the bumper where the black bumper step is (6 in total). You can re-use the body side washers or replace them depending on how shot they are. The bolt washer is semi-integrated and comes with the bolt. The bolts are re-usable but I included the part numbers just in case.
5235660050 (body side cushion)
9010906371 (bumper side bolt)

You'll have to replace the lower bumper mounts near the trailer hitch. The limited model use different brackets to attach the rear bumper and they will need to be removed (2 bolts each on 2 brackets) and replaced for clearance/mounting. You'll need an extra bolt on each side (3 bolts each side) to mount the brackets.
5217435090 (bracket left of trailer hitch)
5217335090 (bracket right of trailer hitch)
9008010083 (2x bolts)

You'll need to replace the lower deflectors that attach to the bottom corners of the rear bumper and car on each side. The part numbers for these are -
53724-35040 (left lower deflector)
53723-35050 (right lower deflector)

You'll also need the integrated rear wheel well cover/mud guards for each side. Those part numbers are -
76626-35250 (left)
76625-35250 (right)

If you want an extra set of the rear sensor wiring harness for modding, the part number is supposedly 8216335150 (edit: received and confirmed).

If you break the jack plug cover, that part number is 5876635010.

If you get the trail/pro bumper, the valance clips are part number 7539235220. I believe you need 14.

Most if not all of the screws and clips can be re-used. I'm not sure if extras are needed because I had a whole bunch of extras from when I did the front a few months ago.

The swap was fairly straight forward. I only drilled for 2 of the sensors because I didn't want to drill through the middle section where the valance is secured. There's actually space between the valance and bumper but not quite enough to fit the sensors at the location I wanted to install them. You can easily mount 4 with an SR5 bumper though.

 
Last edited:
I recently did the door fender flares and started to convert my rear end to a trail/pro bumper.

Here are some notes from the install if anyone is looking to do this in the future. I'll try to upload pictures to each section below sometime next week for some visual guidance.

Door Flares

vXvymEl.jpg


The door flares come unpainted so you'll need to have them painted. You'll also need a rivet gun to set the rubber seals on each part (2 rivets on each side). You'll be able to look at what you pull off to get an idea of where the new trim foam and rubber seals need to be placed.

The flare mouldings on the limited are held in place by a lot of clips (2 orange and a bunch of blue) in addition to a nasty thick double sided adhesive tape. I think it took me longer to remove all the adhesive than to pull and install both flares. A lot of the clips will most likely break and need to be replaced. I needed to use high leverage pliers to pull out one of the orange clips. The clips on the body can be removed by turning them 90 degrees. Also, install the clips onto the flare before pressing it into the body.
The part numbers for the flares and clips are -
7574135901 (right, unpainted)
7574235901 (left, unpainted)
7539535070 (orange clips, I believe the new flare only uses 1 on each side)
7539635020 (blue clips, I bought around 16)

There is a foam tape and rubber seal that need to be attached on each flare before installing. The rubber seal is held on by both tape and rivets.
7579735050 (right, rubber seal padding)
7579835020 (left, rubber seal padding)
7576735090 (foam tape, you need one for each side for a total of 2)
9026904047 (rivets, you need 2 for each side for a total of 4)

Rear Bumper

Rw4p4Vl.jpg


When you remove the rear bumper, there are rubber washers on both sides of the bumper where the black bumper step is (6 in total). You can re-use the body side washers or replace them depending on how shot they are. The bolt washer is semi-integrated and comes with the bolt. The bolts are re-usable but I included the part numbers just in case.
5235660050 (body side cushion)
9010906371 (bumper side bolt)

You'll have to replace the lower bumper mounts near the trailer hitch. The limited model use different brackets to attach the rear bumper and they will need to be removed (2 bolts each on 2 brackets) and replaced for clearance/mounting.
5217435090 (bracket left of trailer hitch)
5217335090 (bracket right of trailer hitch)

You'll need to replace the lower deflectors that attach to the bottom corners of the rear bumper and car on each side. The part numbers for these are -
53724-35040 (left lower deflector)
53723-35050 (right lower deflector)

You'll also need the integrated rear wheel well cover/mud guards for each side. Those part numbers are -
76626-35250 (left)
76625-35250 (right)

If you want an extra set of the rear sensor wiring harness for modding, the part number is supposedly 8216335150 (I haven't confirmed, yet).

If you break the jack plug cover, that part number is 5876635010.

If you get the trail/pro bumper, the valance clips are part number 7539235220. I believe you need 14.

Most if not all of the screws and clips can be re-used. I'm not sure if extras are needed because I had a whole bunch of extras from when I did the front a few months ago.

The swap was fairly straight forward. I only drilled for 2 of the sensors because I didn't want to drill through the middle section where the valance is secured. There's actually space between the valance and bumper but not quite enough to fit the sensors at the location I wanted to install them. You can easily mount 4 with an SR5 bumper though.


I yet to paint and install the rear door flares as well :-)

Let’s see the bumpers :-)
 
Took some left over RuffStuff Specialties parts I had sitting on the shelf and started laying out the swingout carrier for my Coastal Offroad high clearance rear bumper. I'm thinking about doing a ladder/cooler rack on the driver's side vs the traditional Jerry can mount most do. I also snagged a used Metaltech4x4 front that is tweaked pretty good for 1/3 what they go for new and I'm not sure how much I'll have to cut out/fix to get it back straight. Honestly surprised at how thin the outer bumper shell is, you can just lean in to it and the bumper will flex. Having never seen one in person I figured I'd try it out and see why now that it's mounted.

HcMrCPQh.jpg

zQ5CP2rh.jpg

BXzOVU2h.jpg

J7wNfbMh.jpg

WB2CaKuh.jpg

H86c0E8h.jpg
 
Last edited:
Gave the OG Limited grille a refresh. Super happy to get one of the first of these grilles.

560f564b93e62253fcc907c8c8f519f6.jpg

0203f6c5093991a11ff91c5164b45049.jpg


Sent from my iPhone using Tapatalk
 
Gave the OG Limited grille a refresh. Super happy to get one of the first of these grilles.

560f564b93e62253fcc907c8c8f519f6.jpg

0203f6c5093991a11ff91c5164b45049.jpg


Sent from my iPhone using Tapatalk


Looks good, where did you get it? Been trying to do something similar to mine. Tried the Chinese pro garnish and it didn’t work out..
 
Blacked out all the chrome, removed the pinstripes, made use of the original 20’ rims by plastidipping them. I think the only thing I’d like to add next would be a gobi ladder.
 

Attachments

  • 48681DFC-4C53-4F84-A168-92BF4C657A18.jpeg
    48681DFC-4C53-4F84-A168-92BF4C657A18.jpeg
    87.4 KB · Views: 1,695
Last edited:

Hey Marty--love the mods to your Limited Edition. I'm actually going on nearly the same path. I've updated the front end, put on the more aggressive tires and the TRD rims. I went with the Predator rails, which hang a bit lower than the ones you chose, but still required me to remove the rocker panel trim (which as you know is massive on the LE).

But as you see in the pics below, I'm at a bit of an impasse with the rocker panel trim to replace it. I need something that has a much lower profile than the original LE trim, but still has the pocket in the front to cover the frame and meshes nicely in front and back with the fender trim.

Yours looks perfect--what did you use? Did you trim up the LE's rocker trim (like AntMan did) or did you buy something OEM (like the SR5 rocker trim) or after-market?

Pics: Imgur: The magic of the Internet
 
rocker panels?

75857-35010 Rocker Molding Front RIGHT 1
75858-35010 Rocker Molding Front LEFT 1
75395-04010 Rocker Molding Fastener LEFT 2
75395-04010 Rocker Molding Fastener RIGHT 2
75805-35130 Rocker Moulding RIGHT 1
75806-35100 Rocker Moulding LEFT 1

76924-13020 Rocker Molding Retainer 16
90189-06006 Rocker Molding Grommet 2

This is perfect--exactly what I needed!
 

Members online

Forum statistics

Threads
278,307
Messages
3,554,054
Members
248,016
Latest member
Advally Service

Trending content

Back
Top