
You are using an out of date browser. It may not display this or other websites correctly.
You should upgrade or use an alternative browser.
You should upgrade or use an alternative browser.
Mapping out engine bay add-ons
- Thread starter Liquidmantis
- Start date


carlos.elmotor
New member
+1 liquid, I've been waiting on these to come in for a few weeks. Just finalized my order today w/ Cristo. First time buying something from them, but was a great experience and will be going back to them in the future as a result.[MENTION=55765]cjacob316[/MENTION] I don't know if you were considering swapping out the Bandi mount for some reason, but I went by Slee today to grab a switch for the compressor and talked to them about their mount. There was indeed an issue with '16s, the captured nuts on the fender were moved. They redesigned their bracket though and just got the new ones in stock.
Also, just as a general comment, that was my first time in Slee and I was really impressed with them. I must've spent at least 15 minutes talking with the sales manager about my build plans and lift recommendations.
carlos.elmotor
New member
One other option, if you're not dead set on the spod, is to fab up a bracket to mount your secondary power distribution in the space over your second battery. This will keep your firewall/driver's side area open for your compression w/ the Slee mount.I'm about to do a compressor install and so far the only ready-made mounting bracket I've turned up is the Slee bracket that mounts behind the relay box. My concern is that location is the spot to mount a Spod or distribution block. I may or may not end up with one but I'm hoping to lay things out "right" from the beginning. I can see myself ending up with compressor, dual battery, and Spod all installed. This seems like it would be a standard combo on built-out rigs so I'm hoping I can find advice on making the whole package fit.
My current thoughts are:
Dual batteries in stock location
- How well does this fit?
- More weight on drivers side
Second battery on passenger side radiator area hole
- Forces relocation of other bits
Second battery in passenger side firewall area hole
- competes with ideal space for compressor
Compressor in passenger side firewall area hole
- no readily available turnkey mounting bracket
- competes with second battery
Compressor in driver side firewall area hole
- competes with Spod/distribution block
I'm in a bit of time crunch to get the compressor mounted before a trip at the end of the month so my wrenching/fabricating time is very limited. Right now I'm thinking I might just go with the Slee mount for a fast solution and reevaluate if I end up needing the Spod.
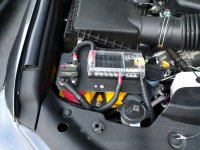
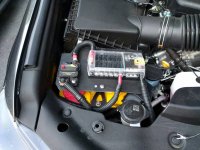
I just used two pieces of 2" angle aluminum bolted together to make a C-bracket. Then bolted my fuse block and breaker onto a platform made out of a thick plastic tray. Bolted the combined part to the C-bracket and slipped the C bracket under the battery hold down before tightening it down. Total cost was ~$20.
As timing would have it, my 2016 variant Slee compressor mount arrived this evening. Excellent quality and finish, though I did have to drill two extra holes to get my ARB twin closer to the DS fender. Drill markers faintly visible in the bottom of this pic.
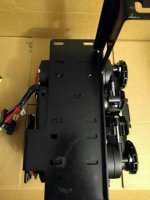
I ran out of time on the installation this evening due to the minor bracket mod, but should have it in by tomorrow or Wednesday. Will post pics to my build thread once my post count is high enough.
Attachments


Last edited:


Liquidmantis
New member
I ran out of time on the installation this evening due to the minor bracket mod, but should have it in by tomorrow or Wednesday. Will post pics to my build thread once my post count is high enough.
Post pad and get your 15 already! I'm ready to see your build.
I have a '12 mind you, but this works great for me
That's definitely easier than dealing with the air pump relocation. How solid is that though? I've read that the front location is reinforced just like the driver's side as it's mirrored for right-hand drive vehicles. No worries about metal fatigue or heat in the firewall location?

Jono.ful
New member
Compressor mount is completely solid, it's bolted to the battery mount and inner fender. As for the battery, that blue top is something stupid like 75lbs. I used 5/8" ready rod to make the standoffs and large fender washers to distribute the weight as much as I could. It's been installed for a year now with no adverse effects at all. As for heat, it is closer to the exhaust manifold that I would otherwise like it to be, but I can hold my hand there with the engine running without it being at all uncomfortable.
carlos.elmotor
New member
Ha! Thanks [MENTION=138432]Liquidmantis[/MENTION]. I'm trying to keep my posts value-add for the community, but it seems like it's taking forever to reach that magic 15 post threshold. Soon though!Post pad and get your 15 already! I'm ready to see your build.
That's definitely easier than dealing with the air pump relocation. How solid is that though? I've read that the front location is reinforced just like the driver's side as it's mirrored for right-hand drive vehicles. No worries about metal fatigue or heat in the firewall location?
Let me know if you end up making your own spod/power distribution bracket and have any questions.

Jhalko
New member
Any pics of these Spods in a 5th gen?
http://www.toyota-4runner.org/5th-gen-t4rs/220563-jhalkos-2011-limited-build-travel-thread-2.html
Near bottom, on my list when I return is to hopefully fab up a mounting plate for my compressor, among many other things.
carlos.elmotor
New member
Quick follow-up here to report back:One other option, if you're not dead set on the spod, is to fab up a bracket to mount your secondary power distribution in the space over your second battery. This will keep your firewall/driver's side area open for your compression w/ the Slee mount.
I just used two pieces of 2" angle aluminum bolted together to make a C-bracket. Then bolted my fuse block and breaker onto a platform made out of a thick plastic tray. Bolted the combined part to the C-bracket and slipped the C bracket under the battery hold down before tightening it down. Total cost was ~$20.
As timing would have it, my 2016 variant Slee compressor mount arrived this evening. Excellent quality and finish, though I did have to drill two extra holes to get my ARB twin closer to the DS fender. Drill markers faintly visible in the bottom of this pic.
I ran out of time on the installation this evening due to the minor bracket mod, but should have it in by tomorrow or Wednesday. Will post pics to my build thread once my post count is high enough.
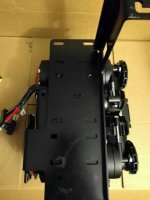
The compressor fit like a glove in the space the bracket was designed for - excellent build quality and tolerances on Slee's part.
I had to/chose to drill two holes in the bracket that would allow me to mount the compressor closer to the DS fender to provide a little extra room to avoid rubbing on a pair of hoses (see obligatory pic below).
Full write up and more pics when I hit my minimum post count - 6 more to go after this one.
Hope this helps anyone mapping out the cramped quarters under the hood.
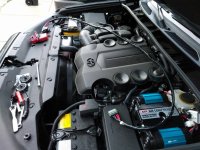
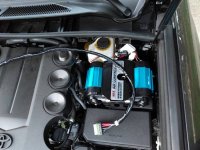
Attachments




Last edited:

Ducmonsta
New member
Quick follow-up here to report back:
The compressor fit like a glove in the space the bracket was designed for - excellent build quality and tolerances on Slee's part.
I had to/chose to drill two holes in the bracket that would allow me to mount the compressor closer to the DS fender to provide a little extra room to avoid rubbing on a pair of hoses (see obligatory pic below).
Full write up and more pics when I hit my minimum post count - 6 more to go after this one.
Hope this helps anyone mapping out the cramped quarters under the hood.
That looks good. I'm really curious to see how you deal with the ginormous ARB wiring harness by the master cylinder.
carlos.elmotor
New member
Thanks [MENTION=68685]Ducmonsta[/MENTION]. That's high praise coming from you. I've been stalking your build thread for some time now.That looks good. I'm really curious to see how you deal with the ginormous ARB wiring harness by the master cylinder.
You're right, the connections at the rear of the compressor were *very tight* tight due to the size of the plastic disconnects and the lack of slack cabling on the compressor-side of the connections. I slipped in a couple of small lengths of wire conduit to protect the wires from the master cylinder and bracket rear as best as possible and routed the connectors into the dead space over the firewall grommet on the DS.
The worst part with that harness, at least in my under-hood setup, was the giant 40amp fuse bumps that I had to squeeze into my already cramped secondary power area up front/PS.
I was already rushing due to losing daylight and ended up routing the harness twice. First starting at the battery, foolishly thinking that I'd have plenty of length on the connector end. Then second, starting with the connection made at the compressor and routing towards the battery. Didn't have an inch to spare once all was cable-tied into place.
I ran out of daylight at the end of the install tonight, so poor picture quality below. I basically rotated the connector (at 12 o'clock in the below pic) into the 3 o'clock position once the wire conduit was in place. I'll try to remember to grab a daylight pic or two of the harness routing and add them here in a follow -up post.
Attachments
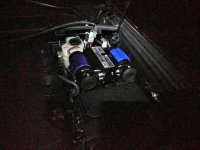
Last edited:
carlos.elmotor
New member
Alright. Quick follow-up to my follow-up:Thanks [MENTION=68685]Ducmonsta[/MENTION]. That's high praise coming from you. I've been stalking your build thread for some time now.
You're right, the connections at the rear of the compressor were *very tight* tight due to the size of the plastic disconnects and the lack of slack cabling on the compressor-side of the connections. I slipped in a couple of small lengths of wire conduit to protect the wires from the master cylinder and bracket rear as best as possible and routed the connectors into the dead space over the firewall grommet on the DS.
The worst part with that harness, at least in my under-hood setup, was the giant 40amp fuse bumps that I had to squeeze into my already cramped secondary power area up front/PS.
I was already rushing due to losing daylight and ended up routing the harness twice. First starting at the battery, foolishly thinking that I'd have plenty of length on the connector end. Then second, starting with the connection made at the compressor and routing towards the battery. Didn't have an inch to spare once all was cable-tied into place.
I ran out of daylight at the end of the install tonight, so poor picture quality below. I basically rotated the connector (at 12 o'clock in the below pic) into the 3 o'clock position once the wire conduit was in place. I'll try to remember to grab a daylight pic or two of the harness routing and add them here in a follow -up post.
As promised, I grabbed some daytime pics of the install and harness routing this afternoon. Pics attached below in no specific order.


This one looks overexposed, but was actually an attempt to show the DS grommet passthrough for the switch harness ---v


Last edited:
DesertEagle
New member
National Luna Install
[MENTION=141503]carlos.elmotor[/MENTION] - clean install! Looks great. I also have a 2016 TRD Pro as well as the ARB Twin Compressor and National Luna dual battery set up - mine is just not installed yet. Seeing your set up was super helpful - thank you! The location of the compressor frees up some options for the dual battery location. For the National Luna dual battery I am interested in how you have mounted the solenoid and also where you mounted/located the battery controller in cab?
[MENTION=141503]carlos.elmotor[/MENTION] - clean install! Looks great. I also have a 2016 TRD Pro as well as the ARB Twin Compressor and National Luna dual battery set up - mine is just not installed yet. Seeing your set up was super helpful - thank you! The location of the compressor frees up some options for the dual battery location. For the National Luna dual battery I am interested in how you have mounted the solenoid and also where you mounted/located the battery controller in cab?
carlos.elmotor
New member
[MENTION=141503]carlos.elmotor[/MENTION] - clean install! Looks great. I also have a 2016 TRD Pro as well as the ARB Twin Compressor and National Luna dual battery set up - mine is just not installed yet. Seeing your set up was super helpful - thank you! The location of the compressor frees up some options for the dual battery location. For the National Luna dual battery I am interested in how you have mounted the solenoid and also where you mounted/located the battery controller in cab?
Hey [MENTION=140508]DesertEagle[/MENTION] - congrats to you on the new truck!
I appreciate the feedback and am happy to hear that some of my posts have been helpful. This forum has been incredibly helpful to me over the last few years (as I've stalked many-a-thread and more prominent member's builds) and I'd like to think I'm paying it forward in some small measure. Please help me build up my rep and "like" any posts that you've found helpful.
On to your question regarding the Intelligent Solenoid (IS) mount:
I, of course, threw out all of my mock-ups and measurements so the below is an off the top of my head, but should get you pretty close along w/ the attached (admittedly half-assed) diagram:
1) Head to your local Lowes
2) Locate a bar of 2in angle aluminum (could only find one in a 6 or 8ft length), but it's cheap
3) Locate a flat sheet electrical box cover in the electrical section ( here's an example -- http://www.lowes.com/pd/Raco-2-Gang-Square-Metal-Electrical-Box-Cover/
4) Measure the width of the two rearward PS fender bolt holes + ~1in (to allow for a half inch overhang on either side)
- This part is going to sit very snugly above a factory white plastic bracket holding several wires/harness
5) Cut two equal lengths of aluminum to the above width to make a C-bracket
- Drill two holes in position D for the fender bolts (see diagram below)
6) Cut the flat plate to accommodate the footprint of the NL IS + 0.25-0.5in greater length
7) Spray paint or plastidip the plate and angle aluminum sections
8) Drill holes A, B, and C (indicated in the diagram) to accommodate the various bolts you've selected
- Do a test assembly to ensure that your bolt lengths will not bump into each other when fully assembled
- More importantly, ensure that your bolts will not rub on the white plastic wiring bracket and/or wiring harness *AT ALL*
9) Crack a cold one and begin assembly of the each of the 4 parts:
- Connect two of your parts by installing bolt B
- Attach your NL IS onto this assembly via bolts A
- Mount the remaining unused bracket component onto your fender at holes D
- Complete the assembly by installing bolts in position C
- Verify that your factory harness is clear of all tolerances
- Connect up your primary and house power
- Verify charging of both batteries after 5min IS delay
- High fives all around and grab another brewski
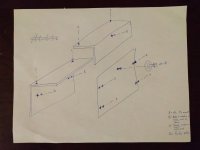
I'll get this into my build thread in greater detail and some pics once I reach my minimum post count... soon hopefully.
Attachments

Last edited:

MTN4RNR
New member
Alright. Quick follow-up to my follow-up:
As promised, I grabbed some daytime pics of the install and harness routing this afternoon. Pics attached below in no specific order.

Just as a quick note, I installed the single ARB with the Slee bracket, and for the space, the single makes life a lot easier. Inflating times are not significantly different, and unless you're filling 35"+ tires for you and others, the single ARB is more than enough to fill 32"-33" tires, IMO. Plus you save your $ and space under the hood for other fun things :biggrin2: Here is my installed version of the Slee bracket, install info and photos on my build page.

carlos.elmotor
New member
Plus you save your $ and space under the hood for other fun things :biggrin2: Here is my installed version of the Slee bracket, install info and photos on my build page.
Nice [MENTION=129593]MTN4RNR[/MENTION]. Agreed on the extra space. Looks like a good platform for a fuse block. Any plans for what you're going to do with the space?
MTN4RNR
New member
Nice [MENTION=129593]MTN4RNR[/MENTION]. Agreed on the extra space. Looks like a good platform for a fuse block. Any plans for what you're going to do with the space?
Likely exactly that. Either a fuse block, or a Switch-Pro. I haven't decided yet as I don't require it at this time, but it is a subject I am casually beginning to research.
carlos.elmotor
New member
Makes sense and no need to rush it.Likely exactly that. Either a fuse block, or a Switch-Pro. I haven't decided yet as I don't require it at this time, but it is a subject I am casually beginning to research.
I have a similar open spot in my PS firewall area. The Shrockworks air injection pump relocation platform that comes with the dual battery kit (*excellent* kit BTW) provides a nice stable platform. Like you, I just don't have anything that needs to go there. At least not now...
Similar threads

- Replies
- 0
- Views
- 268

- Replies
- 1
- Views
- 35K


