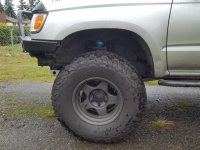
MattJakobs Build Thread-2001 Stellar Blue Pearl

Thanks Ryder! I really like it, very happy to get the old tube bumper off. I also haven't forgotten about getting hub to fender measurements for you. Think the 4Runner still has some settling to do and I'm still pretty loaded up with surf stuff and laundry from taking it all to my parents for Thanksgiving.


Have a question as well. Are my pictures very dark on your computer? I'm at the library right now and they look pretty damn dark compared to when I'm on my computer at home. Wondering if it's just this computer or if my computer makes everything that might brighter.
[MENTION=116387]Unner[/MENTION]

The pics don't look overly dark. I am looking at a darker vehicle, in the shade pics. Seems about right. And I'm glad you dig the new bumper. That is a big upgrade, and an improved face-life to the ass of your vehicle too! LOL.
 
The pics don't look overly dark. I am looking at a darker vehicle, in the shade pics. Seems about right. And I'm glad you dig the new bumper. That is a big upgrade, and an improved face-life to the ass of your vehicle too! LOL.

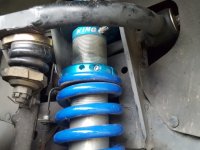
Okay cool. I knew they were kind of dark but the school computer made it look like a shadow. Hopefully it looks at least a little better than that. Hoping I’m not too lazy to take some professional grade pictures this weekend. It’ll be nice to clean it up a bit and actually use my camera.

I also got some preload amount for you. Driver side is at 1 3/8” and passenger side is at 1 5/16”. This is with 650# coils and it looks pretty level. Depending on if I get 861s in the rear or not, that preload amount may go down as I like some rake and it appears like I don’t have any with the addition of the rear bumper.

What are you sitting at with the 600# coils? Too soft of a ride or does it feel about right? These Kings are much more forgiving than my Icons were with a 13” coil at the same 650# rate.
 
Okay cool. I knew they were kind of dark but the school computer made it look like a shadow. Hopefully it looks at least a little better than that. Hoping I’m not too lazy to take some professional grade pictures this weekend. It’ll be nice to clean it up a bit and actually use my camera.

I also got some preload amount for you. Driver side is at 1 3/8” and passenger side is at 1 5/16”. This is with 650# coils and it looks pretty level. Depending on if I get 861s in the rear or not, that preload amount may go down as I like some rake and it appears like I don’t have any with the addition of the rear bumper.

What are you sitting at with the 600# coils? Too soft of a ride or does it feel about right? These Kings are much more forgiving than my Icons were with a 13” coil at the same 650# rate.

I like the 600# coils up front. I raised them 1" from where they were. Hub to fender, I am at about 23" up front and 24.5" in the rear. And the front SPC UCA's were changed from the D to G setting giving me PLENTY of clearance up front. I don't have a new preload measurement on hand, but even witb 8 more turns preload, they feel fine. I am also running a steel cable winch up front off of my AOR front bumper.
 

Attachments

  • IMG_20171123_121713.jpg
    IMG_20171123_121713.jpg
    99.9 KB · Views: 293
  • IMG_20171123_121517.jpg
    IMG_20171123_121517.jpg
    120.9 KB · Views: 280
Thanks Ryder! I really like it, very happy to get the old tube bumper off. I also haven't forgotten about getting hub to fender measurements for you. Think the 4Runner still has some settling to do and I'm still pretty loaded up with surf stuff and laundry from taking it all to my parents for Thanksgiving.


Have a question as well. Are my pictures very dark on your computer? I'm at the library right now and they look pretty damn dark compared to when I'm on my computer at home. Wondering if it's just this computer or if my computer makes everything that might brighter.
[MENTION=116387]Unner[/MENTION]

They look normal to me as well. Not sure why I no longer get email notifications when I'm tagged in a post though...
 
I like the 600# coils up front. I raised them 1" from where they were. Hub to fender, I am at about 23" up front and 24.5" in the rear. And the front SPC UCA's were changed from the D to G setting giving me PLENTY of clearance up front. I don't have a new preload measurement on hand, but even witb 8 more turns preload, they feel fine. I am also running a steel cable winch up front off of my AOR front bumper.

Just ran out and measured as best I could. I’m sitting at 24 1/8” on the driver side and 23 1/8” on the passenger side. Guessing the difference is based on the fact that I don’t have my driver side flare on and I’m on empty. By giving a quick glance, I'm guessing the difference on flare and no flare is maybe 1/2” at most. That +/- 1/2” plus my weight and a full tank of gas, I’m guessing I’m just about level up front. I’m around 23 1/2” to 24” in the back. I’m guessing that measurements right on target since it looks pretty damn level and I’m sure that little bit of rake will disappear with a full tank of gas.

By the looks of it, I have a good amount less of preload so I’m guessing the 650# coils and no winch is really helping me out there.
 
Just ran out and measured as best I could. I’m sitting at 24 1/8” on the driver side and 23 1/8” on the passenger side. Guessing the difference is based on the fact that I don’t have my driver side flare on and I’m on empty. By giving a quick glance, I'm guessing the difference on flare and no flare is maybe 1/2” at most. That +/- 1/2” plus my weight and a full tank of gas, I’m guessing I’m just about level up front. I’m around 23 1/2” to 24” in the back. I’m guessing that measurements right on target since it looks pretty damn level and I’m sure that little bit of rake will disappear with a full tank of gas.

By the looks of it, I have a good amount less of preload so I’m guessing the 650# coils and no winch is really helping me out there.

Nice. I figure that if the ride ever starts to feel rough I can always step up to a 650# springs. They aren't crazy expensive. I think I will make that decision if / when I ever need to rebuild them. If anything, I will keep en eye on the rake. If the rear loses any more lift then I will bring the front down about a half an inch at least. But for now I'm happy where things are at and how it behaves.
 
Bald Mountain/Big Levels

Got to go wheeling this weekend. Left last night and just got back. Did about 400 total miles, with about 20-25 off road. Nice, easy trip, lightly packed. Thin trail at most points so lots of pin stripes, which is a bit of a bummer but still fun and worth it. Good scenic overlooks as well. First time on this trail and it was easy, perfect for an overnight trip. It was a single track trail with a few bypasses, so we ran it both ways. One sort of difficult/fun spot, with a bypass if needed, otherwise a pretty stock friendly trail. Swapped a new radiator in Friday and monitored my temps all weekend and they were perfect. Fluid levels looked good as well.

<a data-flickr-embed="true" href="https://www.flickr.com/photos/150884531@N04/37933455615/in/dateposted-public/" title=".310"><img src="https://farm5.staticflickr.com/4516/37933455615_4da35d63a9_b.jpg" width="1024" height="683" alt=".310"></a><script async src="//embedr.flickr.com/assets/client-code.js" charset="utf-8"></script>

<a data-flickr-embed="true" href="https://www.flickr.com/photos/150884531@N04/38103730624/in/dateposted-public/" title=".311"><img src="https://farm5.staticflickr.com/4554/38103730624_78d2b620c0_b.jpg" width="1024" height="683" alt=".311"></a><script async src="//embedr.flickr.com/assets/client-code.js" charset="utf-8"></script>

<a data-flickr-embed="true" href="https://www.flickr.com/photos/150884531@N04/23955102037/in/dateposted-public/" title=".312"><img src="https://farm5.staticflickr.com/4541/23955102037_5dd668b602_b.jpg" width="1024" height="683" alt=".312"></a><script async src="//embedr.flickr.com/assets/client-code.js" charset="utf-8"></script>

<a data-flickr-embed="true" href="https://www.flickr.com/photos/150884531@N04/38788916582/in/dateposted-public/" title=".313"><img src="https://farm5.staticflickr.com/4537/38788916582_727d64caa0_b.jpg" width="1024" height="683" alt=".313"></a><script async src="//embedr.flickr.com/assets/client-code.js" charset="utf-8"></script>

<a data-flickr-embed="true" href="https://www.flickr.com/photos/150884531@N04/38788914092/in/dateposted-public/" title=".314"><img src="https://farm5.staticflickr.com/4538/38788914092_249c4e3628_b.jpg" width="1024" height="683" alt=".314"></a><script async src="//embedr.flickr.com/assets/client-code.js" charset="utf-8"></script>

<a data-flickr-embed="true" href="https://www.flickr.com/photos/150884531@N04/38788911702/in/dateposted-public/" title=".315"><img src="https://farm5.staticflickr.com/4586/38788911702_cd8fa31402_b.jpg" width="1024" height="683" alt=".315"></a><script async src="//embedr.flickr.com/assets/client-code.js" charset="utf-8"></script>

<a data-flickr-embed="true" href="https://www.flickr.com/photos/150884531@N04/38788910662/in/dateposted-public/" title=".316"><img src="https://farm5.staticflickr.com/4566/38788910662_1d096c2b14_b.jpg" width="1024" height="683" alt=".316"></a><script async src="//embedr.flickr.com/assets/client-code.js" charset="utf-8"></script>

<a data-flickr-embed="true" href="https://www.flickr.com/photos/150884531@N04/38788908292/in/dateposted-public/" title=".317"><img src="https://farm5.staticflickr.com/4533/38788908292_5d8d09273c_b.jpg" width="1024" height="683" alt=".317"></a><script async src="//embedr.flickr.com/assets/client-code.js" charset="utf-8"></script>

<a data-flickr-embed="true" href="https://www.flickr.com/photos/150884531@N04/27043849559/in/dateposted-public/" title=".318"><img src="https://farm5.staticflickr.com/4566/27043849559_3f86b7b829_b.jpg" width="1024" height="683" alt=".318"></a><script async src="//embedr.flickr.com/assets/client-code.js" charset="utf-8"></script>

<a data-flickr-embed="true" href="https://www.flickr.com/photos/150884531@N04/27043848359/in/dateposted-public/" title=".319"><img src="https://farm5.staticflickr.com/4537/27043848359_4d5cfe343e_b.jpg" width="1024" height="683" alt=".319"></a><script async src="//embedr.flickr.com/assets/client-code.js" charset="utf-8"></script>

<a data-flickr-embed="true" href="https://www.flickr.com/photos/150884531@N04/27043846389/in/dateposted-public/" title=".320"><img src="https://farm5.staticflickr.com/4560/27043846389_5999d9dce2_b.jpg" width="1024" height="683" alt=".320"></a><script async src="//embedr.flickr.com/assets/client-code.js" charset="utf-8"></script>
 
Last edited:
Before camping, [MENTION=80933]4x4runner2002[/MENTION] helped me install this LED strip. It's tapped into my dome light so when the door's open, it's on. Super convenient and made getting things in the back so much easier this weekend. With this mod, I plan on adding a table to my swing out bumper since that area is well illuminated now.
<a data-flickr-embed="true" href="https://www.flickr.com/photos/150884531@N04/27064816099/in/dateposted-public/" title=".321"><img src="https://farm5.staticflickr.com/4528/27064816099_d9ebbb58b5_b.jpg" width="1024" height="683" alt=".321"></a><script async src="//embedr.flickr.com/assets/client-code.js" charset="utf-8"></script>
 
Before camping, [MENTION=80933]4x4runner2002[/MENTION] helped me install this LED strip. It's tapped into my dome light so when the door's open, it's on. Super convenient and made getting things in the back so much easier this weekend. With this mod, I plan on adding a table to my swing out bumper since that area is well illuminated now.
<a data-flickr-embed="true" href="https://www.flickr.com/photos/150884531@N04/27064816099/in/dateposted-public/" title=".321"><img src="https://farm5.staticflickr.com/4528/27064816099_d9ebbb58b5_b.jpg" width="1024" height="683" alt=".321"></a><script async src="//embedr.flickr.com/assets/client-code.js" charset="utf-8"></script>

Awesome. I need this. What led strip did u use
 
Well done Matt! That bumper looks pretty sweet on your rig and that LED strip lights up the back like the 4th of July! Glad you had a chance to get out and have some fun. I also dig the finish you went with for your bumpers.:thumb:
 
Awesome. I need this. What led strip did u use

I used This. I was hoping that it had some sort of protective cover over it but it doesn't, just the little LEDs. Also not waterproof but that shouldn't be a problem as it's still in the vehicle. If it ever dies, I'll end up using a waterproof version. I copied Zach, who helped me, and he didn't think his was the waterproof version so I ordered the non-waterproof version. Turns out, he did and all the LEDs are wrapped in a clear, protective, plastic casing.

I also plan on using them as under hood lights as they should be perfect for that as well.

Well done Matt! That bumper looks pretty sweet on your rig and that LED strip lights up the back like the 4th of July! Glad you had a chance to get out and have some fun. I also dig the finish you went with for your bumpers.:thumb:

Thanks Ryder. It was really nice not having the rear swing out in the 4Runner this trip. So much room saved and less worry as well. I've previously bumped it around a bit and had it land on things and break them. No problems at all with this and so much less worry.

And the light is awesome. We didn't get into camp until around 2 AM as one of the guys I was with broke a spindle on the fire road to the trail head so that hung us up a bit. Having that light made setting up camp that night so much easier since I could see everything. With out it, camp set up would've been a real pain.
 
Champion Radiator

Installed a Champion Radiator (Part No. CC1998) and new OEM upper and lower radiator hoses (Part No's. 16571-07030 and 16572-62070) this weekend before making the little wheeling trip. My original OEM radiator had started to leak at the top seal and my temperatures started to raise a couple degrees, especially at highway speeds or at idle. My one real stipulation to this weekends trip was this got done and it did. My temperatures all weekend looked great, right where I wanted them. When wheeling, my transmission temperature stayed below 155* and my coolant stayed between 184-190* for the majority of the time. About what I saw before my previous radiator started leaking. It should be noted that this radiator is a little bigger than the original radiator. I haven't had to add any transmission fluid but I did have to add a decent amount more of coolant. I was able to use the stock hardware as well, and didn't need the factory radiator brackets as the new radiator has them built in. I will be adding washers as well because the radiator does sit a little close to the member behind the grill and I want to space it out to rid of future rubbing.
<a data-flickr-embed="true" href="https://www.flickr.com/photos/150884531@N04/23991817447/in/dateposted-public/" title=".322"><img src="https://farm5.staticflickr.com/4557/23991817447_15a9988f79_b.jpg" width="1024" height="683" alt=".322"></a><script async src="//embedr.flickr.com/assets/client-code.js" charset="utf-8"></script>

<a data-flickr-embed="true" href="https://www.flickr.com/photos/150884531@N04/24984342028/in/dateposted-public/" title=".323"><img src="https://farm5.staticflickr.com/4568/24984342028_f042dab4b5_b.jpg" width="1024" height="683" alt=".323"></a><script async src="//embedr.flickr.com/assets/client-code.js" charset="utf-8"></script>
The Champion branded radiator cap. The OEM cap would not fit.
<a data-flickr-embed="true" href="https://www.flickr.com/photos/150884531@N04/38856621261/in/dateposted-public/" title=".324"><img src="https://farm5.staticflickr.com/4574/38856621261_91b5a59cb4_b.jpg" width="1024" height="683" alt=".324"></a><script async src="//embedr.flickr.com/assets/client-code.js" charset="utf-8"></script>
And an example of how close the radiator is to the member.
<a data-flickr-embed="true" href="https://www.flickr.com/photos/150884531@N04/27080588129/in/dateposted-public/" title=".325"><img src="https://farm5.staticflickr.com/4530/27080588129_47ed48fc1a_b.jpg" width="1024" height="683" alt=".325"></a><script async src="//embedr.flickr.com/assets/client-code.js" charset="utf-8"></script>

Overall, I'm excited about this install. The radiator looks great and has kept my temperatures where they should be. It's an all aluminum radiator so I shouldn't have any problems with the pink milkshake. I also chose not to bypass the radiator's transmission cooler and I kept my existing B&M transmission cooler.
 
Last edited:
I used This. I was hoping that it had some sort of protective cover over it but it doesn't, just the little LEDs. Also not waterproof but that shouldn't be a problem as it's still in the vehicle. If it ever dies, I'll end up using a waterproof version. I copied Zach, who helped me, and he didn't think his was the waterproof version so I ordered the non-waterproof version. Turns out, he did and all the LEDs are wrapped in a clear, protective, plastic casing.

I also plan on using them as under hood lights as they should be perfect for that as well.


Thanks Ryder. It was really nice not having the rear swing out in the 4Runner this trip. So much room saved and less worry as well. I've previously bumped it around a bit and had it land on things and break them. No problems at all with this and so much less worry.

And the light is awesome. We didn't get into camp until around 2 AM as one of the guys I was with broke a spindle on the fire road to the trail head so that hung us up a bit. Having that light made setting up camp that night so much easier since I could see everything. With out it, camp set up would've been a real pain.

What else did you order for it? Are the lights simply 2 wires. One hot one ground ? 12v ?
 
What else did you order for it? Are the lights simply 2 wires. One hot one ground ? 12v ?

Yes, lights are just two wires. One ground and one power. There's little copper specs on the strips every three lights. This is how you cut it to the size you want. I ran them to the rear dome light through the driver side part of the rear hatch. You'll need maybe 5 extra feet of wire to run them into the rear dome light. If you give me a few days, I'll post a brief write up in here with pictures and tag you in it.
 
Yes, lights are just two wires. One ground and one power. There's little copper specs on the strips every three lights. This is how you cut it to the size you want. I ran them to the rear dome light through the driver side part of the rear hatch. You'll need maybe 5 extra feet of wire to run them into the rear dome light. If you give me a few days, I'll post a brief write up in here with pictures and tag you in it.

All good brotha. Thanks.... don't worry about pics.
 
All good brotha. Thanks.... don't worry about pics.

If any questions arise, let me know. I also forgot to mention that we used safety wire to get the wire through the driver side portion of the rear hatch next to the sun roof. All the wire is routed though the hatch so nothing is exposed. I went from top to bottom, relative to the hatch being closed, and found that to be easiest for me. But I did have to dig out the safety wire with a set of long needle nose pliers.
 
If any questions arise, let me know. I also forgot to mention that we used safety wire to get the wire through the driver side portion of the rear hatch next to the sun roof. All the wire is routed though the hatch so nothing is exposed. I went from top to bottom, relative to the hatch being closed, and found that to be easiest for me. But I did have to dig out the safety wire with a set of long needle nose pliers.

I was thinking about the rgb ones. Nice for summer. You can change the light color so less mosquitoes get attracted. Just not sure how it all looks and what other things need to be hooked up
 
Yes, lights are just two wires. One ground and one power. There's little copper specs on the strips every three lights. This is how you cut it to the size you want. I ran them to the rear dome light through the driver side part of the rear hatch. You'll need maybe 5 extra feet of wire to run them into the rear dome light. If you give me a few days, I'll post a brief write up in here with pictures and tag you in it.

I am interested in this write up. Want to see some pics you did of the wire installation tap from dome.
 
Truck is looking good. Welcome to the Kings club!

BTW have you seen Logan Lucky yet? It takes place in your neck of the woods, West Virginia. Not Virgina I realize but still a lot closer than most Hollywood movies.
 
I am interested in this write up. Want to see some pics you did of the wire installation tap from dome.

Give me about a week to get through finals then I will. I’ll make sure to tag you when I do. It’ll likely be in here instead of a separate write up

Truck is looking good. Welcome to the Kings club!

BTW have you seen Logan Lucky yet? It takes place in your neck of the woods, West Virginia. Not Virgina I realize but still a lot closer than most Hollywood movies.

Thanks! Good club to be in, really liking the ride compared to my icons.

I have not, I’ll have to give it a watch over break when I finally get some free time again. If you watch Shameless on Netflix, they do some filming locally. Never seen it but I was riding my bike to class the other day and rode right past a filming.
 

Members online

Forum statistics

Threads
278,316
Messages
3,554,111
Members
248,016
Latest member
Advally Service

Trending content

Back
Top