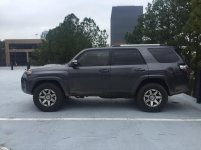
mbumpus11 New Build Thread - Need Input!!

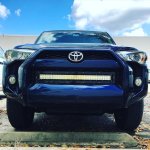
32" LED Light Bar in Grille + Custom Satoshi

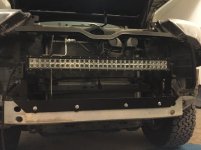
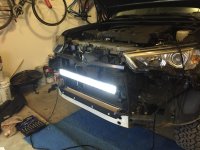
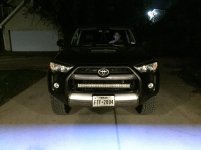
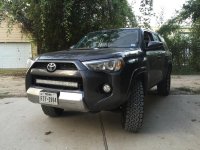
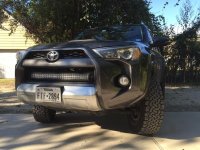
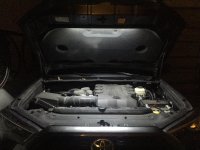
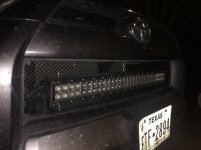
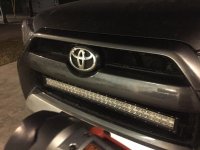
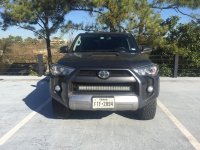
This weekend I finally got around to installing my light bar in my grille.

I had a friend fab up a bracket a couple of weeks ago to my exact specifications that I needed to install it in my grille area.

A little bit of cutting was required on the air dams, but ultimately not much, just enough to squeeze my bar and bracket in.

Removed the front bumper piece, then held the light and bracket in place to see where I needed to cut the air dams. (sorry, don't have pictures of the air dam cutting)

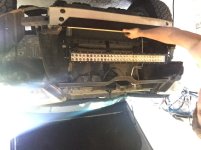
Mounted the bracket by drilling pilot holes into the aluminum front bumper support, then drilled in self-tapping screws with rubber washers on the front, and gasket rubber on the back to prevent additional vibration.

After mounting, plugged up and tested.

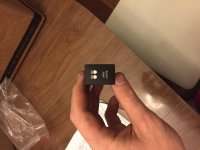
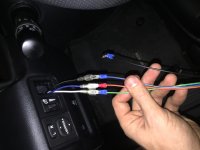
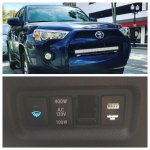
Installed the switch in place of the dummy panel right behind the headlight stick on the steering wheel. Used an AOB switch you can see in the pictures. Cut just enough into the firewall rubber grommet to squeeze the wires through (supplied relay), and plugged it up.

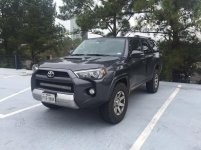
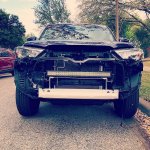
Hadn't finished the lower grille yet, but you can tell that in the pictures attached. You also see that the feet of the light bar supports were pushing up on my bumper...

...con't below...
 

Attachments

  • IMG_5231.jpg
    IMG_5231.jpg
    121.9 KB · Views: 2,156
  • IMG_5240.jpg
    IMG_5240.jpg
    128.4 KB · Views: 2,139
  • IMG_5242.jpg
    IMG_5242.jpg
    130.6 KB · Views: 2,142
  • IMG_5243.jpg
    IMG_5243.jpg
    127.5 KB · Views: 2,142
  • IMG_5246.jpg
    IMG_5246.jpg
    112.2 KB · Views: 2,141
  • IMG_5260.jpg
    IMG_5260.jpg
    133.8 KB · Views: 2,152
  • IMG_5269.jpg
    IMG_5269.jpg
    136.2 KB · Views: 2,114
Continued...

Satoshi Custom Lower Grille:

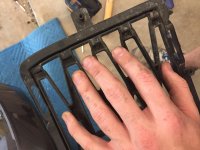
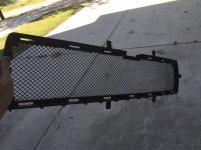
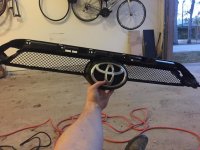
Took the lower grille insert out, and decided to cut it up.

Cut out the interior portions (where my hand is covering) to reuse the grille "frame."

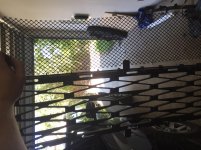
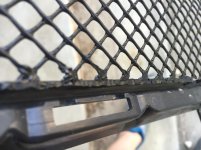
Bought some plastic gutter guard from Lowes (Shop Amerimax Plastic Gutter Guard at Lowes.com) and it was 6" exactly...perfect width for the lower grille. You can see the comparison of the two materials side by side in my pictures.

Then I used a sautering iron to melt the plastics together on the inside of the frame to hide any imperfections. Worked like a charm (as you can see in my picture below).

I actually had to scoot the light bar supports back a little to get the pressure off of where the grille clips in, but once I did that it fit flawlessly.

You can see the finished product below. I'm very pleased and have already gotten compliments in parking lots.

Hope this helps!
 

Attachments

  • IMG_5282.jpg
    IMG_5282.jpg
    127.7 KB · Views: 2,503
  • IMG_5284.jpg
    IMG_5284.jpg
    138.3 KB · Views: 2,471
  • IMG_5286.jpg
    IMG_5286.jpg
    134.1 KB · Views: 2,495
  • IMG_5287.jpg
    IMG_5287.jpg
    123.6 KB · Views: 2,501
  • T4RLB.jpg
    T4RLB.jpg
    138.7 KB · Views: 2,496
Mesh Match

Finally got around to matching the upper grille section with my lower grille section. I ended up redoing the lower one to let my light bar have the face in front of mesh to not be obstructed anymore.

A couple rough parts if you really inspect it, but that's because plastic welding is never the cleanest anyway. Looks pretty good from an overall objective viewpoint as it matches the hood scoop faux mesh as well.
 

Attachments

  • IMG_7118.jpg
    IMG_7118.jpg
    132.3 KB · Views: 1,973
  • IMG_7120.jpg
    IMG_7120.jpg
    122.7 KB · Views: 1,971
  • IMG_7121.jpg
    IMG_7121.jpg
    133 KB · Views: 1,962
  • IMG_7131.jpg
    IMG_7131.jpg
    138.4 KB · Views: 2,019
Great thread. Subd for future mods. Can u tell me which flush led lights you used for the cargo area?mind taking a pic to see how they look?
Thx
 
Great thread. Subd for future mods. Can u tell me which flush led lights you used for the cargo area?mind taking a pic to see how they look?
Thx

Thanks! It's a slow, but practical build. Not trying to be up with the top rock crawlers, but I'm a country boy living in the big city and trying to blend in at least a little bit haha.

Link for my cargo lighting install is below, and has the info on the LEDs as well, just scroll down a little beyond the initial install pics.

Let me know if you have any questions, feel free to PM me!

http://www.toyota-4runner.org/5th-gen-t4rs/199203-cargo-led-lighting-actually-done-right.html
 
Finally got around to matching the upper grille section with my lower grille section. I ended up redoing the lower one to let my light bar have the face in front of mesh to not be obstructed anymore.

A couple rough parts if you really inspect it, but that's because plastic welding is never the cleanest anyway. Looks pretty good from an overall objective viewpoint as it matches the hood scoop faux mesh as well.

Thanks Mbumpus for you blazing the trail with the 32" Lightbar install in the grille. I decided to take on this project myself and did not realize what I was getting myself into...lol those pieces on the sides of the aluminum bumper really do get in the way but I managed to make it all work! Let me know what you think bud. I think it really turned out to give it a clean look.
 

Attachments

  • IMG_0482.jpg
    IMG_0482.jpg
    138.1 KB · Views: 1,729
  • IMG_0493.jpg
    IMG_0493.jpg
    120.5 KB · Views: 1,777
  • IMG_0501.jpg
    IMG_0501.jpg
    133.3 KB · Views: 1,779
Thanks Mbumpus for you blazing the trail with the 32" Lightbar install in the grille. I decided to take on this project myself and did not realize what I was getting myself into...lol those pieces on the sides of the aluminum bumper really do get in the way but I managed to make it all work! Let me know what you think bud. I think it really turned out to give it a clean look.

Man that looks great!

I think this location is the best and most discrete location, but still completely functional.

Glad to see someone else follow my lead! Hopefully more will follow OUR lead now!
 
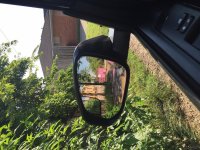
Ordered the RAV4 mirrors for the blind spot retrofit and they were a breeze to put on. Literally took about 10 minutes.

1. Angle both side mirrors all the way down and in
2. I took a flathead screwdriver and stuck it behind the top right of the mirror to get my fingers in a lightly work around to loosen the clips holding the mirror in
3. Pulled the mirror off the clips completely, then disconnected the heating element plug which is located on the top, inner corner of both mirrors.
4. Clipped the heating element plug back on and placed my whole hand flat on the mirror to apply light pressure until the first "click" was heard indicating the mirror was back in place.
5. Repeated on the other side
6. Cleaned fingerprints off the glass

Pics attached. Will add daylight pics tomorrow.

fd25e901dfc8f24408f20bae74c7c112.jpg


e270036ac69dc06c5c02938b285b4f17.jpg


85915cbb7c4b1ea038ae2815af16a2a3.jpg


895f56fbb9f8e9900c516aca5f2e8bfb.jpg


Edit ** - added daylight pic, but does anyone know how to get the pic to rotate?!
 

Attachments

  • IMG_1004.jpg
    IMG_1004.jpg
    140.9 KB · Views: 1,581
Last edited:
Took off my roof rails to overnight them to [MENTION=145761]Manny228[/MENTION]...trading for '10-'13 trail black rails!

Really easy process.

Pop off the black caps at the 3" and 7" marks with a flathead screwdriver to reveal bolts underneath
c90c8952b3e4139023e4d24f705e0872.jpg


Then unscrew those bolts with a metric socket number 12, and it all comes off nice and easy
b5ce4b1485e9c8f47d19703a4aff4d3e.jpg


Boxed up, ready to go!
02b7eff77ddfa73d76232f8aa3d1c602.jpg


And now I have a bald 4Runner while I wait...
19725078cb0fa4ae6f964ad8266d7848.jpg
 
Last edited:
Got the '13 Trail rails in and put em on!

Make sure you have rubber washers if you do this switch. Otherwise your rails will be loose!

I got these from Lowe's and they worked perfectly:
4b16f97737d0073110bfe65254eff4f7.jpg


Finished product (with my Thule crossbars on top)
525e032affc40e9975e155686b47c79f.jpg
 
Due to the rain in Houston and the discussion on another thread about driving through water, I finally decided to install my ARB Rear Differential Breather last night.

First off, why does Toyota make you screw these together? I hadn't used them yet and had to use a screwdriver to loosen them. Good thing I wasn't on the side of the road...
69d57fdeb9c62a423789dc3230a11d01.jpg


343d9f296ca9de52e8872e344dda5758.jpg


Also, this was by far the best move I made the entire time. Kept my eyes clean and where I could see!
ff0195f39c5b30dd5ec1f2d26639ca7a.jpg
 
Following [MENTION=120701]Cymon[/MENTION], I started with a dropped tire. That thing looks more like an anchor than anything.

ebd1d5d1d1a9e12363f2e32e470d31ec.jpg


Located the factory breather

be4d39da1869c49e3eb35abc9fa1c694.jpg
 
Started running the tubing from the engine bay

7ea27210ffb0f13b811580d61b3f066d.jpg


Through the wheel well

a01c323b459462ff67a03eaf9d4aaf3f.jpg


Down the frame rail

af1354293c64dd8c24c0f4697b183ba7.jpg


Up into the rear of the vehicle with the bend in the rail to get over/around the rear suspension

5ffaed35568f2a9242d81482e175d34c.jpg
 
I pulled the tube above the gas tank filler line and then gave it an extra loop around to account for flex/future lift/etc.

4dd2562935146302c3b05e30cc3ee265.jpg


Then I cleaned around the valve because my truck has seen some things

7e4ccd4abf68299ade0e225688fa7b8b.jpg


Made sure the loop would allow me to insert the tube properly before changing the breather valve put with the ARB one

0e05021e3902a964fa5ea1cfc9eed7c2.jpg
 
Replaced the breather valve with ARB fitting, and stuck 'er in

ab296116224a019c2bdea42ef42d4baf.jpg


65473e73fa5082e11ba73ad84df4d4bd.jpg


Then I went back through and zip tied everything. I don't have pics of all this because I was ready to finish it, but I pulled the tube to the inside of the frame rail and zip tied it to some small tubing that is basically under the drivers seat (for a point of reference).

Finished routing the tube within the engine bay and decided on leaving a coil for future mods if necessary to flex/stretch.

cfc805c0ce8c2f8c2e0e3bc7724d3202.jpg


Installed filter

8b378af8f5660252d9aceed2e226d961.jpg


DONE!
 

Members online

Forum statistics

Threads
278,309
Messages
3,554,071
Members
248,016
Latest member
Advally Service

Trending content

Back
Top