
You are using an out of date browser. It may not display this or other websites correctly.
You should upgrade or use an alternative browser.
You should upgrade or use an alternative browser.
McCand's Build Thread
- Thread starter mccand
- Start date
Rear Storage System: Part 1 - Planning ahead
I've been thinking about organization of the rear part of my car a lot, trying to decide how to change things.
For the record: the current approach is to just throw the stuff in there!
This is not working as well as I want, for a couple of reasons.
A set of drawers seems to be in my future. I've been admiring the Goose gear and ARB units, but I live on a pacific island, and I can't just drive to a distributor to pick them up. Instead, I have to pay shipping which frequently doubles the cost of an already expensive item. #ParadiseProblems. I also haul a garbage can around on a regular basis, so whatever goes in there needs to leave space for that.
So, in all likelihood, I'm going to build my own.
And if I'm going to do that, I might as well build it exactly as I want. (As I like to say: "Anything worth doing, is worth overdoing!")
So what else should this thing do?
One thing about my 4th gen that is irritating is that I am 5'11", and if I put down the rear seats, there's a large flat area that measures 5'10" x 3'5", which perfect for the good wife, but is exactly long enough to give me neck pain for the following day, and barely wide enough for the both of us to be comfortable.
However, If I were to build drawers of the right height, then have some extensions that went over the folded up rear seats (which would also be above the wheel wells), I'd have a space measuring 6'3" x 4'6" (plenty of room!), and I wouldn't have to move all the gear out in order to sleep in the car.
Speaking of the good wife, by the time I'd thought all this out, I had some sketches of the basics, and it was time to have a short design review with the boss. Fortunately, she was excited about the idea of a sleeping platform inside the car. She's not a fan of some of the local arthropods (again: #ParadiseProblems), so sleeping outside isn't really her thing. To be honest, I was going to do this anyways :biggrin2:, but having her blessing means less harassment for me (for the rest of my life) while I slave over building this thing.
So here's the basics. The final design should:
With that said, I sat down and started doodling in Solidworks, and here's what I've got:
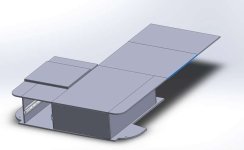
This shows the passenger's side bed extension folded out, while the driver's side is stowed. The left module is likely to be a big drawer, and the right module will probably be two smaller drawers.
One thing decision that fell out of this design was the use of a base plate. I just can't justify using the extra 1.5 inches of space needed to keep that thing, when I never use it. Using a purpose-built baseplate will give me a bunch of that space back, and will let me have make much cleaner mounting options for the drawers. There's some downsides, like figuring out how in the blue blazes I make this thing fit right, but that's food for a future post.
At this point, I'm dealing with something that's moved beyond being a weekend project. This is going to take a while for me to complete, and so I'm dividing it up into manageable chunks and will give each their own post.
Here's a list of all the relevant posts:
(None, yet! Check back soon!)
And here are some links to other rear storage builds that have inspired me as I've worked on this one:
Wazioc
Raycie
MTN4RNR (Part 1, 2, 3, 4, 5, 6, 7) - Note: This is one of my favorite build threads.
I've been thinking about organization of the rear part of my car a lot, trying to decide how to change things.
For the record: the current approach is to just throw the stuff in there!
This is not working as well as I want, for a couple of reasons.
- It's easy to lose things in the pile, especially if one of the kids goes through the back unsupervised
- After living here for a couple of years, I'm have a "normal gear load" that I like to stay in the car, and without better organization, it won's stay put.
- Thing left in the truck get dirty and sandy, which I don't like.
- That darned double-decker thing is worthless. I can't use the Husky liner when it is up, which means the car gets filthy, and it just takes up space when it's down. Also the cargo capacity of it in the up position is a mere 60 lbs. :twitch:
A set of drawers seems to be in my future. I've been admiring the Goose gear and ARB units, but I live on a pacific island, and I can't just drive to a distributor to pick them up. Instead, I have to pay shipping which frequently doubles the cost of an already expensive item. #ParadiseProblems. I also haul a garbage can around on a regular basis, so whatever goes in there needs to leave space for that.
So, in all likelihood, I'm going to build my own.
And if I'm going to do that, I might as well build it exactly as I want. (As I like to say: "Anything worth doing, is worth overdoing!")
So what else should this thing do?
One thing about my 4th gen that is irritating is that I am 5'11", and if I put down the rear seats, there's a large flat area that measures 5'10" x 3'5", which perfect for the good wife, but is exactly long enough to give me
neck pain for the following day, and barely wide enough for the both of us to be comfortable.However, If I were to build drawers of the right height, then have some extensions that went over the folded up rear seats (which would also be above the wheel wells), I'd have a space measuring 6'3" x 4'6" (plenty of room!), and I wouldn't have to move all the gear out in order to sleep in the car.
Speaking of the good wife, by the time I'd thought all this out, I had some sketches of the basics, and it was time to have a short design review with the boss. Fortunately, she was excited about the idea of a sleeping platform inside the car. She's not a fan of some of the local arthropods (again: #ParadiseProblems), so sleeping outside isn't really her thing. To be honest, I was going to do this anyways :biggrin2:, but having her blessing means less harassment for me (for the rest of my life) while I slave over building this thing.
So here's the basics. The final design should:
- Have two "modules", with at least one drawer on each side.
- The spit between the two modules should match the split in the rear seats (60/40)
- Each module should be easy to install or remove, and require few tools
- The height of the drawer units must be sufficient for the extended top surface to go over the wheel wells and the rear seats (when they are folded forward)
- When fully deployed, the extended sleeping surface should go to the edges of the cabin. (Someday, I'm cutting a memory foam pad to fit it! Can't wait!)
- The sleeping platform extensions should be easy to remove from the vehicle for normal use.
With that said, I sat down and started doodling in Solidworks, and here's what I've got:
This shows the passenger's side bed extension folded out, while the driver's side is stowed. The left module is likely to be a big drawer, and the right module will probably be two smaller drawers.
One thing decision that fell out of this design was the use of a base plate. I just can't justify using the extra 1.5 inches of space needed to keep that thing, when I never use it. Using a purpose-built baseplate will give me a bunch of that space back, and will let me have make much cleaner mounting options for the drawers. There's some downsides, like figuring out how in the blue blazes I make this thing fit right, but that's food for a future post.
At this point, I'm dealing with something that's moved beyond being a weekend project. This is going to take a while for me to complete, and so I'm dividing it up into manageable chunks and will give each their own post.
Here's a list of all the relevant posts:
(None, yet! Check back soon!)
And here are some links to other rear storage builds that have inspired me as I've worked on this one:
Wazioc
Raycie
MTN4RNR (Part 1, 2, 3, 4, 5, 6, 7) - Note: This is one of my favorite build threads.
Attachments

Last edited:
Rear Storage System: Part 2 - Baseplate
As discussed above, Goose Gear makes a lovely base plate and drawer system. They also don't require any drilling or other modification of the car, which is ideal.
Several people on the forums have them, and I haven't heard anything say anything negative about them yet.
Here's what their base plate looks like:

I like this. Unfortunately, I can't justify spending $400 on it, along with the $200 - $300 that it's going to cost to get it shipped to the Big Island.* Especially when I can buy plywood here, and I have all these fun tools in my garage.
* We're going to operate under the assumption that my time is worthless, okay? Otherwise, the whole flimsy edifice that justifies my doing this falls apart. Then I am depressed, and STILL won't have a base plate. So don't go there, got it?
Anyhow, the first step was to remove all the existing junk flooring from the 4Runner.
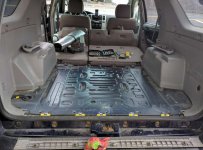
Next, take some measurements, and make some templates for the really complicated sections:
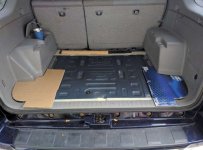
Then test the templates on some scrap wood:
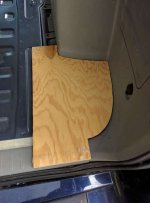
With fit confirmed, the next step is to make a large scale template that will be used to mark the plywood:
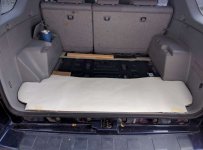
Once I've got the plywood all marked out, it's time to cut things and then sand all the edges smooth:
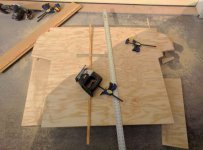
Contrary to what the picture shows, I did almost all the cutting with a portable circular saw. This let me get close to the line, then I used the table sander to get things right where I wanted them.
Finally, time for a test fit:
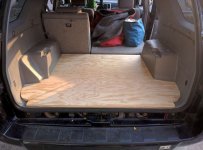
Not bad!
Some further careful measuring let me mark off the spaces that need to be "cut up" into the part to avoid other features, allowing the plate to sit lower, a new router (paid for by the money I'm "saving" by doing this myself) makes short work of this part:
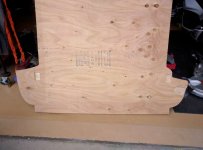
Note the cutout shown on the right-most edge of the base plate in this picture. This was for the wiring harness that comes up through a grommet in the floor. I also have an air line that passes through this, so there's some extra space cut out there. You also can't see three other recessed cuts along the top edge. They match the various protrusions near the rear seats.
One thing that had some potential for trickiness was getting the screw holes in the right place. I ended up cutting the head off of a screw and putting a point on it, then threading it into the appropriate hole. When the plate was placed on top (and pounded) the makeshift center punch left a mark on the plate in the right place. Then it was simple to drill in the right place. A countersink was added to the top surface, and then I used M6x1.0 x 40mm flathead screws to secure the thing.
And that's the worst of it. I then sanded the board, applied some spakling to fill the gaps and dents, sanded it again, then painted it with Duplicolor Bed Armor. After some drying time, I installed it over some thin rubber cut from a bicycle inner-tube to prevent rubbing, and we're in business:
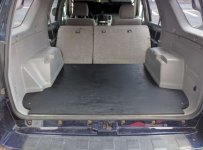
The fit is really nice: nowhere is there a gap large enough to fit a popsicle stick into. When the trunk closes, the base plate extends to within a milimeter or so of the door's surface, so there isn't enough space for things to fall in there and surprise me when I go to unload the groceries. (I've lost a couple bottles of beer that way, which was a travesty. :shocked: Now you know the real reason for this project...)
Overall, planning and making the templates took the most time. Once I got down to cutting wood, I finished everything up in a weekend. Let's call it 8 hours of actual work.
In retrospect, I think I'd do this a bit differently on the material's side - I'd get some good looking birch plywood, then used a marine polyurethane coating. This would result in a base that looked much more appealing, while still protecting it from abuse. And, since I'm an incorrigible engineer :nerd:, I have some nice CAD models of the final thing, so replication should be much easier, should I ever choose to do it.
Of course, this isn't the end - I've still got some drawers to build and install, which will require that I add some t-nuts to provide convenient attachment points.
So the plate is going to need to come out again at some point anyhow. I'll probably replace the rubber padding with some 3/8" carpet pad to reduce road noise and prevent rubbing of paint on the bed. (This will also raise the plate slightly.) However, there's a lot of planning, acquisitions, and such that's got to happen before I can really get started on the drawers (Specifically, getting some good drawer slides).
No rush.
As discussed above, Goose Gear makes a lovely base plate and drawer system. They also don't require any drilling or other modification of the car, which is ideal.
Several people on the forums have them, and I haven't heard anything say anything negative about them yet.
Here's what their base plate looks like:
I like this. Unfortunately, I can't justify spending $400 on it, along with the $200 - $300 that it's going to cost to get it shipped to the Big Island.* Especially when I can buy plywood here, and I have all these fun tools in my garage.
* We're going to operate under the assumption that my time is worthless, okay? Otherwise, the whole flimsy edifice that justifies my doing this falls apart. Then I am depressed, and STILL won't have a base plate. So don't go there, got it?
Anyhow, the first step was to remove all the existing junk flooring from the 4Runner.
Next, take some measurements, and make some templates for the really complicated sections:
Then test the templates on some scrap wood:
With fit confirmed, the next step is to make a large scale template that will be used to mark the plywood:
Once I've got the plywood all marked out, it's time to cut things and then sand all the edges smooth:
Contrary to what the picture shows, I did almost all the cutting with a portable circular saw. This let me get close to the line, then I used the table sander to get things right where I wanted them.
Finally, time for a test fit:
Not bad!
Some further careful measuring let me mark off the spaces that need to be "cut up" into the part to avoid other features, allowing the plate to sit lower, a new router (paid for by the money I'm "saving" by doing this myself) makes short work of this part:
Note the cutout shown on the right-most edge of the base plate in this picture. This was for the wiring harness that comes up through a grommet in the floor. I also have an air line that passes through this, so there's some extra space cut out there. You also can't see three other recessed cuts along the top edge. They match the various protrusions near the rear seats.
One thing that had some potential for trickiness was getting the screw holes in the right place. I ended up cutting the head off of a screw and putting a point on it, then threading it into the appropriate hole. When the plate was placed on top (and pounded) the makeshift center punch left a mark on the plate in the right place. Then it was simple to drill in the right place. A countersink was added to the top surface, and then I used M6x1.0 x 40mm flathead screws to secure the thing.
And that's the worst of it. I then sanded the board, applied some spakling to fill the gaps and dents, sanded it again, then painted it with Duplicolor Bed Armor. After some drying time, I installed it over some thin rubber cut from a bicycle inner-tube to prevent rubbing, and we're in business:
The fit is really nice: nowhere is there a gap large enough to fit a popsicle stick into. When the trunk closes, the base plate extends to within a milimeter or so of the door's surface, so there isn't enough space for things to fall in there and surprise me when I go to unload the groceries. (I've lost a couple bottles of beer that way, which was a travesty. :shocked: Now you know the real reason for this project...)
Overall, planning and making the templates took the most time. Once I got down to cutting wood, I finished everything up in a weekend. Let's call it 8 hours of actual work.
In retrospect, I think I'd do this a bit differently on the material's side - I'd get some good looking birch plywood, then used a marine polyurethane coating. This would result in a base that looked much more appealing, while still protecting it from abuse. And, since I'm an incorrigible engineer :nerd:, I have some nice CAD models of the final thing, so replication should be much easier, should I ever choose to do it.
Of course, this isn't the end - I've still got some drawers to build and install, which will require that I add some t-nuts to provide convenient attachment points.
So the plate is going to need to come out again at some point anyhow. I'll probably replace the rubber padding with some 3/8" carpet pad to reduce road noise and prevent rubbing of paint on the bed. (This will also raise the plate slightly.) However, there's a lot of planning, acquisitions, and such that's got to happen before I can really get started on the drawers (Specifically, getting some good drawer slides).
No rush.
Attachments
-
 IMG_20170409_140647-800.jpg57.9 KB · Views: 891
 -
 IMG_20170412_153038-800.jpg44.7 KB · Views: 906
 -
 IMG_20170412_155908-800.jpg33.7 KB · Views: 878
 -
 IMG_20170412_153025-800.jpg38.1 KB · Views: 879
 -
 IMG_20170412_165019-800.jpg46.9 KB · Views: 869
 -
 IMG_20170412_180331-800.jpg44.6 KB · Views: 865
 -
 IMG_20170414_115601-800.jpg34.3 KB · Views: 858
 -
 IMG_20170416_133506-800.jpg45.3 KB · Views: 880
Last edited:

TheFauxFox
New member
Well, I was installing a bunch of other electronics, and I came across this little gem: the Anker "SoundSync Drive" Bluetooth Adaptor

Now that I have the USB ports, right in the console where the AUX in port is located, it's hardly worth calling this a mod - I simply plugged the thing in.
The only real question was where to mount the puck. After some thinking, I ran the wire under the center console and have the puck sitting right on the center divider for the cupholder.
View attachment 248340
A little configuration of my Android phone and we're in business. Here's what I've got going on:
- Install Android Auto
- Download a couple of playlists
- Unlock the Developer Options Menu for Android
- In developer options, select "stay awake" when plugged in
Now, the phone connects whenever I start the car, and plays through the AUX setting on the radio.
There is some alternator whine on the line, which I'm going to have to take care of, but that's a project for another day. (I'm open to suggestions if you have an easy to deal with it!)
That whine is called a "ground loop." That means the ground on the aux really isn't that good. It should be worse if you're charging your phone (that was the case with me). Go on eBay or Amazon and type in "Ground Loop Interceptor" and you'll find a ton. I hid mine under the center console trim and rewired the aux cord (I'll upload some pics if you want) so its permanent. Otherwise its a super easy plug and play solution.

Inv4drZm
Senior Member
We must think alike (as engineers), I drew mine up in Solidworks with very similar plans as you to create a modular sleeping platform on the right side above the larger of the two folded down rear seats, and above the wheel wheels for extra room. I've only made the baseplate though, and will put off the drawers and sleeping platform for this summer. I'm thinking with an air-nailer and a tablesaw it should be pretty easy to put the rest together.
I will be following this build closely! Nice work!
I will be following this build closely! Nice work!
Thanks!
Got one on order! I was worrying that I was going to have to add grounded shielding to all my new wiring, which didn't sound like fun. If this does the trick, that would be perfect.
While I've seen the problem when using the BT adaptor, the culprit may also be the radio - its ground is through the power port in the rear of the car, which would make for very large loop (circumference of ~20 feet). I'll do some further testing and see what works. Thanks for the tip!
That whine is called a "ground loop." That means the ground on the aux really isn't that good. It should be worse if you're charging your phone (that was the case with me). Go on eBay or Amazon and type in "Ground Loop Interceptor" and you'll find a ton. I hid mine under the center console trim and rewired the aux cord (I'll upload some pics if you want) so its permanent. Otherwise its a super easy plug and play solution.
Got one on order! I was worrying that I was going to have to add grounded shielding to all my new wiring, which didn't sound like fun. If this does the trick, that would be perfect.
While I've seen the problem when using the BT adaptor, the culprit may also be the radio - its ground is through the power port in the rear of the car, which would make for very large loop (circumference of ~20 feet). I'll do some further testing and see what works. Thanks for the tip!
Can I pick your brain?
Thanks! Getting drawer slides is the one thing stopping me from moving forward at the moment. The other thing I'm contemplating is making the sides of the drawer enclosures (where the slides mount) from sheet metal. This would let me make the drawers inside that much larger, since wall thickness would go from 1/2 inch to .120 inches. We'll see.
We must think alike (as engineers), I drew mine up in Solidworks with very similar plans as you to create a modular sleeping platform on the right side above the larger of the two folded down rear seats, and above the wheel wheels for extra room. I've only made the baseplate though, and will put off the drawers and sleeping platform for this summer. I'm thinking with an air-nailer and a tablesaw it should be pretty easy to put the rest together.
I will be following this build closely! Nice work!
Thanks! Getting drawer slides is the one thing stopping me from moving forward at the moment. The other thing I'm contemplating is making the sides of the drawer enclosures (where the slides mount) from sheet metal. This would let me make the drawers inside that much larger, since wall thickness would go from 1/2 inch to .120 inches. We'll see.
Inv4drZm
Senior Member
Thanks! Getting drawer slides is the one thing stopping me from moving forward at the moment. The other thing I'm contemplating is making the sides of the drawer enclosures (where the slides mount) from sheet metal. This would let me make the drawers inside that much larger, since wall thickness would go from 1/2 inch to .120 inches. We'll see.
I've thought about making the whole drawer system out of sheet metal, but I thought it might be a little heavier than wood and more susceptible to bending on any unsupported edges for the top sleeping platform. In the end I think I'll just do all wood; less rattly, and more sound deadening properties than metal. But it would be cool to design it to bolt together, CNC plasma cut all of the panels, and sell and ship them un-assembled.
But making just the vertical supports out of sheet metal could be a pretty cool idea. I could get mine all plasma cut with a rad design, and bend the edges 90 degrees to bolt or screw into the top and bottom wood panels. Could almost have the drawer's sides out of sheet metal too as long as you lined the sides with something soft or didn't put anything in that rolled around too much. I may have to draw this up in Solidworks now!
In the end, if you make the supports and the drawers out of sheet metal, you save what, 2" of width for each drawer? May not be worth it but it would be unique.
Inv4drZm
Senior Member
I just found this thread and I really like how the guy on this page incorporated a slide-out table underneath his drawers. If I did that, I would only do it with one drawer and would make sure it's strong.
Request: Pics of your cargo drawers - Page 4 - Toyota 120 Platforms Forum
This rubber liner would be great for the top as well as for inside the drawers. I might buy some soon.
"Diamond Plate" Roll Rubber Matting
Request: Pics of your cargo drawers - Page 4 - Toyota 120 Platforms Forum
This rubber liner would be great for the top as well as for inside the drawers. I might buy some soon.
"Diamond Plate" Roll Rubber Matting
But making just the vertical supports out of sheet metal could be a pretty cool idea. I could get mine all plasma cut with a rad design, and bend the edges 90 degrees to bolt or screw into the top and bottom wood panels. Could almost have the drawer's sides out of sheet metal too as long as you lined the sides with something soft or didn't put anything in that rolled around too much. I may have to draw this up in Solidworks now!
In the end, if you make the supports and the drawers out of sheet metal, you save what, 2" of width for each drawer? May not be worth it but it would be unique.
Yeah, I figured just the vertical supports - the top surface will probably still be wood, but the metal won't be visible most of the time. I figure using the metal sides could add a substantial amount of drawer space. (12" x 26" x 0.4" = 172 in^2 per piece of wood replaced by metal. Multiply by 4, and we're talking about almost 700 cubic inches).
I was going to leave the drawer sides as wood simply for keeping things quiet. If I hit any bump with stuff in a metal drawer, it's going to be annoyingly loud.
Now, all I need to do (cough, except for all the other things, cough) is find someone local who can do the forming for me . . .
TheFauxFox
New member
We must think alike (as engineers), I drew mine up in Solidworks with very similar plans as you to create a modular sleeping platform on the right side above the larger of the two folded down rear seats, and above the wheel wheels for extra room. I've only made the baseplate though, and will put off the drawers and sleeping platform for this summer. I'm thinking with an air-nailer and a tablesaw it should be pretty easy to put the rest together.
I will be following this build closely! Nice work!
Built the one I want to build in Inventor Fusion... lol

Built the one I want to build in Inventor Fusion... lol
Got a screenshot you can share?

TheFauxFox
New member
Got a screenshot you can share?
At school rn so I cant, Ill try to remember when I get home later! It's only the rectangular prism that fits between the wheel wells, I planned on building the "wings" on the sides separately and without CAD as I didn't want to properly measure them...
One problem solved - thanks to TheFauxFox
So I got one of these, and it made all the difference!

It does seem to attenuate the audio a bit, but the alternater noise is almost completely gone (only noticeable when the volume is WAY up). I think we're good! Thanks for the tip!
(It's amazing how much better the audio from my phone sounds now. $9 well spent!)
That whine is called a "ground loop." That means the ground on the aux really isn't that good. It should be worse if you're charging your phone (that was the case with me). Go on eBay or Amazon and type in "Ground Loop Interceptor" and you'll find a ton. I hid mine under the center console trim and rewired the aux cord (I'll upload some pics if you want) so its permanent. Otherwise its a super easy plug and play solution.
So I got one of these, and it made all the difference!
It does seem to attenuate the audio a bit, but the alternater noise is almost completely gone (only noticeable when the volume is WAY up). I think we're good! Thanks for the tip!
(It's amazing how much better the audio from my phone sounds now. $9 well spent!)
Last edited:
TheFauxFox
New member
So I got one of these, and it made all the difference!
It does seem to attenuate the audio a bit, but the alternater noise is almost completely gone (only noticeable when the volume is WAY up). I think we're good! Thanks for the tip!
(It's amazing how much better the audio from my phone sounds now. $9 well spent!)
Glad to hear! I just hardwired mine with my bluetooth adapter and it solved my prob. Happy listening!
:dancin:
3D Printed UCA covers
I got a bit tired of cleaning crap out of the UCA ball joints, so I printed some covers:
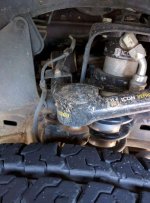
Want to print your own UCA covers? Here's the file for use with Icon's tubular uppers (may work with other products, but no guarantees).
View attachment UCA Ball Joint Cover.zip
If you build your own, I always appreciate people posting "makes" on my thingiverse page!
I got a bit tired of cleaning crap out of the UCA ball joints, so I printed some covers:
Want to print your own UCA covers? Here's the file for use with Icon's tubular uppers (may work with other products, but no guarantees).
View attachment UCA Ball Joint Cover.zip
If you build your own, I always appreciate people posting "makes" on my thingiverse page!
Attachments

Last edited:
blahblah1273
New member
wow very nice.
New Tires!
Well, It was finally time for the old tires to go. They were pretty worn down, getting to where they'd slip in the rain, and were sporting a surprising number of plugs and patches. (The local tire shops were giving me dire warnings every time I brought one in for a flat repair.)
The lava rock around here can be pretty tough on everything. My shoes wear out quick too!
I spent a while falling down the rabbit hole of "which tire is better", then decided to make it easy and see what was available on the island, since shipping anything in is a royal PITA.
So I went down to one of the local stores that focuses on tires and got quotes for a couple of different tires. However, when I went over to Costco, I found I could get some BFG KO2s for 30% less than the first place. It's a deal!
The old tires size was 265/65R17, and I decided to go up a step to 265/70/R17. I've got a 2 inch suspension lift, but I don't want to buy new rims and I don't want to regear, so I'm not going to do anything too extreme.
My spare was an ancient Dunlop - It probably came with the car from the dealer, and had never seen any significant use. So that's getting replaced, and we're going to start regular tire rotation! For your entertainment, the staff at Costco couldn't simply order in a set of 5 tires easily. They had to order a set of 4, then add another tire to it.
Anyhow, here's the car before:
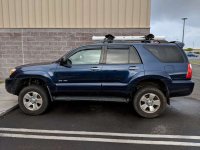
And here's the after:
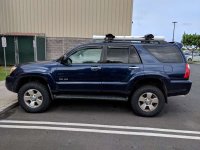
I've run through a tank of gas since they've been installed, and my gas mileage has definitely taken a bit of a hit. The new KO2s are also substantially heavier than the old tires, so there's a noticeable change in the handling (acceleration in particular) of the car. It's not a problem, just noticeably different.
Anyhow, we'll see how things go: I've got a off-road camping trip this weekend...
Well, It was finally time for the old tires to go. They were pretty worn down, getting to where they'd slip in the rain, and were sporting a surprising number of plugs and patches. (The local tire shops were giving me dire warnings every time I brought one in for a flat repair.)
The lava rock around here can be pretty tough on everything. My shoes wear out quick too!
I spent a while falling down the rabbit hole of "which tire is better", then decided to make it easy and see what was available on the island, since shipping anything in is a royal PITA.
So I went down to one of the local stores that focuses on tires and got quotes for a couple of different tires. However, when I went over to Costco, I found I could get some BFG KO2s for 30% less than the first place. It's a deal!
The old tires size was 265/65R17, and I decided to go up a step to 265/70/R17. I've got a 2 inch suspension lift, but I don't want to buy new rims and I don't want to regear, so I'm not going to do anything too extreme.
My spare was an ancient Dunlop - It probably came with the car from the dealer, and had never seen any significant use. So that's getting replaced, and we're going to start regular tire rotation! For your entertainment, the staff at Costco couldn't simply order in a set of 5 tires easily. They had to order a set of 4, then add another tire to it.
Anyhow, here's the car before:
And here's the after:
I've run through a tank of gas since they've been installed, and my gas mileage has definitely taken a bit of a hit. The new KO2s are also substantially heavier than the old tires, so there's a noticeable change in the handling (acceleration in particular) of the car. It's not a problem, just noticeably different.
Anyhow, we'll see how things go: I've got a off-road camping trip this weekend...
Attachments


I've thought about making the whole drawer system out of sheet metal, but I thought it might be a little heavier than wood and more susceptible to bending on any unsupported edges for the top sleeping platform. In the end I think I'll just do all wood; less rattly, and more sound deadening properties than metal. But it would be cool to design it to bolt together, CNC plasma cut all of the panels, and sell and ship them un-assembled.
But making just the vertical supports out of sheet metal could be a pretty cool idea. I could get mine all plasma cut with a rad design, and bend the edges 90 degrees to bolt or screw into the top and bottom wood panels. Could almost have the drawer's sides out of sheet metal too as long as you lined the sides with something soft or didn't put anything in that rolled around too much. I may have to draw this up in Solidworks now!
In the end, if you make the supports and the drawers out of sheet metal, you save what, 2" of width for each drawer? May not be worth it but it would be unique.
Hey Inv4drZm, it's been a while, but I finally made some progress on this. Here's a picture to whet your appetite.
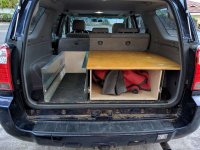
I'll be posting the whole writeup in the next week or two . . .
Attachments

Last edited:
Similar threads
- Replies
- 4
- Views
- 2K


