MNT4R's Build thread

Blew a speaker in the passenger door, it only makes sense to replace all eight (infinity reference 3.5" in the dash, kicker ks 6x9 in the front doors, Polk 6.5" db651 rear and hatch).... and of course soundproof the inner and outer shell of the door and hatch with dynamat.

Honestly, I am going to do more soundproofing. The doors close with an authoritative "thud" now and sound less tin-can like. There has also been a noticeable reduction of exhaust drone and tire road-noise in the cab.

Best part of the install: we flip on the stereo to test the speakers and Sevendust's "waffle" comes on. My son (5Y) who has been helping me the whole time starts head-banging and says "I.....AM......ROCKING!!!!!"

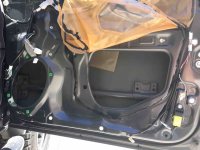
Remove trim: pry off sail piece (opposite rear view mirror, two clips), remove Phillips screws under handle screw cover/handle release/door pull( three). Pry up door from bottom to top (11 clips). Detach wiring harnesses behind handle and light at bottoms of door. Here it is.
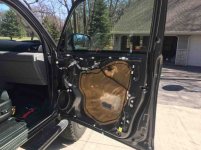
IMG_1921.JPG

You will see some plastic sheeting around the window access point, gentle pry up, it is attached with rubber adhesive.
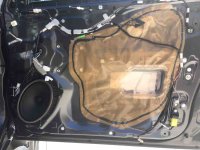
IMG_1922.JPG

Boom. Access. Clean with alcohol.
IMG_1923.JPG

Roll on dynamat to outer door shell. Found it easier to feed it in through window access port, position, pull off wax backing and press to metal while advancing backing off. Stop periodically to roll down thoroughly with small roller. Outer door shell done
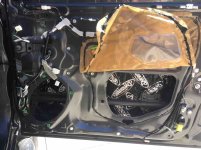
IMG_1924.JPG

Inner door shell done. I didn't cover the plastic sheeting, though one could. I just worry about access to wires and windows if there should ever be an issue.
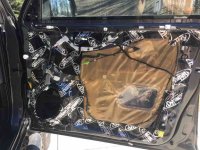
IMG_1925.JPG

Insert speakers and reverse steps.


"I.....AM......ROCKING!!!!!"


Test drive. The speakers sound sweet...the silence (noise reduction) equally enjoyable.
IMG_1593.JPG
 

Attachments

  • IMG_1921.JPG
    IMG_1921.JPG
    45.8 KB · Views: 734
  • IMG_1922.JPG
    IMG_1922.JPG
    76.9 KB · Views: 764
  • IMG_1923.JPG
    IMG_1923.JPG
    73.9 KB · Views: 754
  • IMG_1924.JPG
    IMG_1924.JPG
    67.1 KB · Views: 749
  • IMG_1925.JPG
    IMG_1925.JPG
    53.5 KB · Views: 779
  • IMG_1593.JPG
    IMG_1593.JPG
    130.2 KB · Views: 733
Last edited:
How much of an improvement did you notice in reference to road noise?


It is definitely still there but noticeably decreased. It doesn't ride like a Lexus just yet :) If I had to put a number to it, maybe a 30-40% reduction of road noise. Most of the continued noise is emanating from the floorboards, particularly around the wheel wells. I am pulling the carpet back and deadening these this week and will post an update.


Sent from my iPhone using Tapatalk
 
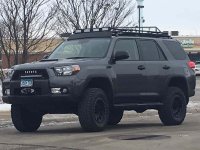
Great looking truck! The RGB rock lights are a bit too Fast and Furious for me but i might just be oversensitive as i'm coming out of a 07 civic SI, and have learned to hate the import scene lol. Subbing for more updates!
 
Great looking truck! The RGB rock lights are a bit too Fast and Furious for me but i might just be oversensitive as i'm coming out of a 07 civic SI, and have learned to hate the import scene lol. Subbing for more updates!


Thanks for the compliment, it's been a fun build! I agree about the RGB lights, honestly. I am changing them out for legit Rigid white rock lights after these break! [emoji106]


Sent from my iPhone using Tapatalk
 
Awesome build! Keeping it clean in MN!

Looks like you've been to Gilbert, if you have any interest, there's a club open house on May 20th. It's the 'free day' at Gilbert! The club is the North Shore Wheelers. Here's a link to the page. Love to see you out there!

NSW4x4 Open House
 
Awesome build! Keeping it clean in MN!


Looks like you've been to Gilbert, if you have any interest, there's a club open house on May 20th. It's the 'free day' at Gilbert! The club is the North Shore Wheelers. Here's a link to the page. Love to see you out there!


NSW4x4 Open House


Looks awesome! Thanks for the info. I will have to make the drive up!


Sent from my iPhone using Tapatalk
 
Time for me to call DEI After seeing this I believe this is the next thing I will be doing to my truck.


Sent from my iPhone using Tapatalk
 
Great build! I really have to start thinking about this sound deadening.

Thanks! It takes a while to remove all the trim, but if you do it in stages it is fun, relatively cheap, really improves the quality of any speaker upgrade, and definitely decreases road noise. The doors (including the cargo door) made the most difference. If there is a way I can be helpful let me know!

Looking Great!

Thanks. Your rig is absolutely awesome, so the feeling is mutual [emoji106]

Time for me to call DEI After seeing this I believe this is the next thing I will be doing to my truck.

Great. Let me know how the DEI stuff works, particularly if you use the spray. I thought about that for the hard to reach places [emoji109]

More updates to come, got some weekend plans...

b8e2982b5490fb78609dfc49fe39c963.jpg


Sent from my iPhone using Tapatalk
 
Last edited:
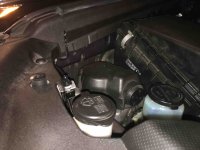
During the installation of my Bussman and during every wiring install since I was getting a little tired of my Petzel headlamp being the only source of lighting for the engine bay. That, in combination with the noise that emanates from under the hood and the hood flex I could see at higher speeds predicated this mod. I realize most of the noise from the engine comes through the firewall, but not all of it.

Prep- dynamat Xtreme kit (this is heat rated for under hood applications), denatured alcohol, beer, dynamat roller, KC underhood lighting kit #355, 4runner underhood insulator (stock, ordered from dealer), 10 clips (also from dealer).

a057425f41e6587d02086d48ce53e190.jpg


Here's what It looked like starting out. Rub down the underside of the hood with denatured alcohol to clean.

923d1f1e956046ef05e90b27ea3f8542.jpg


Apply dynamat to underside of hood in the area that will be covered by the insulator. Use the clip holes as a guide on the sides, the insulator phalange inserts in the back, and mark the front with a magic marker. If you go out past the insulator with the dynamat it will look sloppy.

3ab6789b8d5f89e29baa525665327692.jpg


The KC lights are two ring shaped Lights with 12 LEDs each. The come with a wiring harness and a waterproof switch.

e9e981d9b3d5ee40acb06fc0b4c2451f.jpg


I mounted them on the upper aspect of the two concavities in the hood insulator, this will allow you to still apply the clips and keep the lights pointed down into the engine bay.

664c6bce162bc5af332540d57b6c1c52.jpg


I ran the light wires through the clip holes and bolted the lights down. I then ran the wiring harness down with the washer fluid tubing.

e1a81ea2253ee2d668f593583aea7b94.jpg


Here's what the underside of the hood looks like now.

147c1da257eced272afd064ca1984638.jpg


Lights on!

001050fdc2d4f6b1dc7be9d257bb96be.jpg


Sent from my iPhone using Tapatalk
 
Last edited:
[MENTION=62541]MNT4R[/MENTION] - I may be doing some of this quicker than anticipitated! I blew a speaker in my passenger door over the weekend. The Kicker KS 6X9, was this a directly plug and play in the factory location? I unfortunately have no speaker knowledge and want to replace both the front speakers now, but don't want to mess around to much with drilling out brackets/shrouds etc if possible. Any further information you can provide? Thanks!
 
Last edited:

Members online

Forum statistics

Threads
278,308
Messages
3,554,057
Members
248,016
Latest member
Advally Service

Trending content

Back
Top