MNT4R's Build thread

Dude, you put in some work on this rig and it came out great!

Rigid light are definitely the way to go. I need to get me some on my 3rd gen TR4.
 
Dude, you put in some work on this rig and it came out great!


Rigid light are definitely the way to go. I need to get me some on my 3rd gen TR4.


Thanks for the compliment... just getting started [emoji3] love the rigids. Look sharp, lots of light, holding up well.

Should've used a 6 pack of leinenkugels summer shandy to improve your results.


Dude the first half of this build was fueled on that stuff. Goes down like water! [emoji106][emoji482]


[MENTION=62541]MNT4R[/MENTION] - I may be doing some of this quicker than anticipitated! I blew a speaker in my passenger door over the weekend. The Kicker KS 6X9, was this a directly plug and play in the factory location? I unfortunately have no speaker knowledge and want to replace both the front speakers now, but don't want to mess around to much with drilling out brackets/shrouds etc if possible. Any further information you can provide? Thanks!


So I love my setup and it has made huge difference. For the front doors you can fit 6x9's. the Kicker KS 3-ways have worked well for me with the factory head unit (even replacing the other 6 speakers in the car). I am no car stereo expert, but tons of audiophiles have posted in this forum who have experience, here is an example http://www.toyota-4runner.org/5th-gen-t4rs/204312-speaker-replacement-opinions.html
They are fairly plug and play. You need:
1) brackets
2) wiring harnesses

Best bet is to order through crutchfield (no affiliation) and these items come free with purchase in addition to door dissembling instructions.

Also, 3) any sound reading material you like (which costs extra)

Have fun, private message me with questions!

Fun times.

03e048ed1eae4625377d26c15e963464.jpg


Sent from my iPhone using Tapatalk
 
Last edited:
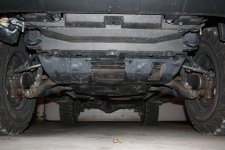
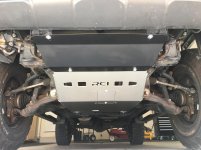
So I decided to get the RCI front skid and filler plate to see how they hold up for the next year of wheeling and harsh winters. The filler plate only comes in stainless and the front skid I selected in aluminum. I will complete the whole underside of the vehicle if they are durable.

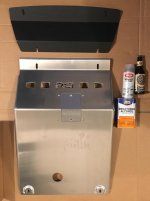
Prep: Plate, denatured alcohol, clearcoat, beer, 8mm, 12mm, and 13mm socket wrenches. Take a look at the final post in the thread to see how much the clear coat changes the appearance of the plate (not at all). I put it on there to curb aluminum oxide formation over the harsh Minnesota winters.

IMG_2037.jpg


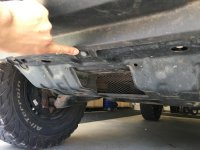
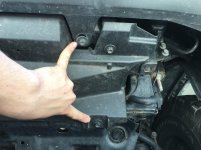
Let's start with the filler plate: remove four 8mm bolts (the two shown on each side) and pop one tab (shown):

IMG_2044.jpg

IMG_2045.jpg


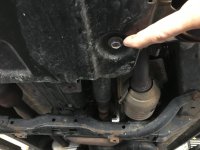
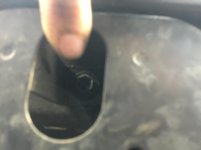
The stock filler pops off, you will see the radiator. Now remove the two 12mm bolts in the rear of the stock front skid (shown), then the two buried in these deeper recesses (shown). The stock front skid is two plates, the rear one will then slide back and drop off.

IMG_2048.jpg

IMG_2050.jpg


You then remove the 6 bolts on the front plate of the stock skid (shown). It will drop out

IMG_2054_Fotor.jpg


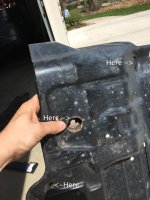
The attachment of the RCI plates is easy. 6 13mm bolts spanning two plates with 2 holes overlapping. Before and after:

IMG_7795.jpg

IMG_2056.jpg

Have a good weekend!
 

Attachments

  • IMG_2037.jpg
    IMG_2037.jpg
    121.9 KB · Views: 611
  • IMG_2044.jpg
    IMG_2044.jpg
    132.9 KB · Views: 599
  • IMG_2045.jpg
    IMG_2045.jpg
    126.9 KB · Views: 622
  • IMG_2048.jpg
    IMG_2048.jpg
    123.6 KB · Views: 627
  • IMG_2050.jpg
    IMG_2050.jpg
    138.9 KB · Views: 605
  • IMG_2056.jpg
    IMG_2056.jpg
    127 KB · Views: 603
  • IMG_2054_Fotor.jpg
    IMG_2054_Fotor.jpg
    132.6 KB · Views: 606
  • IMG_7795.jpg
    IMG_7795.jpg
    135.6 KB · Views: 593
Last edited:
Finally got the ARB awning mounted on the Gobi this weekend. Summer has hit Minnesota at long last... now the family and I are beginning our tour of 6 state parks before winter. First up, whitewater state park http://www.dnr.state.mn.us/state_parks/whitewater/index.html Located in southeast MN it has decent fly fishing and a fairly awesome hike to inspiration point and chimney rock. The awning was a 45 second setup and clutch for our midday cookout!

cbd67461491914c824056fc6ca68f8a1.jpg


4cf506ec512206c14dbf3dd16862aeea.jpg


75aea9d34a3524ce5adb0ae694abf644.jpg


f294506a33204f03596f16e53e257cd6.jpg


84f9b87c61af2633376b26a83c82f7a0.jpg


bc3821f2334c64eebbbc904ea3166210.jpg


715cda4245be729b981eec7c2cf5fdda.jpg


0ab45148f878e2400fa83a21ab757678.jpg


Sent from my iPhone using Tapatalk
 
Last edited:
Looks great thanks for all the great pics and details on your mods! What are you looking to do next?

Thanks [MENTION=90192]2chains[/MENTION] ! The build has been a lot of fun and the forum has been very valuable. As far as next moves:

1) Magnuson Supercharger - I submitted for the pilot so we will see if that happens soon. Either way the supercharger is going in, be it during the pilot or mass release. I have already contacted D&B Performance in the Twin Cities and they will be doing pre- and post- install dynos, which I will post (if able, the pilot-agreement may preclude that if I am fortunate enough to be selected). I will also be posting pics of the install with including ECU removal, so look for that.

2) Rear Suspension Upgrade - Before the Supercharger become a tangible goal I was amassing parts for revising the rear suspension. The back of the vehicle is only going to get heavier as the build continues, so I am going to swap the 2.0 Icons for 2.5 Icons with remote reservoirs and CDC valves. This will be done in addition to adding 3" springs (I currently have 2") and replacing my rusty trailing arms and upper link arms with Icon billet aluminum ones. All of these parts are in my garage, I just need to get the install done. When it is done the rear will sit 1" higher and the suspension stiffness will be adjustable. This will be the perfect segue to:

3) CBI rear bumper with tire swing, jerry can holders, and fold out table. Moving the spare behind the bumper in addition to the additive weight of the bumper will invariably drop the rear down a little, so #2 makes sense.

4) I don't think I am going to get a front bumper, I like the 2010-2013 trail front end a lot. Eventually I might when Pelfreybilt comes out with theirs. In the interim I am going to retrofit Raptor fog light brackets for Rigid D2 amber wides, fogs, and DRLs into the fog/DRL/blinker housing.

Thanks again!
-Jeff

05ec667508c9b6399d66f1dc39d3feed.jpg
 
This is not a badass bumper or extended travel post[emoji6]

Driver door actuator went out. Dealer wanted $600 to fix. Replacing the entire lock assembly with actuator literally took 25min, $68.44, and a quarter cup of coffee. Not OEM, but we will see how it goes.

APDTY 042512 Door Latch With Integrated Lock Actuator Motor Fits Front Left Driver-Side (Replaces Toyota / Lexus 69040-06180, 69040-0C050, 69040-42250) https://www.amazon.com/dp/B00C8EA4GG/ref=cm_sw_r_cp_api_JiOVzbFHYAV2G

With the window up, remove the three Phillips screws securing the door trim.
a100488c03877a709f7a446ddb06b991.jpg


Gently pry up trim being careful not to destroy clips. Remove "sail piece" opposite the rear view mirror first, then door trim.
2ac8b9a44714b0f584ead4f5950e1492.jpg


Undo two cables for latch and lock.
da3b5f3b45c5da77d09435735db490a2.jpg


Detach wiring harness for window/door power
3e68e6c79b31a8cd1ca87284d9ce7a74.jpg


Detach wiring harness for door light
02a28ec2e37fbe0ede9f74caa7e4b0ac.jpg


Set aside trim.
3fba021efd90881d5b4ff42bb880c60b.jpg


Peel back plastic covering posterior/superior ports in door. 1) Loosen three star shaped bolts around latch assembly
20942f4621e24b69b1b7cbc2af97dab5.jpg


2)detach wiring harness. Drop the latch assembly low and twist around window rail. It can make it without loosening the window rail.
63812ebc47a06a39882d5a9a5bcd9440.jpg


Take out of door shell.
88885a04d3be58e6722ee27ed26b7412.jpg


Remove lock and latch cables from assembly. Transfer to new assembly. The upper cable has a door which requires pressure to gently pry open

c31120d7feec9aa69087e50f4dae75ad.jpg

aaab2136a16af8ae16f8378af2ce3a79.jpg


Put assembly back in door shell in similar manner to that with which it was removed. There is a lever from the door handle which needs to seat into the assembly. Here is a pic of the lever in the shell, and here is a pic of where it seats on the assembly.
df9e012895b636bba6eef45a822bb123.jpg

7c83d85caecd457f29e42979ecc13168.jpg


Replace screws in assembly, plug in wiring harness to assembly, plug in wiring harnesses to door, roll down window to facilitate seating the door trim on window ledge, replace door trim and press to fasten clips, replace Phillips screws, replace sail piece, enjoy coffee and extra $500 saved.


Sent from my iPhone using Tapatalk

 
Last edited:
Appleton Off-road Park with MN 4Runner Club. Truck did great and we had a blast. [emoji16][emoji482][emoji106]

b74f754dd4b6a41ec205ae261f107dec.jpeg


45cda8ff0c9718afc6affce560f700dc.jpeg


14abb73d17d3d5975d31604cf44048e5.jpeg


afcfe99604f7c0f3ab7e7979d41c9f9f.jpeg


2edee94eb6ea982f8a4cbf1c6048d306.jpg


51f4fc742130ecc95f74b2a1297682c7.jpeg


5711367b4537e4b4c5ff1fff88af5f53.jpeg


Sent from my iPhone using Tapatalk
 
Last edited:
Been a while since a post. Other recent changes:
1) Upgraded my Icon Stage 2 rear suspension to include 2.5 rear shocks with cdc valves, billet aluminum upper link arms, and billet aluminum trailing arms.

b146ab0af5bcec2dd8aebbb49851dc05.jpg

c63f17273242fc80ec004b02f0bcc8be.jpg


2) Butt warmers, long overdue in Minnesota

a916a769396e731f2cb400899cb5e89b.jpg


Still building [emoji482][emoji1009][emoji16]

57094ab54c71dd6dc7eff03a486f333b.jpg


Sent from my iPhone using Tapatalk
 
Last edited:
When your kid loves climbing up on your Gobi... and Christmas lights.

Merry Christmas All.

77f70eb9e99090ad4ab258637cf195f1.jpg


Sent from my iPhone using Tapatalk
 
Would you take 3 3rd gens(two nice ones and one beater truck), a parts 4Runner, a 1987 Jeep Wrangler with some cool stuff, and a 2008 Buick Lucerne with 26000 miles on trade for your 4Runner? Needless to say I want your truck it looks so good.
 
Great build! Is this the stance with the Icon 3" Overland spring and zero weight in the rear over stock? Any sense if you actually got over 3" of lift?


Thanks! I wound up waiting on the 3” rear springs because I am not putting on a rear bumper this winter. I did dial down the front coilovers to keep the rake under control. So this is the stance with 2” springs, zero backend weight, and 2” of thread showing on the front coilovers (the max is 2.1”). The front end is .75” lower than the back. Perfect for a daily driver and moderate wheeler.


Sent from my iPhone using Tapatalk
 
Last edited:
Would you take 3 3rd gens(two nice ones and one beater truck), a parts 4Runner, a 1987 Jeep Wrangler with some cool stuff, and a 2008 Buick Lucerne with 26000 miles on trade for your 4Runner? Needless to say I want your truck it looks so good.


Thanks man! Do I get to keep my Christmas lights?


Sent from my iPhone using Tapatalk
 
And the magnuson supercharger install starts.

5b34b293ff850984ded3f6eecaa6a788.jpg


99fd6c1ef7a0e1a0db8ae59af07fe171.jpg


cd62915c39cd8ff55f65350399ac84ce.jpg


The BEFORE:

4107c584974f676d4003202a6729b9e1.jpg


Sent from my iPhone using Tapatalk
 

Members online

Forum statistics

Threads
278,307
Messages
3,554,054
Members
248,016
Latest member
Advally Service

Trending content

Back
Top