Mods for 4th Gen Platform Bed

Snagglepus

New member
Just completed four mod/tasks toward completion of a single platform bed in the back of my 07 4Runner. For a link to that build find:
https://www.toyota-4runner.org/4th-gen-t4rs/275579-4th-gen-60-side-platform-bed-build.html

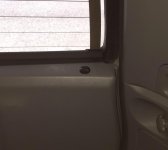
The modifications performed yesterday where related to adding convenience to the cargo area. They involved adding a momentary switch for the tailgate, removing the relays to allow constant power to the windows and to the 12volt outlets. The the advice in this forum is outstanding and all mods that I made to date have worked exactly like they were reported. There is one member out there that flies a Canadian flag who I trust enough to pull relays and cut wires knowing the result will be right. His user name is Kmvreter, Senior Member. Thank you for your awesome posts!

One other maintenance item I performed was cleaning my MAF Valve which was recommended on the forum for warning lights-Check Engine/VCS. For those with 4th Gen the location of the MAF is under the top manifold cover (two nuts removed). Disconnect the battery. Take care to clean around the valve and remove two small phillips screws and pull unit straight out. Spray a fast drying electronics cleaner in and around the MAF. Let it dry for 5 minutes and reinstall. It made an instant performance difference in my 4Runner but really noticed how well it idles down now. I doubt it had ever been cleaned after 161k.

Getting closer to my trip to Montana/Idaho for elk scouting trips. I will add additional picture posts to the build thread in a few more days when the cargo bed is complete. I have an idea for a small table, clothes locker and gun rack.
 

Attachments

  • 29FE5131-E420-47C5-8709-C274995FA9FA.jpg
    29FE5131-E420-47C5-8709-C274995FA9FA.jpg
    52.9 KB · Views: 710
Register to hide this ad
I love the momentary switch for the tailgate! Any chance you have a link to a write-up you followed?

All the other work is fantastic too, btw!
 
Momentary switch

Reply to Codeman528: Thanks for your response. I used several threads from searches for lift gate switch. But the one that explains it pretty well is this link:

Interior Rear Hatch release Button

There are other threads that show 4th Gen wiring harness pictures that I also found useful. The two wires to connect to are described accurately in the threads. But the best picture of the 4th Gen harness is in another post however it kind of hides the light green and red wire. The purple and white wire is easy to find but there are two green and white wires-be sure you find both and choose the light green and red wire.

Here is what I did and it was very quick and easy:
1. Ordered a Ulincos U16A1 Black 16mm Push Button through Amazon Prime for 7.98 per a recommendation from the forum. It’s a nice match and has small screws for the wires
making it super easy.
2. I took off the lift gate panel as described in the thread-I drilled a 7/16 hole in the panel on the left side and used a razor to carve a little more of a hole until I had a snug fit. Secured the switch with the lock nut. Stripped two 18 gauge wires (approx 24” each).
3. I hooked the panel from the weather stripping (with the lift gate open) which keeps the panel attached but open at the bottom where the harness is located-right at work level. Identify the two wires per the thread and attach one wire to each wire with a wire tap. It doesn’t matter which wire from the switch. I did not disconnect the battery.
4. Snap the panel back in the lift gate-you’re done.
 
Last edited:
Additional Mod for Camping

Last night a light bulb went on in my thick brain and I realized I could easily hook up my Satellite Radio to the constant power and run an audio cord from my the radio to a Bluetooth box (I have a couple of these portable Bluetooth boxes we used to use for picnics). Mine is a iLuv brand.

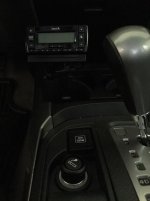
Hey it works great and represents the advantage of an add on satellite radio, the smoker kit mod and the constant power relay jump mod. This constant power mod provides a live outlet right in front of where I mounted the Sat radio. Simply unplug the dock station power on the left side of the dock and replace with the plug power cord that came with the radio. Then unplug the audio cord on the right side that fishes through the dash to the vehicle radio and plug in an audio cord that now travels between the seats to the remote iLuv speaker box. So now you can listen to the news, sports and music with your ignition off. The speaker box also provides a nice close exposed speaker because if you are utilizing a sleeping platform your regular speakers are buried below deck.

The first picture below shows my Sat Radio unit location and the smoker kit front outlet.

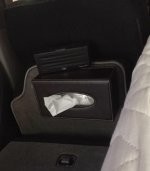
The second picture shows the iLuv speaker location. This speaker has an internal chargeable battery but also has a 5 volt usb cord charger that I plan on connecting to a live outlet as well. I put Velcro strips on the back of this Kleenex box which sticks the back of the raised cushion and provides a nice platform for the speaker and items needed in the middle of the night.
 

Attachments

  • 2AD16C68-0E00-4704-B83F-0CB6974DA2DD.jpg
    2AD16C68-0E00-4704-B83F-0CB6974DA2DD.jpg
    38.7 KB · Views: 610
  • CDDF613D-E48C-4BD6-94D2-FD874CA2992B.jpg
    CDDF613D-E48C-4BD6-94D2-FD874CA2992B.jpg
    43.7 KB · Views: 602
Table For Platform Bed

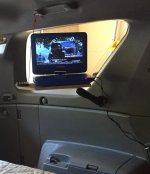
Need a table for a small DVD player in my 4Runner and have a long Ram double socket that did not work out for my phone.

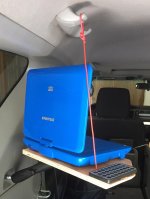
Ended up mounting a Ram Ball to the 6mm screw inside the hole that supports the cargo cover screen. Cut a small piece of plywood for a narrow table thinking I could easily move it out if the way. Well the mount worked good but there is a limit as to what those Ram’s will hold and ended up supporting the weight with a small 18 gauge wire hooked on the clothes hooks. I put constant power into the small storage in the wheel well and directed a speaker cable to a small portable speaker.

The Ram ball for the mount in the side wall was a Ram ball with a male 10mm thread which I reduced to 8mm and then used a 8mm to 6mm automotive stud. There may be more efficient ways to reduce to 6 but the way I did it gave me the clearance for the ball out of the hole. Below are a couple pictures.
 

Attachments

  • EE633911-4B42-40A2-B38A-2BD815CA579A.jpg
    EE633911-4B42-40A2-B38A-2BD815CA579A.jpg
    129.2 KB · Views: 569
  • 49843CE6-5307-4650-9ACA-3B22D542B2C4.jpg
    49843CE6-5307-4650-9ACA-3B22D542B2C4.jpg
    123.8 KB · Views: 566
Last edited:

Members online

Forum statistics

Threads
278,309
Messages
3,554,068
Members
248,016
Latest member
Advally Service

Trending content

Back
Top