Mstudt's SR5 Build & Adventure Thread

What rear shocks are those? Also how much lift will you have in the rear?

They're the Bilstein 5125's from Toytec. I'll running those along with the OME 891 coils, should get 3" of lift. But not really sure at this point in time. I'll be sure to take some before and after measurements when I'm doing the lift this weekend.
 
So, after 5 hours and nothing installed we'be given up on the install. There is no possible way the Bilstein 5100's and Toytec springs will fitthis 4runner. We pried the a-arms down as far as they would go and still needed more then a half more to get the strut in. Not sure why we couldn't get this to work. After seeing how much rind there was, I don't feel safe or comfortable putting this on. Maybe someone can't help me figure out where we went wrong. At this point I'm sending everything back to Toytec next week. I think we're going with a body lift and some 285's. Something I'be read about the 01's is that they're quite a bit lower to the ground then other years. I wonder if this has something to do with the issue we were having today.
 
So, after 5 hours and nothing installed we'be given up on the install. There is no possible way the Bilstein 5100's and Toytec springs will fitthis 4runner. We pried the a-arms down as far as they would go and still needed more then a half more to get the strut in. Not sure why we couldn't get this to work. After seeing how much rind there was, I don't feel safe or comfortable putting this on. Maybe someone can't help me figure out where we went wrong. At this point I'm sending everything back to Toytec next week. I think we're going with a body lift and some 285's. Something I'be read about the 01's is that they're quite a bit lower to the ground then other years. I wonder if this has something to do with the issue we were having today.

i had one hell of a time getting my front suspension in as well. did you try disconnecting the lower a-arm from the spindle? that might enable you to bring it down just enough to fit the struts in there. hope that helps out! goodluck
 
After doing four different front suspension installs, I've learned a few tricks. Take the stock jack and set it upside down on top of the UCA. As you crank it open, it pushes the lower mount down...it goes down pretty far, much further than you can pry by hand. Also, I found that after pushing everything down and setting the top of the strut into the housing, you can pry the mount down enough to get the bottom of the strut in...may need to give it a tap with a hammer. There is a link floating around with pics of this procedure. Did you undo the sway bar end links? That can help too...

I wouldn't send them back, you'd be disappointed if you did. This setup will ride much better than the stock with a body mount...also keep the center of gravity down.
 
I agree with Millerad. Been there with him a couple times and also done my own front end a couple times myself. I also learned that loosening the upper control arm bolts really helps too. Then tighten them back down once you set it back on the ground.
 
After doing four different front suspension installs, I've learned a few tricks. Take the stock jack and set it upside down on top of the UCA. As you crank it open, it pushes the lower mount down...it goes down pretty far, much further than you can pry by hand. Also, I found that after pushing everything down and setting the top of the strut into the housing, you can pry the mount down enough to get the bottom of the strut in...may need to give it a tap with a hammer. There is a link floating around with pics of this procedure. Did you undo the sway bar end links? That can help too...

I wouldn't send them back, you'd be disappointed if you did. This setup will ride much better than the stock with a body mount...also keep the center of gravity down.

I did all of this! We actually had a 4' foot piece of steel to pry down with and still no go. Although, I think I know what the problem was. I really don't think the Toytec/Eibach 3" lift springs were helping. I'm going to give it another try using the stock coils and see where that gets me. Just with mounting the Toytec springs on the 5100's, the pressure had completely crushed the new bushings to the point that they were rolling over the sides of the washer.

I'll give it a go today and see how things go with the stock springs. I'll most likely send the Toytec springs back though.
 
I did all of this! We actually had a 4' foot piece of steel to pry down with and still no go. Although, I think I know what the problem was. I really don't think the Toytec/Eibach 3" lift springs were helping. I'm going to give it another try using the stock coils and see where that gets me. Just with mounting the Toytec springs on the 5100's, the pressure had completely crushed the new bushings to the point that they were rolling over the sides of the washer.

I'll give it a go today and see how things go with the stock springs. I'll most likely send the Toytec springs back though.


Where are you in Missouri I have a similar set up... Where are you in Missouri maybe I can help?
 
Where are you in Missouri I have a similar set up... Where are you in Missouri maybe I can help?

I'm in Pacific, about 30 minutes west of St. Louis off hwy 44.

All I can say about the suspension is :thanks: for telling me to NOT send it back. I finished up my side job this morning and got back on the lift around 11:30. By 12:15 I had the stock spring mounted on the highest setting on the Bilstein and it went incredibly smooth. By 12:30 I realized I was going to be able to mount it with the stock springs. Now I just have to wait until the wife gets home to help my pry it in. Although I don't think the stock springs are going to get me 3", it's going to be better then stock and more then what we're going to need.

Thanks guys!

*Edit* 2 hours later the front lift is finished, not onto the rear.
 
Last edited:
After doing four different front suspension installs, I've learned a few tricks. Take the stock jack and set it upside down on top of the UCA. As you crank it open, it pushes the lower mount down...it goes down pretty far, much further than you can pry by hand. Also, I found that after pushing everything down and setting the top of the strut into the housing, you can pry the mount down enough to get the bottom of the strut in...may need to give it a tap with a hammer. There is a link floating around with pics of this procedure. Did you undo the sway bar end links? That can help too...

I wouldn't send them back, you'd be disappointed if you did. This setup will ride much better than the stock with a body mount...also keep the center of gravity down.

I agree with Millerad. Been there with him a couple times and also done my own front end a couple times myself. I also learned that loosening the upper control arm bolts really helps too. Then tighten them back down once you set it back on the ground.

Where are you in Missouri I have a similar set up... Where are you in Missouri maybe I can help?

Thanks for the words of encouragement guys, and the helping hand. At 7 pm I finished the rear of the 4runner. There is a fair amount of rake to it, but we plan on loading thing down with gear, storage, and sleeping arrangements. I'll get some pictures tomorrow when I have some daylight and post them up.
 
Cobra 19 DX install

Tonight I started on my CB install; nothing to hard about this.

Of course pull the center counsel off.


Next I removed the ashtray and cut out the back of the ashtray mount.


This step is what most opt not to do. I removed to the top of the CB housing and drill a couple holes in it. The holes on the housing are matched with the screw holes for the ashtray mount.


Finally, use the ashtray screws to mount the top CB housing. Carefully slide the CB into the open, and screw back together.


I'll have the install done this Sunday and will post up some pictures then. I'm also replacing the stock dash lights with LED's as I do this install.
 
Last edited:
Nice. Where are you getting the dash LED's?

I got some of them from SuperBrightLED's and the rest from eBay. All my dome lights are from eBay, here are the ones from there. Same quality as other places, just a lot cheaper. All the dash lights are from SuperBrightLED. They are looked in St. Louis so I stopped by and picked them up.
 
Last edited:
The lift and diff drop were finally finished today. I still need to extend the rear brake line later this week.

 
Last edited:
Alright, I have a CB wiring question. I know I can get a add-a-fuse from a local parts store, but I wondering about using the cigarette lighter. I wondering if I can disconnect the actual cigarette lighter and use the power wire from that to power my CB. I tried searching, but only came up with a couple people talking about. Is it possible to do this, and then ground it somewhere close by?
 
LED install

I was able to get some of my LED's done last night. For those of you that are thinking about changing some of your dash lights to LED's, be careful. It seems that a few different years of the 3rd Gen's do not have the same style bulbs as others. My 01 is going to be different then a 99 and 00. I'm starting off with the shifter, rear window, ECT, and climate control buttons for now.

You need to remove the center section of you console. I'm not going to explain how to do this since most of you should already know how.

I didn't take a picture of this but the shifter bulb is on the wire in red, and bulb is located around where the yellow is. Just turn it counter clockwise and pull it out. (#74 LED)


Next, pull the knobs off the climate control, and also remove the cover plate. They both should just pull right off, nothing tricky about it. Take out the 3 screws marked in red and disconnect the 2 plugs in the back.


Remove the three screws in red and remove black cover.


Remove the 3 bulbs marked in yellow. No need to remove the 4 screws marked in red unless you have issues with the bulb to the far left. (NEO4-W)


I then replaced the ECT and rear window LED's. Remove the 2 bulbs marked in yellow (might be difficult to get out). NEO3-WHP


Now just put everything back together. I'll try to get the instrument panel LED's tonight and give another write-up on those.
 
Last edited:
LED Install

I was just able to finish up the instrument panel area of the install. I'll get some pictures when it's a little darker out.

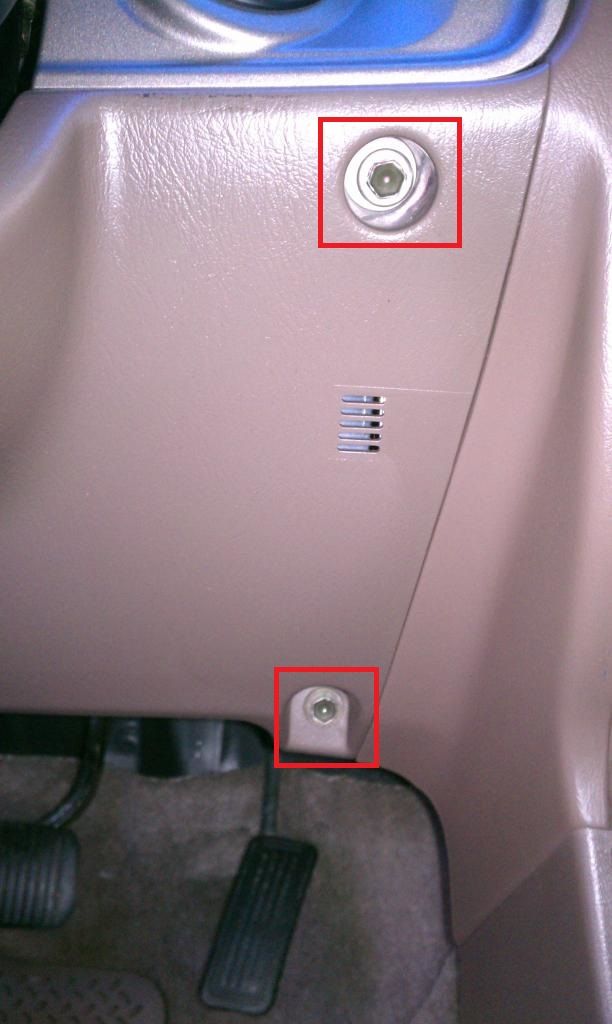
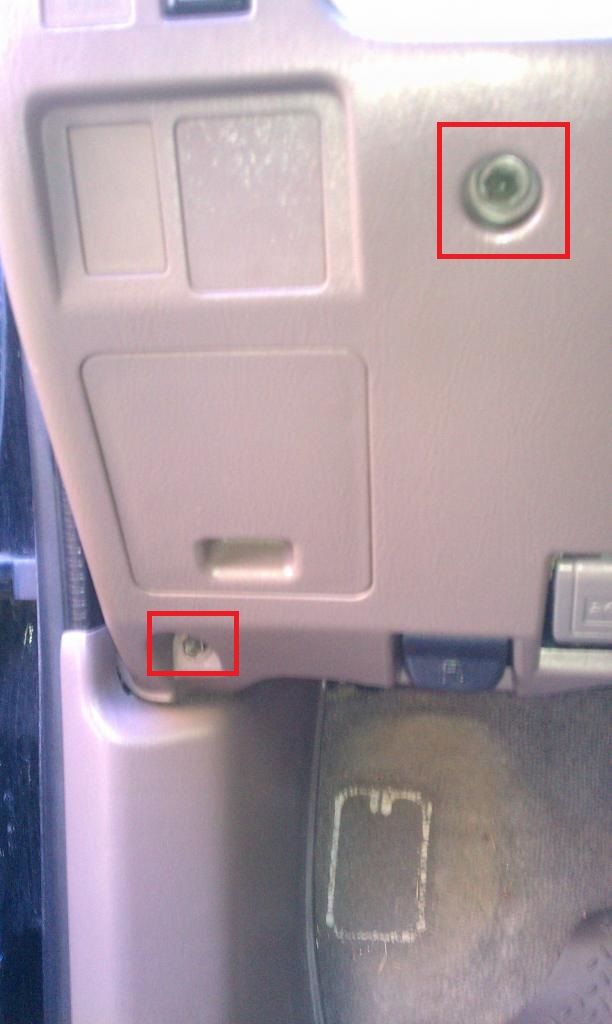
I started by removing the lower part of the dash. The screws I had to remove are marked in red.


Next I removed the section that's covering the key ring. I gently pulled in te bottom right corner to get it loose.
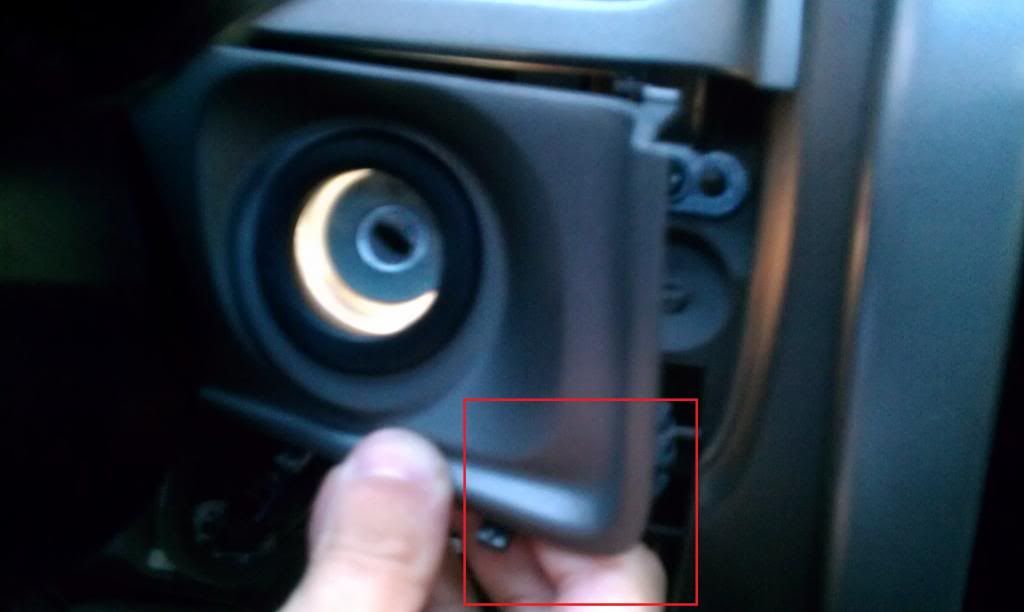

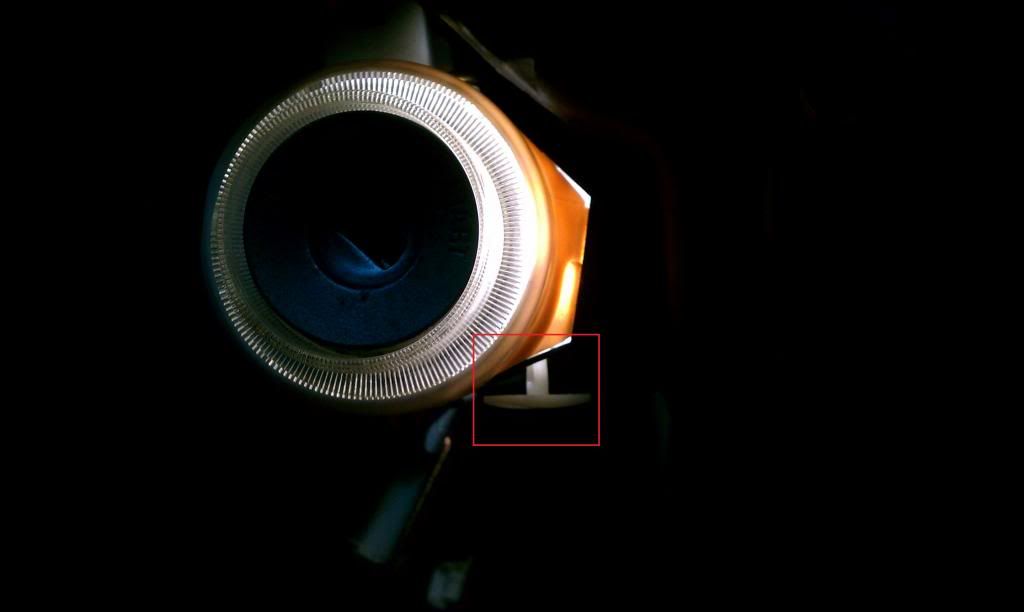
Once the cover is off there is a small white plastic pin thingy that holds the surround on, pull it out. Once it is removed you can slide the surround off and change the bulb (sorry no picture). (#74 LED)


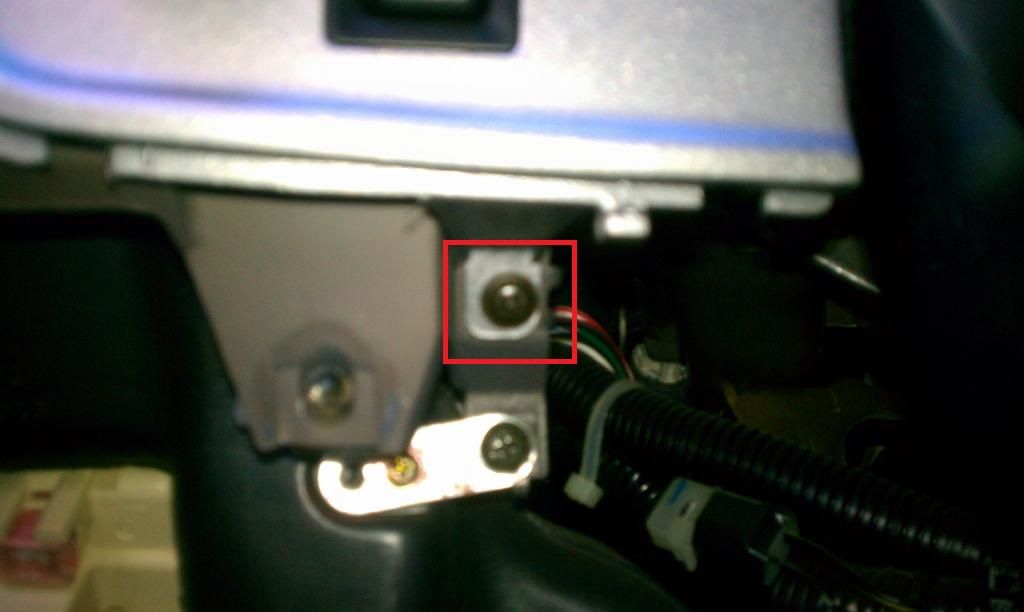
Remove these two screws to loosen the trim around the instrument panel itself. Pull aside.
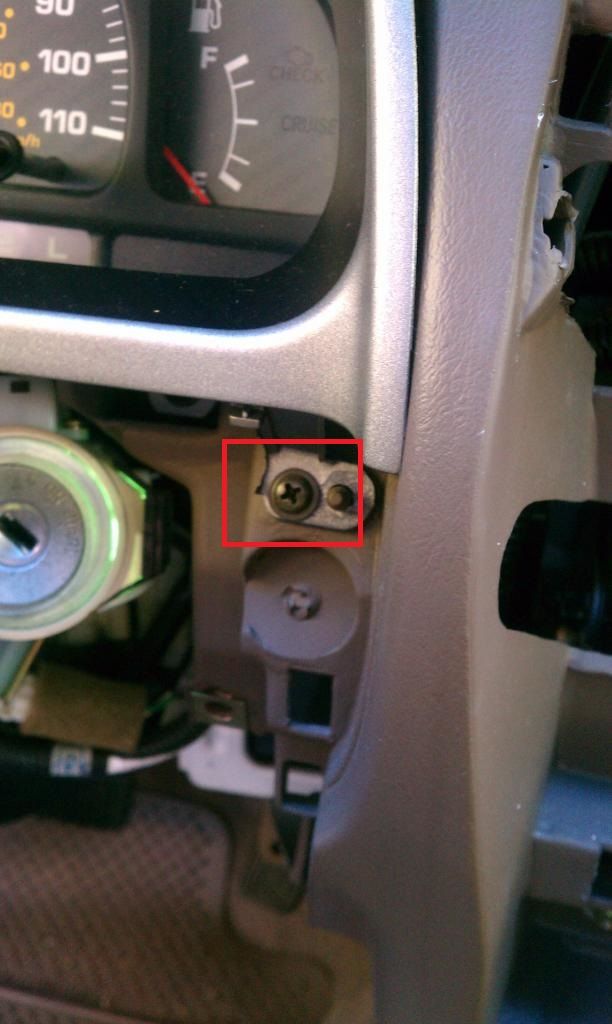


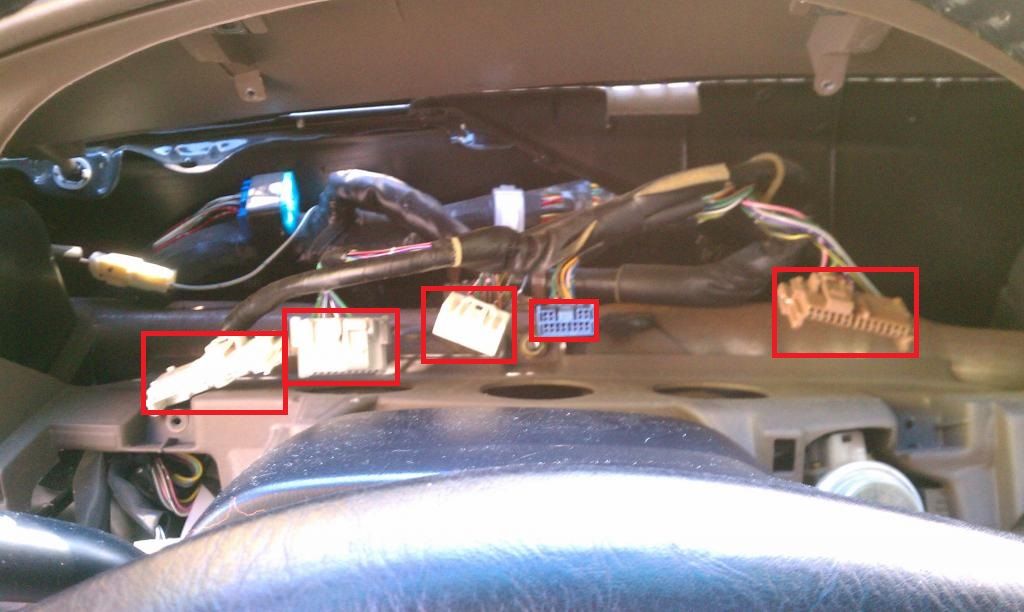
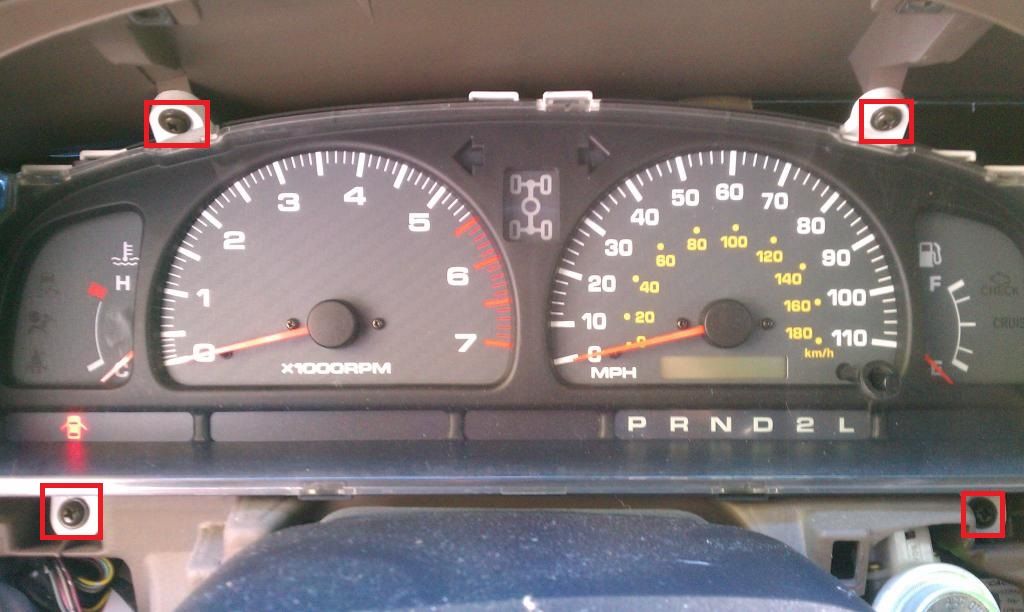
Remove the four screws and disconnect plugs to remove the instrument panel.


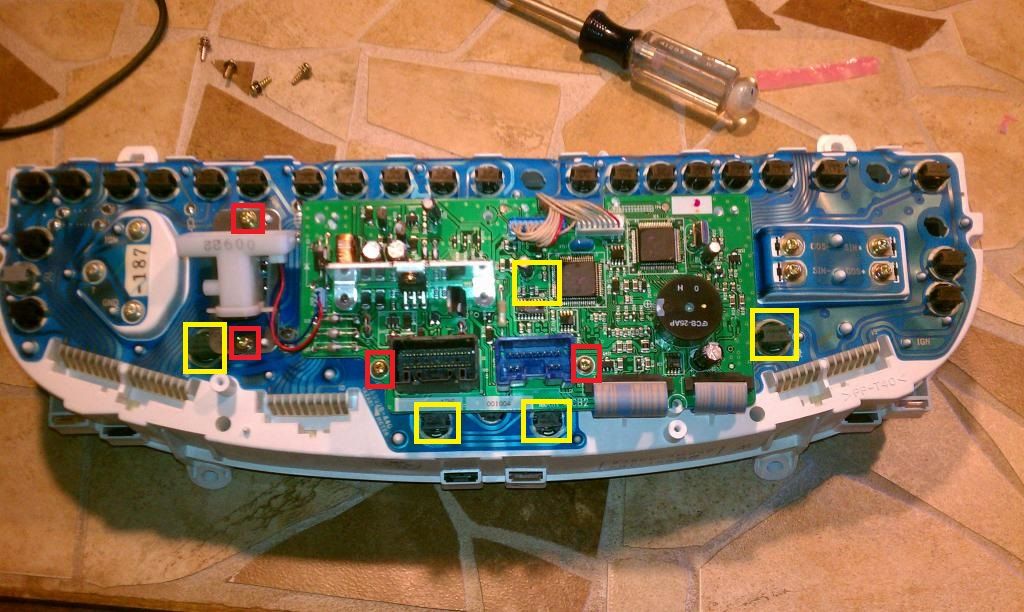
Now remove these six screws to be able to access the bulbs (bulbs are in yellow). I used #74 bulbs for the 2 blinker bulbs.
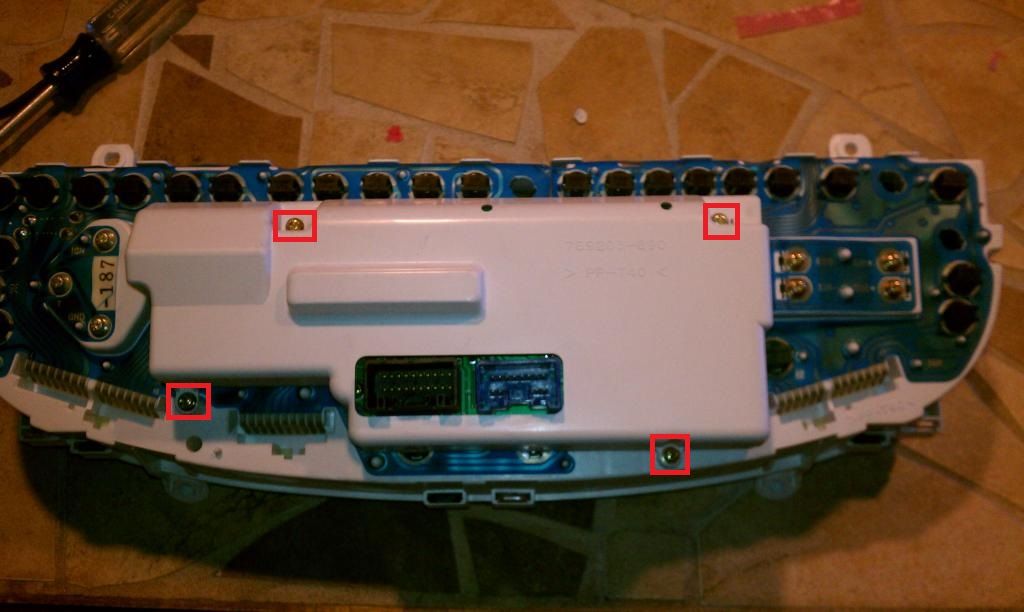

The two lower yellow squares are for the blinkers. (#74 LED)
The far left, far right, and upper middle yellow squares are for the speedo, tach, and 4wd. (#24 LED)


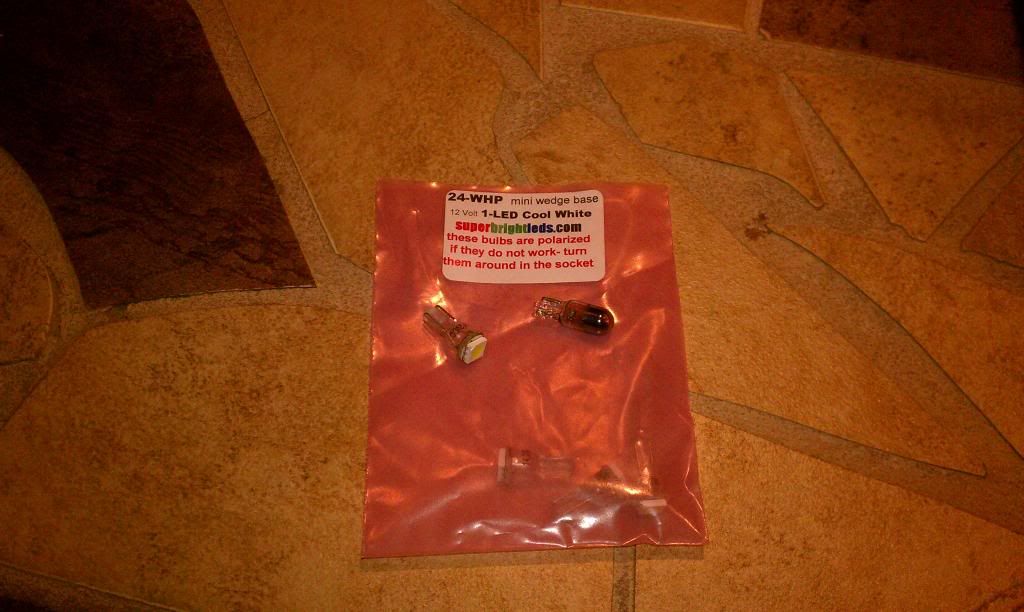
Used these for the speedo and tach bulbs.

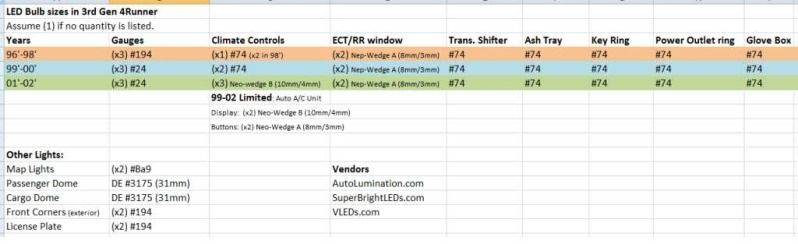
LED bulb chart I wish I had when I started this swap.

Have any questions feel free to ask.

 
Last edited:
Mr. UPS dropped these off!


Just had to roll one up to the 4runner.


Maybe tomorrow will bring less rain and I can get them put on!
 
Nice. I've had mine for a year and not a single complaint about them. Just a suggestion, I have mine at 38psi in front and 35 in back. Seems to be the best for comfort and wear. The shop set them a little low, and they would feel a little loose.
 

Members online

Forum statistics

Threads
278,307
Messages
3,554,056
Members
248,016
Latest member
Advally Service

Trending content

Back
Top