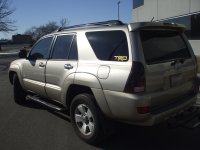
Need help choosing my trd logo

The only version of the 4Runners that the TRD logo is hard to fit is the white/silver Limiteds since there's too many colors happening IMO.

I like mine since the Highlander/Sport models are the closest Toyota got to offering a TRD 4Runner and the '99 Highlander models were almost a Limited edition due to only two color choices and all came with the taller coils which were hit and miss on the other '99 trim levels.
I like having the TRD logo factory look and it does draw some questions from other 4Runner owners.
 
Those OEM stickers do look good. I like the tasteful little emblem that a bunch of eBay stores sell for just a couple bucks also though. It's under TRD black chrome emblem or something like that. I have random TRD parts (radiator cap, spark plug wires, catback, etc) so I figured I wouldn't be too much of a poser for slapping it on the back hatch :D

2ezlb84.jpg


Once I get a locker and an ARB Prado bumper, then I'll get the legitimate TRD Off Road sticker for the back
 
Id like to put them on mine but the only thing stopping me... every time i look at TRD, the first word to come to mind is turd:crybaby: wish they could have come up with a different acronym

It would be funny if someone made some real looking ones that said TuRD.
 
I do like that he made this thread in august and no one responded until i resurrected it a day or 2 ago. Im between black over gray, or what RonMaiden had on his Sunfire, i just cant pick.
 
I think I might go with black over gunmetal, but i don't know if it would look good because it's so dark.
 
I 'll suggest you to go with black over charcoal


I went with Gold ...simple and clean.
 

Attachments

  • trd.jpg
    trd.jpg
    128.1 KB · Views: 2,421
I ordered these off ebay for $18.45 shipped & I got to pick my color combination.
I went with red with black shadow. I think they will look great on my grey 87. Will let ya'll know the quality when they arrive.

TRD Off Road, toyota, sticker, decal, tundra, tacoma : eBay Motors (item 330353108032 end time Feb-13-10 16:34:46 PST)

The stickers arrived yesterday, so of course I had to install them right away :)

The quality is pretty good IMHO. They look very sharp. I got the red to accent the red rock sliders, with black shadow color. Looks nice against the dark gray paint.
I have never had a sticker this hard to install. The glue does not release from the sticker very well. Was a major PITA. I have installed LOTS of these type for my own vehicles as well as company logos on trucks. Most go on easy. These were "different". The backing paper was actually plastic, not paper. Maybe that is why they did not want to release.
Here are the pictures....sorry for the poor phone pix quality.
 

Attachments

  • IMG00183-20100208-1647[1].jpg
    IMG00183-20100208-1647[1].jpg
    48.1 KB · Views: 1,245
  • IMG00184-20100208-1655[1].jpg
    IMG00184-20100208-1655[1].jpg
    53.6 KB · Views: 1,384
  • IMG00185-20100208-1656[1].jpg
    IMG00185-20100208-1656[1].jpg
    41.4 KB · Views: 1,334
  • IMG00192-20100208-1724[1].jpg
    IMG00192-20100208-1724[1].jpg
    59.4 KB · Views: 1,262
  • IMG00189-20100208-1723[1].jpg
    IMG00189-20100208-1723[1].jpg
    60.9 KB · Views: 6,186
I don't know how many of you know this but most of those stickers work best using the windex method of placement meaning you simply spray the area down (after a good cleaning) then place the sticker down and you have about 10 minutes to get it in place but that's plenty of time to move it around and eyeball it or do measurements like i did.

Once it was in place I squeegeed as many of the air bubbles out then just let it set for a while and after a day or so the remaining tiny air bubbles will disappear and you're ready to go.
 
That's the best way to do it, but it was freezing cold when I was doing mine and it would have frozen the windex! hahaha
 
I don't know how many of you know this but most of those stickers work best using the windex method of placement meaning you simply spray the area down (after a good cleaning) then place the sticker down and you have about 10 minutes to get it in place but that's plenty of time to move it around and eyeball it or do measurements like i did.

Once it was in place I squeegeed as many of the air bubbles out then just let it set for a while and after a day or so the remaining tiny air bubbles will disappear and you're ready to go.

Yup, that is how I did it...you can see the wet backing and streaks down the side of the truck.

Not such a good idea with the small lettering and accents. Was a PITA to get everything to stay put and remove the backer.
 

Members online

Forum statistics

Threads
278,310
Messages
3,554,079
Members
248,016
Latest member
Advally Service

Trending content

Back
Top