Need some input, time now!

GonOvr

New member
Alright guys, I have some pretty f-in awesome autometer matched gauges for the 4runner but i need to figure out a way to make it look decent. I need to figure out a way to make these fit in the factory spot. I think I may have to set them on top of the clear plastic and fill the area around the gauges with a flat black plastic of some sort.

I know I know I always come out with the odd ball crap. I like custom, but im not going to run a 5" monster dash mounted tach. I need some idea's on how to make this work.

667f671b.jpg~original

ca7b72be.jpg~original

ed621adf.jpg~original

75acf512.jpg~original

fe3e2a53.jpg~original

d48a1d42.jpg~original
 
Register to hide this ad
How are you with fiberglass? It's not very often I get to use fiberglass but it's fun with endless uses. I would ditch the housing and only use the clear plastic front. Maybe keep the edge of the white plastic housing for the factory mounting. Glass in your own gauge mounts. You can use some block styrofoam and shave it to the shape you need. Then apply the resin and glass over that to get your fiberglass shape. Once the shape is there then scrape out the foam and you have your base product. Use wood rings if need be around the tach and speedo and glue them to the fiberglass base. Add more glass around them to add it to the structure.

The above sounds kind of complex in words but if you have any experience with fiberglass then it shouldn't be too far fetched.

If all else fails you can do an old school gauge cluster with a plate of sheet metal and each gauge attached to that sheet.
 
I agree. Just be ready for a ton of sanding and a huge mess. I just glassed some speaker pods for my doors and after a week of sanding and glassing just gave up and bedlined them. Oh well functionality over beauty that's what I say. Not about my wife tho she's hot and functions well.
 
if you cant do fibergass look into ABS plastic a thin sheet and a hole saw is all you would need.
cut the holes in were the gauges go and then match it up to just cover the missing area that you can see through.
 
Here's the deal, all the other gauges work. I'm trying to tie the new ones in with the surrounding 4 so i get a factory/custom look. I'm leaning towards the ABS plastic route. I just hope I can get them to fit behind the clear plastic. Guess I have another weekend project now.
 
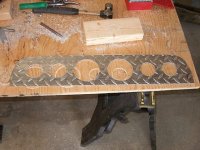
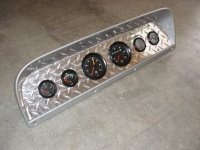
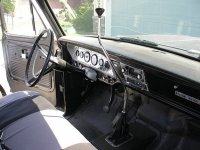
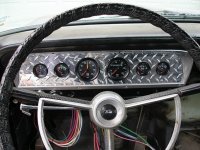
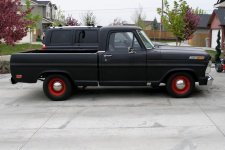
I can't take credit for this one. This was done by a buddy of mine. Super easy and looks clean. Not a Runner, it is in a 69' Ford pickup. It came out super clean. I think the diamond plate would suit the tough look of your rig. You could just cut a piece that would fit over the stock black piece.
 

Attachments

  • Pats dash.jpg
    Pats dash.jpg
    70.4 KB · Views: 275
  • Pats dash 2.jpg
    Pats dash 2.jpg
    56 KB · Views: 275
  • Pats dash 3.jpg
    Pats dash 3.jpg
    62.8 KB · Views: 263
  • Pats dash 4.jpg
    Pats dash 4.jpg
    71.8 KB · Views: 264
  • Pats 69.jpg
    Pats 69.jpg
    71.4 KB · Views: 260
if you cant do fibergass look into ABS plastic a thin sheet and a hole saw is all you would need.
cut the holes in were the gauges go and then match it up to just cover the missing area that you can see through.

This is exactly what I was going to say, replace that whole black panel with ABS. You could even move your lights and gauges around a little, make it 100% unique.
 
If you wanted to try something easy first without changing the entire back piece or going the fiberglass route, you could use some high dense foam. Cut it to match the back panel and cut in the new gauges. If you liked the look of the new gauges with the placement of everything else then you could take time to do a fiberglass backing. If not, then you could design an entire new layout.

I really like the way that tach and speedo look with that stock panel.
 
Well my original plan was to put them on top of the clear plastic... my 3" hole saw decided to destroy my clear plastic cover but left the black base intact.

Plan B.

Since the gauge hole was too big for the autometers I had to downsize it. I cut some clear plastic down to size to make a 3-1/4'' hole. I then epoxied the strips to the back of the black base and then repainted the front so everything is flat black.

DSC01005.jpg~original


With the gauges sitting in

DSC01009.jpg~original

DSC01010.jpg~original

DSC01011.jpg~original


and partially installed and working. I ordered some red LED's to make the outer gauges match.

DSC01012.jpg~original

DSC01013.jpg~original

DSC01014.jpg~original

DSC01015.jpg~original


Its not perfect but it definitely works.
 

Members online

Forum statistics

Threads
278,306
Messages
3,554,046
Members
248,016
Latest member
Advally Service

Trending content

Back
Top