P0200 Code on 2016 62,000 miles

jjames34

New member
The 4runner recently popped a P0020 code ('A' Camshaft Position Actuator 'A' Control Circuit/Open Bank 2) with a check engine and TRAC light. I've read that this code has also been associated with a couple other codes indicating a rodent problem. I looked through the engine and didn't find any wires that were chewed but I also don't know exactly where the sensor is located. I've searched youtube and the internet with no luck explaining a fix. Has anyone else had this single code pop? I appreciate any help and your time.
 
Last edited:
Register to hide this ad
It may be due to a problem with the Camshaft Position Actuator Control Circuit 'A'/Open for Bank 2. Use an OBD-II scanner to clear the error code, then test drive the car to check if the error reappears.fall guys
 
Last edited:
Inspect the wiring harness and connectors leading to the actuator for any signs of wear, corrosion, or loose connections. If the wiring looks good, you may need to test the actuator itself. You can use a multimeter to check for continuity and proper voltage at the actuator connector.
 
Last edited:
The 4runner recently popped a P0020 code ('A' Camshaft Position Actuator 'A' Control Circuit/Open Bank 2) with a check engine and TRAC light. I've read that this code has also been associated with a couple other codes indicating a rodent problem. I looked through the engine and didn't find any wires that were chewed but I also don't know exactly where the sensor is located. I've searched youtube and the internet with no luck explaining a fix. Has anyone else had this single code pop? I appreciate any help and your time.

when my wires were chewed it was behind the fuse box in the engine bay. I did have a small nest of leaves etc there too.

battery ---fuse box--- wire connection
 
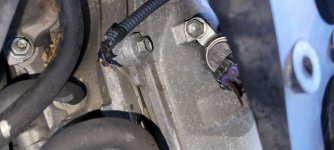
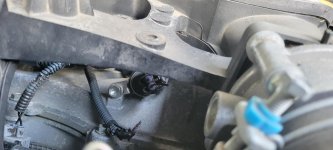
I found the problem. A rodent completely chewed the 2 wires going to the electrical connector. Although, I think I got lucky because that looks like the only wires that were chewed.

I went to the dealership and the parts guy was unaware of how the part comes or how to fix it. They didn't have the female connector in stock (90980-12A02). My hope was that there's a pigtail on it so I could just splice it. One of the gentleman said that the wires just plug into the connector so I would have to splice it and then plug it into the connector. Does anyone have experience they would like to share working with these connectors. Thanks again for your time.

I've attached two pictures showing the damage.
 

Attachments

  • 20250118_114636.jpg
    20250118_114636.jpg
    139 KB · Views: 680
  • 20250117_125823.jpg
    20250117_125823.jpg
    138.7 KB · Views: 678
Last edited:
I found the problem. A rodent completely chewed the 2 wires going to the electrical connector. Although, I think I got lucky because that looks like the only wires that were chewed.

I went to the dealership and the parts guy was a bit clueless. They didn't have the female connector in stock (90980-12A02). My hope was that there's a pigtail on it so I could just splice it. One of the gentleman said that the wires just plug into it so I would have to splice it and then plug it into the connector. Does anyone have experience they would like to share working with these connectors. Thanks again for your time.

I've attached two pictures showing the damage.

Although this is more specific to the RAV4, it has guidance on how to work on Toyota connectors. Perhaps your part number can be found is this document:

https://www.toyota-tech.eu/wire_harness_rm/RM06H0E.pdf
 
I found the problem. A rodent completely chewed the 2 wires going to the electrical connector. Although, I think I got lucky because that looks like the only wires that were chewed.

I went to the dealership and the parts guy was unaware of how the part comes or how to fix it. They didn't have the female connector in stock (90980-12A02). My hope was that there's a pigtail on it so I could just splice it. One of the gentleman said that the wires just plug into the connector so I would have to splice it and then plug it into the connector. Does anyone have experience they would like to share working with these connectors. Thanks again for your time.

I've attached two pictures showing the damage.

There probably is a pin in that female connector , should be able to remove that and replace the wiring to extend it. Can just solder the wires together and heat shrink it and wrap in electrical tape. Also insurance will cover this as well.
 
It is possible to solder the wires. If not enough length due to rodent consumed metal wire and insulation, you can add a length of similar wire.
Sometimes access to solder in place is not doable.
Then you would need to do the necessary disconnecting to move the wires to a spot you can work on the solder repair.
Lots of Youtube demos of soldering and the simple inexpensive tools needed.
I repaired fuel injector wires ate by mice on a Dodge Ram van.
Good luck with the repair.
PM me if you would like to discuss in more detail.
 
It is possible to solder the wires. If not enough length due to rodent consumed metal wire and insulation, you can add a length of similar wire.

If you need to solder the wires, best to start with a new connector housing (they are all over the Internet such as this one: 9098012A02 - HOUSING, CONNECTOR F - Toyota | eBay), and new repair wires with pins which should be available from your dealer or the Internet as well.

That will give you a new connector with wires long enough to solder to the existing wires.
 
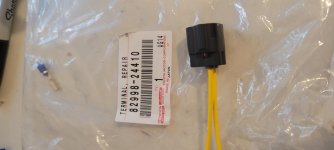
I appreciate the replies. I'm just returning after an unexpected trip. I unfortunately found more damage under the Intake Air Surge Tank. I was able to find the wires with the actual pins that go into the terminal (TERMINAL, REPAIR 82998-24410) online for a fraction of what the dealership wanted. I was also able to reuse the plastic terminal that the dealership wanted $80+ for.
 

Attachments

  • Part Number.jpg
    Part Number.jpg
    122.9 KB · Views: 464
Removal of the Intake Air Surge Tank

The steps below are what I'm finding for the Intake Air Surge Tank removal in order to get to the wires under it. Can any validate these steps or provide any input before I start taking this apart. Thanks for your time.

Tools Needed:
  • Ratchet and socket set (10mm and 12mm)
  • Flathead screwdriver
  • Pliers
  • Extension bar (optional for hard-to-reach bolts)

Preparation:
  • Disconnect the Battery:
  • Disconnect the negative terminal to avoid electrical issues.
  • Remove the Engine Cover:
  • Pull up gently to detach the engine cover from its mounting points.

Step-by-Step Removal:
Disconnect Air Intake Hose:
Loosen the hose clamp connecting the intake hose to the throttle body using a flathead screwdriver or 10mm socket.
Detach any connected vacuum lines or sensors (remember their locations for reinstallation).​
Remove Bolts and Brackets:
Unbolt the mounting brackets securing the intake air surge tank. These are typically 12mm bolts.
There are usually 4-6 bolts, including those attached to support brackets on the engine​
.
Disconnect Electrical Connectors:
Disconnect any electrical connectors attached to sensors on the surge tank. Press the tabs and pull gently​
.
Remove Throttle Body Bolts:
Unbolt the throttle body but do not disconnect the coolant lines (unless necessary). Move the throttle body aside gently.​
Detach Surge Tank:
Carefully lift the surge tank off the intake manifold. There might be a slight resistance due to the gasket seal.
Be cautious of any vacuum hoses still connected—disconnect them as needed.​
Check Gasket Condition:
Inspect the intake manifold gasket for any wear or damage. If needed, replace it before reinstallation.​
 
The steps below are what I'm finding for the Intake Air Surge Tank removal in order to get to the wires under it. Can any validate these steps or provide any input before I start taking this apart. Thanks for your time.

Tools Needed:
  • Ratchet and socket set (10mm and 12mm)
  • Flathead screwdriver
  • Pliers
  • Extension bar (optional for hard-to-reach bolts)

Preparation:
  • Disconnect the Battery:
  • Disconnect the negative terminal to avoid electrical issues.
  • Remove the Engine Cover:
  • Pull up gently to detach the engine cover from its mounting points.

Step-by-Step Removal:
Disconnect Air Intake Hose:
Loosen the hose clamp connecting the intake hose to the throttle body using a flathead screwdriver or 10mm socket.
Detach any connected vacuum lines or sensors (remember their locations for reinstallation).​
Remove Bolts and Brackets:
Unbolt the mounting brackets securing the intake air surge tank. These are typically 12mm bolts.
There are usually 4-6 bolts, including those attached to support brackets on the engine​
.
Disconnect Electrical Connectors:
Disconnect any electrical connectors attached to sensors on the surge tank. Press the tabs and pull gently​
.
Remove Throttle Body Bolts:
Unbolt the throttle body but do not disconnect the coolant lines (unless necessary). Move the throttle body aside gently.​
Detach Surge Tank:
Carefully lift the surge tank off the intake manifold. There might be a slight resistance due to the gasket seal.
Be cautious of any vacuum hoses still connected—disconnect them as needed.​
Check Gasket Condition:
Inspect the intake manifold gasket for any wear or damage. If needed, replace it before reinstallation.​

Thankyou for posting the solution. Much appreciated.
 

Members online

Forum statistics

Threads
278,308
Messages
3,554,057
Members
248,016
Latest member
Advally Service

Trending content

Back
Top