Painting Door Trim

gigajoe

New member
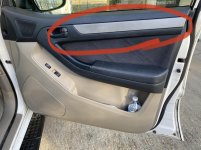
I was looking to see if anyone had any tips for painting the upper door trim on all four doors. I'm referring to the silver trim found on most 4th gens. I believe they are melted plastic riveted, if that's the term, to the rest of the assembly. Is there a way to remove and fasten securely after paint?

thanks
 
Register to hide this ad
I was looking to see if anyone had any tips for painting the upper door trim on all four doors. I'm referring to the silver trim found on most 4th gens. I believe they are melted plastic riveted, if that's the term, to the rest of the assembly. Is there a way to remove and fasten securely after paint?

thanks

can you post a pic of the trim youre referring to? i have an 08 4runner & it doesnt have any silver trim on the upper doors, its all black.

as for painting, its pretty much the same for any part, the prep is the key to getting good results. basically you want to clean the part to remove any dirt, grease or wax residue, dawn dish soap & warm water, then dry & follow up with rubbing alcohol on a clean rag. next scuff or sand the area, if you dont need to remove old paint then just use a red or green scotch brite pad or fine 400-600 grit sand paper, then wipe again with rubbing alcohol & be sure to wipe or blow away any lint or debris, can use a tack cloth too as the final step.

then use 1-2 medium coats of a good primer & allow to dry according to instructions on the can.
then spray the paint, 2-3 light to medium coats are best with the final coat more of a medium heavy coat to get a smooth finish but be careful not to do it too heavy to get runs in the paint.
when spraying do even strokes spraying past the part at the end & before the part at the beginning of each stroke, goal is to not start the spray in the middle of the part. you can also do 1-2 coats of clear in the gloss sheen you prefer, gloss or matte.
this is for spray cans, but you can always use a better quality paint in a gun with a compressor but you usually need some practice or experience to get a good spray pattern.

you should be able to get very good results doing those steps. best of luck!

 
I know what OP is talking about. It's the plastic accent panel next to the door handle. They were usually silver and most are pretty faded and blotchy by now. I was looking for good solutions to this as well. Thought about doing a vinyl wrap on them.

I haven't taken a door panel off, but I understand those pieces are plastic welded and not removable.
 
I know what OP is talking about. It's the plastic accent panel next to the door handle. They were usually silver and most are pretty faded and blotchy by now. I was looking for good solutions to this as well. Thought about doing a vinyl wrap on them.

I haven't taken a door panel off, but I understand those pieces are plastic welded and not removable.

can you post a pic of the part? my 4runner is silver so it must be camouflaged.
 
I think on some models, it might be other colors like fake granite.
 

Attachments

  • IMG_5137.jpg
    IMG_5137.jpg
    137 KB · Views: 1,813
Thats the part I am talking about. Im hoping I can remove it and maybe use a more temporary glue to put it back on after painting. Too cold to mess around with it now. Im planning on redoing all of the silver accent trim in the whole interior and that is the only piece I do not know if it is removable or not. Id imagine to some degree it is or it could've never been painted in the first place.
 
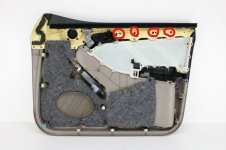
I found this picture of the back of the door. Looks like the circled areas are the plastic welds to the black panel surrounding the door handle. Not sure if you can directly get to the plastic welds for the accent piece. Hard to tell from this picture. You might be able to drill those out pretty easy (I'd use a dremel with a grinder ball), but I'm not sure how easy it would be the "glue" the panel back on after. I'm not sure how solid the back of the piece is.
 

Attachments

  • Inkeds-l1600_LI.jpg
    Inkeds-l1600_LI.jpg
    123.2 KB · Views: 1,297
Last edited:
I found this picture of the back of the door. Looks like the circled areas are the plastic welds to the black panel surrounding the door handle. Not sure if you can directly get to the plastic welds for the accent piece. Hard to tell from this picture. You might be able to drill those out pretty easy (I'd use a dremel with a grinder ball), but I'm not sure how easy it would be the "glue" the panel back on after. I'm not sure how solid the back of the piece is.

Nice, thanks for the pic. It looks like there may be some screws securing it on the end as well. If that is the case I'd probably just use some silicone or other minor adhesive around where the plastic welds are to keep it from bowing in and out. I'll mess with it when it warms up a bit and report back for sure. I'd like to use a colored raptor liner on all the silver trim to make it more durable and longer lasting.
 
Cool deal. It's on my to-do list also, and we have pretty mild winters here in South Louisiana, so I'll report back as well if I happen to beat you to it.
 
I didn't remove the door cards and wrapped those in place. I did take apart the console and wrapped those parts. A sharp Xacto knife helps or any tint kit tools. It also helps to have a hairdryer to help warm the vinyl up a bit. I ordered the vinyl from Amazon, planning on redoing it this year.
 
I found this picture of the back of the door. Looks like the circled areas are the plastic welds to the black panel surrounding the door handle. Not sure if you can directly get to the plastic welds for the accent piece. Hard to tell from this picture. You might be able to drill those out pretty easy (I'd use a dremel with a grinder ball), but I'm not sure how easy it would be the "glue" the panel back on after. I'm not sure how solid the back of the piece is.

Do this
 

Members online

Forum statistics

Threads
278,309
Messages
3,554,075
Members
248,016
Latest member
Advally Service

Trending content

Back
Top