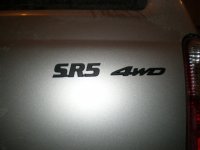
Plasti-Dipped!

Yea for sure try it out. If you dont like it, peel it off. If you like it and it is chipping too fast, use an actual paint.

My brother in law owns a powder coating shop and I asked him about it. He mentioned that if you are going to use an actual paint, that you want to stick permanently that you will have to strip the wheels down to raw metal using chemicals. He advised against painting the wheels and recommended the plasti-spray until I can strip the current coating off and do a good job powdercoating them.

Ill give it a shot this weekend and will post some pics.
 
Just picked up a can of this today from Lowes, $7.87.

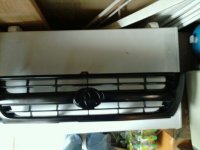
I know its what i'm going to do my emblems with (in fact i'm waiting for a coat to dry on my front grill Toyota symbol as I type this), but i'm hesitant about the wheels.

Obviously we've seen some on here, and they look good in the pics that are taken immediately after being done, but I wonder I how good they'll look 6 months, 1 year, 2 years... down the road?
 
Multiple touch ups for mostly city driving too? Most off road I do is on dirt roads in Texas...

So than is this more of a hassel than its worth?

Mines been on for 2 months now ad trough all kinds of winter storms and highway on my bumper and no road debree or salt has effecte it in any way.
 
Just picked up a can of this today from Lowes, $7.87.

I know its what i'm going to do my emblems with (in fact i'm waiting for a coat to dry on my front grill Toyota symbol as I type this), but i'm hesitant about the wheels.

Obviously we've seen some on here, and they look good in the pics that are taken immediately after being done, but I wonder I how good they'll look 6 months, 1 year, 2 years... down the road?

I had mine plasti-dipped and went for a drive down a gravel road for about 20 miles. Afterwards they were pretty messed up! I went ahead and removed it, did a self etching primer, base coat, then clear coat. It has held up great for almost a year now! I think Plasti-Dip is fine if you stay on the street.
 
I had mine plasti-dipped and went for a drive down a gravel road for about 20 miles. Afterwards they were pretty messed up! I went ahead and removed it, did a self etching primer, base coat, then clear coat. It has held up great for almost a year now! I think Plasti-Dip is fine if you stay on the street.


I think i'm gonna use what I have left in my can after I finish my emblems and do (1) wheel and drive around with it for a week just to see what happens. I want to see if I like the look of my wheels being black, and this seems like a fairly inexpensive way to test it out. If I do like it, then i'll see how it holds and decide if I want to do all of them, or go ahead and paint them with something more permanent. If not I can just peel it off I suppose, and decide from that point forward exactly what I want to do.
 
I had a hard time finding plasti-dip but got some from the Home Depot today. Hope for nice weather this weekend so I can plasti-dip something!
 
Amazing! Actually just picked some up today i was looking at blacking out my emblems, any tips or advice? :cool:

I also plasti-dipped my lugs and used the lug wrench to tighten them and it didn't even scratch up the lugs. I put about 6 coats on each wheel.

So far its holding up great. You could always throw some wheel paint on after the first coat to strengthen it up and then put the other layers of plasti on.

The emblems are very easy to do. You don't have to take them off either (I wish I would have known this b4 I did ALL of mine!) Just clean the emblems really good then tape off the surrounding area and then spray your emblems. DONT worry about the over spray on the paint around the emblem! Once you spray them you will be able peel the over spray off with your fingers/nails. There is enough distance between the emblem and the cars paint that when you peel the over-spray it wont peel with the emblem. It worked with my two "limited" side badges.

If you want a better idea check this out:
DIY - Matte Black Emblems - Plastidip, no emblem removal required! - Club Lexus Forums
 
I also plasti-dipped my lugs and used the lug wrench to tighten them and it didn't even scratch up the lugs. I put about 6 coats on each wheel.

So far its holding up great. You could always throw some wheel paint on after the first coat to strengthen it up and then put the other layers of plasti on.

The emblems are very easy to do. You don't have to take them off either (I wish I would have known this b4 I did ALL of mine!) Just clean the emblems really good then tape off the surrounding area and then spray your emblems. DONT worry about the over spray on the paint around the emblem! Once you spray them you will be able peel the over spray off with your fingers/nails. There is enough distance between the emblem and the cars paint that when you peel the over-spray it wont peel with the emblem. It worked with my two "limited" side badges.

If you want a better idea check this out:
DIY - Matte Black Emblems - Plastidip, no emblem removal required! - Club Lexus Forums

That's the link I was about to post. It's really helpful to know that you don't have to take the emblems off. I heard getting them back on can be a pain.
 
That's the link I was about to post. It's really helpful to know that you don't have to take the emblems off. I heard getting them back on can be a pain.

OHHH it is! I took off all my rear emblems to paint them and it sucked so bad to get them back on I just left them off. Getting them straight and getting the 3m double sided tape on sucks big time.

Here is a pic of my grill. Sorry I don't have one of it on the car yet or a pic of the smoked tails. (to smoke tails btw take them off and spray them with "VHT night shades" until you get your desired darkness and if you mess up buy some "goof off" and take it off"

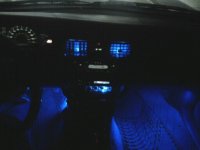
Also here is a picture of my interior lights. The dash and instrument panel aren't done yet but I I have blue LEDS in my glove box.
 

Attachments

  • grill222.jpg
    grill222.jpg
    35.8 KB · Views: 2,284
  • 222lightsblue.jpg
    222lightsblue.jpg
    22 KB · Views: 2,210
Last edited:
] The emblems are very easy to do. You don't have to take them off either (I wish I would have known this b4 I did ALL of mine!) Just clean the emblems really good then tape off the surrounding area and then spray your emblems. DONT worry about the over spray on the paint around the emblem! Once you spray them you will be able peel the over spray off with your fingers/nails. There is enough distance between the emblem and the cars paint that when you peel the over-spray it wont peel with the emblem. It worked with my two "limited" side badges.

If you want a better idea check this out:
DIY - Matte Black Emblems - Plastidip, no emblem removal required! - Club Lexus Forums

Very Helpful! thanks im goin to be plasti dipping this weekend!:bluejump:
 
a guy on tacoma world just got a runner and plastidipped his emblems.


derekabraham's 2002 4Runner - Page 6 - Tacoma World Forums


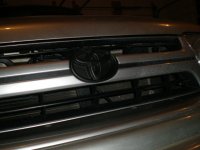
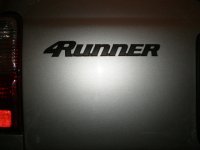
I did my front symbol last night and rear's tonight. Taping everything off takes most of the time. Before taping off I just wiped everything down with some simple green and a damp wash cloth (trucks dirty from recent snow/salt), then dried it with a heat gun. I found using a heat gun in between coats really speeds up the drying time. Directions say wait 30 minutes between coats but with a heat gun you can pretty much do one coat after another. Plus I think it prevents any runs in the paint because it doesn't get time to run, if you put some low heat on it right after you spray it begins to dry immediately and practically self levels. Total time approx 2 hours per night.

It was dark in my garage when I took the pics so they're not that good, but it should give you an idea:
 

Attachments

  • 4runner mod file 045.jpg
    4runner mod file 045.jpg
    81.8 KB · Views: 2,643
  • 4runner mod file 049.jpg
    4runner mod file 049.jpg
    87.6 KB · Views: 2,122
  • 4runner mod file 050.jpg
    4runner mod file 050.jpg
    93.2 KB · Views: 2,092
Last edited:
These look great! gives the vehicle a great look, How many coats did u use?


Did 4 on the front last night, but I only used 3 on the rears tonight.

Since I figured out from last night that once I put a mild base coat down for the 1st coat and then to use the heat gun (basically keeping it about 12"-16" away and keeping it moving at all times) on each coat after that, I laid the 2nd and 3rd coats on pretty heavy and made sure to get heat on them right as I finished spraying. No runs to worry about, and left it slightly tacky in between the coats. Then as I was peeling everything off, I put a little bit of heat back on them as I was going along just to keep it warm and so it would pull off easier. Used toothpics to essentially "scrape" along the edges and then just dug out with the tip of the tp in between the tight areas.
 

Members online

Forum statistics

Threads
278,307
Messages
3,554,054
Members
248,016
Latest member
Advally Service

Trending content

Back
Top