Project pinemind - 1985 4Runner DLX Restoration

Good report. I probably need to do this injector inspection/cleaning also so this is very helpful. I look forward to your injector cleaning report.
 
Nice rig. Way to get quality parts that last!

Do you not have room to pull the engine? It is so much easier to fix things on the stand. With the quality of the truck's condition, that engine is begging for more shine!
 
Nice rig. Way to get quality parts that last!

Do you not have room to pull the engine? It is so much easier to fix things on the stand. With the quality of the truck's condition, that engine is begging for more shine!

When I originally started this back in March of 2019, I hadn't done much more than an oil change to a car, so I wasn't about to dive in and pull out an engine. Also, at that time, I had planned on ordering an engine for Spring of 2020 from 22REPerformance, so I was just working to familiarize myself with the workings of the 22RE, and get the engine bay painted to match the truck best I could. Now, because it ran so well after all my repairs, it gave me more confidence to tackle bigger items and forgo the engine replacement for now. As stated in prior posts, I'm waiting on good weather to do the head gasket/timing chain and valve cover gasket to address the 2 remaining issues: external coolant leak and valve cover oil leak. Once those two items are fixed, the truck will be mechanically perfect. I still may get an engine for 2021 depending on how this summer goes, but in that case, I'll have brand new parts to swap over and all the hard work will have been done.

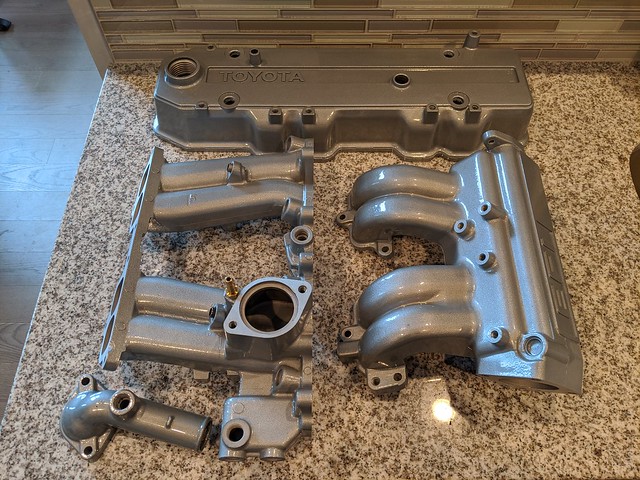
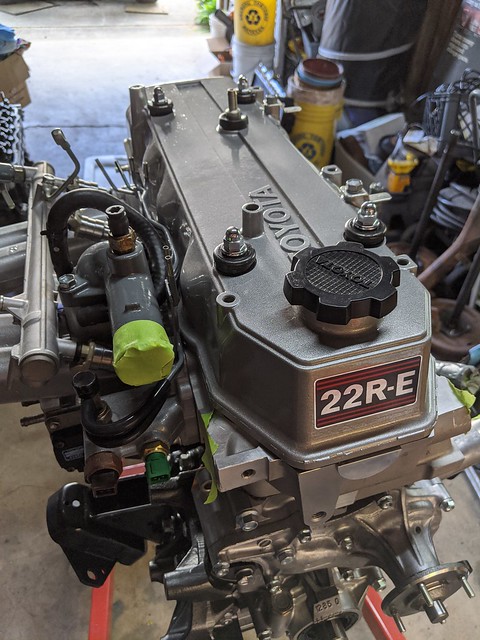
On that note, I finally received my manifolds and valve cover back from 22REPerformance, who did a full restoration and powder coating. When I do the head gasket, I'll be able to clean up what's remaining and install these parts on it when I put it back together, along with new steel heater hoses too. So the remaining items of the engine that aren't clean will now be shiny and brand new hopefully some time in late March/early April.

49580661956_97f073fe11_z.jpg


49580661471_e30873065d_z.jpg


49580161348_c0f3f1a2bd_z.jpg
 
Thanks for that injector post. I recently picked up a 1985 4runner and been trying to familiarize myself with things to track down a strange idle issue. Sprayed some carb cleaner in the area of the fuel rail and got a surge in rpm’s. I’m thinking it’s either a gasket leak on the plenum or a leak from maybe the injector orings
 
Great job with this restoration. I restored a 1985 SR5 extended cab a while back. I can appreciate your efforts. Looks wonderful.
 
Read all four pages. Awesome work! Your attention to detail is very good and I like what you've done with the interior. One of the cleanest first gens I've seen.
 
Wow, almost 3 months since my last post. A lot (of planning) has happened as I've been awaiting for the weather to turn. I don't have anywhere indoor to work on this, so living in the Northeast only gives me a solid 4 months to get things done. And as it's coming up on topless season, I need to hurry up my current predicament ...

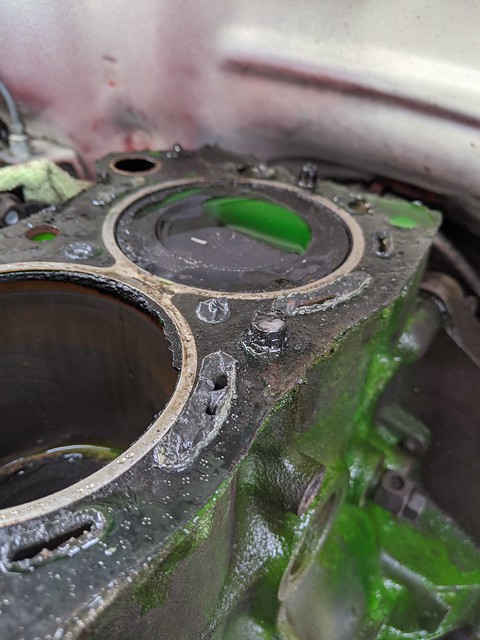
I started the head gasket back in mid-April as I wanted to get the coolant leak/oil leaks fixed for the summer. Note that I "was" planning on dropping in a brand new engine in Spring of 2021 from 22REperformance, and I took this head gasket/timing chain overhaul as an educational challenge to buy me a leak free summer. But ... as plans usually go, I ran into issues. Stripped everything down and began taking off the head bolts. All the exhaust side ones were next to impossible to crack loose, but 7/8 of them eventually started turning. The last one (2nd in from firewall on exhaust side) would not budge with my 36" breaker bar. After tapping it with a hammer to loosen up all the carbonized oil, I thought I broke it loose. But I actually broke it off. Then I had to use a pry bar to get the rocker assembly off, while loosening the other 2 stuck exhaust bolts as there was so much build up in the rocker bolt channels, I couldn't pull them out. When I finally got the rocker assembly off, unfortunately I saw that I cracked the head bolt off in the block about 1/8" above the surface. Shit.


I tried a few methods with a propane torch (stud extractor, brand new vice grips), and it was not going anywhere. At this point, I would have had to get it towed, or take out the engine block to take to a machine shop for them to attempt to get it out. I instead, decided to speed up the engine replacement process by a year, and ordered an engine from Yota1. My thought process: original engine with original internals. I could put this thing back together after getting the head resurfaced/valve job, and then end up blowing out the bottom end. I know that I already had some blow-by in the piston rings so I took the easy way out (non-wallet wise). My engine just got put on the truck and should be hear in time for the weekend after Memorial Day.

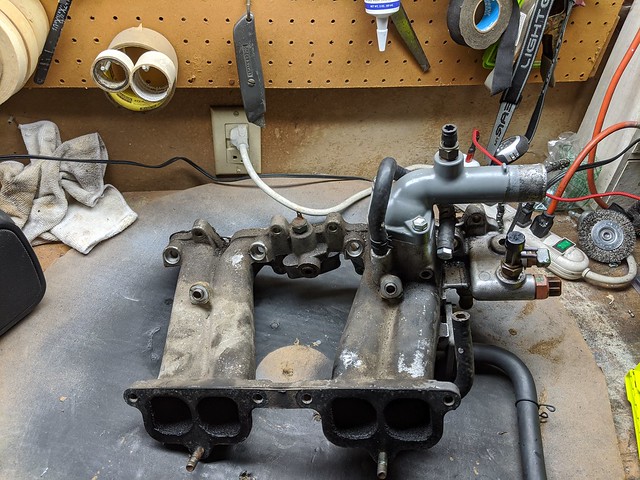
Now that the bad news is out of the way, let's move on to progress in a positive direction. I completed refinishing, cleaning, painting the intake plenum and manifold that I had powdercoated by 22REperformance. I'm still trying to work out a way to disassemble the throttle body completely so I can get all the parts painted or powder coated, but the butterfly valve staked screws are proving a problem. I already trashed one ebay throttle body in trying to remove it, so in no way to I trust myself to do this on my own. I tabled that piece to a later date, but I did polish it up real nice for now and readjusted the TPS (with 4crawler's allen head screws so I can adjust it on the truck in the future).

Here is the manifold with all the accessories on it (some new some painted):


And the plenum (before/after):


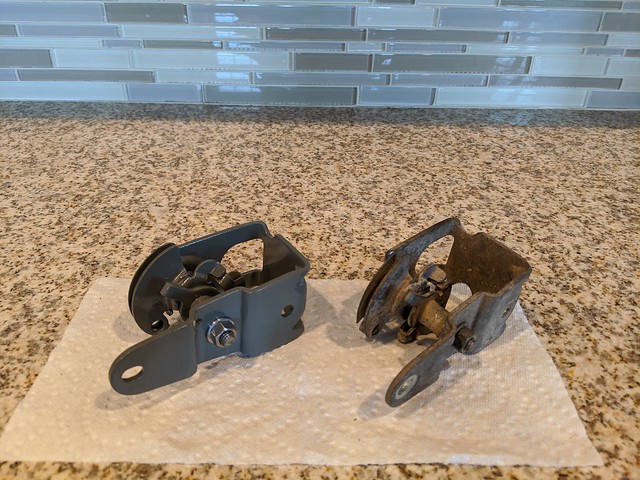
I also (carefully) painted and reassembled the throttle body brackets as well, I just haven't put them on yet as it makes storing this awkward. Note: I've been using Duplicolor Engine Enamel - New Ford Gray as my accent color throughout the engine bay (aside from satin black on some pieces). Primer -> Base -> Matte clear, all Duplicolor Engine Enamel brand line (ceramic). It holds up ok, would love to powder coat in the future, but some of these parts make it tough to do son.


I ordered new OEM heater hoses, the ones that wrap around the block. I decided to prime and paint these as well, as they notoriously rust and are thin. I'll be doing the same thing to my other steel radiator hose (once I get the old engine out -> the one near the alternator/back of timing cover):


Next, I started the process of removing the engine. I've never done anything like this before, so all new for me. Since I was waiting on the engine, I decided to take the transmission out and start the horrible process of cleaning 35 years of oil leaks and driveshaft grease. I knew it was going to be bad, just like my engine bay was. So I wasn't looking forward to it. Taking the driveshafts out took longer than expected but glad I had my stubby Milwaukee impact wrench.

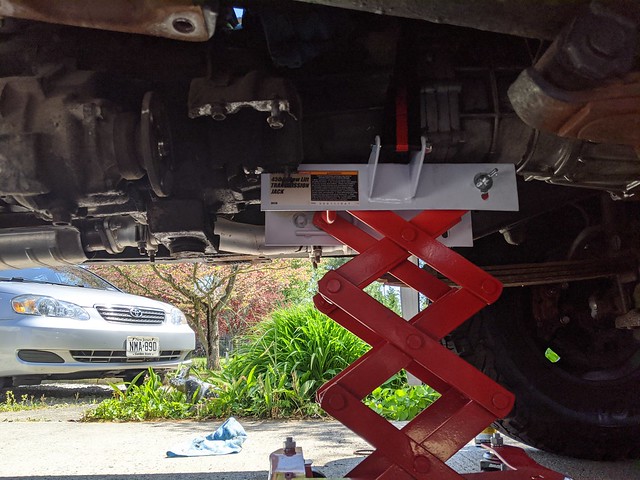
Used a tranny jack from Harbor Freight to get it out, this wasn't too terrible. I've heard getting it back in is the tricky part. There was oil in the bellhousing but not much. It doesn't look like I had a rear main seal leak, as that was one of my suspicions. Most of the oil leak was from the rear of the valve cover/half moons and ran down the passenger side, seeping everwhere it could for god knows how long.


Then began decrudification part 2: Revenge of the W56. I used Gunk, I used brake cleaner, Super Clean, power washer. Didn't put a dent in it (Ghostbusters 2 reference). At the end of the day, the most effective was a plastic razor blade scraper. And once that was off, a variety of stainless steel fine wire wheels to get as much as I could. There were still spots I couldn't get too, but this isn't a show car, and I'm probably replacing the transmission and transfer case next Spring anyway as I found plenty of metal shavings on the magnetic transmission and transfer case drain plugs :(.


Bottom half scraped with scraper:


Bottom half after wire wheeling:


Apparently I didn't take any pictures of it complete, probably because I was so tired of looking at that thing after spending about 8 to 10 hours cleaning it. Note, there were spots I couldn't reach but also couldn't be seen. I took the liberty of knowing I would just paint over it, not great but you'll see below that it came out pretty damn good.


[missing picture]


I decided to use Eastwood AlumaBlast 2k to give it an original aluminum cast look with a bit of flake. I used their Self-Etch primer in black, and luckily, it held:


Then came the Alumablast and a 2k Matte Clear coat. Came out amazing:


Then I painted the flanges, and the upper dust cover traditional satin black with a matte clear. I also painted the sensors (transfer case and reverse light) just because. We'll see if it flakes off when I torque them in:


I finshed it up by installing new drain/fill plugs and installing a Marlin Crawler short shift kit (no picture yet).


Next up this weekend, weather permitting (looks like rain at least Saturday), I'm going to degrease the undercarriage, rust proof the crossmember frame area, and pull out the engine. Look for many more updates now that the weather is better!
 
Great post! The time you spent cleaning and painting the parts no one sees is the difference between a repair and a resto. Keep up the good work.
 
A lot has transpired in the last few weeks so I wanted to update the thread as to my progress. A few weekends ago, I picked up my new 22RE engine from the shipping depot. I got the engine from Yota1 Performance and it's just a stock 22RE long block with oil pan (no head work, cam, etc). It was packaged well and came without any noticeable damage. The one odd part, it didn't have the fuel pump block off plate installed (indicating it was for a 22R) but the product listed when I ordered it was for a 22RE specifically. No worries, just swapped over my old plate and hardware.


Out with the old:


Before tackling adding all the parts onto the new engine, I masked and painted off the rear of the engine bay that was still red from last spring, as I couldn't get to it with the engine in place:


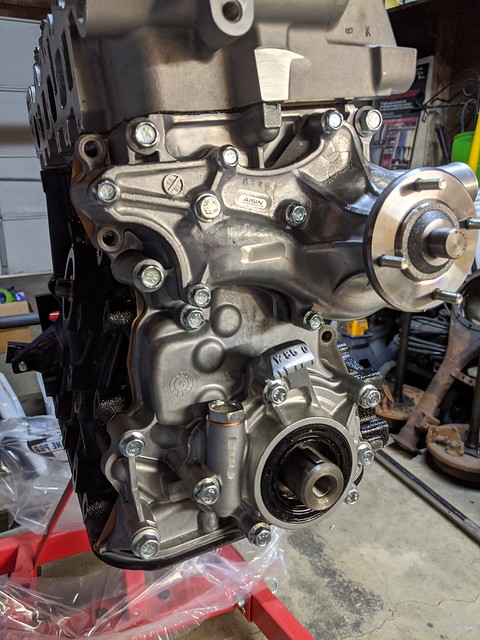
Once on the stand, I gave it a closer inspection. One of the reasons, besides turnaround time, I went with Yota1 was because they used OEM Toyota gaskets and seals, and also OEM parts (like the Aisin water pump and oil pump). There was no overuse of silicone/RTV, especially on the head gasket area (only where needed on the timing cover/head corners). The oil pan silicone seal was also really well done without slop.


What follows is a bunch of pictures of the adding of parts to the new engine. A lot of these parts were either new, painted, or powdercoated, with all new Toyota hardware as well. I painted all the steel radiator hoses a "New Ford Grey" which has been my accent color on other random parts in the engine bay. I tried to keep with the black, gray, silver theme to make it look as OEM as possible, with just a tad bit of flair coming through this color used throughout.


Restored, tanked, and silver gloss powdercoated valve cover with new acorn nuts/grommets and accessory hardware. This looks really great and I couldn't wait to get this on there. The color looks stock and I know it will hold up and never look like my previous old one.


Installed my A/C compressor bracket in advance of my next project, which is to add the A/C back (it came from the factory on this 4Runner but P.O. yanked it out). This was powdercoated last spring when I did my various pulleys and power steering brackets as well. I was a bit nervous about removing the 4 timing cover bolts to replace them with the longer bolts to accomodate the A/C bracket width, but so far, no leaks ...


Rear of the assembled painted steel heater hoses plus the EGR cooler plate:


Noticed this nice engraving on the passenger side of the head to mark their product, pretty cool actually:


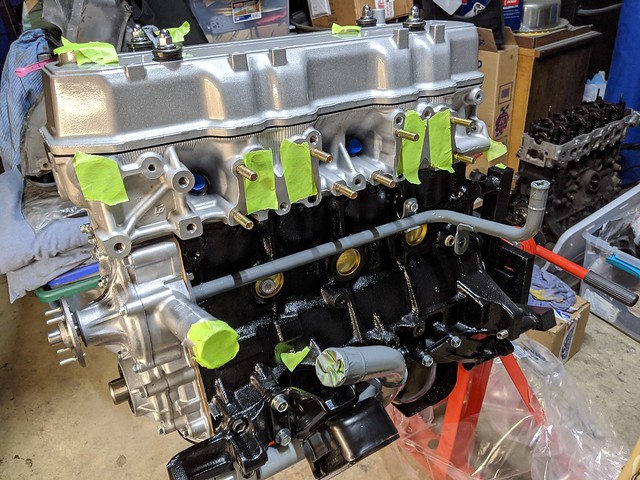
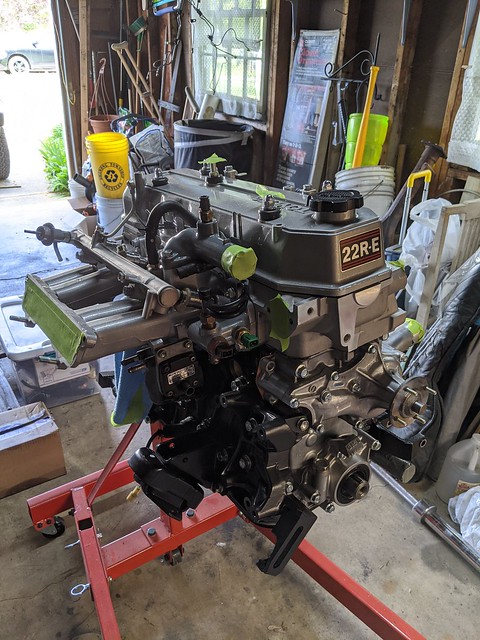
Powdercoated intake manifold, fuel rail and thermostat housing/sensors installed. Again, really happy I got the manifolds and valve cover tanked and powder coated (thanks 22REPerformance.com):


Ordered a new OEM cold start time switch, pricy and the old one checked out. But I'm trying to get as many new OEM parts as I can with the reset of a new engine. So both that and the coolant temp sensor are new:


This part was painful so I only have a after photo. In retrospect, I should have snapped a pre-photo to show all the oil, grease, and impenetrable gunk on the undercarriage from leaks, driveshaft grease etc. I think I spent the better part of a week after work at night scraping and wire wheeling to get the area clean. The hardest part was the fuel lines, since they can't be removed due to the kink and the rear body frame support, so I had to clean them while they were in the truck (unless I wanted to remove the body mounts and jack up the body, which I defintely didn't want to do nor had the tooling to do). I then used some Eastwood products to paint, starting with Rust Encapsulator (two coats) follow by their Rubberized Undercoating product (two coats).


I spent another few nights doing the same to the front axle, differential, backing plates and other front axle pieces, which had a significant amount of oil, old rattle can jobs, etc. I used the same Rust Encapsulator, then followed it up with 2 cotas of Extremem Chassis Black (satin). This photo is just after the Rust Encapsulator so it's the matte finish.


** Continued in next post - limited to 20 images per post **
 
This is right before I put the engine back in, with the finished front axle area painted, rear engine bay factory white paint, painted brake booster black, and brake/clutch lines reinstalled:
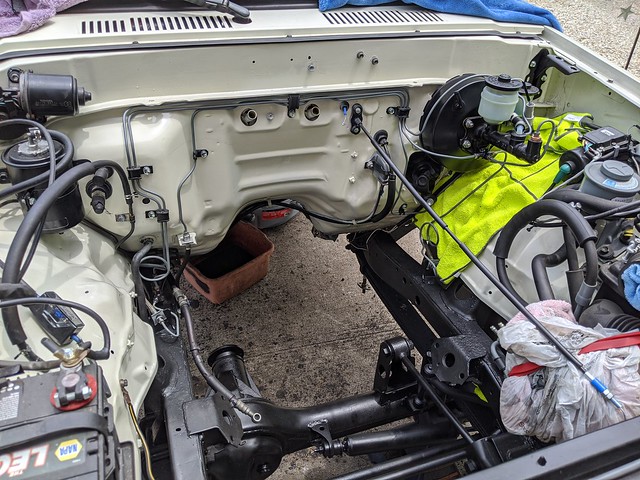


Engine installed, this was a late night photo after cramming this in one night after work. It went in fairly easily, just a bit of jockeying with the load leveler to get the motor mount bolt holes lined up. I put in new OEM motor mounts and hardware, naturally. Ready to tackle the transmission install next.


Next was the back plate, new flywheel and Aisin clutch kit. First time ever installing clutch components, so I was careful to use Loctite on the flywheel bolts and torque per FSM specification. I used a breaker bar on the crank bolt/frame rail to hold the crankshaft while torquing the flywheel bolts which worked well.

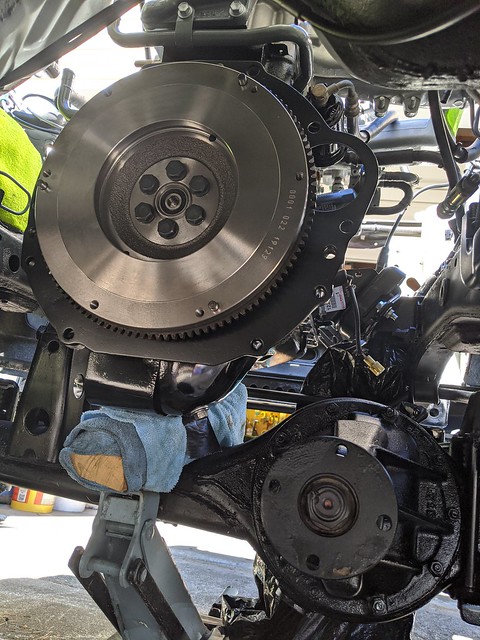


Next up, getting the transmission in. This wasn't as bad as I thought, and took about an hour of maneuvering with the tranny lift and some brute force with my knees to get it aligned right. The biggest issue here is the dust shield for the front driveshaft. I couldn't get the tranny to sit properly on the jack given the width of the plate it sits on, so it was always off center (hence the knee shoves). But once in, I got the easy bolts in, then the tranny to block brace bolts. Lastly, the top two transmission bolts, which were easy with the help of this specialized 17mm 18" ratcheting box wrench that could angle the head. This tool I bought after struggling on removal with all other methods outlined online (3' extensions with wobbles, go in through tranny opening in cab, etc). None of those methods worked until I bought that tool and it was worth the $30 easily.
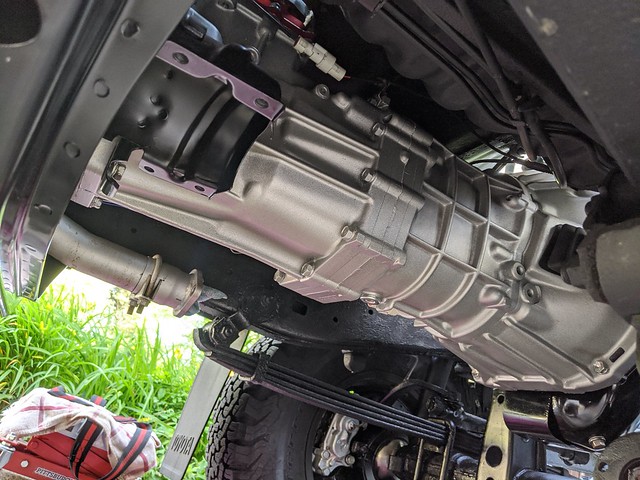


Clutch slave cylinder in and lines attached:


Back to the engine, getting the wiring settled and the vacuum lines before getting the plenum on:


Plenum on with the painted throttle bracket assemblies. Really starting to come together now!


Fast forward a bit, and everything is all assembled. Poured in just about 5 quarts of 10w-30 break-in oil, bled the brakes and clutch, filled the coolant with a spill-free funnel. Ready for a first start.


So following the break-in procedure from Yota1, I primed the oil pump with the coil/EFI fuse removed until the Oil Light went out. Then I reconnected those and cycled the key to ON with the fuel jumper in place to pressurize the fuel lines. It took a few cranks but then started right up. It was definitely idling a bit high, but my first focus was leaks, mainly fuel. I smelled some fuel so checked the rail, but it turned out, the 4th injector in the rear was dripping fuel. Now I had installed the injectors/rail into the manifold awhile back, so this meant ... tear off the plenum again and removing all the vacuum lines. Turns out, I pinched the o-ring so I replaced it and properly eased it back in, lubing with motor oil:


On the next start, the fuel issue was addressed, and began to see some coolant leaks. Here were the three things I had to tighten, surprisingly:

1. A/C temp sensor on thermostat housing. I thought this was cranked down but apparently not enough. Had to really tighten it a few cycles to get it to stop leaking.
2. Temp gauge sensor between 3rd and 4th cylinder on intake manifold. Again, this was tight, but not tight enough.
3. Bi-valve plastic vacuum valve above the cold start switch where the two short vacuum lines run to. This one was nerve-wracking since the thread alignment was in a good spot prior to tightening to accommodate the vacuum lines. After cranking it down, it was facing rear. I pushed it a bit more so the short vacuum lines wouldn't be too kinked and got it to a good place. More importantly, the leak was fixed and I didn't strip out the brass threads or manifold.

After this I could focus on timing which posed the second problem. I did an initial non-jumped adjustment of the distributor but I had to retard it back to the top of the bolt range to get to 12 degrees, which shouldn't have been the case as it should sit mid-way in the slot if I inserted it correctly. So I went and inserted a jumper to drop the idle down to set it to 5 degrees, and the jumper had no effect. Scratching my head, I read that if the TPS wasn't properly adjusted, and thought the throttle plate was open and not at IDL, it would not jump down. TPS had been adjusted and I didn't want to go through that nonsense again especially with the throttle body on the truck. But I checked the throttle body, and noticed that the throttle plate wasn't contacting the stop screw. Turns out I hadn't adjusted the throttle cable properly, and loosened it up enough to get the plate to settle and have just enough slack in the line. Once this was done, the jumper properly lowered the idle down, and I was able to set timing to 5 degrees, with the distributor landing in the middle of the bolt slot range as expected.

Last issue was an o2 sensor code via the check engine light. This was a new o2 heated densor sensor which I had working prior and wired up properly (for my LCE header), so I was a bit confused. Did I damage it when it was sitting out of the exhaust pipe? I also noticed I had a small exhaust leak near the pipe that houses the o2 sensor and connects to the catalytic converter. Turns out, I had placed the washers for the o2 sensor below the o2 sensor plate (so between the o2 sensor plate and the gasket), and this was causing the exhaust leak and the o2 sensor code. I swapped it around, tightened it down and the exhaust leak plus the o2 sensor code went away.

Next in the break in process was the 20 minutes of revving between 1500 and 2000 rpms to break in the cam. Since I have a DLX, I don't have a tachometer, and just used my timing light which had a tach, and manually pulled the throttle plate standing in front of the engine. Tedious, but I got it done. Coolant was finally burped and no more bubbles in the spill-free funnel, so I was ready for a first drive ... after I attach the driveshafts (newly rebalanced, u-joints replaced, sandblasted and painted). That took another hour, what a pain it is tightening those bolts, especially the front drive shaft to transfer case.

First drive went great, no major issues. I have yet to have any temperature issues at all, and no more leaks to be seen. In the past week, I've already driven the 500 miles needed before the first oil change and valve adjustment. The top has come off and the weather has been good so I've been enjoying the random local low speed drives. I made sure to exercise the transmission/clutch and not go above 3500 RPMs or 55 MPH. I'll be doing the valve adjustment and oil change this weekend.

A few other cosmetic things as well. My rear axle and assorted parts were the most rusted parts on the truck and it looked horrible in comparison to everything else. I have a spare axle and backing plates, that I'm going to restore off the truck (proper sandblast, primer, paint) and put new leaf springs on as well. But temporarily, I wanted to get it looking passable and spent another week after work wire wheeling the hell out of axle, Eastwood Rust Encapsulator and Extreme Chassis Black paint. It came out better than I thought, and now I don't wince when looking at it from behind.

Before:


After:
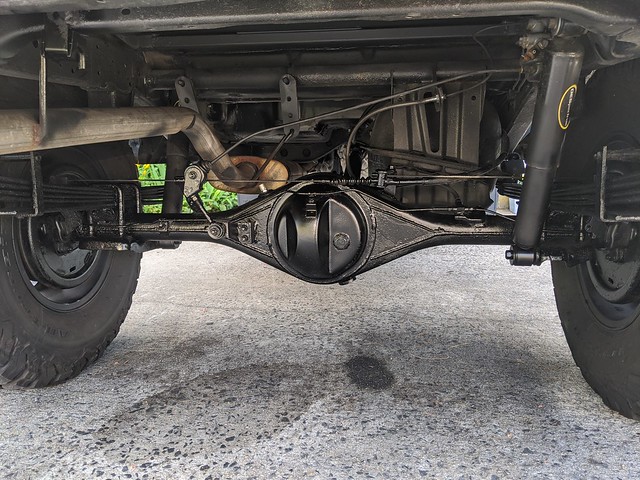


I had my skidplate powder coated awhile back, so I install that as well with new hardware. I've never had a skidplate on my '85 4Runners before but I like the look as it doesn't hang down too far.


A nice shot down the undercarriage showing the newly rebuilt driveshafts, tranny, etc. Have a bit of cleaning to do from a paddle board trip I took last weekend:


I then went ahead and did some front grille and bumper painting. I used gloss black on the headlight surrounds, and was able to find a close match on the gray (Nissan Grey from DupliColor) for the inner headlight bezels. They were really faded so it was a much needed item to address. I used DupliColor Trim & Bumper paint on the plastic bumper ends and it looks good. I also painted the bolt ends (8 of them) satin black along with the bumper, bumper insert, and valance. This time, I used Krylon Fusion Satin Black, and it's the best rattle can black I've used. Too bad I didn't discover this brand/model before I started all this a year ago.


So a lot of progress, and I'm super happy with where I stand now. What's next?

1. A/C install - I have most of the parts, hardware, I'm not too sure off. I've got all new Denso parts (evaporator, condenser, dryer, expansion valve) and sourced some of the discontinued hoses from a seller on eBay. With the top off, it's not a huge priority, but I'd like to get it in so I can take it somewhere to get converted from R12 and charged.
2. New TPS install - I had a new OEM TPS but didn't install because my original checked out. I'm having a slight rumble at idle occasionally, and figured I'd put this in and see what happens. It was dumb not to do this prior to installation of everything, but I trusted the multimeter.
3. Rear Bumper OEM - I can't source a stock one, and the previous owner replaced the rear floor, which removes the stock bumper bracket mounts. I'm going to be talking to a machine shop to have them build me some brackets and a flat rear bumper that can connect to the frame rails. Once this is done, I'm going to order an OEM fiberglass bumper from toyotafiberglass, and put this on the solid bumper as a skin. I know the stock bumper is mainly for looks with it's original mount points on the rear floor, which to me is pointless in the event of an accident. So I think this modification will serve better overall by integrating it with the frame rails. Still need to source some of the strange brackets that connect the end caps to the rear to the side pieces, but this should complete it cosmetically.
4. Rear axle area restoration - As mentioned, I have a spare rear axle in much better shape. I'm going to have it sandblasted along with a spare 3rd member housing and then paint it. I'll also be ordering new stock leaf springs, associated hardware/components, drum brake parts, and assembling this off the truck. It's not high on my list right now so I may push this until autumn.
5. Front axle rebuild - last on the list, and will be pushed until autumn earliest but most likely next spring. I haven't decided if I'm going to do this myself, given the knuckle alignment issues without the SST. I've seen videos on people making their own SST for shimming the knuckle, but not sure if I want to tackle this. Regardless, the knuckles definitely leak and I want to get that addressed and also sandblast and paint all the steering components on the front too.
 
Excellent work, I really enjoy following this thread. Any new progress?

Thanks! If you want to know my "progress" over the past month+ after getting the new engine in, refer to my misery in this thread:

22RE Random Slight Miss at Warm Idle


Now that it's fixed after driving myself crazy, I'll update this thread. The only real updates have been fun stuff.

I finally bought a Softopper. This summer has been a 30% chance of t-storms everyday since mid-June from now. Meaning driving with the top off, which should be joyous, results in crippling anxiety, sky watching, and timing how quickly I can get my tarp and bungees setup (3 min 23 seconds record time).

This was the best option, since it can retract in minutes and leave no ugly frame overhead. Plus you can actually remove the entire boot/top assembly in 30 seconds by removing 2 pins if you're sure it's not going to rain. I'm not wild on the addition of the bright silver tracks and such and it would be nice if they offered a black painted option for additional $$$ (I hate silver and chrome), but KTT has the ugly frame, and Canback is dead. This has saved my ass so many times and I'm really glad I bought it.


Also in this photo, you'll see the addition of some Yakima and Thule gear to carry my standup paddle board. I was able to find a Thule Rack (SUP Taxi) that had large enough straps to go around the rear roll bar. The Yakima versions didn't allow for this. Then I found some old Yakima rain gutter towers on eBay, had an old crossbar from many cars ago, and fashioned up this thing. It's fine for SUP's with the large span and slight downward angle due to the roll bar being low, and it also provides great shade on long trips.


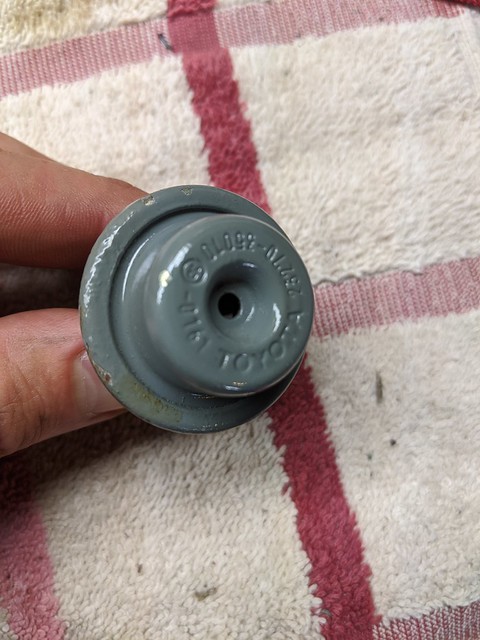
And this was the piece of crap I forgot to check 8 weeks ago that I believe is the source of my random misfires that I just fixed. Screw missing for fuel damper. Replaced with OEM, misfires now gone:


A/C is delayed because Denso is out of stock of the condenser until mid-September, so that project is pointless. Frankly, I'm just going to enjoy it the rest of the summer. I've got some stock 1985 DLX steel wheels off at the powder coater to get them cleaned up and satin white. I sourced a used rear Smittybuilt bumper as well that's getting blasted and coated too. I realize it's not OEM but I need some protection back there until I figure out how I'm going to get an OEM rear bumper.

Looks for those cosmetic updates within the next 2 weeks!
 
I was under the impression that the screw was just an indicator on those dampers and didn't have any impact on performance. I'm guessing you would have noticed if it was leaking gas though...
 

Members online

Forum statistics

Threads
278,317
Messages
3,554,128
Members
248,016
Latest member
Advally Service

Trending content

Back
Top