Rear end Rust/leak w Pics..

Yup, 24mm. Make sure to get a 6-point socket, not a 12.
K thanks! That's what I was going to do. I have a 12 sided one but I'm not going to even try and use it. I screwed up my filler plug with a 12 sided one. I had to use a pipe wrench to get it out finally. I hated to do that but had no choice.
 
This exact thing happened to my '99 Limited in June. I was able to get a brand new rear axle housing from Toyota and with labor the swap cost just short of $2,000. We were able to use all the original parts and just change the axle housing. My mechanic and I also looked into finding junk yard axles but determined it would only save $300 and I may not even end up with a good axle. So we decided to use new parts. I couldn't be happier with how it turned out. I'm so glad I didn't get rid of the car. Sure it cost a lot of money, I'm very fond of my Runner, and being able to drive it again is just priceless. Do the job right, just replace that axle housing.
 
This exact thing happened to my '99 Limited in June. I was able to get a brand new rear axle housing from Toyota and with labor the swap cost just short of $2,000. We were able to use all the original parts and just change the axle housing. My mechanic and I also looked into finding junk yard axles but determined it would only save $300 and I may not even end up with a good axle. So we decided to use new parts. I couldn't be happier with how it turned out. I'm so glad I didn't get rid of the car. Sure it cost a lot of money, I'm very fond of my Runner, and being able to drive it again is just priceless. Do the job right, just replace that axle housing.
That's cool! I went to the Toyota dealership and asked them how much to get a whole new rear end. He quoted me a cost of $2100 for the rear end. The total cost with labor would be $2700. I'm not sure what I'm gonna do yet. It's not my primary vehicle so I can take some to try and fix this one first & see what happens..
 
That's cool! I went to the Toyota dealership and asked them how much to get a whole new rear end. He quoted me a cost of $2100 for the rear end. The total cost with labor would be $2700. I'm not sure what I'm gonna do yet. It's not my primary vehicle so I can take some to try and fix this one first & see what happens..

Clean up the housing, and have a shop cut off the old cover and have an aftermarket one welded on. This is the best option in terms of longevity and cost.

Here's the one I'd use if I had to do this again: Toyota Pick Up Heavy Duty Differential Cover

Not too expensive, looks highly functional, should do the job pretty simply. If you can properly do the prep work, then this should only be an hour or 2 of labor at a welding shop.

This way you come away with a permanent fix for maybe a couple hundred bucks rather than 2k for a whole new rear end.

If some of your other parts are rusted beyond functionality, then maybe you should look for a complete rear end at a yard or something
 
Nah, the rest of the housing is very thick, like 3/16" whereas the cover is about 1/16 or less. The cover definitely rusts through long before there are any issues with the rest of the housing. On mine also, the cover rusted worse than the rest of the housing, so double whammy on the cover as opposed to the structural part of the housing.
 
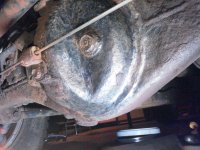
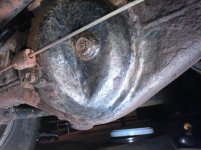
Ok so I put it in my garage last night & decided to start cleaning it up for a little bit. I used my Dewalt cordless drill and put a wire wheel on it. Started on the right side of the pumpkin cover where the suspected leak was thought to be.

I didn't drain it yet but I was able to break the drain plug free just to make sure I could drain it, with a 6 point 24mm socket that I bought at lowes. Worked great!

Most of the rust seemed to be coming off fairly easy. I also used a lil screw driver to kinda chisel some of the rust chunks that wouldn't come off. At one point I got a spot on the right side down to bare metal. Sure enough a lil pin hole appeared!! Oil started seeping out of it slowly. I was like YES!! I FOUND IT!! It is super small like the size of a pencil tip.

Then I started on the left side & so far I haven't found any there yet. But it was time to quit since I had to work early today. Will continue when I get home today maybe.

One question though & I didn't think of this while I was doing it but "is that gear Oil flammable"?? I tried searching for a lil bit last night but couldn't find a sure answer. There was some very small sparks while I was grinding. Should I be worried about starting a fire just using that wire wheel?? I might eventually use my little dremel with a small grinder attachment on it to get some of the hard chunks off. I dont have a regular grinder or I would use that..

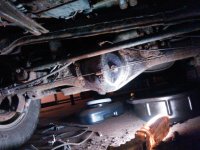
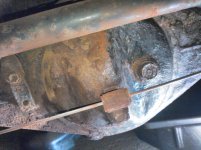
Here are some pictures of the progress so far & thanks again to everyone that has been helping me through this so far..
ba1d542237d6fd8462b314f2485db075.jpg

a500ee7c9f5229b6aefb39d24bd0d7a8.jpg

75b51cd8fff83c8b08354d4f5d0f514a.jpg

fe04bd08e48acfff056d6cb2931b275b.jpg

3dd263d2785d6d160a0399b39bab9ea2.jpg
 
Not flammable. Just make sure you get it as close to clean as possible. And no oil can be coming out. One other thing I found that helped get the JB Weld in there was to put some of the mixture on a paper clip tip and "push" it into the hole a little. Don't get crazy as you don't want that dried JB weld floating around in the dif (although I really don't think it would hurt it) then just push some more in with your finger. Don't spread it out to thick and try to make it smooth to the surface like body filler (as apposed to putting it on like a piece of chewing gum). It also has a tendency to "run" so keep working it until it stays in place. One more thing, the longer setting stuff works better than the 5 minute stuff. Good luck.
 
Yeah, I hate to say it, but it kind fo looks like you barely made a dent in your full rust stripping job.

I highly recommend using an angle grinder instead of a drill. If you dont' already have one, they aren't very expensive (I think $60-75 for a good dewalt one), and they spin faster and take the abuse better than a drill. I used a cone shaped twisted wire wheel and worked great.

Even with that, if you have a compressor, then the needle scaler is still 10 times better than the angle grinder and wire wheel, which is 10 times better than chiseling.

Once you get it pretty well stripped, and have found the pin holes, I would recommend draining your gear oil completely, then cleaning the surface with a good degreasing cleaner before you put on the jb weld. I used MAF cleaner which is expensive, but you just spray it on, don't have to scrub or wipe, and it doesn't leave a residue. I used JB weld putty because I had some pretty good sized holes, though the liquid is probably better. Mine lasted almost a year and didn't actually fail (I finally got a new housing on it before the JB weld failed). Other have reported JB weld lasting 1-2 years before failing. I suspect it fails because the metal rusts out from under it.

The JB weld will definitely buy you the time to make the decision on what to do, which is nice.

It looks like you also have a big impact dent on the left side of the cover. There shouldn't be an indent on the left side. You might check carefully for cracks and holes of there too. Now I even more highly recommend the aftermarket weld on cover...
 
Not flammable. Just make sure you get it as close to clean as possible. And no oil can be coming out. One other thing I found that helped get the JB Weld in there was to put some of the mixture on a paper clip tip and "push" it into the hole a little. Don't get crazy as you don't want that dried JB weld floating around in the dif (although I really don't think it would hurt it) then just push some more in with your finger. Don't spread it out to thick and try to make it smooth to the surface like body filler (as apposed to putting it on like a piece of chewing gum). It also has a tendency to "run" so keep working it until it stays in place. One more thing, the longer setting stuff works better than the 5 minute stuff. Good luck.
Ok I will try that! Thank you so much for the great advise. I did buy some JB weld already. I'm not so sure it's the long setting kind though. I will check when I get home. It was 2 tubes in a pack & I think I only paid 7 bucks or so for it. I bought it at auto zone. If it's not I'll look for the long setting kind.

What about that putty stuff that you mix together that hardens like steel?? I have some of that do you think I could use that also??
 
Yeah, I hate to say it, but it kind fo looks like you barely made a dent in your full rust stripping job.

I highly recommend using an angle grinder instead of a drill. If you dont' already have one, they aren't very expensive (I think $60-75 for a good dewalt one), and they spin faster and take the abuse better than a drill. I used a cone shaped twisted wire wheel and worked great.

Even with that, if you have a compressor, then the needle scaler is still 10 times better than the angle grinder and wire wheel, which is 10 times better than chiseling.

Once you get it pretty well stripped, and have found the pin holes, I would recommend draining your gear oil completely, then cleaning the surface with a good degreasing cleaner before you put on the jb weld. I used MAF cleaner which is expensive, but you just spray it on, don't have to scrub or wipe, and it doesn't leave a residue. I used JB weld putty because I had some pretty good sized holes, though the liquid is probably better. Mine lasted almost a year and didn't actually fail (I finally got a new housing on it before the JB weld failed). Other have reported JB weld lasting 1-2 years before failing. I suspect it fails because the metal rusts out from under it.

The JB weld will definitely buy you the time to make the decision on what to do, which is nice.

It looks like you also have a big impact dent on the left side of the cover. There shouldn't be an indent on the left side. You might check carefully for cracks and holes of there too. Now I even more highly recommend the aftermarket weld on cover...
Oh wow! I didn't realize that was a dent! Im pretty sure I've never hit anything with it but i dunno. I dont take it off road much.

Yeah I know. I'm gonna grind it down a lot more when I get time and see what it looks like. And also look into getting some other tools as you said. I have a small Air compressor but I am not sure it would be big enough to run Air tools or not. Its a small husky one that I got from home Depot years ago just to Air up tires. I can't remember the psi it puts out though. I dont think it has a very big tank..

If I can get this to last another year or 2 when I get my other car paid for that would be great. I dont plan to keep it much longer then that..

Thanks so much for the great advise!
 
the needle scaler is still 10 times better than the angle grinder and wire wheel, which is 10 times better than chiseling.

It looks like you also have a big impact dent on the left side of the cover. There shouldn't be an indent on the left side. You might check carefully for cracks and holes of there too. Now I even more highly recommend the aftermarket weld on cover...


x2.

The air scaler really does work nice and it is also a good test of material strength. If there are sections that are paper thin and about to fail the air scaler will probably put small dents into the material.
 
The rear end on my 2002 is a bit rusty but nothing like that. No leaks. In a couple of weeks I am going to clean it up good and coat it with POR-15. Great stuff. Stops rust in its tracks.
 
Progress..

Well so far so good I haven't found anymore leaks on the right side. I think I got most of the rust off on the right side where I found that pin hole. I used a dremel with a grinding wheel & also used the wire wheel too. I also put a small piece of putty over the pin hole for now so it doesn't continue leaking while I search for more pin holes. Not sure how much better I can get this side with the tools that I have. I would of bought that air scaler but I dont think my air compressor is big enough to run air tools. Is this side prepped good enough as far as rust removal goes?? Might be kinda hard to tell in the pictures though..

Im kinda afraid to get any more off on this side since the metal might be getting pretty thin and I don't wanna make any holes. Thanks!
 

Attachments

  • NCM_0636.jpg
    NCM_0636.jpg
    136.4 KB · Views: 485
  • NCM_0635.jpg
    NCM_0635.jpg
    135.3 KB · Views: 490
  • NCM_0634.jpg
    NCM_0634.jpg
    131.4 KB · Views: 481
  • NCM_0637.jpg
    NCM_0637.jpg
    133.3 KB · Views: 484
I'm pretty sure you have a hole on the other side, Looking at the pics and the way the wetness pattern flows downward with the peak almost pointing to the other spot. It's also above the other place of wetness, so it can't be the other hole. The first couple of pictures really shows where the hole is on the left (from the back)
 

Members online

Forum statistics

Threads
278,312
Messages
3,554,085
Members
248,016
Latest member
Advally Service

Trending content

Back
Top