Rebuild Alternator (W/ Pics)

So I've been doing a bunch of work on my car and one of the things that I've been curious about is the condition of my alternator. It has been working well but with my commute I don't want to break down. The alternator is Toyota Denso so I am assuming it is original to the car and from seeing the lack of maintenance from the previous owner, I also assumed it had never been rebuilt. So I ordered a bunch of parts and decided to attempt to rebuild it myself, including the bearings.

Parts;
27370-75060 BRUSH & HOLDER ASSY, ALTERNA
27388-42010 BRUSH, COVER
27443-63020 COVER, BEARING
90099-10140 BEARING
90099-10192 BEARING
27064-42010 SEAL SUB-ASSY, PLATE
27384-50030 WASHER, ALTERNATOR
27387-42021 INSULATION, WASHER T
27389-42010 INSULATOR, TERMINAL (NEED 4)

OZiQEHi.jpg


First, Remove the alternator. Fairly straight forward.

Remove both both nuts from the alternator post. Then the plastic insulator underneath can be easily removed.

R2wO4Th.jpg

2Vp7PSN.jpg

u4d3aTV.jpg


Remove the three 10mm nuts and the phillips screw holding down the alternator shield. Be careful not to lose the small metal tab that goes between one of the the nuts and the phillips screw. The metal shield can now be removed.

NNLkVMX.jpg

XN4l2Ea.jpg

C9cpyI4.jpg


Remove the five phillips screws that were under the shield. You can then remove the brush assembly and the regulator. Yup, the brushes are looking pretty worn out. Unscrew the four phillips screws holding the alternator post assembly. Remove the four rubber insulators.

AqKEH3s.jpg

rtouE4C.jpg

JDfeQlp.jpg

AVdl1Pn.jpg

fjEaqNY.jpg


You'll need to remove the alternator pulley nut. I used an impact to break it loose since I didn't think about this until after it was out of the vehicle. Remove the alternator pulley. Remove the 4 (8mm or 10mm) nuts holding the outer shell together. Then you'll need to gradually work the two pieces apart. I used a hammer and screwdriver to tap them apart enough to get a flat head screwdriver on opposite sides and pry it apart the rest of the way. Be careful with the four copper wire ends that stick up as you work on the rest. Now to work on the two halves.

l2XSCXi.jpg

FTnC1cb.jpg

C7hZYSd.jpg

j5Lij1R.jpg

vqlPtCV.jpg

3dC8E5n.jpg
 
Last edited:
Register to hide this ad
Remove the four studs (8mm or 10mm deep socket or wrench). Remove the four phillips screws holding the bearing cover plate. remove plate. I used a 19mm socket to push the bearing out from the outside of the case. The bearing came out fairly easily and a press might not be needed. I then used a 36mm socket to push the new bearing in from the inside of the case stopping when i felt the slightest increase in resistance in the press. Replace bearing cover plate and the four phillips screws and four studs.

uq88FLw.jpg

3mIcPQq.jpg

DNgZlaV.jpg

CRAJmcz.jpg

yC6FBTf.jpg

dxhOf7l.jpg


Now to start on the other half. I used an impact extension to push the shaft from the outside of the case and it pushed the bearing out of the case attached to the shaft and rotor. The bearing pushed out of the case easily. Be careful the rotor doesn't fall to the floor. The is a wavy washer that was between the bearing and pulley. There is a small retaining washer pressed onto the shaft above the bearing. I was able to pry it off with a screwdriver.

0xUWjW3.jpg

rU6W9AX.jpg

VG6JNY4.jpg

MMtQQz2.jpg


The bearing was difficult to remove from the shaft. I ended up grinding down a three jaw puller from harbor freight so the teeth could fit under the bearing and was finally able to remove it that way. The bearing was on pretty tight and took some effort to get off. There was a small washer under the bearing I bent a little but hammered flat again before reassembly. I put the washer back on and used 15mm socket to push the new bearing back on. I used the opposite half of the alternator case to hold the rotor while I pressed the bearing onto the rotor until I felt slight increase in resistance in the press. I tapped on the new retaining washer. I then pressed the rotor with new bearing into it's half of the case. I noticed that the bearing went into the case VERY easily. I probably could have just tapped it in gently with a hammer.

5w7oaqd.jpg

SxIctl4.jpg

rFD7EXK.jpg

6XNSXNy.jpg

3cFYX25.jpg

mY8QVUl.jpg
 
Last edited:
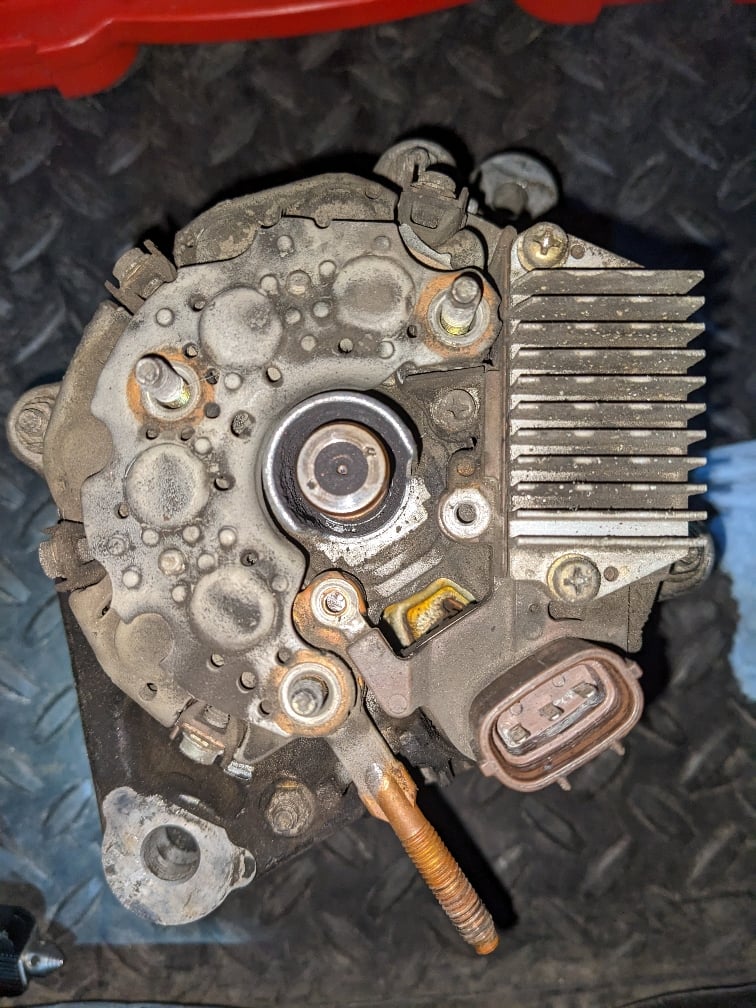
Placed the two halves back together. Make sure the the alternator spins smoothly and you didn't bend any of the fins or wires that might scrape. The fins on the side of the case opposite the pulley may scrape until pulley nut is tightened and pulls the rotor tight against it's side of the case. Don't forget to replace the wavy washer that goes on the shaft between the pulley and bearing. Replace the four nuts that hold the case together. Put the four new wire insulators in place. Put the new plate seal on the brush side of the shaft. Place post assembly back on and replace the four phillips screws removed earlier. Install the regulator and new brush assembly and replace the five Phillips screws. The two long screws of the five go through the regulator. Place new cover over brushes. Place shield and small metal tab back on alternator and replace the three nuts and one Phillips screw holding them on. Place new plastic insulator on alternator post and secure with one of the post nuts. The other nut will secure the alternator wire to the post upon reinstall in your vehicle.

Make sure everything rotates smoothly one last time and reinstall. Other that struggling to remove the smaller of the two bearings this process went pretty smoothly. I am an amateur DIY so I know I may not have done everything perfect. Any advice or tips for the future are appreciated.

3FOU8zv.jpg

5E8xFyp.jpg

VIChxQ8.jpg

LMKY82d.jpg

XN4l2Ea.jpg
 
Last edited:
fantastic post.. very well documented.. thanks for taking the effort and time to take such clear shots..

is there any way of replacing the copper sections on the shaft? they seem to be a bit worn down.
 
fantastic post.. very well documented.. thanks for taking the effort and time to take such clear shots..

is there any way of replacing the copper sections on the shaft? they seem to be a bit worn down.

I noticed it was worn but I didn't see any replacement part listed separate from buying the whole rotor assembly, and that was a little too expensive. I also am not sure if or how it would be removed.

2000 Toyota 4Runner Alternator Parts
 
Last edited:
This is fantastic. Usually an alternator is just thought of as a full replacement item. But I like this better. Great pictures and write up.

Do you think you saved enough money on it to justify the time (regardless of the fun in doing this)?
 
I found this thread showing someone removing the slip ring. It looks fairly simple to remove except I'm not sure where the wires go and how easy it would be to solder them.

Post #22
Alternator bearing replacement?

I believe this is the slip ring. I just ordered the one from amazon and will be replacing it since mine has a deep groove in it. I really wish I had known about this part ahead of time so I could have replaced it at the same time. Taking apart the alternator isn't hard, but pulling the smaller bearing off is a little bit of a pain.

Slip Ring: 8.8mm ID x 14.5mm OD

SLIP RING, ROTOR - 28-82853

Nippondenso internal fan alternator slip ring for Chrysler, Honda, Suzuki, Toyota - 7190904
 
Last edited:
This is fantastic. Usually an alternator is just thought of as a full replacement item. But I like this better. Great pictures and write up.

Do you think you saved enough money on it to justify the time (regardless of the fun in doing this)?

I enjoyed the puzzle of rebuilding it and prefer to keep OEM quality for most things, especially when I can offset costs by repairing it myself.

All of the parts I ordered were $85.

I probably could have just reused a bunch of the smaller parts so if you just count the cost of the two bearings and a brush assembly it would have been $52.

I didn't really shop around much so you might be able to find them cheaper.
 
thanks for this post.
ws trying to find one that went into more than just brushes. Watched timmys for brush replacement on my last 4runner.

My current 4runner alt has 280k on it, looks original anyway, it is a denso and has the denso sticker but does not say rebuilt.

Anyway, wanted to do more than just brushes, wont get to it for a month or so, but anyway, thanks for this post and clear directions


anyone running one wiht more miles with original bearings ?
 
Reviving a thread from the dead

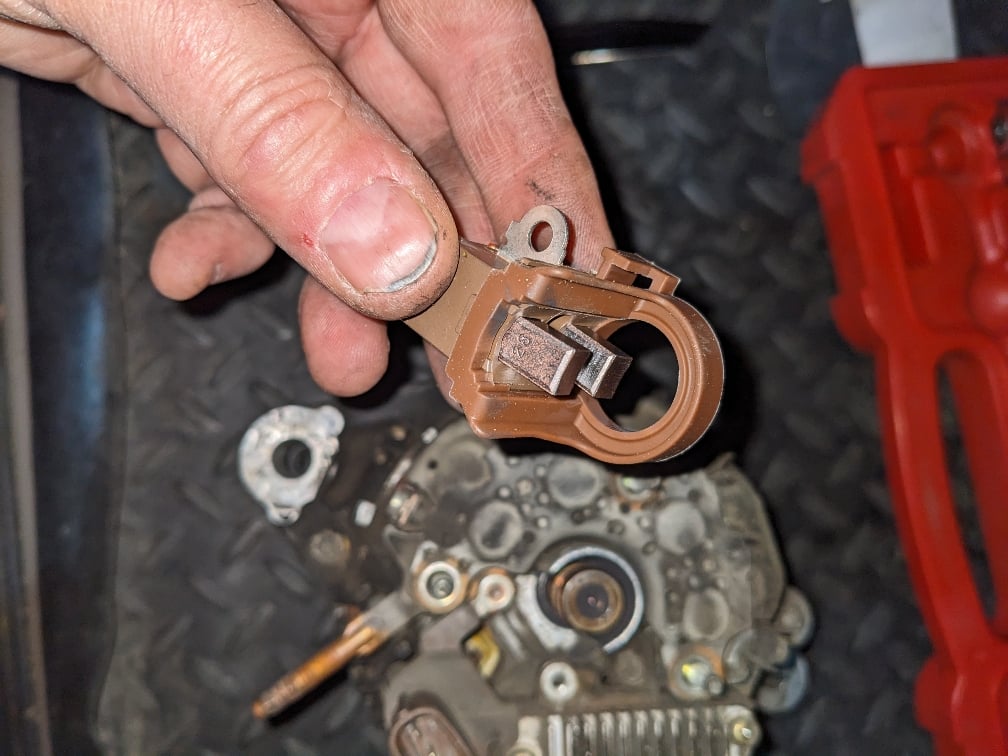
I had a Denso alt go bad, so I sourced a junkyard unit out of another 4runner, it eventually died, too. Pulled it apart and found the brush holder was different than what OP posted
View attachment 402861
As expected, the brushes were gone, here is what new ones look like (spring loaded to contact the shaft)
20c3929eca18bd89125de080881e2602.jpg


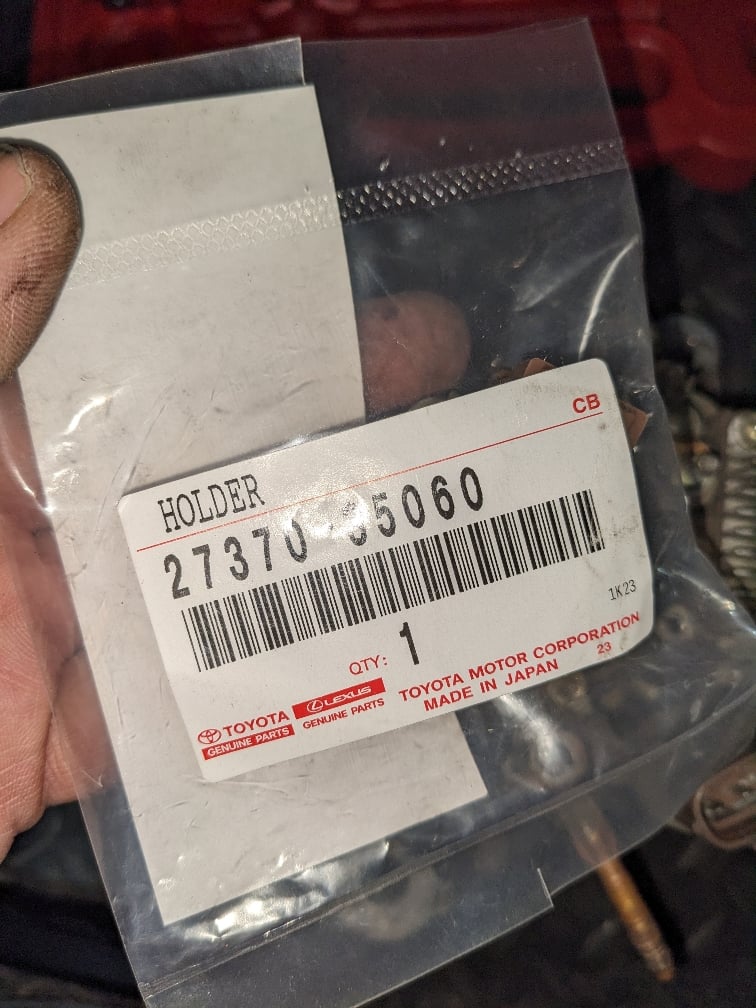
Turns out there are potentially 2 different brush holders for these trucks/alternators, and without the VIN both will be "correct" for our trucks on parts.toyota.com

OP posted 27370-75060 which is the correct brush holder for an 80 amp Alternator

27370-35060 is for the 60 amp, and fits a 10+ vehicles
197271c6eddff0fd6b22b7b30971c265.jpg


The tag on my bad alt was worn, so I bought both brush holders before cracking mine open, low and behold, I had the smaller 60 amp alternator.

The brush holder swap was as simple as removing 4 nuts and 2 screws.

3fac3b3c3a300e0ba26584e39194036d.jpg


Done and back on the road - I did not want to mess with the bearings lol
 
Last edited:
I think this is an awesome write-up and I definitely support the DIY approach. But, some jobs just look like too much of a hassle for the savings, this being one of those jobs. Same goes for rebuilding a steering rack. Once you quantify how much you spent on the rebuild kit and your time, the replacement one from Toyota looks pretty attractive.

I definitely support the easy and affordable fix of replacing brushes. An involved rebuild like this to save maybe $100, I'm not so sure it's worth it. You can purchase rebuilt Denso alternators for a pretty affordable cost. My two cents.
 
Reviving a thread from the dead

I had a Denso alt go bad, so I sourced a junkyard unit out of another 4runner, it eventually died, too. Pulled it apart and found the brush holder was different than what OP posted
View attachment 402861
As expected, the brushes were gone, here is what new ones look like (spring loaded to contact the shaft)
20c3929eca18bd89125de080881e2602.jpg


Turns out there are potentially 2 different brush holders for these trucks/alternators, and without the VIN both will be "correct" for our trucks on parts.toyota.com

OP posted 27370-75060 which is the correct brush holder for an 80 amp Alternator

27370-35060 is for the 60 amp, and fits a 10+ vehicles
197271c6eddff0fd6b22b7b30971c265.jpg


The tag on my bad alt was worn, so I bought both brush holders before cracking mine open, low and behold, I had the smaller 60 amp alternator.

The brush holder swap was as simple as removing 4 nuts and 2 screws.

3fac3b3c3a300e0ba26584e39194036d.jpg


Done and back on the road - I did not want to mess with the bearings lol


I discovered that also when I rebuilt my smaller Alt and then discovered the 80a has different brushes. They are only 20 ish dollars (or were 4-5 years ago) at the dealer…..easy repair.


Sent from my iPhone using Tapatalk
 
... I definitely support the DIY approach. But, some jobs just look like too much of a hassle for the savings, this being one of those jobs. ... I'm not so sure it's worth it. You can purchase rebuilt Denso alternators for a pretty affordable cost...

That's what my retired buddy NYC mechanic said, "I've never rebuilt an alternator, steering rack or brake caliper and don't know how", for that exact reason, I was floored.
 
That's what my retired buddy NYC mechanic said, "I've never rebuilt an alternator, steering rack or brake caliper and don't know how", for that exact reason, I was floored.

Agree [emoji817] and to Tim's point, I would not go to the trouble of a complete alternator rebuild, the Toyota regulator/rectifier is almost the cost of a rebuilt alternator by itself today.

That said, a $20 set of brushes to retain an OEM alternator is well worth $20 and 5 minutes of my time.
 
Agree [emoji817] and to Tim's point, I would not go to the trouble of a complete alternator rebuild, the Toyota regulator/rectifier is almost the cost of a rebuilt alternator by itself today.

That said, a $20 set of brushes to retain an OEM alternator is well worth $20 and 5 minutes of my time.


I put in an aftermarket VR and diode block in my 70a and both are still going 5 years later.


Sent from my iPhone using Tapatalk
 
Agree [emoji817] and to Tim's point, I would not go to the trouble of a complete alternator rebuild, the Toyota regulator/rectifier is almost the cost of a rebuilt alternator by itself today.

That said, a $20 set of brushes to retain an OEM alternator is well worth $20 and 5 minutes of my time.
I agree with both you and Tim, I'm just stuck on how to remove the top bolt from the alternator itself. I've used multiple extensions with a swivel socket and no luck. :(

Sent from my SM-T220 using Tapatalk
 
I agree with both you and Tim, I'm just stuck on how to remove the top bolt from the alternator itself. I've used multiple extensions with a swivel socket and no luck. :(

Sent from my SM-T220 using Tapatalk
Top bolt? From the bracket?

A 14mm wrench or socket for that top, pivot, bolt and a 12mm for the lower adjuster bolts (2)

Sent from my Pixel 4 XL using Tapatalk
 
Top bolt? From the bracket?

A 14mm wrench or socket for that top, pivot, bolt and a 12mm for the lower adjuster bolts (2)

Sent from my Pixel 4 XL using Tapatalk
There's two long bolts holding my starter in place. The bottom bolt I am able to get out. It's the top bolt that I'm unable to remove due to location and angle. It's wet and rainy right now but I'll search for a quick picture for reference.

Edit: it doesn't appear that my starter is attached to the exhaust by a bracket either. I haven't seen one anywhere in that area.

Sent from my SM-T220 using Tapatalk
 
Last edited:

Members online

Forum statistics

Threads
278,312
Messages
3,554,083
Members
248,016
Latest member
Advally Service

Trending content

Back
Top