Removing 2nd row seats

There are probably more detailed write-ups, but this is how I did it:

Removing 2nd row seat backs

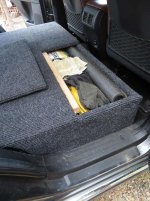
Thanks 4RExplorer. Actually, I decided to go home that afternoon of my post to try on my own and it was actually no problem at all. To anyone hesitant about the project, don't be! The point of concern - the brackets attached to the door frames - detached from the seats with a bolt reachable after popping the seat back plastic off (which is only held in place by easy to use clips that don't break; pull from the bottom). Then the side bolt holding the bracket on is easy to reach. I would recommend taking some pictures of the 60% seat's seatbelt buckle arrangement, as that would probably be the only tricky part putting it all back together in the future. I also recommend putting the seat bolts back in the holes to prevent liquids or dirt from getting in and below that panel. I should mention that it was also self-explanatory how to remove the transition piece with the tie-downs in back of the seats. I decided to cut the insulating fabric underneath the gap in the styrofoam insulation, so I could remove the front piece of styrofoam that would get in the way of any attempt to build a level plywood cover. Cutting the fabric in this place should not have any negative repercussions when reinstalling the seats later.

Now comes the harder part of cutting a perfectly fitting piece of plywood to make the top of the new storage box. To get the floor even from the back of the truck to the back of the front seats will result in the plywood cover being about 8.5 inches above the floor in back of the front seats, which should leave a nice bit of storage underneath.
 
'19 ORP - Took the 60% side 2nd-row seat bottom out today. Took about 7 minutes. Just pulled the 2 plastic trim pieces off by hand, used a 14mm socket to remove the 2 bolts and voila; plenty of room to sleep in the T4R ;-)
 
New platform and storage

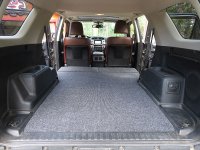
I finally built a platform and storage over where the back seats used to be. Here a a couple of pics:

attachment.php


attachment.php
 

Attachments

  • 2019-0822-sm.jpg
    2019-0822-sm.jpg
    129.5 KB · Views: 11,070
  • 2019-0824-sm.jpg
    2019-0824-sm.jpg
    131.7 KB · Views: 6,811
Love this man you have more pics? Is that two pieces? I don't see a split between the 2nd row area?

Thanks! I am pretty happy at how it turned out, especially since it was intended to be a 'first draft'! I used materials I had around the house, except for the cheap carpeting I bought at Lowe's. I intend to re-do it with higher grade plywood and improve with what I learned, but it's good enough as is.

I cut and shaped first plywood panel to go from the break where the floor starts to drop down from the back (which I beveled to fit better to the shallow drop angle) to the back of the foot beds. I leveled it with cut pieces of 2x4, and the foot bed edge has a full width 2x6 for strength and support (leaving a small overhang to allow for the 1x8 frame coming later). After I put in other small supports underneath the panel to reduce flex, I used heavy-duty double-sided tape to secure the panel to metal surfaces exposed when the seats were removed.

Then I built the box section from 1x8 pine that wraps all the way around from under the edge of the first panel (to cover the entire area from the panel to the floor) to just behind the front seats (when they are all the way back, off course). Then I cut the storage box cover panels. Be sure to leave a little wiggle room for 2x the carpet thickness between the covers. (As an aside, a 1x10 ripped down to about 1x9 would have been better, as I needed to shim underneath the 1x8 frame to bring it up level)

Since I couldn't find matching carpet, I just went ahead and carpeted the whole floor from the back of the truck, which is why you can't see the break where the first panel starts. I cut, fit, and stapled the carpet while the storage covers were on, then cut out the panel rectangles afterwards, leaving 2 inches to spare to wrap the carpet inside the storage lip. Doing it this way ensured a nice tight fit around where the covers go and no carpet breaks the entire length to the front. Really looks built in!

Inside the storage area, I have room for my fishing equipment, roof rack pads and tie-downs, blanket, tools, extra work gloves and rain jacket, and more! No more box of crap in the way of my bike and other things I need to load.

Hope this helps. I don't have any more photos, but I suppose I could take some.
 
Thanks! I am pretty happy at how it turned out, especially since it was intended to be a 'first draft'! I used materials I had around the house, except for the cheap carpeting I bought at Lowe's. I intend to re-do it with higher grade plywood and improve with what I learned, but it's good enough as is.

I cut and shaped first plywood panel to go from the break where the floor starts to drop down from the back (which I beveled to fit better to the shallow drop angle) to the back of the foot beds. I leveled it with cut pieces of 2x4, and the foot bed edge has a full width 2x6 for strength and support (leaving a small overhang to allow for the 1x8 frame coming later). After I put in other small supports underneath the panel to reduce flex, I used heavy-duty double-sided tape to secure the panel to metal surfaces exposed when the seats were removed.

Then I built the box section from 1x8 pine that wraps all the way around from under the edge of the first panel (to cover the entire area from the panel to the floor) to just behind the front seats (when they are all the way back, off course). Then I cut the storage box cover panels. Be sure to leave a little wiggle room for 2x the carpet thickness between the covers. (As an aside, a 1x10 ripped down to about 1x9 would have been better, as I needed to shim underneath the 1x8 frame to bring it up level)

Since I couldn't find matching carpet, I just went ahead and carpeted the whole floor from the back of the truck, which is why you can't see the break where the first panel starts. I cut, fit, and stapled the carpet while the storage covers were on, then cut out the panel rectangles afterwards, leaving 2 inches to spare to wrap the carpet inside the storage lip. Doing it this way ensured a nice tight fit around where the covers go and no carpet breaks the entire length to the front. Really looks built in!

Inside the storage area, I have room for my fishing equipment, roof rack pads and tie-downs, blanket, tools, extra work gloves and rain jacket, and more! No more box of crap in the way of my bike and other things I need to load.

Hope this helps. I don't have any more photos, but I suppose I could take some.

Wow thank for the write up. I like reading what everyone does. Should make the process a bit easier when I take the plunge myself.

I assume you are just storing your rear seats?
 
Wow thank for the write up. I like reading what everyone does. Should make the process a bit easier when I take the plunge myself.

I assume you are just storing your rear seats?

Yes, and I hope the basement stays clear of rodents until I can get them off the floor! Since I screwed the box together, it shouldn't be too tough to undo.
 
Removing second row seats 2013 (with third row)

Hi all,
I would like to remove the second row seats of my 4Runner 2013.
I have a 3 row seats model but I can't pivot the bottom of the seats forward.
I was wondering if there is a thread about that specific type of seats. I checked Youtube but no luck.
Thanks!
Mike
 

Members online

Forum statistics

Threads
278,310
Messages
3,554,079
Members
248,016
Latest member
Advally Service

Trending content

Back
Top