Replacing cable for heater control valve

mike_m

New member
Hi,
I need to replace the cable for my heater control valve on my 2000 4runner. Has anyone done this job before? If so, what is the easiest way to do it?

Thanks

Mike M
 
Register to hide this ad
Are you planning to replace the inner cable only?
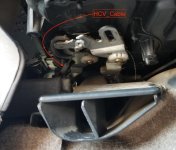
Take a picture of how the inner cable is attached to the shift lever at the HVAC control panel. remove your old cable (you may have to straighten the cable to pull it out from the engine bay end)
Slide it from the engine bay to the HVAC control. Then bent it to match the old cable.
 
Cable very stiff

Reviving this thread, as I might be replacing that cable on my 2001 T4R.

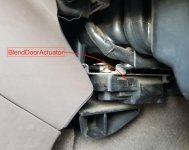
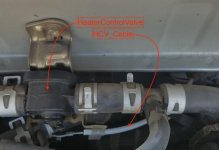
This is the cable that goes from the HVAC Blend Door Actuator (under the radio/hvac cluster) to the Heater Control Valve (on the firewall in the engine bay).

In debugging poor AC cooling, it seems the blend door and control valve are not repositioning. I'm replacing the actuator. But, this cable is also really stiff to pull/push. So, any advice on removing/reinstalling is appreciated. Thanks!
 

Attachments

  • BlendDoorActuator_1s.jpg
    BlendDoorActuator_1s.jpg
    59 KB · Views: 3,491
  • BlendDoorCamCable_1s.jpg
    BlendDoorCamCable_1s.jpg
    75.2 KB · Views: 3,711
  • HeaterControlValve_1s.jpg
    HeaterControlValve_1s.jpg
    47.1 KB · Views: 3,960
I move mine by hand on my 1998. You can assist it with your hand switching from hot to cold. I pulled a 1997 limted dash completely apart. Thst area is kinda rough.

It maybe a little bit of a task to change those 2 rods and straws. I would try to blow graphite into those straws first. May lube it enough work smoothly again. :)


Sent from my SM-A536V using Tapatalk
 
what brillo said

I lubricate mine from the interior before every winter to remove its stiffness, but we still have to move the heat/cold lever very slow if the truck is cold, works like a charm once warmed up. To lubricate, I spray on the stiff wire while playing with the hot/cold lever on the dash to make the lubricant propagate into the wire's sheath.

Never tought of assisting it by hand, might do that in the future when it's very cold.

Anyway, your a/c not blowing cold could also be that control valve under your hood that does not seal full well anymore (letting hot coolant even on cold position), or it could be miss-adjusted (you can adjust it by replacing the cable in the small clamp)

If you feel that your hose is hot after the heater control valve, cold position in dashboard, it might not seal well anymore.
 
Just a follow-up.

I initially removed the HCV cable, lubricated it with liquid graphite, and reinstalled. When I lubed it outside the car, it seemed much better. But, when installed, routed in the 180 deg arc, and pinched by the spring clips, it was really stiff and didn't work.

So, I bought a new Toyota brand one (in fact, that's the only place I could find one). Anyway, it slides quite easily. After install, you can move it with light finger force. And... this totally fixed my HVAC issue. Now, the blend doors reposition properly, and the heater control valve is moved properly.

 
Reviving this thread, as I might be replacing that cable on my 2001 T4R.

So, any advice on removing/reinstalling is appreciated. Thanks!

Did you end up replacing the cable? I have to do the same, the end snapped where it connects to the HCV.
 
Yes, I did replace the HCV cable. It's not that hard, except for one and a half annoying access things.

Half-point: You need to remove the HCV actuator in the left of the passenger footwell. It's held on with 3 phillips sheet metal screws. 2 are easy to access, the rear-left one needs a shorty screw driver, and even then you need to push it into the carpet to get a good shot.

Full-point: The HCV cable is held in place by 3 spring clips (each end, and middle). The one near the HCV actuator is annoyingly difficult to access. Small hands, and/or long curved needle-nose pliers, help.

Note: It helps to tie/tape a string to the cable at the HCV Valve end and pull it into the driver footwell. You'll need the string to pull the new cable back through the firewall grommet into the engine bay.
 
Thanks Wayne. As soon as I get my cable ordered up I will follow your steps. Also, do you have the part number of the cable?
 
Yes the HCV Cable is
Toyota part#: 87286-35040

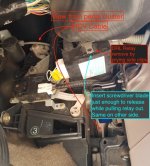
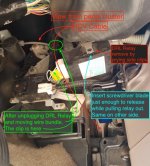
When R&R, you may also need to remove the headlights/DRL relay under the driver side dash for access. (I can't fully remember). If so, you don't need to unscrew anything there. It's held into its bracket on the sides. Jamb a small flat screwdriver between the bracket and the relay just enough to release and slide partly out, then do the same on the other side, then incrementally wiggle it out.
 

Attachments

  • 5-DvrFootwell1b.jpg
    5-DvrFootwell1b.jpg
    103.4 KB · Views: 2,903
1999 Bowden cable

The cable is readily found online with a search on "1999 (or, whatever your year) blend door cable 4runner" or something similar. It's about a $25 part. Thank you for this post. I assumed that replacing the cable would be difficult and require taking apart the dash to release clips somewhere in the middle. If it's really an easy replacement, I will be very happy to have hot/cold working again instead of moving the blend door by hand.
 
Thanks for the heads up, tought this would be a pita so never tought about replacing the gripping cable and just got used to use the heat dial slowly. Just ordered the part.
 
Full-point: The HCV cable is held in place by 3 spring clips (each end, and middle). The one near the HCV actuator is annoyingly difficult to access. Small hands, and/or long curved needle-nose pliers, help.

When you say "3 spring clips"...where are those? I see one near the HCV and I assume there is one on the other end near the actuator. But, the rest of the cable seems to be between the firewall and the dash. (Mine goes through the firewall almost immediately (5") after the sprint clip at the HCV end.

-Kokomodo
 
Replaced the cable.

My son and I replaced the actuator cable on his 1999 4Runner this morning. Followed Wayne's instructions. We did not need to remove anything other than the actuator motor in the passenger footwell. Some notes. Having two people did make the job easier, but it isn't necessary. Definitely tie a string to the cable before you pull it out. The clip next to the HCV opens from the bottom. Push down on a tab nearest to the firewall at the bottom of the clip, and then push toward the front of the vehicle, swinging the clip upward. The other two clips are just spring jaws that you push the cable into, or work it out to remove it. I did not need to remove anything in the driver's footwell near the pedal cluster. The clip was readily accessible. Make sure the outer sheath of the cable is positioned properly so that both ends will line up with the clips. Also, after you clip the cable in place, but before you attach it to the actuator and the HCV, test it to make sure it slides easily inside the sheath. If not, you may have crimped something. Oh, and have a good flashlight and a young person who still has good vision handy. That made a huge difference. In our case, we still have some work to do as it appears the actuator motor itself my need to be replaced (part on the way) and the AC may need to be recharged. But, the cable replacement went smoothly.
 
Last edited:

Members online

Forum statistics

Threads
278,307
Messages
3,554,048
Members
248,016
Latest member
Advally Service

Trending content

Back
Top