You are using an out of date browser. It may not display this or other websites correctly.
You should upgrade or use an alternative browser.
You should upgrade or use an alternative browser.
Replacing fan clutch
- Thread starter atalarico
- Start date

ZionXIX
New member
So you see my problem.If you're really on St. Kitts, finding parts may not be so easy.

atalarico
Senior Member
Ah, crap sorry for not seeing this sooner. So, I definitely came across the part number for that stud in my weeks of research. Now I can't find it! I'd check Google and look for results from the YotaTech forum, and maybe the ih8mud forums? Those were the other two places I was getting good info from.
Speaking of which, I definitely just read this Fan Clutch replacement - YotaTech Forums
It's talking about:
"I have read the following in several sources: Toyota 4Runner V6 4WD 5VZFE MUST follow mftr. torque specs when reinstalling the fan clutch, pulleys, and water pump housing!! Most common reason for water pump bearing failure i s overtorqueing during this process.
Most write-ups indicate that the four 10 mm bolts should be tightened to 65 IN/lbs and no tighter.
Yet the fan clutch is bolted to the fan bracket which appears to be completely isolated from the waterpump housing and bearings. See pictures:
http://www.4x4wire.com/toyota/mainte...elt/tbr_03.jpg
http://www.4x4wire.com/toyota/mainte...elt/tbr_04.jpg
How could tightening these bolts possibly affect the waterpump or bearings?
What am I missing?"
I definitely over-torqued mine because I was using those nuts to rotate the assembly so I could reach the next stud to thread. I think I need to go back and do it right, eh? I should use a pry bar to rotate it, right?
Speaking of which, I definitely just read this Fan Clutch replacement - YotaTech Forums
It's talking about:
"I have read the following in several sources: Toyota 4Runner V6 4WD 5VZFE MUST follow mftr. torque specs when reinstalling the fan clutch, pulleys, and water pump housing!! Most common reason for water pump bearing failure i s overtorqueing during this process.
Most write-ups indicate that the four 10 mm bolts should be tightened to 65 IN/lbs and no tighter.
Yet the fan clutch is bolted to the fan bracket which appears to be completely isolated from the waterpump housing and bearings. See pictures:
http://www.4x4wire.com/toyota/mainte...elt/tbr_03.jpg
http://www.4x4wire.com/toyota/mainte...elt/tbr_04.jpg
How could tightening these bolts possibly affect the waterpump or bearings?
What am I missing?"
I definitely over-torqued mine because I was using those nuts to rotate the assembly so I could reach the next stud to thread. I think I need to go back and do it right, eh? I should use a pry bar to rotate it, right?

nevada
Senior Member
it cant.Ah, crap sorry for not seeing this sooner. So, I definitely came across the part number for that stud in my weeks of research. Now I can't find it! I'd check Google and look for results from the YotaTech forum, and maybe the ih8mud forums? Those were the other two places I was getting good info from.
Speaking of which, I definitely just read this Fan Clutch replacement - YotaTech Forums
It's talking about:
"I have read the following in several sources: Toyota 4Runner V6 4WD 5VZFE MUST follow mftr. torque specs when reinstalling the fan clutch, pulleys, and water pump housing!! Most common reason for water pump bearing failure i s overtorqueing during this process.
Most write-ups indicate that the four 10 mm bolts should be tightened to 65 IN/lbs and no tighter.
Yet the fan clutch is bolted to the fan bracket which appears to be completely isolated from the waterpump housing and bearings. See pictures:
http://www.4x4wire.com/toyota/mainte...elt/tbr_03.jpg
http://www.4x4wire.com/toyota/mainte...elt/tbr_04.jpg
How could tightening these bolts possibly affect the waterpump or bearings?
What am I missing?"
I definitely over-torqued mine because I was using those nuts to rotate the assembly so I could reach the next stud to thread. I think I need to go back and do it right, eh? I should use a pry bar to rotate it, right?

LittleCaesar
New member
Finger tight for the nuts, then about 1/8 of a turn clockwise to tighten. I believe the torque spec is 48 in/lbs, less than the valve covers so not tight at all. I don't think even one of my stud threads is visible on any of the four.
atalarico
Senior Member
it cant.
Yeah, most of that thread came to that conclusion, but then there were still recommendations to not over-torque them.
Finger tight for the nuts, then about 1/8 of a turn clockwise to tighten. I believe the torque spec is 48 in/lbs, less than the valve covers so not tight at all. I don't think even one of my stud threads is visible on any of the four.
Ah! See, I was wondering earlier in the thread if you're supposed to be able to see the threads from the stud, but I think it got buried. Sounds like not! I haven't a clue as to how you'd be able to gauge the torque on this given the space constriction, so I'll just loosen them all up, torque some tester bolt nearby to see what 40-60in/lbs feels like, and then estimate.
atalarico
Senior Member
So you see my problem.
I think you're looking for one of the parts listed here...
ToyoDIY.com Water Pump Assembly Parts Listing
Probably the 16100G BOLT, STUD(FOR WATER PUMP SET)
90116-08270
nevada
Senior Member
Yeah, most of that thread came to that conclusion, but then there were still recommendations to not over-torque them.
Ah! See, I was wondering earlier in the thread if you're supposed to be able to see the threads from the stud, but I think it got buried. Sounds like not! I haven't a clue as to how you'd be able to gauge the torque on this given the space constriction, so I'll just loosen them all up, torque some tester bolt nearby to see what 40-60in/lbs feels like, and then estimate.
in my opinion, you would be wasting your time. they will be fine. they may be over tight, but given their location, its fairly difficult to get them over tight to the point of a failure. which is really the only concern. I think you would have to try to do that.
atalarico
Senior Member
in my opinion, you would be wasting your time. they will be fine. they may be over tight, but given their location, its fairly difficult to get them over tight to the point of a failure. which is really the only concern. I think you would have to try to do that.
Dude, have you not seen how I manage to be the outlier with even the most "routine" of tasks?! :lol:
Honestly it'll give me something to do. Hah. Watch, I'll under-torque them and the damn fan will fly off.

JRZEE2000TR4LTD
Senior Member
Those studs listed above are the studs that mount the WP. I believe the studs you're looking for only come on the fan bracket.
More Information for AISIN FBT004
If you can get a bite on those nuts, they'll come loose but at this point, I would remove the entire fan bracket, fan clutch, fan assembly and put a torch to that nut and get a quality 12mm and use the closed end and wrench it off. Or maybe a small pipe wrench might get a bite on it too.
More Information for AISIN FBT004
If you can get a bite on those nuts, they'll come loose but at this point, I would remove the entire fan bracket, fan clutch, fan assembly and put a torch to that nut and get a quality 12mm and use the closed end and wrench it off. Or maybe a small pipe wrench might get a bite on it too.
Last edited:

mtbtim
Elite Member
A flare wrench is the wrong wrench for that job IMHO. I just replaced my fan clutch on Sunday morning. I used 2 normal 12MM craftsman boxes in wrench. The perfect wrench to use would be a long 12mm ratchet end wrench.
https://www.amazon.com/TEKTON-WRN77...4420&sr=8-1&keywords=long+12mm+ratchet+wrench
Thanks for posting the wrench suggestion. I just bought one because I'm going to be replacing a fan clutch for another dude next Wednesday. I'm sure hoping I don't have the same problems the OP is having.
OP, you do seem to be cursed with working on your rig. You had a difficult time with the trans cooler install as well. You have to perform some type ceremony to ward off the evil spirits.
ZionXIX
New member
Those studs listed above are the studs that mount the WP. I believe the studs you're looking for only come on the fan bracket.
More Information for AISIN FBT004
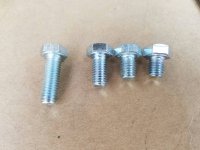
After discovering that my Fan assembly only has 3 bolts, I have been searching for an alternative to replacing the entire fan bracket assembly. I thought about cutting some threaded rod. Then I decided to just buy a long enough M8 bolt and cut the head off. However I was concerned with how the threaded rod portion of the bolt would sit in the bracket. How does the factory bolt dtay secure? Is it welded? Locktite? Maybe the bracket female threads stop at a wall in order to torque the threaded rods to a high enough value to prevent backing out?
Well however they chose to install it, the previous threaded rod came out, what's to stop this one from doing the same? It was at that point I thought, why cut the bolt at all? Why not buy a bolt of the appropriate length and just use the bolt as it was intended.....to bolt stuff together. I bought several lengths of M8 bolts since I did not know what size I would need.
I bought a 25, 20, 16, 12, and 10mm just to avoid a 2nd trip to the store. I ended up using a 20mm with a 5/16 lock nut washer to simulate the effect of the flange nut with the 'teeth' for digging into metal. I found that with the lock nut washer, the 20mm barely caught the threads. It was just enough so I could put a wrench on it to tighten down the lock nut washer. Had I used a flat washer, threading the bolt would have been no problem. I even think I could have gone down to the 16mm bolt with a flat washer as I had the fan contorted a little when trying to thread the bolt. I think it turned out pretty well. I might try swapping out the bolts when I change the belts.
The bolt that missing in the 1st picture is the 20mm
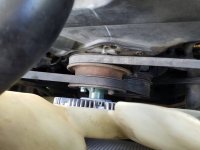
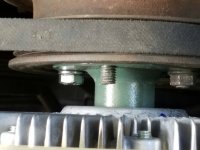
Sent from my SM-G930T using Tapatalk
Attachments





mtbtim
Elite Member
Hate to report [MENTION=55192]atalarico[/MENTION] but I found replacing the fan clutch to be very straight forward and quick to do. Had it replaced in around 30 minutes. Video coming out soon.
The nuts holding my fan clutch onto the pulley were very easy to break free. I'm guessing either your nuts were severely over-tightened like you surmised or they were corroded and rusted on there.
Anyway, hope your next project goes smoother.
The nuts holding my fan clutch onto the pulley were very easy to break free. I'm guessing either your nuts were severely over-tightened like you surmised or they were corroded and rusted on there.
Anyway, hope your next project goes smoother.


After discovering that my Fan assembly only has 3 bolts, I have been searching for an alternative to replacing the entire fan bracket assembly. I thought about cutting some threaded rod. Then I decided to just buy a long enough M8 bolt and cut the head off. However I was concerned with how the threaded rod portion of the bolt would sit in the bracket. How does the factory bolt dtay secure? Is it welded? Locktite? Maybe the bracket female threads stop at a wall in order to torque the threaded rods to a high enough value to prevent backing out?
Well however they chose to install it, the previous threaded rod came out, what's to stop this one from doing the same? It was at that point I thought, why cut the bolt at all? Why not buy a bolt of the appropriate length and just use the bolt as it was intended.....to bolt stuff together. I bought several lengths of M8 bolts since I did not know what size I would need.
I bought a 25, 20, 16, 12, and 10mm just to avoid a 2nd trip to the store. I ended up using a 20mm with a 5/16 lock nut washer to simulate the effect of the flange nut with the 'teeth' for digging into metal. I found that with the lock nut washer, the 20mm barely caught the threads. It was just enough so I could put a wrench on it to tighten down the lock nut washer. Had I used a flat washer, threading the bolt would have been no problem. I even think I could have gone down to the 16mm bolt with a flat washer as I had the fan contorted a little when trying to thread the bolt. I think it turned out pretty well. I might try swapping out the bolts when I change the belts.
The bolt that missing in the 1st picture is the 20mm
View attachment 212856View attachment 212857View attachment 212858
Sent from my SM-G930T using Tapatalk
Bringing old thread back due to the same issue as Zion. While doing some trails yesterday my fan blade broke (2 fins) and while replacing everything I noticed one of the bolts/nuts holding the clutch on is missing. One question is, should I be able to remove that broken stud and then put new one in (or 4 new bolts as shown here) or will I be needing a new pulley/bracket that actually houses the studs? In other words are the studs removable from the pulley? 2nd question is, what actually houses these studs... looks like the pulley is bolted onto the bracket then fan clutch onto the pulley?
Thanks