Retrofit suggestions/advice?

Hmm I guess maybe some of the aftermarket ones have a different mounting pattern for the brackets? If it’s a real pita, I could probably reuse the backs on my OEM lights and harvest the lenses from an aftermarket set. How much work was it to make the brackets work? Which aftermarket did you use?

Yeah that’s what I presumed about the mounting patterns, being different across the manufacturers. The Lighwerkz bracket may have been designed on true OEM so you may be good there. As far as the PITA of it that I had to modify it really wasn’t bad at all, just a little annoying.
My tip to you is watch Lightwerkz video on YouTube. He shows the most important step which really is lighting up the headlamp and marking on walls before you do anything to it. I messed up my first time and had to redo it.
 
On the plus side, baking them open was surprisingly easy. I just reused the stock sealant to cram em back together, but leaving it on was a huge pita to fit some of the stuff back together. I’ll be much better prepared to do the actual retro now...I think lol.

It was good practice for sure.

My advice - despite appearances, junk most of the factory sealant and cram that recess with new when you do the lights for real. I thought the factory grey would be enough also... and then I had to pull them off the truck to re-open and re-seal them after the first time around. I used the black butyl rubber morimoto stuff and it worked well so far and solved my 'not quite sealed' condition.
 
I am curious about the newer LED units as well, but leary of the fact that they are a single unit and if your LED ever goes out, the entire thing is shot and needs to be replaced... right? (save for dis-assembly and soldering in a new emitter). That makes me less inclined to run them considering you might shoot yourself in the foot long term, or at least set yourself up for some not so easy repairs down the road potentially. I would be more inclined to consider an LED specific projector that had a replaceable LED.

Yeah, this is a good point, and one I did consider. It's a double edged sword here, the all-in-one simplicity of install vs having to break 'em back open once they do fail to change out the whole unit. An easily-replaceable LED unit is what I'd prefer as well...but if they last long enough to make it to the next technological advancement, this may be a moot point, as I'd probably be cracking 'em open again to shove in the latest and greatest anyway. :reddance: I'm gonna have to dig into this one a bit more...looks like the LED they use is a Chinese one (HML-3 7545) - not sure about the quality/longevity on that one.

The other downside is that any/all LED proejctors out there are probably outside of my preferred color range and probably not high CRI.


Yeah that’s what I presumed about the mounting patterns, being different across the manufacturers. The Lighwerkz bracket may have been designed on true OEM so you may be good there. As far as the PITA of it that I had to modify it really wasn’t bad at all, just a little annoying.
My tip to you is watch Lightwerkz video on YouTube. He shows the most important step which really is lighting up the headlamp and marking on walls before you do anything to it. I messed up my first time and had to redo it.

I'm gonna go with the TYCs, which I believe are direct factory replicas - so we'll see once I get them open.

I'm guessing you mean mounting/aiming/lighting it all up before you permanently seal again? Good tip.

It was good practice for sure.

My advice - despite appearances, junk most of the factory sealant and cram that recess with new when you do the lights for real. I thought the factory grey would be enough also... and then I had to pull them off the truck to re-open and re-seal them after the first time around. I used the black butyl rubber morimoto stuff and it worked well so far and solved my 'not quite sealed' condition.

Oh 100%! I just crammed at all back because the water damage done to them in some areas was beyond salvaging. I plan on cleaning the crap out of whichever housing backs/lenses I decide to use - any tips for that? Seems like a heat gun on low and a lot of tedious peeling...doesn't sound fun. :ybrick: I plan on buying a roll of RetroRubber while I'm at it as well.
 
even if you use the aftermarket lights, you keep the stock internals and swap over if necessary, its good to use it for parts when certain parts break, you can also swap the lens over or shroud over. just take your time and do it right.
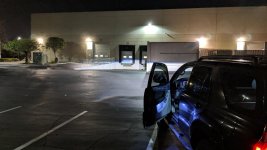
heres what s2000 projectors and 50w and cbb bulbs can do, camera is a google pixel 2 xl auto setting.
50865284_10161284289535704_3969755013751767040_o.jpg
 

Attachments

  • 50865284_10161284289535704_3969755013751767040_o.jpg
    50865284_10161284289535704_3969755013751767040_o.jpg
    135.3 KB · Views: 458
even if you use the aftermarket lights, you keep the stock internals and swap over if necessary, its good to use it for parts when certain parts break, you can also swap the lens over or shroud over. just take your time and do it right.

heres what s2000 projectors and 50w and cbb bulbs can do, camera is a google pixel 2 xl auto setting.

View attachment 352615
Nice! Good height on the purple shift too. Did they do any lense spacing/tuning for that specifically or a happy bi-product of your setup?

I still love my S2K retro I finished last year. I've been running crap bulbs and Lexus Denso 35w ballasts so might switch that up soon. At minimum, I'll get some CBB or night breakers.

Sent from my SM-G955U1 using Tapatalk
 
Last edited:
Nice! Good height on the purple shift too. Did they do any lense spacing/tuning for that specifically or a happy bi-product of your setup?

I still love my S2K retro I finished last year. I've been running crap bulbs and Lexus Denso 35w ballasts so might switch that up soon. At minimum, I'll get some CBB or night breakers.

Sent from my SM-G955U1 using Tapatalk

lightwerkz did the retrofit for me, clear lens was stock, only mod i did was the bulb spacer mod, which help make it a little brighter, i used a 16 gauge bare solid wire to make it space about 1mm at the bulb area. 2mm and you will loose intensity.

im at least 120+ feet from the loading dock.
 
I've seen someone retrofit G5-EXLS using those CB&D brackets, said he had to grind some of the inner shroud to for clearance.
 
I've seen someone retrofit G5-EXLS using those CB&D brackets, said he had to grind some of the inner shroud to for clearance.

Nice. Looking at the EXL beam pattern though, I kinda dislike all the foreground spill. The intensity is pretty incredible though.

I wonder how the Lightwerkz brackets compare to the CB&D. $55 for the CB&D vs $70 might tip the scales though haha.
 
The ones Lightwerkz sells are from CB&D, odd there's such a large difference in price.

I'm going to retro my parents' GX470 with EXLs in place of the projector highbeams, will be making foreground limiters for them.
 
The ones Lightwerkz sells are from CB&D, odd there's such a large difference in price.

I'm going to retro my parents' GX470 with EXLs in place of the projector highbeams, will be making foreground limiters for them.

Hmmm...that is strange.

Sounds awesome! How do the foreground limiters work. I'd been interested in following your build! :drummer:
 
Hmmm...that is strange.

Sounds awesome! How do the foreground limiters work. I'd been interested in following your build! :drummer:

Probably won't be any time soon LOL I still need to get cracking on a retro for my 3rd-gen and get my 4th-gen back on the road, which has a pair of retrofitted headlights ready to install :biggrin1:

Foreground limiters are just shields mounted at the upper half of the projectors Official: Morimoto Mini D2S 4.0 - HiDplanet : The Official Automotive Lighting Forum . Even some OEM HID projectors have them, the Lexus RX330's for example.
 
I used NGK G5-R's and the pre-made brackets. The G5-R uses a threaded shaft and is D2S

If I were to throw one of those threaded shaft bi-xenons into the reflector high beam on my 07's, would I need to do much by way of aiming, or would that be pretty close to the factory low beam projector's cut off?
 
Probably won't be any time soon LOL I still need to get cracking on a retro for my 3rd-gen and get my 4th-gen back on the road, which has a pair of retrofitted headlights ready to install :biggrin1:

Foreground limiters are just shields mounted at the upper half of the projectors Official: Morimoto Mini D2S 4.0 - HiDplanet : The Official Automotive Lighting Forum . Even some OEM HID projectors have them, the Lexus RX330's for example.

Ah I see! It looks like that'd help quite a bit - thanks for the link. The RX350 projectors are quite nice from what I've seen, especially when tuned correctly.

If I were to throw one of those threaded shaft bi-xenons into the reflector high beam on my 07's, would I need to do much by way of aiming, or would that be pretty close to the factory low beam projector's cut off?

I'd assume they'd aim decent since they'd thread into the shaft - probably would have to widen the hole though. They also make a high beam specific projector that works pretty well for that, but from my research, a good LED bulb in the stock reflectors can pack an even bigger punch.
 
even if you use the aftermarket lights, you keep the stock internals and swap over if necessary, its good to use it for parts when certain parts break, you can also swap the lens over or shroud over. just take your time and do it right.
heres what s2000 projectors and 50w and cbb bulbs can do, camera is a google pixel 2 xl auto setting.
View attachment 352615

gotta love that s2000 glass
 
Lots of good info on here. [MENTION=117203]Drift Monkey[/MENTION] if you haven't decided on a projector yet, the 'moto D2S 5.0's are killer for the money. I threw some Hi-lens LED from Profile Performance in the high beam bucket and a pair of XBAleds for DRL - output is fantastic for lows and wild with quad highs. Definitely would reccomend the TYC housings, but they are fun to open with the butyl they use! Let me know if you have any q's.

https://www.toyota-4runner.org/3418145-post210.html


<a data-flickr-embed="true" href="https://www.flickr.com/photos/185141496@N07/49316998182/in/dateposted-public/" title="DRL"><img src="https://live.staticflickr.com/65535/49316998182_729164a0ff_c.jpg" width="800" height="450" alt="DRL"></a><script async src="//embedr.flickr.com/assets/client-code.js" charset="utf-8"></script>
 
Lots of good info on here. [MENTION=117203]Drift Monkey[/MENTION] if you haven't decided on a projector yet, the 'moto D2S 5.0's are killer for the money. I threw some Hi-lens LED from Profile Performance in the high beam bucket and a pair of XBAleds for DRL - output is fantastic for lows and wild with quad highs. Definitely would reccomend the TYC housings, but they are fun to open with the butyl they use! Let me know if you have any q's.

https://www.toyota-4runner.org/3418145-post210.html


<a data-flickr-embed="true" href="https://www.flickr.com/photos/185141496@N07/49316998182/in/dateposted-public/" title="DRL"><img src="https://live.staticflickr.com/65535/49316998182_729164a0ff_c.jpg" width="800" height="450" alt="DRL"></a><script async src="//embedr.flickr.com/assets/client-code.js" charset="utf-8"></script>

Yeah its between the 5.0s or the G5-R (or BRT) if I end up going HIDs.

Any tips with opening the TYCs? I remember reading through your thread and you had a fun time getting all the butyl off lol.

I read through some of your thread while researching and your build came out awesome! Nice job man!
 
If I were to throw one of those threaded shaft bi-xenons into the reflector high beam on my 07's, would I need to do much by way of aiming, or would that be pretty close to the factory low beam projector's cut off?


I used the pre-cut brackets/mounting plates from CB&D (bought through LightWerkz) and didn't have any issues during aiming... but I only addressed the vertical and didn't do any left to right aiming. Overall my retrofit ended up pretty close to the factory projector aiming.
I am sure there are levels of projector tuning I haven't addressed also. My beam pattern cutoff is kind of two steps from left to right, with the right currently a little higher than the left (the lower section of the right meets the higher section (above the step) of the left). It doesn't bother me much to be honest but I might mess with it in the spring.
 
Yeah its between the 5.0s or the G5-R (or BRT) if I end up going HIDs.

Any tips with opening the TYCs? I remember reading through your thread and you had a fun time getting all the butyl off lol.

I read through some of your thread while researching and your build came out awesome! Nice job man!
Right on. :cheers:

To be honest, I wouldn't use the oven with the TYC's unless you want to concern yourself with melting stuff you don't want to melt. The heat gun and a pliers seemed to be the safest way of getting that gray garbage out of the cracks. It takes time - at least, on my set it did. I hear that people open them up with no issues after 8 min in the oven, but after 15 minutes, mine didn't budge. Nice thing is, any deformation to the housing from prying the lens off is easily formed back into shape with heat, and is hidden once put back together and installed!
 
Right on. :cheers:

To be honest, I wouldn't use the oven with the TYC's unless you want to concern yourself with melting stuff you don't want to melt. The heat gun and a pliers seemed to be the safest way of getting that gray garbage out of the cracks. It takes time - at least, on my set it did. I hear that people open them up with no issues after 8 min in the oven, but after 15 minutes, mine didn't budge. Nice thing is, any deformation to the housing from prying the lens off is easily formed back into shape with heat, and is hidden once put back together and installed!

Interesting...I actually tried the heat gun method and it was a major PITA compared to the oven for me. The waterlogged OEM housing I had separated in like 7-8 minutes. What temp did you try for the TYCs?

My TYCs actually got delivered today from RockAuto, now if I could only decide wtf to retro in them...lol. :hurt:
 

Members online

Forum statistics

Threads
278,313
Messages
3,554,090
Members
248,016
Latest member
Advally Service

Trending content

Back
Top